King Dodongo: Difference between revisions
mNo edit summary |
No edit summary Tag: Disambiguation links |
||
| Line 14: | Line 14: | ||
}} | }} | ||
|alias= | |alias= | ||
|race= | |race= {{Term|Series|Dodongo|link}}<ref name="Navi">{{Cite|{{Color|OoT White|King Dodongo}}<br/>This is a huge Dodongo that eats anything! Give it a shock, and finish it off with your sword!|Navi|OoT}}</ref> | ||
|gender= | |gender= | ||
|game= OoT | |game= OoT | ||
| Line 44: | Line 44: | ||
|voiceactor= | |voiceactor= | ||
}} | }} | ||
{{Term/Store|King Dodongo||Series, OoT, OoT3D}} | {{Term/Store|King Dodongo|King Dodongos|Series, OoT, OoT3D, HW, HWDE|plural}} are recurring {{Plural|Series|Boss|link}} in {{TLoZ|Series}}.<ref>{{Cite Book|quote= |book= E |publisher= |page= 187 {{Exp Game|OoT, OoT3D}}}}</ref><ref>{{Cite|'''Fire-Breathing'''<br/>{{Big|'''King Dodongo'''}}|Game Screen|HW}}</ref><ref name="HWDE Screen"/>{{Name Ref|OoT (Himekawa), SSBB, HWL}} | ||
==Characteristics== | ==Characteristics== | ||
| Line 51: | Line 51: | ||
|quote1= {{Color|OoT White|King Dodongo}}<br/>This is a huge Dodongo that eats anything! Give it a shock, and finish it off with your sword! | |quote1= {{Color|OoT White|King Dodongo}}<br/>This is a huge Dodongo that eats anything! Give it a shock, and finish it off with your sword! | ||
}} | }} | ||
{{Term|OoT3D|King Dodongo}} is the second {{Term|OoT3D|Boss|link}} fought in {{OoT}}. It appears inside {{Term|OoT3D|Dodongo's Cavern|link}}, where it must be defeated for {{Term|OoT3D|Link|link}} to receive the {{Term|OoT3D|Spiritual Stone of Fire|link}} from {{Term|OoT3D|Darunia|link}}. It is a massive {{Term|OoT3D|Dodongo|link}} that will consume anything.<ref name="Navi"/> Though it was originally the protector of the {{Term|OoT3D|Dodongo's Cavern|display=Cavern}}, {{Term|OoT3D|Ganondorf|link}} drove it into a frenzy, making it hostile to intruders.<ref name="E 187">{{Cite Book|quote= |book= E |publisher= |page= 187}}</ref>{{Note|{{Guide|OoT|Nintendo}} states that {{Term|OoT3D|King Dodongo}} blocked the {{Plural|OoT3D|Goron|link}} out of {{Term|OoT3D|Dodongo's Cavern}} when it appeared inside.<ref>{{Cite Guide|quote= The Gorons had been blocked from their favorite rockeries ever since King Dodongo appeared and moved into the cavern. Only when Link threw a bomb at the entrance to the cavern did hope reappear on the faces of the Gorons.|game= OoT |guide= Nintendo |page= 48}}</ref> This is contradicted by {{E}}, which states that {{Term|OoT3D|King Dodongo}} had been inside the {{Term|OoT3D|Dodongo's Cavern|display=Cavern}} as its guardian before {{Term|OoT3D|Ganondorf}}'s arrival.<ref name="E 187"/>}} | |||
To ready an attack, King Dodongo inhales air and releases a blast of damaging flame if allowed to inhale completely. During this time, Link can toss [[Bomb]]s, or a nearby [[Bomb Flower]], into its mouth. If successful, the bomb will explode inside, causing King Dodongo to collapse. King Dodongo is vulnerable to [[Sword]] attacks at this time, the [[Critical Point]] of the battle. If Link does not apply enough damage during the Critical Point, King Dodongo will rear up, curl into a ball, and roll around the arena. If Link stands close to the lava, the external walls, or hides beneath or behind the [[Shield]], he can avoid damage. King Dodongo hits an arena wall at the end of its rampage; it unfolds and moves about until Link is close enough to target again, repeating the cycle. | To ready an attack, King Dodongo inhales air and releases a blast of damaging flame if allowed to inhale completely.<ref name="E 187"/> During this time, Link can toss [[Bomb]]s, or a nearby [[Bomb Flower]], into its mouth. If successful, the bomb will explode inside, causing King Dodongo to collapse. King Dodongo is vulnerable to [[Sword]] attacks at this time, the [[Critical Point]] of the battle. If Link does not apply enough damage during the Critical Point, King Dodongo will rear up, curl into a ball, and roll around the arena.<ref name="E 187"/> If Link stands close to the lava, the external walls, or hides beneath or behind the [[Shield]], he can avoid damage. King Dodongo hits an arena wall at the end of its rampage; it unfolds and moves about until Link is close enough to target again, repeating the cycle. | ||
When defeated, King Dodongo curls into a ball and rolls into the lava pit. The lava hardens, trapping King Dodongo, half-submerged. Link receives a [[Heart Container]] as a reward. | When defeated, King Dodongo curls into a ball and rolls into the lava pit. The lava hardens, trapping King Dodongo, half-submerged. Link receives a [[Heart Container]] as a reward. | ||
| Line 67: | Line 68: | ||
==={{HW|-}}=== | ==={{HW|-}}=== | ||
{{Noncanon|Start}} | {{Noncanon|Start}} | ||
In {{HW}}, King Dodongo | In {{HW}}, {{Plural|HWDE|King Dodongo}} appear as {{Plural|HWDE|Giant Boss|link}} that are encountered in several {{Term|HWDE|Legend Mode|link}} and {{Term|HWDE|Adventure Mode|link}} stages. In {{Term|HWDE|Legend Mode}}, {{Plural|HWDE|King Dodongo}} appear in the {{Plural|HWDE|Scenario|link}} "{{Term|HWDE|The Armies of Ruin|link}}", "{{Term|HWDE|The Water Temple|link}}", "{{Term|HWDE|Ganondorf's Return|link}}", "{{Term|HWDE|The Dragon of the Caves|link}}", and "{{Term|HWDE|The Other Hero|link}}". Not all {{Plural|HWDE|Scenario}} where they appear require the {{Plural|HWDE|Warrior|link}} to defeat them. | ||
King Dodongo | {{Plural|HWDE|King Dodongo}} differ from their previous incarnation as they bear golden scales, two red horns on both sides of their head, red claws, and red crystals running along their back and joints. In "{{Term|HWDE|The Water Temple}}" and "{{Term|HWDE|The Other Hero}}", {{Plural|HWDE|King Dodongo}} appear more closely resembling their {{OoT|-}} appearance. {{Term|HWDE|King Dodongo}} attack with a variety of moves, such as curling and rolling into a ball, stomping their claws, roaring loudly, breathing streams of flames, or by launching {{Plural|HWDE|Fireball|link}} after inhaling deeply. These attacks also harm nearby {{Plural|HWDE|Enemy|link}}. Because of their immense size, they take minimal damage from most attacks. They become vulnerable when {{Plural|HWDE|Bomb|link}} are thrown down their throats as they suck in air, which stuns them and exposes their {{Term|HWDE|Weak Point Gauge|link}}. | ||
King Dodongo may drop | {{Plural|HWDE|King Dodongo}} may drop their {{Plural|HWDE|King Dodongo's Claws|link|display=Claws}} as {{Plural|HWDE|Silver Material|link}} or one of their {{Plural|HWDE|King Dodongo's Crystal|link|display=Crystals}} as a gold Material when defeated. | ||
{{Noncanon|End}} | {{Noncanon|End}} | ||
| Line 88: | Line 89: | ||
File:OoT3D NW 2011 King Dodongo.png|{{Term|OoT3D|King Dodongo}} from {{OoT3D|-}} | File:OoT3D NW 2011 King Dodongo.png|{{Term|OoT3D|King Dodongo}} from {{OoT3D|-}} | ||
File:OoT3D King Dodongo Boss Challenge.png|{{Term|OoT3D|King Dodongo}}'s {{Term|OoT3D|Boss Challenge}} image from {{OoT3D|-}} | File:OoT3D King Dodongo Boss Challenge.png|{{Term|OoT3D|King Dodongo}}'s {{Term|OoT3D|Boss Challenge}} image from {{OoT3D|-}} | ||
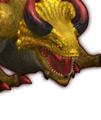
File:HW King Dodongo Render.png|A render of {{Term|HW|King Dodongo}} from {{HW|-}} | File:HW King Dodongo Render.png|A render of a {{Term|HW|King Dodongo}} from {{HW|-}} | ||
File:HW King Dodongo Render 2.png|A render of {{Term|HW|King Dodongo}} from {{HW|-}} | File:HW King Dodongo Render 2.png|A render of a {{Term|HW|King Dodongo}} from {{HW|-}} | ||
File:HW King Dodongo Adventure Mode Icon.png|The {{Term|HW|Adventure Mode}} icon of {{Term|HW|King Dodongo}} from {{HW|-}} | File:HW King Dodongo Adventure Mode Icon.png|The {{Term|HW|Adventure Mode}} icon of a {{Term|HW|King Dodongo}} from {{HW|-}} | ||
File:HW King Dodongo Adventure Mode Credits Sprite.png|The {{Term|HW|Adventure Mode}} credits icon of {{Term|HW|King Dodongo}} from {{HW|-}} | File:HW King Dodongo Adventure Mode Credits Sprite.png|The {{Term|HW|Adventure Mode}} credits icon of a {{Term|HW|King Dodongo}} from {{HW|-}} | ||
File:HWDE King Dodongo Portrait.png|A portrait of {{Term|HWDE|King Dodongo}} from {{HWDE|-}} | File:HWDE King Dodongo Portrait.png|A portrait of a {{Term|HWDE|King Dodongo}} from {{HWDE|-}} | ||
File:HWDE King Dodongo Portrait 2.png|A portrait of {{Term|HWDE|King Dodongo}} from {{HWDE|-}} | File:HWDE King Dodongo Portrait 2.png|A portrait of a {{Term|HWDE|King Dodongo}} from {{HWDE|-}} | ||
File:HWDE King Dodongo Mini Map Icon.png|The map icon of {{Term|HWDE|King Dodongo}} from {{HWDE|-}} | File:HWDE King Dodongo Mini Map Icon.png|The map icon of a {{Term|HWDE|King Dodongo}} from {{HWDE|-}} | ||
File:HWDE King Dodongo Mini Map Icon 2.png|The map icon of {{Term|HWDE|King Dodongo}} from {{HWDE|-}} | File:HWDE King Dodongo Mini Map Icon 2.png|The map icon of a {{Term|HWDE|King Dodongo}} from {{HWDE|-}} | ||
</gallery> | </gallery> | ||
| Line 104: | Line 105: | ||
* {{Term|Series|Dongorongo|link}} | * {{Term|Series|Dongorongo|link}} | ||
* {{Term|Series|King Dobongo|link}} | * {{Term|Series|King Dobongo|link}} | ||
{{Notes}} | |||
{{Ref}} | {{Ref}} | ||
Revision as of 22:51, 24 May 2024
King Dodongos are recurring Bosses in The Legend of Zelda series.[5][6][3][name references needed]
Characteristics
Ocarina of Time

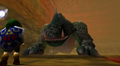
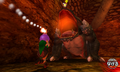
King Dodongo is the second Boss fought in Ocarina of Time. It appears inside Dodongo's Cavern, where it must be defeated for Link to receive the Spiritual Stone of Fire from Darunia. It is a massive Dodongo that will consume anything.[4] Though it was originally the protector of the Cavern, Ganondorf drove it into a frenzy, making it hostile to intruders.[7][note 1]
To ready an attack, King Dodongo inhales air and releases a blast of damaging flame if allowed to inhale completely.[7] During this time, Link can toss Bombs, or a nearby Bomb Flower, into its mouth. If successful, the bomb will explode inside, causing King Dodongo to collapse. King Dodongo is vulnerable to Sword attacks at this time, the Critical Point of the battle. If Link does not apply enough damage during the Critical Point, King Dodongo will rear up, curl into a ball, and roll around the arena.[7] If Link stands close to the lava, the external walls, or hides beneath or behind the Shield, he can avoid damage. King Dodongo hits an arena wall at the end of its rampage; it unfolds and moves about until Link is close enough to target again, repeating the cycle.
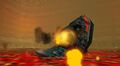
When defeated, King Dodongo curls into a ball and rolls into the lava pit. The lava hardens, trapping King Dodongo, half-submerged. Link receives a Heart Container as a reward.
Other Appearances
Super Smash Bros. Brawl
In Super Smash Bros. Brawl, King Dodongo appears as a Sticker.
| Sticker | Artwork from | Effect in The Subspace Emissary | Usable by |
|---|---|---|---|
King Dodongo |
Ocarina of Time | [Flame] - Attack +38 | All |
Hyrule Warriors
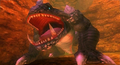
In Hyrule Warriors, King Dodongos appear as Giant Bosses that are encountered in several Legend Mode and Adventure Mode stages. In Legend Mode, King Dodongos appear in the Scenarios "The Armies of Ruin", "The Water Temple", "Ganondorf's Return", "The Dragon of the Caves", and "The Other Hero". Not all Scenarios where they appear require the Warriors to defeat them.
King Dodongos differ from their previous incarnation as they bear golden scales, two red horns on both sides of their head, red claws, and red crystals running along their back and joints. In "The Water Temple" and "The Other Hero", King Dodongos appear more closely resembling their Ocarina of Time appearance. King Dodongo attack with a variety of moves, such as curling and rolling into a ball, stomping their claws, roaring loudly, breathing streams of flames, or by launching Fireballs after inhaling deeply. These attacks also harm nearby Enemies. Because of their immense size, they take minimal damage from most attacks. They become vulnerable when Bombs are thrown down their throats as they suck in air, which stuns them and exposes their Weak Point Gauge.
King Dodongos may drop their Claws as Silver Materials or one of their Crystals as a gold Material when defeated.
Trivia
- In Ocarina of Time, King Dodongo and Volvagia share a battle theme that is different from the one that plays for all other Bosses.
- King Dodongo has the lowest amount of health in Ocarina of Time. It can be defeated with two Jump Attacks while using Deku Sticks.[citation needed]
- Scaldera, a Boss from Skyward Sword, almost perfectly parallels with King Dodongo from Ocarina of Time. Both serve as the second Boss of their game, both are a large, four-legged beast, both can curl up into a ball and roll around in order to move faster, and both live in a volcano or fiery area and are commonly associated with Fire. Furthermore, both Bosses are defeated by Link by throwing a Bomb into the mouth of the Boss as it sucks up air to prepare an attack, allowing Link to attack it while it is stunned.
Nomenclature
| Language | Names | Meanings |
|---|---|---|
Japanese |
| |
ChineseSI | 多东哥王 (Duōdōnggē wáng) (OoT) | |
German | König Dodongo (HWDE) | King Dodongo |
Italian |
| |
| This table was generated using translation pages. To request an addition, please contact a staff member with a reference. | ||
Gallery
-
King Dodongo from Ocarina of Time
-
King Dodongo after being defeated from Ocarina of Time
-
King Dodongo from Ocarina of Time 3D
-
King Dodongo's Boss Challenge image from Ocarina of Time 3D
-
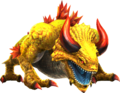
A render of a King Dodongo from Hyrule Warriors
-
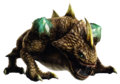
A render of a King Dodongo from Hyrule Warriors
-
The Adventure Mode icon of a King Dodongo from Hyrule Warriors
-
The Adventure Mode credits icon of a King Dodongo from Hyrule Warriors
-
A portrait of a King Dodongo from Hyrule Warriors: Definitive Edition
-
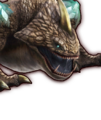
A portrait of a King Dodongo from Hyrule Warriors: Definitive Edition
-

The map icon of a King Dodongo from Hyrule Warriors: Definitive Edition
-

The map icon of a King Dodongo from Hyrule Warriors: Definitive Edition


See Also
Notes
- ↑ The Legend of Zelda: Ocarina of Time—Official Nintendo Player's Guide by Nintendo Power states that King Dodongo blocked the Gorons out of Dodongo's Cavern when it appeared inside.[8] This is contradicted by Encyclopedia, which states that King Dodongo had been inside the Cavern as its guardian before Ganondorf's arrival.[7]
References
- ↑ "Infernal Dinosaur
King Dodongo" — Game Screen (Ocarina of Time) - ↑ The Legend of Zelda: Ocarina of Time—Prima's Official Strategy Guide, Prima Games, pg. 32
- ↑ 3.0 3.1 "Fire-Breathing
King Dodongo" — Game Screen (Hyrule Warriors: Definitive Edition) - ↑ Encyclopedia, Dark Horse Books, pg. 187 (OoT | OoT3D)
- ↑ "Fire-Breathing
King Dodongo" — Game Screen (Hyrule Warriors) - ↑ 7.0 7.1 7.2 7.3 Encyclopedia, Dark Horse Books, pg. 187
- ↑ "The Gorons had been blocked from their favorite rockeries ever since King Dodongo appeared and moved into the cavern. Only when Link threw a bomb at the entrance to the cavern did hope reappear on the faces of the Gorons." (The Legend of Zelda: Ocarina of Time—Official Nintendo Player's Guide, Nintendo of America, pg. 48)
- ↑ 9.0 9.1 Enciclopedia di Hyrule, Magazzini Salani, pg. 187
- ↑ 10.0 10.1 "Mega Dodongo - Dinosauro degli inferi" — N/A (Ocarina of Time 3D, Italian localization)
- ↑ Nintendo Official Guidebook—The Legend of Zelda: Ocarina of Time, Shogakukan, pg. 145
- ↑ Nintendo Official Guidebook—The Legend of Zelda: Ocarina of Time, Shogakukan, pg. 143
Mazura • Jermafenser • Rebonack • Carock • Gooma • Barba • Thunderbird • Link's Shadow
Ball and Chain Trooper • Armos Knights • Lanmolas • Moldorm • Agahnim
Helmasaur King • Arrghus • Mothula • Blind the Thief • Kholdstare • Vitreous • Trinexx • Ganon
Moldorm • Genie • Slime Eye • Angler Fish • Slime Eel • Facade • Evil Eagle • Hot Head • Shadow Nightmares
Spike Roller • Moblin Chief • Hinox • Dodongo Snakes • Lanmola • Hydrosoar
Master Stalfos • Gohma • Armos Knight • Rover • Grim Creeper • Turtle Rock • Blaino
Gohma • King Dodongo • Barinade • Phantom Ganon • Volvagia • Morpha • Bongo Bongo • Twinrova • Ganon
Lizalfos • Big Octo • Stalfos • Meg • Flare Dancer • White Wolfos • Dark Link • Dead Hand • Gerudo Thief • Iron Knuckle
Odolwa • Goht • Gyorg • Twinmold • Majora's Mask
Dinolfos • Gekko • Wizzrobe • Gerudo Pirate • Wart • Gekko and Mad Jelly
Captain Keeta • Iron Knuckle • Sharp • Igos du Ikana • Garo Master • Gomess • Eyegore
Aquamentus • Dodongo • Mothula • Gohma • Digdogger • Manhandla • Gleeok • Medusa Head • General Onox
Twinrova • Ganon
Brother Goriyas • Facade • Omuai • Agunima • Great Moblin • Syger • Vire • Poe Sisters • Frypolar
Pumpkin Head • Head Thwomp • Shadow Hag • Eyesoar • Smog • Octogon • Possessed Nayru • Plasmarine • Ramrock • Veran
Twinrova • Ganon
Giant Ghini • Swoop • Subterror • Armos Warrior • Great Moblin • Smasher • Vire • Angler Fish • Blue Stalfos
Gohma • Kalle Demos • Gohdan • Helmaroc King • Jalhalla • Molgera • Puppet Ganon • Ganondorf
Mothula • Darknut • Phantom Ganon • Stalfos • Wizzrobe • Mighty Darknut • Big Octo![]()
Phantom Ganon • Stone Arrghus • Helmaroc King • Big Poe • Big Moldorm • Frostare • Vaati • Ganon
Chief Soldier • Shadow Link • Manhandla • Dodongos • Big Dark Stalfos • Gohma • Big Dodongo
Big Green Chuchu • Gleerok • Mazaal • Big Octorok • Gyorg Pair • Vaati
Madderpillar • Dark Nut • Big Blue Chuchu • Red Dark Nut • Black Knight
Diababa • Fyrus • Morpheel • Stallord • Blizzeta • Armogohma • Argorok • Zant • Puppet Zelda • Ganon
Ook • King Bulblin • Dangoro • Twilit Carrier Kargarok • Twilit Bloat
Deku Toad • Death Sword • Darkhammer • Darknut • Aeralfos • Phantom Zant
Stagnox • Fraaz • Phytops • Cragma • Byrne • Skeldritch • Demon Train • Chancellor Cole • Malladus
Mothula • Snapper • Heatoise • Big Blin • Rocktite • Geozard Chief • Dark Link![]()
Ghirahim • Scaldera • Moldarach • The Imprisoned • Koloktos • Tentalus • Levias • Bilocyte • Demise
Stalfos • Lizalfos • Stalmaster • Moldarach • LD-002G Scervo • Dark Lizalfos • Magmanos • Moldorm • LD-003D Dreadfuse
Yuga • Moldorm • Margomill • Gemesaur King • Arrghus • Knucklemaster • Stalblind • Zaganaga • Dharkstare • Grinexx • Yuga Ganon
Armos • Red Stalfos • Heedles • Green & Red Goriyas • Gigabari • Gibdos & Purple Mini-Moldorms • Red Eyegores • Flying Tiles & Devalants • Big Pengator & Pengators • Fire Gimos • Moldorm • Lorule Ball and Chain Soldier • Arrghus
Margoma • Arrghus • Moldorm • Blizzagia • The Lady's Pets • Stalchampion • Prismantus • The Lady • Shadow Links
Electric Blob King • Electric Blob Queen • Hinox Brothers • Freezlord • Vulture Vizier • Grim Repoe • Gigaleon
Windblight Ganon • Fireblight Ganon • Thunderblight Ganon • Waterblight Ganon • Monk Maz Koshia(TCB) • Calamity Ganon • Dark Beast Ganon
Stone Talus • Stone Talus (Luminous) • Stone Talus (Rare) • Igneo Talus • Frost Talus • Igneo Talus Titan(TCB) • Molduga • Molduking(TCB) • Hinox • Blue Hinox • Black Hinox • Master Kohga
Bosses in Tears of the Kingdom
Colgera • Yunobo • Moragia • Marbled Gohma • Sludge Like • Mucktorok • Queen Gibdo • Seized Construct • Phantom Ganon • Demon King's Army • Demon King Ganondorf • Demon Dragon