Barbarian Set: Difference between revisions

From Zelda Wiki, the Zelda encyclopedia
Jump to navigation Jump to search
mNo edit summary
(→‎{{BotW|-}}: templatize, add headers)
Line 17: Line 17:
==Location and Uses==
==={{BotW|-}}===
==={{BotW|-}}===
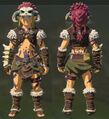
The Barbarian Set is an {{Term|BotW|Armor|link}} set consisting of the [[Barbarian Helm]], [[Barbarian Armor]], and [[Barbarian Leg Wraps]]. Each piece must be obtained from a [[Treasure Chest]] in the following [[Ancient Shrine]]s respectively:  
*[[Tu Ka'loh Shrine]] at [[Lomei Labyrinth Island]].
Line 27: Line 26:
According to the item descriptions, the armor set was once worn by an ancient warlike tribe from the [[Faron (Region)|Faron Region]]. After obtaining them, [[Granté]] will begin selling each piece of the set for 4,000 [[Rupees]].  


====Description====
{{Inventory/Set|BotW|Barbarian Set}}


{| class="wikitable mw-collapsible mw-collapsed" data-expandtext="Show Upgrade Data" data-collapsetext="Hide Upgrade Data" style="width:70%; text-align:left;"
====Upgrades====
|+
{{Armor Data|BotW}}
!width=10%| Armor
!width=3%| [[File:BotW Armor Icon.png|20px]]
!colspan="2"| 1st Upgrade
!width=3%| [[File:BotW Armor Icon.png|20px]]
!colspan="2"| 2nd Upgrade
!width=3%| [[File:BotW Armor Icon.png|20px]]
!colspan="2"| 3rd Upgrade
!width=3%| [[File:BotW Armor Icon.png|20px]]
!colspan="2"| 4th Upgrade
!width=3%| [[File:BotW Armor Icon.png|20px]]
!width=10%| Effect
|-
|rowspan="2" style="text-align:center"| {{Section|Barbarian Helm|[[File:BotW Barbarian Helm Icon.png|link=Barbarian Helm]]<br/> '''Barbarian Helm'''}}
|rowspan="2" style="text-align:center"|'''3'''
|rowspan="2" width="3%" style="text-align:center"| '''x1'''
|rowspan="2" width="5%" style="text-align:center"| [[File:BotW Lynel Horn Icon.png|50px|link=Lynel Horn]]
|rowspan="2" style="text-align:center"| '''5'''
|width="3%" style="text-align:center"| '''x3'''
|width="5%" style="text-align:center"| [[File:BotW Lynel Horn Icon.png|50px|link=Lynel Horn]]
|rowspan="2" style="text-align:center"| '''6'''
|width="3%" style="text-align:center"| '''x4'''
|width="5%" style="text-align:center"| [[File:BotW Lynel Hoof Icon.png|50px|link=Lynel Hoof]]
|rowspan="2" style="text-align:center"| '''7'''
|width="3%" style="text-align:center"| '''x2'''
|width="5%" style="text-align:center"| [[File:BotW Lynel Guts Icon.png|50px|link=Lynel Guts]]
|rowspan="2" style="text-align:center"| '''11'''
|rowspan="2"| '''Attack Up'''
|-
|style="text-align:center"| '''x2'''
|style="text-align:center"| [[File:BotW Lynel Hoof Icon.png|50px|link=Lynel Hoof]]
|style="text-align:center"| '''x1'''
|style="text-align:center"| [[File:BotW Lynel Guts Icon.png|50px|link=Lynel Guts]]
|style="text-align:center"| '''x1'''
|style="text-align:center"| [[File:BotW Shard of Dinraal's Horn Icon.png|50px|link=Shard of Dinraal's Horn]]
|-
|rowspan="2" style="text-align:center"| {{Section|Barbarian Armor|[[File:BotW Barbarian Armor Icon.png|link=Barbarian Armor]]<br/> '''Barbarian Armor'''}}
|rowspan="2" style="text-align:center"|'''3'''
|rowspan="2" width="3%" style="text-align:center"| '''x1'''
|rowspan="2" width="5%" style="text-align:center"| [[File:BotW Lynel Horn Icon.png|50px|link=Lynel Horn]]
|rowspan="2" style="text-align:center"| '''5'''
|width="3%" style="text-align:center"| '''x3'''
|width="5%" style="text-align:center"| [[File:BotW Lynel Horn Icon.png|50px|link=Lynel Horn]]
|rowspan="2" style="text-align:center"| '''6'''
|width="3%" style="text-align:center"| '''x4'''
|width="5%" style="text-align:center"| [[File:BotW Lynel Hoof Icon.png|50px|link=Lynel Hoof]]
|rowspan="2" style="text-align:center"| '''7'''
|width="3%" style="text-align:center"| '''x2'''
|width="5%" style="text-align:center"| [[File:BotW Lynel Guts Icon.png|50px|link=Lynel Guts]]
|rowspan="2" style="text-align:center"| '''11'''
|rowspan="2"| '''Attack Up'''
|-
|style="text-align:center"| '''x2'''
|style="text-align:center"| [[File:BotW Lynel Hoof Icon.png|50px|link=Lynel Hoof]]
|style="text-align:center"| '''x1'''
|style="text-align:center"| [[File:BotW Lynel Guts Icon.png|50px|link=Lynel Guts]]
|style="text-align:center"| '''x1'''
|style="text-align:center"| [[File:BotW Shard of Farosh's Horn Icon.png|50px|link=Shard of Farosh's Horn]]
|-
|rowspan="2" style="text-align:center"| {{Section|Barbarian Leg Wraps|[[File:BotW Barbarian Leg Wraps Icon.png|link=Barbarian Leg Wraps]]<br/> '''Barbarian Leg Wraps'''}}
|rowspan="2" style="text-align:center"|'''3'''
|rowspan="2" width="3%" style="text-align:center"| '''x1'''
|rowspan="2" width="5%" style="text-align:center"| [[File:BotW Lynel Horn Icon.png|50px|link=Lynel Horn]]
|rowspan="2" style="text-align:center"| '''5'''
|width="3%" style="text-align:center"| '''x3'''
|width="5%" style="text-align:center"| [[File:BotW Lynel Horn Icon.png|50px|link=Lynel Horn]]
|rowspan="2" style="text-align:center"| '''6'''
|width="3%" style="text-align:center"| '''x4'''
|width="5%" style="text-align:center"| [[File:BotW Lynel Hoof Icon.png|50px|link=Lynel Hoof]]
|rowspan="2" style="text-align:center"| '''7'''
|width="3%" style="text-align:center"| '''x2'''
|width="5%" style="text-align:center"| [[File:BotW Lynel Guts Icon.png|50px|link=Lynel Guts]]
|rowspan="2" style="text-align:center"| '''11'''
|rowspan="2"| '''Attack Up'''
|-
|style="text-align:center"| '''x2'''
|style="text-align:center"| [[File:BotW Lynel Hoof Icon.png|50px|link=Lynel Hoof]]
|style="text-align:center"| '''x1'''
|style="text-align:center"| [[File:BotW Lynel Guts Icon.png|50px|link=Lynel Guts]]
|style="text-align:center"| '''x1'''
|style="text-align:center"| [[File:BotW Shard of Naydra's Horn Icon.png|50px|link=Shard of Naydra's Horn]]
|}


====Dye Options====
{{Dye/Set|BotW|Barbarian Helm|Barbarian Armor|Barbarian Leg Wraps}}


Revision as of 02:15, 16 June 2023

The Barbarian Set is a recurring Armor Set in The Legend of Zelda series.[1][citation needed]

Location and Uses

Breath of the Wild

The Barbarian Set is an Armor set consisting of the Barbarian Helm, Barbarian Armor, and Barbarian Leg Wraps. Each piece must be obtained from a Treasure Chest in the following Ancient Shrines respectively:

Each piece increases Link's Attack Up by one when worn. If all three pieces are worn and have been upgraded at least twice by a Great Fairy, they provide the Charge Atk. Stamina Up Set Bonus.

According to the item descriptions, the armor set was once worn by an ancient warlike tribe from the Faron Region. After obtaining them, Granté will begin selling each piece of the set for 4,000 Rupees.

Description

Template:Inventory/Set

Upgrades

Template:Armor Data

Dye Options

Dye Optionshide ▲
BotW Barbarian Helm Icon.png
Barbarian Helm
BotW Barbarian Armor Icon.png
Barbarian Armor

BotW Barbarian Leg Wraps Icon.png
Barbarian Leg Wraps

Tears of the Kingdom

Template:Inventory/Set


Dye Optionshide ▲
TotK Barbarian Helm Icon.png
Barbarian Helm
TotK Barbarian Armor Icon.png
Barbarian Armor

TotK Barbarian Leg Wraps Icon.png
Barbarian Leg Wraps

Other Appearances

Hyrule Warriors: Age of Calamity


The Barbarian Helm is aquired upon completing the "Anti-Element Training" Quest. The Barbarian Armor is aquired upon completing the "Coliseum: Expert" Quest. The Barbarian Leg Wraps are aquired upon completing the "Hair Width Trial: Expert+" Quest.

Template:Inventory/Set

Dye Optionshide ▲
HWAoC Barbarian Helm Icon.png
Barbarian Helm
HWAoC Barbarian Armor Icon.png
Barbarian Armor

HWAoC Barbarian Leg Wraps Icon.png
Barbarian Leg Wraps

Trivia

  • Upgrading Barbarian Set pieces to level ★★ reduces their Sell Price by 60 Rupees, and level ★★★ pieces sell for the same price as ★ pieces. All other Armor Upgrades in the game increase the Armor's value.

Nomenclature

ZW Nomenclature Asset.png Names in Other Regions ZW Nomenclature Asset 2.png
LanguageNames
This table was generated using translation pages.
To request an addition, please contact a staff member with a reference.

Gallery

See Also

References

  1. Creating a Champion, Dark Horse Books, pg. 184