Lone Labyrinth
Lone Labyrinth is a Level in Tri Force Heroes.[1] It is the third Level of The Ruins Area, preceded by Palace Noir and followed by the Grim Temple.
Lone Labyrinth is a crypt filled with ghosts and the undead. It notably features purplish-grey platforms throughout the Level that appear and disappear as they follow a set path, which the Links must quickly follow before they disappear beneath them, lest they fall down a bottomless pit.

In Stage 1, the Links appear on a ledge next to a bottomless pit. A Shock Switch immediately beside them is struck to make a bridge of appearing and disappearing platforms appear, which the Links must follow to cross the pit. On the next ledge the Links find the Gust Jar, Gripshot and Fire Gloves. The Links can throw one Link onto another ledge to the right, where a somewhat-hidden Squiddy, three Jars, and three Skulls can be found. To proceed ahead, the Shock Switch on the ledge with the Items must be struck, which will cause platforms to appear from the right and left sides, before joining and bridging towards the ledge. These two platforms lead to an unlit Torch and a Shock Switch on the right side, and a Bomb Flower and an encased Shock Switch on the left. The Links must use their Items to strike both Switches and light the Torch within 15 seconds, at which point the platforms begin to disappear beneath them. When the Links manage to do all three tasks, a bridge leading to the Triforce Gateway appears.

In Stage 2, the Links appear at another ledge over a pit. An unlit Torch can be seen nearby, with Chasupa flocking around it. Lighting the Torch with the Fire Gloves will create a set of vanishing platforms moving north to another ledge. On the northern ledge is a raised platform with a Treasure Chest containing a Red Rupee, and another Chasupa nearby. Also on this raised platform is an unlit Torch, which when lit, causes another Treasure Chest (containing a Purple Rupee) to appear beyond a gap to the left. It can be reached by propelling a Link over the gap using the Gust Jar; once the Chest is opened, a set of vanishing platforms appears that allows the Link to return. The Links can then take another series of vanishing platforms east to a ledge with a Big Switch. Pressing it with all three Links summons three White Poes. After they are defeated, more vanishing platforms will appear to the east, which will circle around an area where the Links must fight three colored Poes and two Chasupa. These platforms will also lead to a ledge with Hearts and Jars at the far east. Once the Enemies are all defeated, a bridge leading to the Triforce Gateway appears. The vanishing platforms will also become solid, and will no longer disappear.

In Stage 3, the Links appear at a ledge with vanishing platforms below them that move left to right and back. These platforms lead to a square column where a single unlit Torch sits across a gap to the north. Lighting the Torch creates another series of platforms that lead south, eventually coming to a square platform and a ledge over a gap. Light Ghini float around on either side. The Links must cross this gap by throwing each other over, and having the last Link grip onto them with the Gripshot. Once all three Links are over the other side, they can form a Totem to light a Torch, which will create vanishing platforms going north to the right of the square platform. The floor of the current ledge will slide forward to close the gap that was just crossed. The Links must quickly follow this new path north and throw each other onto a ledge with two Hearts. The Link with the Gripshot will have to cross last by gripping onto a grated cage to get across. Once they are across, the Link with the Gust Jar can propel the others to the ledge on the right, as indicated by a string of floating Rupees. The two Links then form a Totem to light a final Torch, which creates a loop of vanishing platforms to the south, where three colored Poes are fought. To the right of them is a ledge with Jars and a Treasure Chest containing a Purple Rupee. The Poes' defeat creates vanishing platforms leading south, which come to a dead end in mid-air, dropping the Links down to the Triforce Gateway. A Shock Switch nearby can be struck to raise a platform back up above, if the Links need to return.

In Stage 4, the Links drop down into a pit where a ReDead suddenly appears. Small ledges to the sides of the room hold Hearts and Blue Rupees, and some Energy Potions and Jars sit beside each ledge. After the ReDead is defeated, four more will appear. Defeating them all makes the Triforce Gateway appear.
Drablands Challenges
Once the Boss of The Ruins has been defeated, Lone Labyrinth can be replayed with the following Drablands Challenges: "Guard the Orb!", "Adventure in the dark!", and "Don't drop the pot!". Each Challenge features the same configuration of Enemies.
In "Guard the Orb!" and "Adventure in the dark!", three extra Hearts rest on the floor next to the second Torch in Stage 2.
Materials
At the end of the Level, three Treasure Chests can be opened. Two contain the same Material, and one contains another, more valuable Material.
| Drablands Challenge | — |
|---|---|
| Magical Materials | |
| Drablands Challenge | Don't drop the pot! |
| Magical Materials | |
| Drablands Challenge | Guard the orb! |
| Magical Materials | |
| Drablands Challenge | Adventure in the dark! |
| Magical Materials |
| Drablands Challenge | Magical Materials |
|---|---|
— | |
Don't drop the pot! | |
Guard the orb! | |
Adventure in the dark! |
Enemies and Traps
- Stage 1

- Stage 2


- Stage 3
-

Blue Poe ×1
-

Chasupa ×3
-

Green Poe ×1
-

Light Ghini ×2
-

Red Poe ×1

- Stage 4
![ReDead ×5[a]](/wiki/File:TFH_ReDead_Model.png)
- ↑ One appears first; others appear after it is defeated.
Treasure Chests
| Treasure Chest | |
|---|---|
| Contents | |
| Notes | On a ledge after the first set of vanishing platforms in Stage 2 |
| Treasure Chest | |
| Contents | |
| Notes | Appears after lighting a Torch west of the previous Treasure Chest in Stage 2 |
| Treasure Chest | |
| Contents | |
| Notes | On a ledge east of the three colored Poes in Stage 3 |

| Treasure Chest | Contents | Notes |
|---|---|---|
On a ledge after the first set of vanishing platforms in Stage 2 | ||
Appears after lighting a Torch west of the previous Treasure Chest in Stage 2 | ||
On a ledge east of the three colored Poes in Stage 3 |
Trivia
- As described in Vol. 5 of the Drablands Diary, a set of green handprints is hidden in each Level of The Ruins. They can be found in Stage 2 of Lone Labyrinth on the wall south of the Links' starting position, and are only visible by being thrown over the railing.
Nomenclature
| Language | Names | Meanings |
|---|---|---|
Japanese | なげきの迷宮 (Nageki no Meikyū)[3] | Labyrinth of Mourning |
FrenchCA | dédale des sanglots sic[7] | |
FrenchEU | Dédale des sanglots[5] | |
German | Irrgarten der Trauer[4] | |
Italian | Labirinto triste[2] | |
SpanishLA | Laberinto de los lamentos[6] | |
SpanishEU | Laberinto de los Lamentos[8] | |
| This table was generated using translation pages. To request an addition, please contact a staff member with a reference. | ||
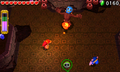
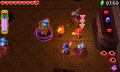
Gallery
-
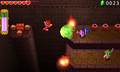
Reaching the Treasure Chest in Stage 2
-
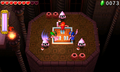
Battling White Poes in Stage 2
-
Battling Chasupa and colored Poes over vanishing platforms in Stage 2
-

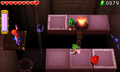
Using the Gripshot to cross a gap in Stage 3
-
Battling colored Poes over vanishing platforms in Stage 3
-
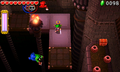
Battling a ReDead in Stage 4
-
Battling four more ReDeads in Stage 4


References
- ↑ Encyclopedia, Dark Horse Books, pg. 161
- ↑ "Labirinto triste" — Level Selection (Tri Force Heroes)
- ↑ "なげきの迷宮" — Level Selection (Tri Force Heroes)
- ↑ "Irrgarten der Trauer" — Level Selection (Tri Force Heroes)
- ↑ "Dédale des sanglots" — Level Selection (Tri Force Heroes)
- ↑ "Laberinto de los lamentos" — Level Selection (Tri Force Heroes)
- ↑ "dédale des sanglots" — Level Selection (Tri Force Heroes)
- ↑ "Laberinto de los Lamentos" — Level Selection (Tri Force Heroes)