Sealed Gateway
The Sealed Gateway is a Level in Tri Force Heroes.[1] It is the first Level of the Fortress Area, and is followed by Bomb Storage.
The Sealed Gateway is the entrance and the castle grounds of the Fortress Area, and is where the Links begin their infiltration of the base. The Level starts from ground level, where the fortress walls are heavily guarded by numerous Soldier Enemies.

In Stage 1, the Links begin at a clearing guarded by two Green Sword Soldiers, where the entrance is barricaded by an iron gate to the east. Two Boomerangs and a Gust Jar can be found at the front of the gate, which will lower when the Items are taken. Along the rest of the way, the Links encounter two Spear Throwing Soldiers, and a giant Cracked Block that stands in the way of the fortress bridge, which can be blown up by using two Bomb Flowers that grow nearby. More Sword Soldiers and a Spear Throwing Soldier are encountered on the bridge, which comes to another iron gate. A Shock Switch on the bridge's railing must be struck to lower the gate, opening the way to the Triforce Gateway.

In Stage 2, the Links enter the fortress's courtyard. The heroes walk north and up a staircase into an open yard, but are immediately trapped inside as a Grey Ball and Chain Soldier appears. Defeating it lowers the gates, leading to another yard where the Links are once again trapped and must battle Green Sword Soldiers, Spear Throwing Soldiers, and Bomb Soldiers. The Spear and Bomb Soldiers attack from ledges, requiring the Links to throw each other over to fight them. After they are all defeated, the gate to the Triforce Gateway lowers.

In Stage 3, the Links appear on a path heading toward the fortress moat, which they must cross to get to the next Triforce Gateway. They come across a barrier of Elevator Blocks; a raised wall of yellow blocks followed by a lowered wall of purple blocks, which can be alternated by striking the Shock Switch nearby. One Link can strike the Switch twice to allow the other two to cross, or simply throw them over; the third Link must stand on the lowered yellow blocks, then hit the Switch to raise them, or simply wait for the other Links to reach another Shock Switch. On the other side is a Squiddy and two Spear Throwing Soldiers, plus another set of Elevator Blocks heading north toward the moat. More Soldiers are encountered on this side, and Soldiers across the moat will also attack by throwing Spears and Bombs over. To the right in this area by the moat is another Shock Switch, and guarded by yellow Elevator Blocks, a ledge with a Treasure Chest containing a Red Rupee. To the left is yet another Shock Switch and a much higher ledge, which can be reached by having two Links stand on lowered purple Elevator Blockss, the third Link striking the Switch to raise them, then one Link throwing the other onto the ledge. Up there are several Jars containing Hearts, a Chest with three Hearts, and a Chest with a Purple Rupee.
The moat can be crossed by having two Links stand on a set of yellow Elevator Blocks in between the two Shock Switches, then raising them, which also lowers a set of purple Elevator Blocks on the other side, allowing them to use their Gust Jar and Boomerang to get each other across. They can then stand on a pair of Floor Switches that create a staircase for the Link left behind. The attacking Bomb Soldier and Spear Throwing Soldier are encountered on ledges here; just ahead is the Triforce Gateway.

In Stage 4, the Links enter inside the fortress. The heroes ride an elevating platform up, where a couple of Bomb Soldiers attack from the ledges. A Treasure Chest on one of the ledges can be opened for a Red Rupee. At the very top is a gap with two Floor Switches on the other side, reachable by propelling two of the Links over with the Gust Jar. These Switches create a bridge for the third Link. The heroes then reach a narrow walkway over a pit, blocked by two Pendulums hanging from ropes. These Pendulums can be swung by using the Gust Jar on them from the right side, allowing one or more of the Links to cross over. A Floor Switch on the other side opens a wall on the left side of the Pendulums, allowing one of the Link to use the Boomerang to carry the Links over from this opening. Once all three Links are reunited, two Grey Ball and Chain Soldiers appear to fight them. Once they are defeated, the doors leading to the fortress's balcony and Triforce Gateway are opened.
Drablands Challenges
Once the Bosses of the Fortress have been defeated, Sealed Gateway can be replayed with the following Drablands Challenges: "Evade the Wallmaster!", "Halved attack and defense!", and "Don't drop the pot!".
Materials
At the end of the Level, three Treasure Chests can be opened. Two contain the same Material, and one contains another, more valuable Material.
| Drablands Challenge | — |
|---|---|
| Magical Materials | |
| Drablands Challenge | Don't drop the pot! |
| Magical Materials | |
| Drablands Challenge | Evade the Wallmaster! |
| Magical Materials | |
| Drablands Challenge | Halved attack and defense! |
| Magical Materials |
| Drablands Challenge | Magical Materials |
|---|---|
— | |
Don't drop the pot! | |
Evade the Wallmaster! | |
Halved attack and defense! |
Enemies and Traps
- Stage 1


- Stage 2


- Stage 3

- Stage 4

![Wallmaster ×1[a]](/wiki/File:TFH_Wallmaster_Model.png)
Treasure Chests
| Treasure Chest | |
|---|---|
| Contents | |
| Notes | Within a set of Elevator Blocks on the east side of Stage 3 |
| Treasure Chest | |
| Contents | |
| Notes | On a high ledge on the west side of Stage 3 |
| Treasure Chest | |
| Contents |
|
| Notes | On a high ledge on the west side of Stage 3 |
| Treasure Chest | |
| Contents | |
| Notes | On the left ledge while ascending the lift in Stage 4 |

| Treasure Chest | Contents | Notes |
|---|---|---|
Within a set of Elevator Blocks on the east side of Stage 3 | ||
On a high ledge on the west side of Stage 3 | ||
| On a high ledge on the west side of Stage 3 | |
On the left ledge while ascending the lift in Stage 4 |
Trivia
- As described in Vol. 4 of the Drablands Diary, a scarab is hidden on a wall in each Level of the Fortress. One can be found in Stage 2 of Sealed Gateway, behind the Triforce Gateway and next to the first tree on the right.
Nomenclature
| Language | Names | Meanings |
|---|---|---|
Japanese | 鉄壁の関門 (Teppeki no Kanmon)[3] | Iron Gateway |
FrenchCA | Portes scellées | |
FrenchEU | Portes scellées[5] | |
German | Stadttore[4] | |
Italian | Passaggio sigillato[2] | |
SpanishLA | Entrada sellada[6] | |
SpanishEU | Entrada Sellada[7] | |
| This table was generated using translation pages. To request an addition, please contact a staff member with a reference. | ||
Gallery
-
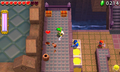
A ledge with Hearts and Rupees in Stage 3
-
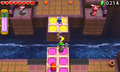
Using the Boomerang to cross the moat in Stage 3
-
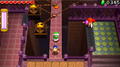
The Pendulums blocking a narrow path in Stage 4
-

A shortcut for subsequent Links to pass the Pendulums, Stage 4
-
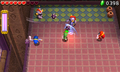
Battle with two Grey Ball and Chain Soldiers at the end of Stage 4


References
- ↑ Encyclopedia, Dark Horse Books, pg. 160
- ↑ "Passaggio sigillato" — Level Selection (Tri Force Heroes)
- ↑ "鉄壁の関門" — Level Selection (Tri Force Heroes)
- ↑ "Stadttore" — Level Selection (Tri Force Heroes)
- ↑ "Portes scellées" — Level Selection (Tri Force Heroes)
- ↑ "Entrada sellada" — Level Selection (Tri Force Heroes)
- ↑ "Entrada Sellada" — Level Selection (Tri Force Heroes)