Stone Corridors
Stone Corridors is a Level in Tri Force Heroes.[1] It is the second Level of The Dunes Area, preceded by Infinity Dunes and followed by Gibdo Mausoleum.
Stone Corridors takes place in a desert fortress over a sea of sand. Throughout the Level, the Links encounter Anubis-like statues that must be transported to a base, which functions as a Floor Switch and is used to open passageways. If the statue is lost, it will reappear at a preset location nearby. Later on, the Level also features grated platforms that tilt left or right to the Links' weight. The Links must carefully balance these tilting platforms, lest they slide down into the sand below.

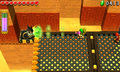
In Stage 1, the Links appear on top of a fortress overseeing a sea of sand. Immediately the Boomerang, Gripshot, and Gust Jar are provided for their use. Ahead of the Items is a tall Sand Mound surrounded by three Floor Switches and a base. The Mound can be blown away with the Gust Jar to reveal an Anubis statue. This statue can be picked up and thrown into the base, which activates it as a Floor Switch. The Links then press the three other Floor Switches to form a bridge over the sea of sand. The heroes then enter a Quicksand-filled area with fallen ruins and Sandfish swimming between them. In the north-west is another Sand Mound concealing an Anubis statue. The Links must transport this statue to the top of a pyramid-like structure to the east, however a river of flowing sand prevents the Links from going further. The Gust Jar can be used to propel them across as well as the statue, and the last Link can be carried over using the Boomerang, or he can cross the river himself by firing the Gripshot at a Stake, one of the other Links, or the statue. The Links must then throw each other up the steps of the pyramid structure and stand on the Floor Switches on each of the steps, and throw the statue into its base at the top. This will open the door to the Triforce Gateway. Several Rupees sit on the steps as well, and a Sand Mound concealing a Squiddy sits to the right of the structure.

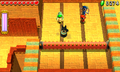
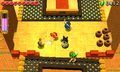
In Stage 2, the Links appear on a small ledge. To the north is a grated wall with a panel, which can be gripped onto using the Gripshot from the top of a Totem, and will flip the Link to the other side. To the right is another Anubis statue; the Link can grip either it or the Stake to move across the gap. A Floor Switch nearby is pressed to raise a sloped staircase, allowing the Links to reunite. This however also activates an Arrow Trap to the far right that continuously shoots Arrows down a narrow path. To safely move past the onslaught of Arrows, the Links pick up and drop the Anubis statue into their path, which protects the heroes as a shield. The Links can then move it forward without having to pick it up by using the Gust Jar on it. South of the Arrow Traps is a rolling Spiketrap, which blocks the Links' passage. The statue can again used to protect the Links from the trap. Eventually the Links arrive to a small enclosure with four tall Sand Mounds, containing a Heart, a Red Rupee, a Purple Rupee, and a Skullrope. To the left of the enclosure is a much bigger Spiketrap which the Links must safely pass by using the statue. Further left are a series of ledges with Floor Switches, which the Links must throw each other up, and place the statue into its base on top to open the way to the next Triforce Gateway.

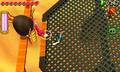
In Stage 3, the Links appear on a ledge in front of a grated platform that will tilt to the Links' weight. On a pillar to the right is a Red Rupee, which should be collected using the Gripshot, lest one of the Links cause the platform to tilt over. The next ledge over has an Anubis statue, as well as another grated platform with a hole in its center supported by a wooden beam. The Links must safely transport the statue over the tilting platforms, while making sure neither it or they fall into the sand below, using a combination of their Items to pull or propel themselves across, and teamwork to keep the platforms balanced. The next ledge has two Karat Crabs plus several Jars containing Hearts beside walls to the left and right; however, breaking these Jars will allow more Karat Crabs to run out from holes in the walls. Up ahead is another grated platform with a hole; A red column stands in the middle of the hole, which the Links can throw the statue to as they gradually transport it over a gap to the next tilting platform, and finally to the next ledge. The statue's base appears on the left side of the last grated platform, which the Links must carefully throw the statue into. Once the statue is returned to its base, a wall opens leading to the Triforce Gateway.

Stage 4 is where Vulture Vizier is fought, atop a large, tilting grated platform. The Links start on a high-up ledge with many Jars containing Hearts, and once they drop down to the battle area, Vulture Vizier arrives and the battle begins. At the south end of the tilting platform is a small ledge with three more Jars, where the Links are safe from the Boss's attacks. Along the left and right sides of the platform are railings where Vulture Vizier perches, along with several Hearts and Rupees. Once the Boss is defeated, platforms rise up to the north, leading to a large Egyptian Sphinx whose head pulls back to reveal the final Triforce Gateway.
Drablands Challenges
Once the Boss of The Dunes has been defeated, Stone Corridors can be replayed with the following Drablands Challenges: "Clear within the time limit!", "Evade the Wallmaster!", and "Don't fall at all!".
In "Clear within the time limit!", the Links are given a timer of one minute in Multiplayer, or two minutes in single-player. This timer can be increased by collecting Hourglasses or wearing Linebeck's Uniform.
In "Evade the Wallmaster!", the Wallmaster can add its weight to any tilting platform when it slams down, so the Links should attempt to defeat it before crossing these platforms.
Materials
At the end of the Level, three Treasure Chests can be opened. Two contain the same Material, and one contains another, more valuable Material.
| Drablands Challenge | — |
|---|---|
| Magical Materials | |
| Drablands Challenge | Clear within the time limit! |
| Magical Materials | |
| Drablands Challenge | Evade the Wallmaster! |
| Magical Materials | |
| Drablands Challenge | Don't fall at all! |
| Magical Materials |
| Drablands Challenge | Magical Materials |
|---|---|
— | |
Clear within the time limit! | |
Evade the Wallmaster! | |
Don't fall at all! |
Enemies and Trap
![Sandfish ×2[a]](/wiki/File:TFH_Sandfish_Model.png)
![Squiddy[b]](/wiki/File:TFH_Squiddy_Model.png)
![Skullrope ×1[b]](/wiki/File:TFH_Skullrope_Model.png)
![Karat Crab ×6[c]](/wiki/File:TFH_Karat_Crab_Model.png)

- Stage 1
- Stage 2
-

Arrow Trap ×2
-

Spiketrap ×2
- Stage 3
- Stage 4
- ↑ These Enemies respawn indefinitely.
- ↑ Hidden inside a Sand Mound.
- ↑ Two are visible; two are hidden in each side wall.
![Wallmaster ×1[a]](/wiki/File:TFH_Wallmaster_Model.png)
Trivia
- As alluded to in Vol. 7 of the Drablands Diary, a "hieroglyph" of Link is hidden on a wall in each Level of The Dunes. He can be found in Stage 2 of Stone Corridors, on the outer south wall of the area where the second Spiketrap rolls.
Nomenclature
| Language | Names | Meanings |
|---|---|---|
Japanese | 石の回廊 (Ishi no Kairō)[3] | Stone Corridor |
FrenchCA | Cloître de pierre | |
FrenchEU | Cloître de pierre[5] | |
German | Steinerne Korridore[4] | |
Italian | Corridoi di pietra[2] | |
SpanishLA | Corredores de piedra[6] | |
SpanishEU | Corredores de Piedra[7] | |
| This table was generated using translation pages. To request an addition, please contact a staff member with a reference. | ||
Gallery
-

The Anubis-like statue
-
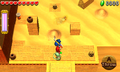
The Sand-covered area of Stage 1
-

Using the statue to shield from an Arrow Trap, Stage 2
-
Using the statue to block a Spiketrap's path, Stage 2
-
In Stage 3, numerous Karat Crabs hide in the holes of these walls
-
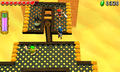
One method to cross the gap between tilting platforms in Stage 3
-
Propelling the statue into its pedestal, Stage 3
-
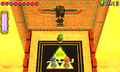
A mural of Vulture Vizier at the end of Stage 3
-
Battling Vulture Vizier atop a tilting platform in Stage 4


References
- ↑ Encyclopedia, Dark Horse Books, pg. 160
- ↑ "Corridoi di pietra" — Level Selection (Tri Force Heroes)
- ↑ "石の回廊" — Level Selection (Tri Force Heroes)
- ↑ "Steinerne Korridore" — Level Selection (Tri Force Heroes)
- ↑ "Cloître de pierre" — Level Selection (Tri Force Heroes)
- ↑ "Corredores de piedra" — Level Selection (Tri Force Heroes)
- ↑ "Corredores de Piedra" — Level Selection (Tri Force Heroes)