Abyss of Agony
Abyss of Agony is a Level in Tri Force Heroes.[1] It is the second Level of the Riverside Area, preceded by Secret Fortress and followed by Cove of Transition.
The Level takes place at a cliffside with rushing waterfalls, which the Links must climb, eventually reaching a watery grotto.

In Stage 1, the Links begin at a lake with rapidly moving currents and several docks. The Links must carefully swim in the moving water while avoiding Spikes, and quickly swim over to a small island with two Water Rods and a Bow. The Spikes can be detonated by firing an Arrow at them, or by performing a Spin Attack from a safe distance. Using the Water Rod to reach the Shock Switches on the left and right sides, the Links must hit these Switches using Arrows or their Swords, which will lower wooden dams on each side and reveal more Shock Switches. The Switch on the right side will cover itself with metal flaps if any of the Links get too close, forcing them to strike it from a distance using Arrows, while the Switch on the left side is protected by a small ledge, and can be activated by causing a chain reaction of explosions from nearby Spikes. When both of these Shock Switches have been hit, they will remove the two locks over the largest dam in the center of the Stage, which will open the way to the Triforce Gateway. The Water Rod must be used to cross the waterfall onto its platform.

Stage 2 starts the Links at the base of the waterfalls, next to a tall cliff. The Links must climb the cliff side using their Water Rods. They eventually make their way to a rapidly moving river with a few spots of solid ground, where a group of Water Octoroks and a Keeleon spawn. After they are defeated, electrified Buzz Blobs will then appear. Defeating all Enemies opens the Triforce Gateway, reachable with the Water Rods.

In Stage 3, the Links reappear higher up the cliffside, near a tall brick pillar and a Squiddy. Up several ledges to their left is a Water Wheel and a wooden platform on a pulley. The Water Wheel is used to make the platform move, by turning it with the upward force of a Water Rod's pillar; using the Water Rod on the left side makes the platform move right, and using it on the right side makes it move left. The Links must work in tandem to turn the Water Wheel and transport each other further along the cliff face, until they reach an alcove with another Water Wheel, which can be used to return the wooden platform and carry over the remaining Link. While riding the platform, the Link with the Bow must fire Arrows at two Shock Switches as they move, each of which opens a wooden wall blocking the path further up the cliff. Eventually, they reach another Water Wheel, this one powering a Ferris wheel-like mechanism with platforms that carry the Links over a large gap, high above the Stage's starting area. On the ledge at the other side of the gap is a second Water Wheel to carry over the remaining Link(s), as well as a Shock Switch that turns the tall pillar into an lift. Should any of the Links fall down to the starting area, they can ride this lift to return to the upper ledge. At the very top of the cliff is the Triforce Gateway.

Stage 4 is where the Electric Blob Queen is fought in a large pool inside a grotto. The Links appear at the top of a large cliff, and the battle begins once they all drop down to ground level. Along the sides of the pool are ledges that the Links can climb to avoid the Mini-Boss's electrical attacks, and to fire Arrows from once its weak point has risen. The pool also contains several Hearts hidden underwater. Once the Mini-Boss is defeated, the Triforce Gateway appears on a wooden dock at the top of a hill to the north.
Drablands Challenges
Once the Boss of the Riverside has been defeated, Abyss of Agony can be replayed with the following Drablands Challenges: "Halved attack and defense!", "Guard the orb!", and "Clear within the time limit!".
In "Clear within the time limit!", the Links are given a timer of one minute in Multiplayer, or four minutes in single-player. This timer can be increased by collecting Hourglasses or wearing Linebeck's Uniform. The pool where the Electric Blob Queen is fought also has several Water Octoroks in it.
In "Guard the orb!", one of the two Water Rods is placed at the starting ledge, allowing the Links to cross the lake together to where the other Items are found.
Materials
At the end of the Level, three Treasure Chests can be opened. Two contain the same Material, and one contains another, more valuable Material.
| Drablands Challenge | — |
|---|---|
| Magical Materials | |
| Drablands Challenge | Halved attack and defense! |
| Magical Materials | |
| Drablands Challenge | Guard the orb! |
| Magical Materials | |
| Drablands Challenge | Clear within the time limit! |
| Magical Materials |
| Drablands Challenge | Magical Materials |
|---|---|
— | |
Halved attack and defense! | |
Guard the orb! | |
Clear within the time limit! |
Enemies and Traps


Treasure Chests
| Treasure Chest | |
|---|---|
| Contents | |
| Notes | On a stone platform in the southwest corner of Stage 1 |
| Treasure Chest | |
| Contents | |
| Notes | On a wooden ledge near the top of the elevator lift in Stage 3 |
| Treasure Chest | |
| Contents | |
| Notes | On the left upper ledge of the cliff, before dropping to the ground in Stage 4 |

| Treasure Chest | Contents | Notes |
|---|---|---|
On a stone platform in the southwest corner of Stage 1 | ||
On a wooden ledge near the top of the elevator lift in Stage 3 | ||
On the left upper ledge of the cliff, before dropping to the ground in Stage 4 |
Trivia
- As alluded to in Vol. 2 of the Drablands Diary, a "Turtle Rock"—a rock resembling a turtle shell—is hidden in each Level of the Riverside. One can be found in Stage 2 of Abyss of Agony, by swimming to the east of the Links' starting position.
Nomenclature
| Language | Names | |
|---|---|---|
Japanese | かえらずの淵 (Kaerazu no Fuchi)[3] | |
FrenchCA | Gouffre sans retour[7] | |
FrenchEU | Gouffre du non-retour[5] | |
German | Ewiger Abgrund[4] | |
Italian | Abisso infinito[2] | |
SpanishLA | Abismo sin retorno[6] | |
SpanishEU | Abismo de No Regresarás[8] | |
| This table was generated using translation pages. To request an addition, please contact a staff member with a reference. | ||
Gallery
-
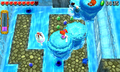
Battling Enemies at the top of Stage 2

References
- ↑ Encyclopedia, Dark Horse Books, pg. 159
- ↑ "Abisso infinito" — Level Selection (Tri Force Heroes)
- ↑ "かえらずの淵" — Level Selection (Tri Force Heroes)
- ↑ "Ewiger Abgrund" — Level Selection (Tri Force Heroes)
- ↑ "Gouffre du non-retour" — Level Selection (Tri Force Heroes)
- ↑ "Abismo sin retorno" — Level Selection (Tri Force Heroes)
- ↑ "Gouffre sans retour" — Level Selection (Tri Force Heroes)
- ↑ "Abismo de No Regresarás" — Level Selection (Tri Force Heroes)