Forgotten Temple
The Forgotten Temple,(BotW | TotK | HWAoC)[1][2][3] also known as the Old Ruin,(TotK)[4] is a recurring location in The Legend of Zelda series.
Features and Overview
Breath of the Wild
Related Quests

|
A Gift from the Monks | |||
| Side Quest | ||||
A Gift from the Monks | |
|
|
A Gift from the Monks | |||
| Side Quest | ||||
A Gift from the Monks | |
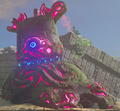
The Forgotten Temple is an Ancient Hylian Ruin located at the northeastern end of the Tanagar Canyon on the Tabantha Frontier.[5] It was originally constructed to remember the heroes who aided the Royal Family of Hyrule against Ganon over the ages.[6] During the Era of Prosperity, several Guardians were placed inside to ensure its safety and the Rona Kachta Shrine was constructed near its end to challenge a future hero.[6] However, the Temple has been abandoned for so long that many do not recall its original purpose.[6] It remained undisturbed until the Great Calamity a century prior to Link's awakening from the Slumber of Restoration.[5] The interior of the Forgotten Temple is now filled with Decayed Guardians, who will shoot Link on sight. Behind the Rona Kachta Shrine is the Mother Goddess Statue, which is not only the tallest in Hyrule, but the oldest as well.[7]
Several Updrafts can be found along the Temple's grounds, allowing Link to Paraglide above the chamber walls inside.
At 3:00 AM, Dinraal will descend toward the Tanagar Canyon, causing Winds and Updrafts to appear around the Forgotten Temple.
As part of the "A Gift from the Monks" Side Quest, the Monks will direct Link to the Forgotten Temple, where he will receive a prize for conquering all 120 Ancient Shrines.[8] In front of the Mother Goddess Statue, Link can find three Stone Chests containing the Hero of the Wild Set.[9] After obtaining all three pieces of Armor, the Side Quest will be completed.
Areas

Enemies
Normal Mode
-
Decayed Guardian ×12

Master Mode
-
Decayed Guardian ×12
-


Treasure Chests
| Treasure Chest | |
|---|---|
| Contents | |
| Notes | Inside an alcove built into the base of the wall near the second Updraft |
| Treasure Chest | |
| Contents | |
| Notes | On the floor between the second and third Updrafts |
| Treasure Chest | |
| Contents | |
| Notes | On the floor on the north side of the wall that bisects the Temple |
| Treasure Chest | |
| Contents | |
| Notes | Inside an alcove built into the base of the wall near the fourth Updraft |
| Treasure Chest | |
| Contents | |
| Notes | East of the pillars south of Rona Kachta Shrine |
| Treasure Chest | |
| Contents | |
| Notes | Directly in front of the Mother Goddess Statue |
| Treasure Chest | |
| Contents | |
| Notes | To the Mother Goddess Statue's right |
| Treasure Chest | |
| Contents | |
| Notes | To the Mother Goddess Statue's left |

| Treasure Chest | Contents | Notes |
|---|---|---|
Inside an alcove built into the base of the wall near the second Updraft | ||
On the floor between the second and third Updrafts | ||
On the floor on the north side of the wall that bisects the Temple | ||
Inside an alcove built into the base of the wall near the fourth Updraft | ||
East of the pillars south of Rona Kachta Shrine | ||
Directly in front of the Mother Goddess Statue | ||
To the Mother Goddess Statue's right | ||
To the Mother Goddess Statue's left |
Korok Seeds
| Korok |  |
|---|---|
| Type | |
| Notes | On the westernmost entrance pillar |
| Korok |  |
| Type | |
| Notes | Hidden under a metal door by the Temple's entrance |
| Korok |  |
| Type | |
| Notes | Hidden behind a pile of destructible rocks on the southwestern side of Temple's roof |
| Korok |  |
| Type | |
| Notes | Hidden behind a pile of destructible rocks on the southeastern side of Temple's roof |
| Korok |  |
| Type | |
| Notes | On the northeastern side of the Temple's roof |
| Korok |  |
| Type | |
| Notes | Behind the Mother Goddess Statue's head |

| Korok | Type | Notes |
|---|---|---|
| On the westernmost entrance pillar | |
| Hidden under a metal door by the Temple's entrance | |
| Hidden behind a pile of destructible rocks on the southwestern side of Temple's roof | |
| Hidden behind a pile of destructible rocks on the southeastern side of Temple's roof | |
| On the northeastern side of the Temple's roof | |
| Behind the Mother Goddess Statue's head |
Tears of the Kingdom
- Related Quests


|
Goddess Statue of Power | |||
| Side Quest | ||||
Goddess Statue of Power | |

|
The Dragon's Tears | |||
| Main Quest | ||||
The Dragon's Tears | |

|
The Mother Goddess Statue | |||
| Side Quest | ||||
The Mother Goddess Statue | |
|
|
Goddess Statue of Power | |||
| Side Quest | ||||
Goddess Statue of Power | |
|
|
The Dragon's Tears | |||
| Main Quest | ||||
The Dragon's Tears | |
|
|
The Mother Goddess Statue | |||
| Side Quest | ||||
The Mother Goddess Statue | |

As in Breath of the Wild, the Forgotten Temple sits inside Tanagar Canyon on the Tabantha Frontier.
During the Imprisoning War in the Era of Myth, the Forgotten Temple was used as a refuge by Rauru and his army after Ganondorf attacked and killed Sonia at their castle atop the Great Plateau. In the Memory "The Sages' Vow", Rauru meets with the leaders of the various tribes of Hyrule.[10] They report that the last remaining free village of the Gerudo has fallen to Demon King Ganondorf.[11] Understanding the risk that the face, Rauru opens the rear chamber of the Temple to reveal a chamber where four Secret Stones are kept.[12] He grants these Secret Stones to the tribe leaders, allowing the Zora, Rito, Goron, and Gerudo leaders to respectively become the Sages of Water, Wind, Fire, Lightning. Together with the Sage of Spirit Mineru and the Sage of Time Zelda, the Sages swear their loyalty to him and vow to fight Demon King Ganondorf alongside him.[13][14] After this, the late queen Sonia was buried in this chamber. It features a circular pit with a lotus structure and a small pond at its center, above which the Secret Stones float before they are claimed. This lotus is surrounded by seven platforms that each lead to a staircase trailing out of the circular pit. Between these platforms, there are stones of various sizes in a rock garden. Concentric circles emanate from these stones in the garden.
In the Memory "A King's Duty", Rauru can be seen visiting Sonia's grave and offering a lone Sundelion in her memory. He is joined by Zelda, who now remembers that Demon King Ganondorf was the man she met Beneath Hyrule Castle and deduces that their resistance to him is doomed to fail.[15] Despite her warnings, Rauru insists that they must try and reminds her that they may yet rely on Link's help in the future.[16][17] In the adjacent room, Hylian soldiers can be seen preparing for battle.

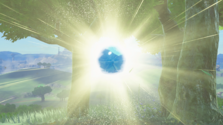
At some point after the Imprisoning War's end, the back wall of the Secret Stone chamber was torn down and a hallway to a new chamber was built. This new chamber houses a Floor Map that depicts the 11 Dragon's Tears atop the geography of Hyrule at the time. This Floor Map includes Hyrule Castle at its center in the exact position it can be found in the future. An oculus in the ceiling sits over the Floor Map, and inside this oculus there is a large Light protected with Zonai-style lattice. A stone memorial sitting just northeast of the Floor Map is engraved with the phrase, "A tear with a tear".[18] The walls surrounding the Floor Map bear 11 blind arches depicting the Geoglyphs, which are also found on diamond-shaped tablets on top of the Floor Map. The Mother Goddess Statue was also added at some point to the Forgotten Temple after the Imprisoning War, and the floor leading to the Secret Stone chamber was heavily altered. Sundelions began to grow at Sonia's grave after Rauru left one as an offering.
In modern times, the Forgotten Temple now shows signs of travelers visiting, as Wooden Boxes and Boards can be found throughout and around its grounds. Due to the Upheaval, various features of the Forgotten Temple have been altered. Fallen Debris now dots the rooftop of the Temple, and there are now no longer any Updrafts throughout its interior. The Mother Goddess Statue has been toppled, and the Mayausiy Shrine has appeared inside the Temple. The ground behind the Mother Goddess Statue blocking the Door to the Secret Stone chamber has given way, allowing entry further into the Forgotten Temple. This Door bears a modified sefirot with eight circles and an Eye Symbol carved into it. The bottom circle acts as a Terminal which activates and opens the Door when Rauru uses his Right Arm. This exact sefirot pattern can also be found on the Temple of Time atop the Great Sky Island.

In order to return the Mother Goddess Statue to normal, Link must visit the Springs of Courage, Wisdom, and Power and speak to their respective Goddess Statues. Upon confirming the status of the Mother Goddess Statue for them and offering them Farosh's Claw,[19][20] Naydra's Claw,[21] and Dinraal's Claw respectively,[22] Link is able to help them restore strength to the Mother Goddess Statue. With these tasks completed, the Goddess Statues will instruct him to visit the Mother Goddess Statue in tribute.[23] At the Forgotten Temple, the Mother Goddess Statue will thank Link for his display of courage, wisdom, and power.[24] As a gesture of thanks, she will gift him the Goddess White Sword,[25] concluding the Side Quest "The Mother Goddess Statue".[note 1]
After researching the Geoglyph at North Hyrule Plain, Impa and Cado travel to the Forgotten Temple as part of the Main Quest "The Dragon's Tears". According to ancient Sheikah records in Kakariko Village,[27] the Forgotten Temple contains information related to the Geoglyphs and the Dragon's Tears.[28] This alludes to the Floor Map, where several slabs depicting the Geoglyphs can be found. Impa and Cado became separated when the former ran ahead to explore the Temple while Cado was busy securing their aircraft.[29] Impa can be found beside Mayausiy Shrine, where she is stumped on the location of the Floor Map.[30]

When Link approaches the Floor Map during "The Dragon's Tears", Impa and Cado will soon follow and remark upon it and the surrounding walls.[31][32] From the order of the Geoglyphs depicted on the blind arches, Impa deduces that the next Geoglyph is located near Rito Village.[33] Cado adds that the locations of the remaining Geoglyphs are also located on the Floor Map.[34] To Cado's dismay, Impa resolves to immediately visit the remaining Geoglyphs herself.[35][36]
After visiting each of the Geoglyphs and viewing their Memories, Link can return to Impa and Cado at the Forgotten Temple to inform them of Zelda's transformation into the Light Dragon.[37] Impa decides to return to the records at Kakariko Village in order to research a possible method to undo Zelda's draconification.[38] With their journey at an end, Cado also decides to return to Kakariko Village.[39]
Areas

Creatures


During "The Dragon's Tears"

Enemies
Monster Outpost inside the entrance
-
-

Bokoblin ×2


Monster Outpost southwest of the wall bisecting the Temple
Materials


Equipment


Zonai Devices
Treasure Chests
| Treasure Chest | |
|---|---|
| Contents | |
| Coordinates | -1301, 2447, -0056 |
| Notes | Atop the pillar near the second Monster Outpost |
| Treasure Chest | |
| Contents | |
| Coordinates | -1267, 2496, -0030 |
| Notes | Atop the northern side of the wall bisecting the Temple |
| Treasure Chest | |
| Contents | |
| Coordinates | -1223, 2498, -0104 |
| Notes | In the alcove built into the base of the wall in the trench south of the Mayausiy Shrine |
| Treasure Chest | |
| Contents | |
| Coordinates | -1149, 2648, -0056 |
| Notes | Atop the wall dividing the Mayausiy Shrine and the Mother Goddess Statue |
| Treasure Chest | |
| Contents | |
| Coordinates | -1063, 2717, -0050 |
| Notes | On the floor behind and above the Mother Goddess Statue |
| Treasure Chest | |
| Contents | |
| Coordinates | -1057, 2698, -0016 |
| Notes | Atop the arch behind the Mother Goddess Statue |
| Treasure Chest | |
| Contents | |
| Coordinates | -1046, 2728, -0061 |
| Notes | Beside the lintel above the doorway leading southwest inside the Secret Stone chamber |


| Treasure Chest | Contents | Coordinates | Notes |
|---|---|---|---|
-1301, 2447, -0056 | Atop the pillar near the second Monster Outpost | ||
-1267, 2496, -0030 | Atop the northern side of the wall bisecting the Temple | ||
-1223, 2498, -0104 | In the alcove built into the base of the wall in the trench south of the Mayausiy Shrine | ||
-1149, 2648, -0056 | Atop the wall dividing the Mayausiy Shrine and the Mother Goddess Statue | ||
-1063, 2717, -0050 | On the floor behind and above the Mother Goddess Statue | ||
-1057, 2698, -0016 | Atop the arch behind the Mother Goddess Statue | ||
-1046, 2728, -0061 | Beside the lintel above the doorway leading southwest inside the Secret Stone chamber |
Korok Seeds
| Korok |  |
|---|---|
| Type | |
| Coordinates | -1185, 2481, -0100 |
| Notes | In the trench south-southeast of Mayausiy Shrine |
| Korok |  |
| Type | |
| Coordinates | -1147, 2535, -0032 |
| Notes | Atop the Tree southeast of Mayausiy Shrine |
| Korok |  |
| Type | |
| Coordinates | -1052, 2616, 0031 |
| Notes | Between the three rock spires at the back end of the Temple's roof |

| Korok | Type | Coordinates | Notes |
|---|---|---|---|
| -1185, 2481, -0100 | In the trench south-southeast of Mayausiy Shrine | |
| -1147, 2535, -0032 | Atop the Tree southeast of Mayausiy Shrine | |
| -1052, 2616, 0031 | Between the three rock spires at the back end of the Temple's roof |
Other Appearances
Hyrule Warriors: Age of Calamity
The Forgotten Temple appears during "EX Alert: Forgotten Temple", which is an EX Vicious Monster Battle. It consists of the chamber housing the Mother Goddess Statue and the antechamber south of it.
Trivia
- The design of the Forgotten Temple is inspired by the Sealed Temple from Skyward Sword, and it features similar architecture to the Spring of Wisdom, Spring of Courage, Spring of Power, and the Lanayru Promenade.[6]
Nomenclature
| Language | Names | |
|---|---|---|
Japanese | わす忘れさ去られたしんでん神殿 | |
ChineseTR | 忘卻神殿 (Wàngquè shéndiàn) | |
ChineseSI | 忘却神殿 (Wàngquè shéndiàn) | |
FrenchCA | Temple oublié | |
FrenchEU | Temple oublié | |
German | Vergessener Tempel | |
Italian | Tempio dimenticato | |
Korean | 잊혀진 신전 | |
SpanishEU | Templo olvidado | |
| This table was generated using translation pages. To request an addition, please contact a staff member with a reference. | ||
Gallery
-
The Mother Goddess Statue and Rona Kachta Shrine from Breath of the Wild
-
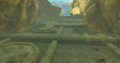
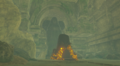
The exposed Forgotten Temple roof along Tanagar Canyon from Breath of the Wild
-
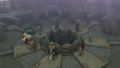
The Six Sages swearing their loyalty to Rauru from Tears of the Kingdom
-
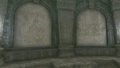
The Geoglyph wall from Tears of the Kingdom


See Also
- Ancient Hylian Ruin
- EX Alert: Forgotten Temple
- Mayausiy Shrine
- Rona Kachta Shrine
- Sealed Temple
- Tabantha Frontier
- Tanagar Canyon
Notes
References
- ↑ "Forgotten Temple" — Map (Breath of the Wild)
- ↑ "Forgotten Temple" — Map (Tears of the Kingdom)
- ↑ "EX Alert: Forgotten Temple" — Map (Hyrule Warriors: Age of Calamity)
- ↑ "[East of here.] The east, you say? Well... If you look southeast, you'll see an old ruin in the bottom of the valley. I don't know who built it and when, but it's big. I bet something like that was constructed for some kind of special purpose. You should take a look! Just be careful getting there. A fall down that steep valley won't do your bones any favors." — Monkton (Tears of the Kingdom)
- ↑ 5.0 5.1 Creating a Champion, Dark Horse Books, pg. 412
- ↑ 6.0 6.1 6.2 6.3 Creating a Champion, Dark Horse Books, pg. 312
- ↑ "Head to the Forgotten Temple where the oldest statue of the Goddess stands to see what they have left for you there." — Adventure Log (Breath of the Wild)
- ↑ "You have at last conquered all of our trials. Having fulfilled our purpose, we monks bestow upon you this... The warrant of a true hero. You must now depart for the Forgotten Temple." — Monk (Breath of the Wild)
- ↑ "You've accepted the gift from the monks at the Forgotten Temple.
Inside, you found a special green outfit made especially for the hero who braved the wilderness alone.
Will donning this outfit help you to become the land's true hero?" — Adventure Log (Breath of the Wild) - ↑ "Backed into a corner by the attacks in all parts of Hyrule, leaders facing the Demon King's forces gather at Rauru's call. He gives each a Zonai secret stone, making them sages with powers amplified by the stones. All of the sages raise their voices as one, pledging to fight with King Rauru to the end." — Adventure Log (Tears of the Kingdom)
- ↑ "King Rauru... We just received word that the last free village in the Gerudo Desert has fallen. At this rate, the Demon King's army will overwhelm us." — Sage of Water (Tears of the Kingdom)
- ↑ "I understand. Our only hope is for me to defeat the Demon King." — Rauru (Tears of the Kingdom)
"Rauru. The Demon King... He is not someone you can stop by yourself. But...you are not alone. You have the Gerudo, Goron, Zora, and Rito leaders, as well as Zelda... And of course...you can count on me." — Mineru (Tears of the Kingdom)
"There's something I'd like to show you all." — Rauru (Tears of the Kingdom) - ↑ "Stand with me. I need all your aid." — Rauru (Tears of the Kingdom)
- ↑ "We all, gathered here, swear on our lives to serve Rauru, the King of Light." — Six Sages (Tears of the Kingdom)
- ↑ "I came... I came to this era after finding a man underground." — Zelda (Tears of the Kingdom)
"Hm. Go on." — Rauru (Tears of the Kingdom)
"When I witnessed what the secret stone did to Ganondorf... At that moment, I knew for sure. What we found underground—that was him!" — Zelda (Tears of the Kingdom)
"He was still alive... Still powerful... He continues to live on...all the way until my time! In tomorrow's battle... We won't be able to defeat him. No matter how strong we think we are, he'll survive!" — Zelda (Tears of the Kingdom)
"And you... And you will..." — Zelda (Tears of the Kingdom) - ↑ "Maybe so... But it is my duty to try. It was my hubris that set us on this path. I must atone for my error in judgement." — Rauru (Tears of the Kingdom)
"And above all else... I remain the king of Hyrule. As with any leader, it is my duty to safeguard and protect my people. Even if I must risk my life." — Rauru (Tears of the Kingdom)
"Rauru..." — Zelda (Tears of the Kingdom) - ↑ "And if it proves impossible for us to defeat Ganondorf...we rely on your knight...and that legendary sword he carries. Our last line of defense will be Link." — Rauru (Tears of the Kingdom)
- ↑ "A tear with a tear" — N/A (Tears of the Kingdom)
- ↑ "I would ask you to go to that land and bring tidings to me of the Mother Goddess Statue. Please... I beg of you..." — Spring of Courage Statue (Tears of the Kingdom)
- ↑ "Seek the golden spirit Farosh, who looses lightning as she dances across the heavens. When you have gained Farosh's claw, offer it at this spring." — Spring of Courage Statue (Tears of the Kingdom)
- ↑ "Seek the blue spirit Naydra, who chills the air around her as she dances across the heavens. When you have gained Naydra's claw, offer it at this spring." — Spring of Wisdom Statue (Tears of the Kingdom)
- ↑ "Seek the red spirit Dinraal, wreathed in flame as she dances across the heavens. When you have gained Dinraal's claw, offer it at this spring." — Spring of Power Statue (Tears of the Kingdom)
- ↑ "With your aid, a measure of our strength has gone to restore the Mother Goddess Statue who dwells in the vast canyon. You should make a pilgrimage there in tribute." — Spring of Power Statue (Tears of the Kingdom)
- ↑ "Devout swordsman who offers his prayers, I am deeply grateful for the aid you have provided to the statues of the springs." — Mother Goddess Statue (Tears of the Kingdom)
- ↑ "I bestow this upon you in recognition of your wisdom, power, and courage." — Mother Goddess Statue (Tears of the Kingdom)
- ↑ "In recognition of your wisdom, power, and courage, I should like to present to you a sword. Kindly organize your belongings so that another sword may fit among them, and return to me once this is done." — Mother Goddess Statue (Tears of the Kingdom)
- ↑ "But finally we can see it. The geoglyph! Well done, Link. You know, I read something in the village's old literature—a passage about what the ancients called Dragon's Tears. "Where the Tears rest upon the earth, we marked down the images to which they gave birth."" — Impa (Tears of the Kingdom)
- ↑ "Let us continue to examine the geoglyphs. They may contain further clues that lead to Princess Zelda. You know, according to the literature, there is something to do with geoglyphs in the Forgotten Temple. The Forgotten Temple lies at the bottom of a canyon in Hebra. I think we should make our way there soon." — Impa (Tears of the Kingdom)
- ↑ "To be honest, Lady Impa deduced that there is something related to the geoglyphs here. It took some effort for us to get up here, but we managed it. But then Lady Impa grew impatient. The moment I took my eyes off her, she went deep into the temple all by herself. Once I finish mooring the balloon, I plan to hurry after her." — Cado (Tears of the Kingdom)
- ↑ "I believe there is something related to the geoglyphs somewhere within this temple. I am searching, but so far, it has been in vain. The chambers here are enormous, so it will be a difficult task at best. Where could it be..." — Impa (Tears of the Kingdom)
- ↑ "Ahhh. This place..." — Impa (Tears of the Kingdom)
"Lady Impa, let's head down. We must investigate up close..." — Cado (Tears of the Kingdom) - ↑ "There, upon the walls... Are those not...geoglyphs?! Hm. What could this mean?" — Impa (Tears of the Kingdom)
- ↑ "As for the next painting..." — Impa (Tears of the Kingdom)
"According to the floor map, it is near Rito Village." — Impa (Tears of the Kingdom) - ↑ "It seems the locations of the other geoglyphs from the wall are marked on the floor map as well." — Cado (Tears of the Kingdom)
- ↑ "I can hardly believe what my eyes behold. Who could have guessed this old ruin still held such secrets?" — Impa (Tears of the Kingdom)
"It is said that the geoglyphs appeared all over Hyrule during the Upheaval when Princess Zelda went missing. Hm. How are they connected to these images here..." — Impa (Tears of the Kingdom)
"There is no time to dawdle! Let us hurry and investigate the remaining geoglyphs." — Impa (Tears of the Kingdom) - ↑ "Oh! L-Lady Impa... Perhaps you should rest a bit before such a trying journey." — Cado (Tears of the Kingdom)
- ↑ "I see... So the Dragon's Tears were shed by Princess Zelda when she transformed. And the geoglyphs were drawn by an ancient people who touched those memories and saw visions, as you did. Perhaps in the past they were more attuned to that sort of thing than the people of today. Hm... I understand now. So that is the truth of it all. Link. If all of the memories you saw are true, then that means... Since our Princess Zelda has become the Light Dragon, she can never again return to her original form. It is...painfully tragic. Our dear Princess Zelda... No. It cannot be!" — Impa (Tears of the Kingdom)
- ↑ "There must be a way...some method to restore Princess Zelda to her former self. Link, I will return to Kakariko Village and review the ancient literature once more. That is the most I can do to help Princess Zelda..." — Impa (Tears of the Kingdom)
- ↑ "I suppose our journey has come to an end... I think I will return to the village alongside Lady Impa." — Cado (Tears of the Kingdom)