Forsaken Fortress Room
The Forsaken Fortress Room is a location in The Wind Waker.[1]
Features and Overview
The Forsaken Fortress Room is one of the Rooms in the Nintendo Gallery, located behind the door opposite Carlov's counter. It contains Figurines of all Bosses and Minibosses. The wallpaper design is based on the Forsaken Fortress, hence the name of the Room.
Like every other Room, a note is pinned on the wall to the left of the door walking in. It gives instructions on how to view figurines.
Viewing your favorite figurines:
![]()
![]() Move Up and Down
Move Up and Down
![]()
![]() Rotate
Rotate
![]() Zoom by Tilting Up and Down
Zoom by Tilting Up and Down
![]() View Explanation
View Explanation
![]() Quit
Quit
List of Figurines
There are a total of 18 Figurines in the Forsaken Fortress Room.
| Figurine |  Big Octo |
|---|---|
| Description | Habitat: Great Sea |
| Notes | Permanently missable; Pictograph must be taken before all six are defeated. |
| Figurine |  Darknut |
| Description | Habitat: Tower of the Gods |
| Notes | Obtained with a Pictograph of any Darknut without a cape or Shield. |
| Figurine |  Darknut |
| Description | Habitat: Earth Temple |
| Notes | Obtained with a Pictograph of any Darknut with a Shield but no cape. |
| Figurine |  Ganondorf |
| Description | Base of Operations: Ganon's Castle |
| Notes | Can be obtained by taking a Pictograph during battle, then Saving and restarting gameplay outside the battle. Otherwise, requires a Legendary Pictograph. |
| Figurine |  Gohdan, the Great Arbiter |
| Description | Habitat: Tower of the Gods |
| Notes | Pictograph can be taken after Gohdan is defeated. |
| Figurine |  Gohma |
| Description | Habitat: Dragon Roost Island |
| Notes | During the first quest, can only be obtained with a Pictograph taken during the rematch in Ganon's Tower. |
| Figurine |  The Monstrous Helmaroc King |
| Description | Habitat: Forsaken Fortress |
| Notes | Permanently missable; Pictograph must be taken before it is defeated. |
| Figurine |  Jalhalla, Protector of the Seal |
| Description | Habitat: Earth Temple |
| Notes | — |
| Figurine |  Kalle Demos |
| Description | Habitat: Forbidden Woods |
| Notes | — |
| Figurine |  Mighty Darknut |
| Description | Habitat: Hyrule Castle |
| Notes | — |
| Figurine |  Moblin |
| Description | Habitat: Forsaken Fortress |
| Notes | — |
| Figurine |  Molgera, Protector of the Seal |
| Description | Habitat: Wind Temple |
| Notes | — |
| Figurine |  Mothula |
| Description | Habitat: Forbidden Woods |
| Notes | Can be obtained with a Pictograph of either the Enemy or the Miniboss. |
| Figurine |  Phantom Ganon |
| Description | Habitat: Forsaken Fortress |
| Notes | Permanently missable; Pictograph must be taken before he is defeated. |
| Figurine |  Puppet Ganon |
| Description | Habitat: Ganon's Castle |
| Notes | Permanently missable; Pictograph must be taken before it is defeated. |
| Figurine |  Stalfos |
| Description | Habitat: Earth Temple |
| Notes | — |
| Figurine |  Wizzrobe |
| Description | Habitat: Tower of the Gods |
| Notes | — |
| Figurine |  Wizzrobe |
| Description | Habitat: Wind Temple |
| Notes | Permanently missable; Pictograph must be taken before it is defeated. |
| Figurine | Description | Notes |
|---|---|---|
Big Octo | Habitat: Great Sea | Permanently missable; Pictograph must be taken before all six are defeated. |
Darknut | Habitat: Tower of the Gods | Obtained with a Pictograph of any Darknut without a cape or Shield. |
Darknut | Habitat: Earth Temple | Obtained with a Pictograph of any Darknut with a Shield but no cape. |
Ganondorf | Base of Operations: Ganon's Castle | Can be obtained by taking a Pictograph during battle, then Saving and restarting gameplay outside the battle. Otherwise, requires a Legendary Pictograph. |
Gohdan, the Great Arbiter | Habitat: Tower of the Gods | Pictograph can be taken after Gohdan is defeated. |
Gohma | Habitat: Dragon Roost Island | During the first quest, can only be obtained with a Pictograph taken during the rematch in Ganon's Tower. |
The Monstrous Helmaroc King | Habitat: Forsaken Fortress | Permanently missable; Pictograph must be taken before it is defeated. |
Jalhalla, Protector of the Seal | Habitat: Earth Temple | — |
Kalle Demos | Habitat: Forbidden Woods | — |
Mighty Darknut | Habitat: Hyrule Castle | — |
Moblin | Habitat: Forsaken Fortress | — |
Molgera, Protector of the Seal | Habitat: Wind Temple | — |
Mothula | Habitat: Forbidden Woods | Can be obtained with a Pictograph of either the Enemy or the Miniboss. |
Phantom Ganon | Habitat: Forsaken Fortress | Permanently missable; Pictograph must be taken before he is defeated. |
Puppet Ganon | Habitat: Ganon's Castle | Permanently missable; Pictograph must be taken before it is defeated. |
Stalfos | Habitat: Earth Temple | — |
Wizzrobe | Habitat: Tower of the Gods | — |
Wizzrobe | Habitat: Wind Temple | Permanently missable; Pictograph must be taken before it is defeated. |
Nomenclature
| Language | Names | |
|---|---|---|
| This table was generated using translation pages. To request an addition, please contact a staff member with a reference. | ||
Gallery

-
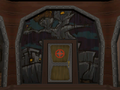
The door to the Forsaken Fortress Room from The Wind Waker
-
The door to the Forsaken Fortress Room from The Wind Waker HD

References
- ↑ The Legend of Zelda: The Wind Waker HD PRIMA Official Game Guide, Prima Games, pg. 350