Template:OoTNavMap: Difference between revisions
Jump to navigation
Jump to search
PhantomCaleb (talk | contribs) (From the Places in OOT NavMap. Thanks, Dany!) |
m (→Usage: replaced: Category:Imagemap Templates → Category:Imagemap templates) |
||
| (7 intermediate revisions by 4 users not shown) | |||
| Line 1: | Line 1: | ||
{{Clear}} | {{Clear}} | ||
<center> | <center> | ||
{| style="border-collapse: collapse; text-align: center; width: 240px; background-color: # | {| style="border-collapse: collapse; text-align: center; width: 240px; background-color: #1d578b;" | ||
! colspan="2" style="border: 1px solid # | ! colspan="2" style="border: 1px solid #426787; padding: 5px; background-color: #1d578b;" | Regions in {{OoT}} | ||
|- | |- | ||
| style="border: 1px solid # | | style="border: 1px solid #426787; padding: 5px;" | | ||
<imagemap> | <imagemap> | ||
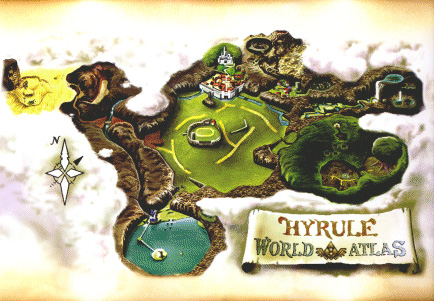
File:Hyrule Image Map.jpg | File:Hyrule Image Map.jpg | ||
| Line 22: | Line 22: | ||
rect 1 58 45 111 [[Desert Colossus]] | rect 1 58 45 111 [[Desert Colossus]] | ||
rect 263 76 303 100 [[Kakariko Village]] | rect 263 76 303 100 [[Kakariko Village]] | ||
rect 305 72 340 98 [[Kakariko Graveyard]] | rect 305 72 340 98 [[Kakariko Village Graveyard|Kakariko Graveyard]] | ||
rect 267 26 302 50 [[Death Mountain]] | rect 267 26 302 50 [[Death Mountain]] | ||
rect 242 33 269 55 [[Goron City]] | rect 242 33 269 55 [[Goron City]] | ||
| Line 37: | Line 37: | ||
==Explanation== | ==Explanation== | ||
This template provides an easy way to navigate [[Hyrule]] in | This template provides an easy way to navigate [[Hyrule]] in {{OoT}}. | ||
==Usage== | ==Usage== | ||
| Line 43: | Line 43: | ||
{{NoWikiTemp|Normal}} | {{NoWikiTemp|Normal}} | ||
[[Category: | [[Category:Imagemap templates|{{PAGENAME}}]]</noinclude> | ||
Latest revision as of 14:46, 9 July 2023
| Regions in Ocarina of Time | |
|---|---|
 Click on a location | |
Explanation
This template provides an easy way to navigate Hyrule in Ocarina of Time.
Usage
To use this template, type:
{{OoTNavMap}}