Mirror Chamber: Difference between revisions
m (→Gallery) |
(BAM! take THAT, you puny {{sources}} tag!) |
||
| Line 7: | Line 7: | ||
|inhab = | |inhab = | ||
|items = [[Mirror of Twilight]] | |items = [[Mirror of Twilight]] | ||
|related = [[Arbiter's Grounds]]<br>[[Gerudo Desert]] | |related = [[Arbiter's Grounds]]<br>[[Gerudo Desert]]<br>[[Twilight Realm]]<br>[[Palace of Twilight]] | ||
|theme music = | |theme music = | ||
}} | }} | ||
The Mirror Chamber | The '''Mirror Chamber''' is a location in ''[[The Legend of Zelda: Twilight Princess|Twilight Princess]]''. It is an ancient, open-air atrium located above the [[Arbiter's Grounds]] that houses not only the [[Sage]]s, but the [[Mirror of Twilight]] and thus the only entrance to the [[Twilight Realm]]. Link cannot gain access to the Mirror Chamber until after he defeats [[Stallord]], the boss of the Arbiter's Grounds. | ||
The Mirror Chamber resembles the [[Wikipedia:Colosseum|Roman Colisseum]] in structure, and boasts six, great equidistant spires that serve as symbolic insignias of the Sages that oversee the chamber. One of the spire tops is shattered, symbolizing the death of the Water Sage at the hands of [[Ganondorf]]. | |||
==History== | |||
Prior to the events of ''Twilight Princess'', [[Ganondorf]] was put to trial by the [[Seven Sages]] in the Mirror Chamber.<ref>{{cite|In all of his fury and might, he was blind to any danger, and thus was he exposed, subdued, and brought to justice.|A Sage|Twilight Princess}}</ref> However, despite having been struck by the [[Sword of the Sages]] in an attempt to execute him, Ganondorf was able to break free of his Sage-given shackles using the [[Triforce of Power]], killing the Sage of Water in the process.<ref>{{cite|By some divine prank, he, too, had been blessed with the chosen | |||
power of the gods. His abiding hatred and lust for power turned to purest malice...|A Sage|Twilight Princess}}</ref> The Sages then quickly proceeded to send Ganondorf to the Twilight Realm via the Mirror of Twilight, located at the rear of the chamber. | |||
When Link arrives at the Chamber, only a statue resembling the [[Goddess of Sand]] resides within, with no indication of the Mirror of Twilight or the large, [[Portal Stone|black monolith]] that had chained Ganondorf in the past. After riding atop the statue and using the [[Spinner]] at the apex of the large structure, the statue itself dips into the sand, raising not only the black stone, but the Mirror of Twilight itself. [[Midna]], however, realizes that only one-fourth of the Mirror is in tact, and it is at this point that the Sages make their appearance and explain that [[Zant]] has fragmented the mirror with the help of Ganondorf's "mighty magic," not having been able to completely shatter it due to him being the false king of the Twilight Realm.<ref>{{Cite|You seek it...but the Mirror of Twilight has been fragmented by mighty magic. That magic is a dark power that only he possesses... His name is... Ganondorf.|Sages|Twilight Princess}}</ref> The Sages then reveal the location of the three missing shards: [[Snowpeak]], [[Sacred Grove]], and the [[City in the Sky]].<ref>{{cite|Only the true leader of the Twili can utterly destroy the Mirror of Twilight...so Zant could merely break it into pieces. Once broken by magic, the Mirror of Twilight became fragments, which even now lie hidden across the land of Hyrule. One is in the snowy mountain heights... One is in an ancient grove... And one is in the heavens...|The Sages|Twilight Princess}}</ref> Once the young hero and Midna succeed in gathering the three [[Mirror Shard]]s, they return to the Mirror Chamber to reassemble the Mirror of Twilight and enter the [[Palace of Twilight]] to ultimately defeat Zant. | |||
During the ending credits, Link, Princess Zelda and Midna gather at the Mirror Chamber to bid farewell to the Twilight Princess as she returns to her realm. However, just as she is about to depart, she sheds a tear and uses it to completely shatter the Mirror of Twilight, thus destroying the only connection between Hyrule and the Twilight Realm.<ref>{{cite|Well, the princess spoke truly: as long as that mirror's around, we could meet again...|Midna|Twilight Princess}}</ref> | |||
==Gallery== | ==Gallery== | ||
<gallery> | <gallery> | ||
File:Midna's Farewell.jpg|Link, Zelda and Midna gathered at the Mirror Chamber, as seen in the game's ending | |||
File:Midna's Farewell 6.jpg|Midna running back to the take portal to the Twilight Realm, as seen in the game's ending | |||
File:Mirror Chamber 2.jpg|Link and Zelda standing in the Mirror Chamber, as seen in the game's ending | File:Mirror Chamber 2.jpg|Link and Zelda standing in the Mirror Chamber, as seen in the game's ending | ||
File:MirrorChamber.png|The rising of the Goddess Statue in the Mirror Chamber atop the Arbiter's Grounds | File:MirrorChamber.png|The rising of the Goddess Statue in the Mirror Chamber atop the Arbiter's Grounds | ||
File:MirrorChamber2.png|The Mirror of Twilight condemning Ganondorf to the Twilight Realm within the Mirror Chamber | File:MirrorChamber2.png|The Mirror of Twilight condemning Ganondorf to the Twilight Realm within the Mirror Chamber | ||
</gallery> | </gallery> | ||
< | |||
==References== | |||
<div class="references-small"> | |||
<references/> | |||
</div> | |||
[[Category:Places]] | [[Category:Places]] | ||
[[Category:Places in The Legend of Zelda: Twilight Princess]]{{names|added_by_bot|Japanese=|Spanish(SP)=Circo del Espejo|French=Chambre du miroir|German=|Italian=}} | [[Category:Places in The Legend of Zelda: Twilight Princess]] | ||
<br>{{names|added_by_bot|Japanese=|Spanish(SP)=Circo del Espejo|French=Chambre du miroir|German=|Italian=}} | |||
Revision as of 02:43, 6 July 2010
The Mirror Chamber is a location in Twilight Princess. It is an ancient, open-air atrium located above the Arbiter's Grounds that houses not only the Sages, but the Mirror of Twilight and thus the only entrance to the Twilight Realm. Link cannot gain access to the Mirror Chamber until after he defeats Stallord, the boss of the Arbiter's Grounds.
The Mirror Chamber resembles the Roman Colisseum in structure, and boasts six, great equidistant spires that serve as symbolic insignias of the Sages that oversee the chamber. One of the spire tops is shattered, symbolizing the death of the Water Sage at the hands of Ganondorf.
History
Prior to the events of Twilight Princess, Ganondorf was put to trial by the Seven Sages in the Mirror Chamber.[1] However, despite having been struck by the Sword of the Sages in an attempt to execute him, Ganondorf was able to break free of his Sage-given shackles using the Triforce of Power, killing the Sage of Water in the process.[2] The Sages then quickly proceeded to send Ganondorf to the Twilight Realm via the Mirror of Twilight, located at the rear of the chamber.
When Link arrives at the Chamber, only a statue resembling the Goddess of Sand resides within, with no indication of the Mirror of Twilight or the large, black monolith that had chained Ganondorf in the past. After riding atop the statue and using the Spinner at the apex of the large structure, the statue itself dips into the sand, raising not only the black stone, but the Mirror of Twilight itself. Midna, however, realizes that only one-fourth of the Mirror is in tact, and it is at this point that the Sages make their appearance and explain that Zant has fragmented the mirror with the help of Ganondorf's "mighty magic," not having been able to completely shatter it due to him being the false king of the Twilight Realm.[3] The Sages then reveal the location of the three missing shards: Snowpeak, Sacred Grove, and the City in the Sky.[4] Once the young hero and Midna succeed in gathering the three Mirror Shards, they return to the Mirror Chamber to reassemble the Mirror of Twilight and enter the Palace of Twilight to ultimately defeat Zant.
During the ending credits, Link, Princess Zelda and Midna gather at the Mirror Chamber to bid farewell to the Twilight Princess as she returns to her realm. However, just as she is about to depart, she sheds a tear and uses it to completely shatter the Mirror of Twilight, thus destroying the only connection between Hyrule and the Twilight Realm.[5]
Gallery
-
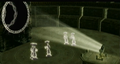
Link, Zelda and Midna gathered at the Mirror Chamber, as seen in the game's ending
-
Midna running back to the take portal to the Twilight Realm, as seen in the game's ending
-
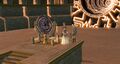
Link and Zelda standing in the Mirror Chamber, as seen in the game's ending
-
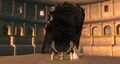
The rising of the Goddess Statue in the Mirror Chamber atop the Arbiter's Grounds
-
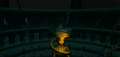
The Mirror of Twilight condemning Ganondorf to the Twilight Realm within the Mirror Chamber


References
- ↑ "In all of his fury and might, he was blind to any danger, and thus was he exposed, subdued, and brought to justice." — A Sage (Twilight Princess)
- ↑ "By some divine prank, he, too, had been blessed with the chosen power of the gods. His abiding hatred and lust for power turned to purest malice..." — A Sage (Twilight Princess)
- ↑ "You seek it...but the Mirror of Twilight has been fragmented by mighty magic. That magic is a dark power that only he possesses... His name is... Ganondorf." — Sages (Twilight Princess)
- ↑ "Only the true leader of the Twili can utterly destroy the Mirror of Twilight...so Zant could merely break it into pieces. Once broken by magic, the Mirror of Twilight became fragments, which even now lie hidden across the land of Hyrule. One is in the snowy mountain heights... One is in an ancient grove... And one is in the heavens..." — The Sages (Twilight Princess)
- ↑ "Well, the princess spoke truly: as long as that mirror's around, we could meet again..." — Midna (Twilight Princess)
| Language | Name | |
|---|---|---|