Bosses in Skyward Sword: Difference between revisions
Jump to navigation
Jump to search

(Let's keep the renders, as they're more aesthetically pleasing. Half the model images are missing, and some have backgrounds while others don't.) |
m (→{{Plural|SS|Sub-Boss}}: fixes Stalfos images) |
||
| (3 intermediate revisions by 2 users not shown) | |||
| Line 4: | Line 4: | ||
=={{Plural|SS|Sub-Boss}}== | =={{Plural|SS|Sub-Boss}}== | ||
<gallery class="center"> | <gallery class="center"> | ||
File:SS Stalfos Render.png|{{Term|SS|Stalfos|link}}<br>''({{Term|SS|Skyview Temple|link}})'' {{Exp|(First Visit)}} | File:SS Stalfos Render.png|{{Term|SS|Stalfos|link}}<br/>''({{Term|SS|Skyview Temple|link}})'' {{Exp|(First Visit)}} | ||
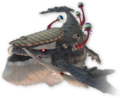
File:SS Lizalfos | File:SS Lizalfos Model.png|{{Term|SS|Lizalfos|link}}<br/>''({{Term|SS|Earth Temple|link}})'' | ||
File:SS Stalfos Render.png|Three {{Plural|SS|Stalfos|link}}<br>''({{Term|SS|Skyview Temple|link}})'' {{Exp|(Second Visit)}} | File:SS Stalfos Render.png|Three {{Plural|SS|Stalfos|link}}<br/>''({{Term|SS|Skyview Temple|link}})'' {{Exp|(Second Visit)}} | ||
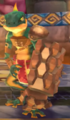
File:SS Stalmaster Render.png|{{Term|SS|Stalmaster|link}}<br>''({{Term|SS|Ancient Cistern|link}})''<br>''({{Term|SS|Sky Keep|link}})'' | File:SS Stalmaster Render.png|{{Term|SS|Stalmaster|link}}<br/>''({{Term|SS|Ancient Cistern|link}})''<br/>''({{Term|SS|Sky Keep|link}})'' | ||
File:SS Moldarach | File:SS Moldarach Model.png|{{Term|SS|Moldarach|link}}<br/>''({{Term|SS|Lanayru Shipyard|link}})'' | ||
File:SS LD-002G Scervo | File:SS LD-002G Scervo Model.png|{{Term|SS|LD-002G Scervo|link}}<br/>''({{Term|SS|Sandship|link}})'' | ||
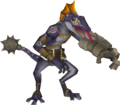
File:SS Dark Lizalfos Model.png|{{Term|SS|Dark Lizalfos|link}}<br>''({{Term|SS|Fire Sanctuary (Dungeon)|link}})'' | File:SS Dark Lizalfos Model.png|{{Term|SS|Dark Lizalfos|link}}<br/>''({{Term|SS|Fire Sanctuary (Dungeon)|link}})'' | ||
File:SS Magmanos | File:SS Magmanos Model.png|{{Term|SS|Magmanos|link}}<br/>''({{Term|SS|Fire Sanctuary (Dungeon)|link}})'' | ||
File:SS Moldorm Model.png|{{Term|SS|Moldorm|link}}<br>''({{Term|SS|Fire Sanctuary (Dungeon)|link}})''<br>''({{Term|SS|Sky Keep|link}})'' | File:SS Moldorm Model.png|{{Term|SS|Moldorm|link}}<br/>''({{Term|SS|Fire Sanctuary (Dungeon)|link}})''<br/>''({{Term|SS|Sky Keep|link}})'' | ||
File:SS LD-003D Dreadfuse Model.png|{{Term|SS|Dreadfuse|link}}<br>''({{Term|SS|Sky Keep|link}})'' | File:SS LD-003D Dreadfuse Model.png|{{Term|SS|Dreadfuse|link}}<br/>''({{Term|SS|Sky Keep|link}})'' | ||
File:SS Metal Shield Moblin Model.png|{{Term|SS|Metal Shield Moblin|link}}<br>''({{Term|SS|Sky Keep|link}})'' | File:SS Metal Shield Moblin Model.png|{{Term|SS|Metal Shield Moblin|link}}<br/>''({{Term|SS|Sky Keep|link}})'' | ||
</gallery> | </gallery> | ||
=={{Plural|SS|Boss}}== | =={{Plural|SS|Boss}}== | ||
<gallery class="center"> | <gallery class="center"> | ||
File:SS Ghirahim Render.png|Demon Lord: {{Term|SS|Ghirahim|link}} (''First Battle'')<br>''({{Term|SS|Skyview Temple|link}})''{{exp|First Visit}} | File:SS Ghirahim Render.png|Demon Lord: {{Term|SS|Ghirahim|link}} (''First Battle'')<br/>''({{Term|SS|Skyview Temple|link}})''{{exp|First Visit}} | ||
File:SS Scaldera Render.png|Pyroclastic Fiend: {{Term|SS|Scaldera|link}}<br>''({{Term|SS|Earth Temple|link}})'' | File:SS Scaldera Render.png|Pyroclastic Fiend: {{Term|SS|Scaldera|link}}<br/>''({{Term|SS|Earth Temple|link}})'' | ||
File:SS Moldarach | File:SS Moldarach Model.png|Thousand-Year Arachnid: {{Term|SS|Moldarach|link}}<br/>''({{Term|SS|Lanayru Mining Facility|link}})'' | ||
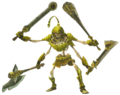
File:SS The Imprisoned | File:SS The Imprisoned Model.png|{{Term|SS|The Imprisoned|link}}<br/>(''First Battle'')<br/>''({{Term|SS|Sealed Grounds|link}})'' | ||
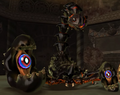
File:SS Koloktos | File:SS Koloktos Model.png|Ancient Automaton: {{Term|SS|Koloktos|link}}<br/>''({{Term|SS|Ancient Cistern|link}})'' | ||
File:SS Tentalus Render.png|Abyssal Leviathan: {{Term|SS|Tentalus|link}}<br>''({{Term|SS|Sandship|link}})'' | File:SS Tentalus Render.png|Abyssal Leviathan: {{Term|SS|Tentalus|link}}<br/>''({{Term|SS|Sandship|link}})'' | ||
File:SS Ghirahim Render 2.png|Demon Lord: {{Term|SS|Ghirahim|link}} (''Second Battle'')<br>''({{Term|SS|Fire Sanctuary (Dungeon)|link}})'' | File:SS Ghirahim Render 2.png|Demon Lord: {{Term|SS|Ghirahim|link}} (''Second Battle'')<br/>''({{Term|SS|Fire Sanctuary (Dungeon)|link}})'' | ||
File:SS The Imprisoned Model 2.png|{{Term|SS|The Imprisoned|link}}<br>(''Second Battle'')<br>''({{Term|SS|Sealed Grounds|link}})'' | File:SS The Imprisoned Model 2.png|{{Term|SS|The Imprisoned|link}}<br/>(''Second Battle'')<br/>''({{Term|SS|Sealed Grounds|link}})'' | ||
File:SS Levias Possessed Render.png|Great Spirit of the Skies: {{Term|SS|Levias|link}}<br>''({{Term|SS|Thunderhead|link}})'' | File:SS Levias Possessed Render.png|Great Spirit of the Skies: {{Term|SS|Levias|link}}<br/>''({{Term|SS|Thunderhead|link}})'' | ||
File:SS Bilocyte Model.png|Ocular Parasite: {{Term|SS|Bilocyte|link}}<br>''({{Term|SS|Thunderhead|link}})'' | File:SS Bilocyte Model.png|Ocular Parasite: {{Term|SS|Bilocyte|link}}<br/>''({{Term|SS|Thunderhead|link}})'' | ||
File:SS The Imprisoned Model 4.png|{{Term|SS|The Imprisoned|link}}<br>(''Third Battle'')<br>''({{Term|SS|Sealed Grounds|link}})'' | File:SS The Imprisoned Model 4.png|{{Term|SS|The Imprisoned|link}}<br/>(''Third Battle'')<br/>''({{Term|SS|Sealed Grounds|link}})'' | ||
</gallery> | </gallery> | ||
<gallery class="center"> | <gallery class="center"> | ||
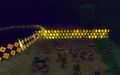
File:SS Horde Battle.png|{{Term|SS|Horde Battle|link}}<br>''({{Term|SS|Hylia's Realm|link}})'' | File:SS Horde Battle.png|{{Term|SS|Horde Battle|link}}<br/>''({{Term|SS|Hylia's Realm|link}})'' | ||
File:SS Ghirahim Render 3.png|Demon Lord: {{Term|SS|Ghirahim|link}}<br>(''Third Battle'')<br>''({{Term|SS|Hylia's Realm|link}})'' | File:SS Ghirahim Render 3.png|Demon Lord: {{Term|SS|Ghirahim|link}}<br/>(''Third Battle'')<br/>''({{Term|SS|Hylia's Realm|link}})'' | ||
File:SS Demise | File:SS Demise Model.png|{{Term|SS|Demise|link}}<br/>''({{Term|SS|Demise's Realm|link}})'' | ||
</gallery> | </gallery> | ||
Latest revision as of 22:06, 4 May 2023
The following is a list of all Bosses in Skyward Sword.
Sub-Bosses
-

-
-
Three Stalfos
(Skyview Temple)
-
-
-

-
-

-
-
-


Bosses
-

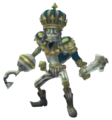
Demon Lord: Ghirahim (First Battle)
(Skyview Temple)
-

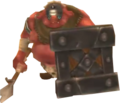
Pyroclastic Fiend: Scaldera
(Earth Temple) -
Thousand-Year Arachnid: Moldarach
(Lanayru Mining Facility) -
The Imprisoned
(First Battle)
(Sealed Grounds) -

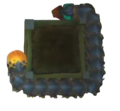
Ancient Automaton: Koloktos
(Ancient Cistern) -

-

Demon Lord: Ghirahim (Second Battle)
(Fire Sanctuary) -

The Imprisoned
(Second Battle)
(Sealed Grounds) -
Great Spirit of the Skies: Levias
(Thunderhead) -

Ocular Parasite: Bilocyte
(Thunderhead) -

The Imprisoned
(Third Battle)
(Sealed Grounds)


-
-

Demon Lord: Ghirahim
(Third Battle)
(Hylia's Realm) -