Bosses in The Wind Waker: Difference between revisions
Jump to navigation
Jump to search

mNo edit summary |
|||
| (39 intermediate revisions by 14 users not shown) | |||
| Line 1: | Line 1: | ||
<noinclude>A chronological list of the bosses and mini-bosses which appear in {{TWW}}.</noinclude> | <noinclude>{{DISPLAYTITLE:Bosses in {{TWW|-}}}} | ||
A chronological list of the bosses and mini-bosses which appear in {{TWW}}. | |||
</noinclude> | |||
=='''[[Boss]]es'''== | |||
<gallery class="center"> | |||
File:TWW Gohma Artwork.png|[[Gohma]]<br/>{{Small|''([[Dragon Roost Cavern]])''}} | |||
File:TWW Kalle Demos Artwork.png|[[Kalle Demos]]<br/>{{Small|''([[Forbidden Woods]])''}} | |||
File:TWW Gohdan Artwork.png|[[Gohdan]], The Great Arbiter<br/>{{Small|''([[Tower of the Gods]])''}} | |||
File:TWW Helmaroc King Artwork.png|The Monstrous [[Helmaroc King]]<br/>{{Small|''([[Forsaken Fortress]])''}} | |||
File:TWW Jalhalla Artwork.png|[[Jalhalla]], Protector of the Seal<br/>{{Small|''({{Term|TWW|Earth Temple|link}})''}} | |||
File:TWW Molgera Artwork.png|[[Molgera]], Protector of the Seal<br/>{{Small|''([[Wind Temple]])''}} | |||
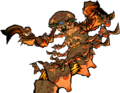
File:TWW Puppet Ganon Artwork.png|[[Puppet Ganon]]<br/>{{Small|''({{Term|TWW|Ganon's Castle|link}})''}} | |||
File:TWW Ganondorf Artwork.png|[[Ganondorf]]<br/>''{{Small|({{Term|TWW|Ganon's Castle|link}})''}} | |||
</gallery><noinclude> | |||
=='''[[ | =='''[[Sub-Boss]]es'''== | ||
<gallery class="center"> | <gallery class="center"> | ||
File: | File:TWW Bokoblin Artwork.png|[[Bokoblin]]<br/>{{Small|''([[Forsaken Fortress]])''}}<br/>{{Small|''([[Dragon Roost Cavern]]{{Exp|×2}})''}} | ||
File:Moblin | File:TWW Moblin Artwork.png|[[Moblin]]<br/>{{Small|''([[Dragon Roost Cavern]])''}} | ||
File:Mothula.png|[[Mothula]]<br> | File:TWW Mothula Artwork.png|[[Mothula]]<br/>{{Small|''([[Forbidden Woods]])''}} | ||
File:TWW Darknut.png|[[Darknut]]<br> | File:TWW Darknut Artwork.png|[[Darknut]]<br/>{{Small|''([[Tower of the Gods]])''}} | ||
File: | File:TWW Phantom Ganon Artwork.png|[[Phantom Ganon]]<br/>{{Small|''([[Forsaken Fortress]])''}}<br/>{{Small|''({{Term|TWW|Ganon's Castle|link}})''}} | ||
File: | File:TWW Stalfos Artwork.png|[[Stalfos]]<br/>{{Small|''({{Term|TWW|Earth Temple|link}})''}} | ||
File:Wizzrobe.png|[[Wizzrobe | File:TWW Wizzrobe Artwork.png|[[Wizzrobe (Boss)|Wizzrobe]]<br/>{{Small|''([[Wind Temple]])''}} | ||
File: | File:TWW Mighty Darknut Artwork.png|[[Mighty Darknut]]<br/>{{Small|''([[Hyrule Castle#The Wind Waker|Hyrule Castle]]{{Exp|×2}})''}} | ||
File: | File:TWW Gohma Artwork.png|[[Gohma#The Wind Waker|Gohma]]<br/>{{Small|''({{Term|TWW|Ganon's Castle|link}})''}} | ||
File:TWW Kalle Demos.png|[[Kalle Demos]]<br> | File:TWW Kalle Demos Artwork.png|[[Kalle Demos]]<br/>{{Small|''({{Term|TWW|Ganon's Castle|link}})''}} | ||
File:TWW Jalhalla.png|[[Jalhalla]]<br> | File:TWW Jalhalla Artwork.png|[[Jalhalla]]<br/>{{Small|''({{Term|TWW|Ganon's Castle|link}})''}} | ||
File:Molgera.png|[[Molgera]]<br> | File:TWW Molgera Artwork.png|[[Molgera]]<br/>{{Small|''({{Term|TWW|Ganon's Castle|link}})''}} | ||
File:Big Octo Figurine | File:TWW Big Octo Figurine Model.png|[[Big Octo]]<br/>{{Small|''([[Great Sea]])''}} | ||
</gallery> | </gallery> | ||
{{BossNav}}[[Category:Boss Galleries]]</noinclude> | {{BossNav}}[[Category:Boss Galleries]]</noinclude> | ||
Latest revision as of 09:02, 24 April 2024
A chronological list of the bosses and mini-bosses which appear in The Wind Waker.
Bosses
-
-

-
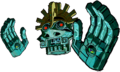
Gohdan, The Great Arbiter
(Tower of the Gods) -
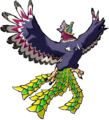
The Monstrous Helmaroc King
(Forsaken Fortress) -

Jalhalla, Protector of the Seal
(Earth Temple) -
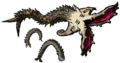
Molgera, Protector of the Seal
(Wind Temple) -

-


Sub-Bosses


