Tower of the Gods: Difference between revisions
m (Minor addition) |
(Minor expansion. Thanks so much to Zelda Legends, where I found the KORL's quote for the reference I wanted to add =D) |
||
| Line 3: | Line 3: | ||
|location = The Tower of the Gods | |location = The Tower of the Gods | ||
|game = ''[[The Legend of Zelda: The Wind Waker|The Wind Waker]]'' | |game = ''[[The Legend of Zelda: The Wind Waker|The Wind Waker]]'' | ||
|item = [[Bow|Hero's Bow]]<br>[[Treasure Chart]]s x2 | |item = [[Command Melody]]<br>[[Bow|Hero's Bow]]<br>[[Treasure Chart]]s x2 | ||
|mini-boss = [[Darknut]] | |mini-boss = [[Darknut]] | ||
|boss = [[Gohdan]] | |boss = [[Gohdan]] | ||
| Line 21: | Line 21: | ||
[[File:Revealing the TotG.png|thumb|left|The three pearls summoning the Tower of the Gods]] | [[File:Revealing the TotG.png|thumb|left|The three pearls summoning the Tower of the Gods]] | ||
The tower is hidden deep under the waves and requires all three of the [[Goddess Pearls]] to pull it from the depths. [[Link]] must travel to three [[Triangle Islands]] and place the correct Pearl on their respective statues. The final statue will then explode and send Link shooting through the air and slamming into a giant wall. Luckily, the [[King of Red Lions]] arrives and guides Link into the entrance of the Tower. | The tower is hidden deep under the waves and requires all three of the [[Goddess Pearls]] to pull it from the depths. [[Link]] must travel to three [[Triangle Islands]] and place the correct Pearl on their respective statues. The final statue will then explode and send Link shooting through the air and slamming into a giant wall. Luckily, the [[King of Red Lions]] arrives and guides Link into the entrance of the Tower. | ||
{{clear|left}} | |||
==Themes and Navigation== | ==Themes and Navigation== | ||
The dungeon combines elements of water and light, and is separated into three territories: In the first floor, Link and the [[King of Red Lions]] have to move through the water (and with great difficulty, considering the fact that the wind is not blowing here), whose level goes up and down at certain times. As Link explores the rooms, he has to take advantage of the water's changing level so that he can bring statues that open new paths, and ultimately close the main source of water to open new ones so that the path leading to the second floor can be crossed. | The dungeon combines elements of water and light, and is separated into three territories: In the first floor, Link and the [[King of Red Lions]] have to move through the water (and with great difficulty, considering the fact that the wind is not blowing here), whose level goes up and down at certain times. As Link explores the rooms, he has to take advantage of the water's changing level so that he can bring statues that open new paths, and ultimately close the main source of water to open new ones so that the path leading to the second floor can be crossed. | ||
Once there, Link has to separately guide three semi-sentient statues through various obstacles to the central altar. Doing this gives him access to the third floor. There are three destinations on the second floor, each with one statue; Link eventually finds and learns the [[Command Melody]] to telepathically control the statues and bring them to the altar, then finds the [[Bow|Hero's Bow]] to shoot distant targets that activate elevators and platforms. | Once there, Link has to separately guide three semi-sentient statues (named '''Servants of the Tower''' by the [[King of Red Lions]])<ref>{{cite|Link, it is I, the King of Red Lions. I am afraid there are some areas to which you will not be able to bring the servants of the tower. But do not fear leaving them behind! Once you have awakened them, they will wait patiently for your return. Of this I assure you!|King of Red Lions|TWW}}</ref> through various obstacles to the central altar. Doing this gives him access to the third floor. There are three destinations on the second floor, each with one statue; Link eventually finds and learns the [[Command Melody]] to telepathically control the statues and bring them to the altar, then finds the [[Bow|Hero's Bow]] to shoot distant targets that activate elevators and platforms. | ||
Once Link reaches the third floor, he solves a puzzle that rewards him with the [[Key#Boss_Key|Big Key]], then finally crosses a staircase patrolled by [[Kargarok|Kargaroc]] birds and some [[Beamos]] to find the boss's lair. The tower is guarded by [[Gohdan]], a giant floating head and pair of hands, and who serves as the ultimate challenge for the chosen one who visits the tower in search of his fate's goal. The entrance to flooded [[Hyrule]] is nearby this tower, only accessible after the dungeon has been beaten and the bell at the top rings (oddly, that area is accessible only once under normal conditions). | Once Link reaches the third floor, he solves a puzzle that rewards him with the [[Key#Boss_Key|Big Key]], then finally crosses a staircase patrolled by [[Kargarok|Kargaroc]] birds and some [[Beamos]] to find the boss's lair. The tower is guarded by [[Gohdan]], a giant floating head and pair of hands, and who serves as the ultimate challenge for the chosen one who visits the tower in search of his fate's goal. The entrance to flooded [[Hyrule]] is nearby this tower, only accessible after the dungeon has been beaten and the bell at the top rings (oddly, that area is accessible only once under normal conditions). | ||
| Line 55: | Line 55: | ||
File:Tower Of The Gods.png|Map of the Tower of the Gods | File:Tower Of The Gods.png|Map of the Tower of the Gods | ||
</gallery> | </gallery> | ||
==References== | |||
<references/> | |||
<center> | <center> | ||
Revision as of 03:19, 8 January 2011
Template:Dungeons The Tower of the Gods is a sacred tower used by the Gods to test the courage of potential heroes. The tower's main item is the Hero's Bow, and the Command Melody is also learned here.
Fishman's Comment  |
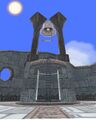
Entrance to the Tower

The tower is hidden deep under the waves and requires all three of the Goddess Pearls to pull it from the depths. Link must travel to three Triangle Islands and place the correct Pearl on their respective statues. The final statue will then explode and send Link shooting through the air and slamming into a giant wall. Luckily, the King of Red Lions arrives and guides Link into the entrance of the Tower.
The dungeon combines elements of water and light, and is separated into three territories: In the first floor, Link and the King of Red Lions have to move through the water (and with great difficulty, considering the fact that the wind is not blowing here), whose level goes up and down at certain times. As Link explores the rooms, he has to take advantage of the water's changing level so that he can bring statues that open new paths, and ultimately close the main source of water to open new ones so that the path leading to the second floor can be crossed.
Once there, Link has to separately guide three semi-sentient statues (named Servants of the Tower by the King of Red Lions)[1] through various obstacles to the central altar. Doing this gives him access to the third floor. There are three destinations on the second floor, each with one statue; Link eventually finds and learns the Command Melody to telepathically control the statues and bring them to the altar, then finds the Hero's Bow to shoot distant targets that activate elevators and platforms.
Once Link reaches the third floor, he solves a puzzle that rewards him with the Big Key, then finally crosses a staircase patrolled by Kargaroc birds and some Beamos to find the boss's lair. The tower is guarded by Gohdan, a giant floating head and pair of hands, and who serves as the ultimate challenge for the chosen one who visits the tower in search of his fate's goal. The entrance to flooded Hyrule is nearby this tower, only accessible after the dungeon has been beaten and the bell at the top rings (oddly, that area is accessible only once under normal conditions).
Minor Enemies and Traps
- Yellow ChuChus
- Bubbles
- Armos
- Armos Knights
- Wizzrobes
- Beamos
- Rats
- Keese
- Moving platforms
Trivia
- When connected by lines, Dragon Roost Island, Forest Haven, and Greatfish Isle form a large triangle; the three Triangle Isles, when connected by lines, creates a smaller triangle attached to the larger one - the entire image created is that of the Triforce, and the Tower of the Gods exists at the dead center of the symbol.
- Like the Great Palace in The Adventure of Link, the tower is used to test the courage of potential heroes.
- The Tower is the tallest structure in the game and can be seen from almost every area of the map grid. It appears to have several dozen floors, but Link only goes through a few and is then teleported to the top.
- With the exception of the Shadow Temple, it is the only dungeon in the The Legend of Zelda series in which a boat can be used for entrance as well as being available for use inside.
- The Final Boss of the Tower, Gohdan, is similar to Bongo Bongo from Ocarina of Time, Ramrock from Oracle of Ages, Mazaal from The Minish Cap, Andross from the Starfox series, and Eyerok from Super Mario 64 due to their possession of two severed hands (and, with the exception of Andross and Bongo Bongo, having eyes on the palms of those hands).
- Tower of the Gods shares similarity to the Temple of Time from Ocarina of Time and Twilight Princess. It mirrors the Temple of Time from Twilight Princess, in that it contains statues which Link is able to control. The interior design for the dungeons is also similar.
- It's one of the only two dungeons in the game without a Warp Jar. The other is Forsaken Fortress.
Gallery
-
The bell that must ring atop the tower to open the gateway to Hyrule beneath the Great Sea
-
Map of the Tower of the Gods

References
- ↑ "Link, it is I, the King of Red Lions. I am afraid there are some areas to which you will not be able to bring the servants of the tower. But do not fear leaving them behind! Once you have awakened them, they will wait patiently for your return. Of this I assure you!" — King of Red Lions (The Wind Waker)
| Islands in The Wind Waker | |||||||||||||||||||||||
|---|---|---|---|---|---|---|---|---|---|---|---|---|---|---|---|---|---|---|---|---|---|---|---|
Click on an island | |||||||||||||||||||||||
| Language | Name | |
|---|---|---|