Sand Temple: Difference between revisions
(+18 images, courtesy of Hylian King =)) |
PhantomCaleb (talk | contribs) (How about this?) |
||
| Line 17: | Line 17: | ||
==Entrance to the Temple== | ==Entrance to the Temple== | ||
{{Main|Three Trials}} | {{Main|Three Trials}} | ||
[[File:Sand Temple Entrance.png|thumb|left|The entrance to the Sand Temple.]] | |||
The dungeon is located within the desert in the [[Sand Realm]], north of the [[Ocean Realm]]. After Link manages to restore the rails that lead to the temple, he must go through three trials in order to reach his destination: [[Rocktite|the big eye that looms in the shadows]], the twisted tunnel, and the impenetrable fortress. The first trial is a replica of the fight against [[Rocktite]], fought previously in a cave southwest of the [[Snow Realm]]; the second trial regards crossing a maze similar to the [[Lost Woods]], and the third trial is beaten by destroying the turrets adhered to the external walls of the temple. | The dungeon is located within the desert in the [[Sand Realm]], north of the [[Ocean Realm]]. After Link manages to restore the rails that lead to the temple, he must go through three trials in order to reach his destination: [[Rocktite|the big eye that looms in the shadows]], the twisted tunnel, and the impenetrable fortress. The first trial is a replica of the fight against [[Rocktite]], fought previously in a cave southwest of the [[Snow Realm]]; the second trial regards crossing a maze similar to the [[Lost Woods]], and the third trial is beaten by destroying the turrets adhered to the external walls of the temple. | ||
{{Clear|left}} | |||
==Themes and Navigation== | ==Themes and Navigation== | ||
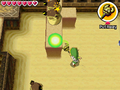
[[File:Sand Temple Block Push.png|thumb|left|Link pushing a heavy object with the Sand Wand.]] | [[File:Sand Temple Block Push.png|thumb|left|Link pushing a heavy object with the Sand Wand.]] | ||
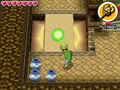
[[File:Sand Temple Puzzle.png|thumb|right|Link solving a puzzle in the Sand Temple with the Sand Wand.]] | |||
In some ways, the dungeons is mildly reminiscent of [[Mutoh's Temple]] from ''[[The Legend of Zelda: Phantom Hourglass|Phantom Hourglass]]'', not only because it's a pyramid as well, but also because of the inner decoration, though the environment is lighter in tone. | In some ways, the dungeons is mildly reminiscent of [[Mutoh's Temple]] from ''[[The Legend of Zelda: Phantom Hourglass|Phantom Hourglass]]'', not only because it's a pyramid as well, but also because of the inner decoration, though the environment is lighter in tone. | ||
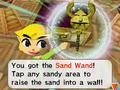
The dungeon forces Link to manipulate sand in order to solve the various traps and puzzles as well as find hidden objects buried within. To do so, the young hero must look for the temple's main item, which is the [[Sand Wand]] (guarded by three [[Stalfos#Size and Strength|Stalfos Warriors]]). The temple is also home to many undead [[Stalfos]] as well as sand enemies known as [[Gerune]] that are immune to all attacks until being hardened with the power of the Sand Wand. With the same item, Link can use sand to solve block puzzles that open special doors. | The dungeon forces Link to manipulate sand in order to solve the various traps and puzzles as well as find hidden objects buried within. To do so, the young hero must look for the temple's main item, which is the [[Sand Wand]] (guarded by three [[Stalfos#Size and Strength|Stalfos Warriors]]). The temple is also home to many undead [[Stalfos]] as well as sand enemies known as [[Gerune]] that are immune to all attacks until being hardened with the power of the Sand Wand. With the same item, Link can use sand to solve block puzzles that open special doors. | ||
| Line 32: | Line 34: | ||
==Gallery== | ==Gallery== | ||
<gallery> | <gallery perrow="5"> | ||
File:Sand Temple Boulder Dodge.png|Link dodging incoming boulders in the Sand Temple. | File:Sand Temple Boulder Dodge.png|Link dodging incoming boulders in the Sand Temple. | ||
File:Sand Temple Eyeball Switch.png|Link attempting to hit an Eyeball Switch by firing an Arrow between the boulders as they pass by. | File:Sand Temple Eyeball Switch.png|Link attempting to hit an Eyeball Switch by firing an Arrow between the boulders as they pass by. | ||
| Line 46: | Line 42: | ||
File:Sand Wand.png|Link obtaining the Sand Wand. | File:Sand Wand.png|Link obtaining the Sand Wand. | ||
File:Sand Temple Rolling Spike.png|Link keeping a rolling spike in place using the Sand Wand. | File:Sand Temple Rolling Spike.png|Link keeping a rolling spike in place using the Sand Wand. | ||
File:Sand Temple Rolling Spike 2.png|Link using the immobilized rolling spike as a bridge. | |||
File:Ergtorok Stunned.png|Link stunning Ergtoroks using the Sand Wand. | File:Ergtorok Stunned.png|Link stunning Ergtoroks using the Sand Wand. | ||
File:Sand Temple Quicksand Path.png|Link making a path with the Sand Wand in order to cross over the quicksand | File:Sand Temple Quicksand Path.png|Link making a path with the Sand Wand in order to cross over the quicksand | ||
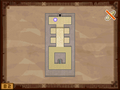
File:Sand Temple Basement 1.png|The map of the first level of the Sand Temple's basement. Treasure Chests are marked on the map | |||
File:Sand Temple Basement 2.png|The map of the second level of the Sand Temple's basement. | |||
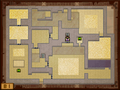
File:Sand Temple Floor 1.png|The first floor of the Sand Temple. | |||
File:Sand Temple Floor 2.png|The second floor of the Sand Temple. Treasure Chests are marked on the map | |||
File:Sand Temple Floor 3.png|The third floor of the Sand Temple. | |||
File:ST Light Arrow Room.png|The map of the room beneath the Sand Temple where the Bow of Light lies. | |||
</gallery> | </gallery> | ||
{{Names | {{Names | ||
|English= Desert Temple | |English= Desert Temple | ||
Revision as of 18:01, 23 August 2011
Template:Stamp Template:Dungeons The Sand Temple is a temple in Spirit Tracks.
Entrance to the Temple

The dungeon is located within the desert in the Sand Realm, north of the Ocean Realm. After Link manages to restore the rails that lead to the temple, he must go through three trials in order to reach his destination: the big eye that looms in the shadows, the twisted tunnel, and the impenetrable fortress. The first trial is a replica of the fight against Rocktite, fought previously in a cave southwest of the Snow Realm; the second trial regards crossing a maze similar to the Lost Woods, and the third trial is beaten by destroying the turrets adhered to the external walls of the temple.


In some ways, the dungeons is mildly reminiscent of Mutoh's Temple from Phantom Hourglass, not only because it's a pyramid as well, but also because of the inner decoration, though the environment is lighter in tone.
The dungeon forces Link to manipulate sand in order to solve the various traps and puzzles as well as find hidden objects buried within. To do so, the young hero must look for the temple's main item, which is the Sand Wand (guarded by three Stalfos Warriors). The temple is also home to many undead Stalfos as well as sand enemies known as Gerune that are immune to all attacks until being hardened with the power of the Sand Wand. With the same item, Link can use sand to solve block puzzles that open special doors.
The resident boss is Skeldritch, a semi-metallic living column armored with cannons that shoot giant rocks. Rather than restore power to the Tower of Spirits, like the other temples within Hyrule, the Sand Temple's sole purpose is to protect a powerful weapon known as the Bow of Light.
Trivia
In the PAL version of the game, the dungeon is titled Desert Temple, which is consistent with the fact that the rabbits from the Sand Realm are actually named Desert Rabbits.
Gallery
-
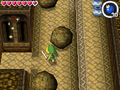
Link dodging incoming boulders in the Sand Temple.
-
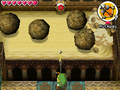
Link attempting to hit an Eyeball Switch by firing an Arrow between the boulders as they pass by.
-
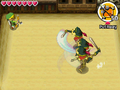
Link facing off against three Stalfos Warriors in the Sand Temple.
-
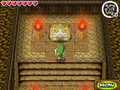
The Treasure Chest in which the Sand Wand is found.
-
Link obtaining the Sand Wand.
-
Link keeping a rolling spike in place using the Sand Wand.
-

Link using the immobilized rolling spike as a bridge.
-
Link stunning Ergtoroks using the Sand Wand.
-
Link making a path with the Sand Wand in order to cross over the quicksand
-
The map of the first level of the Sand Temple's basement. Treasure Chests are marked on the map
-
The map of the second level of the Sand Temple's basement.
-
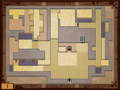
The first floor of the Sand Temple.
-
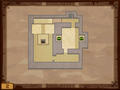
The second floor of the Sand Temple. Treasure Chests are marked on the map
-

The third floor of the Sand Temple.
-
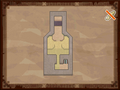
The map of the room beneath the Sand Temple where the Bow of Light lies.


| Language | Name | |
|---|---|---|