Savage Labyrinth: Difference between revisions
(Minor reorganization. Added dungeon navigation template) |
m (images and infobox) |
||
| Line 1: | Line 1: | ||
{{image}} | {{Dungeons | ||
|name = Savage Labyrinth | |||
|type = mini | |||
|image = [[File:Savage Labyrinth Safe Room.jpg|250px]] | |||
|location = [[Outset Island]] | |||
|game = ''[[The Legend of Zelda: The Wind Waker|The Wind Waker]]'' | |||
|item = [[Triforce Chart]]<br>[[Piece of Heart]] | |||
|quest = | |||
|mini-boss = | |||
|boss = | |||
|element = | |||
|theme music = | |||
|strategy = | |||
}} | |||
The '''Savage Labyrinth''' is a mini-dungeon in ''[[The Legend of Zelda: The Wind Waker|The Wind Waker]]''. | The '''Savage Labyrinth''' is a mini-dungeon in ''[[The Legend of Zelda: The Wind Waker|The Wind Waker]]''. | ||
==Entrance to the Labyrinth== | ==Entrance to the Labyrinth== | ||
[[File:Savage Labyrinth Entrance.jpg|thumb|left|The entrance to the labyrinth is blocked by a Stone Head]] | |||
The place is located on a cliff on the far east side of [[Outset Island]] and can be accessed by a [[Deku Leaf]] and the [[Power Bracelet]]s (to remove the [[Stone Head]] covering the entrance), or with the [[Hookshot]]. In this labyrinth, there are fifty-one floors, each with enemies that get more difficult the further you descend into its depths. | The place is located on a cliff on the far east side of [[Outset Island]] and can be accessed by a [[Deku Leaf]] and the [[Power Bracelet]]s (to remove the [[Stone Head]] covering the entrance), or with the [[Hookshot]]. In this labyrinth, there are fifty-one floors, each with enemies that get more difficult the further you descend into its depths. | ||
| Line 29: | Line 44: | ||
#[[Boko Baba]] x3, [[Peahat]] x3 | #[[Boko Baba]] x3, [[Peahat]] x3 | ||
#[[Bokoblin]] x4, [[ChuChu|Green ChuChu]] x4 | #[[Bokoblin]] x4, [[ChuChu|Green ChuChu]] x4 | ||
[[File:Savage Labyrinth Room.jpg|thumb|right|300px|Peahats in one of the labyrinth's levels]] | |||
#[[Mothula]] x3, [[Bokoblin]] x2 | #[[Mothula]] x3, [[Bokoblin]] x2 | ||
#[[Mothula|Winged Mothula]] x2 | #[[Mothula|Winged Mothula]] x2 | ||
| Line 62: | Line 78: | ||
#[[Mighty Darknut]] x4 | #[[Mighty Darknut]] x4 | ||
#[[Heart Container#Piece of Heart|Piece of Heart]], Exit | #[[Heart Container#Piece of Heart|Piece of Heart]], Exit | ||
==Gallery== | |||
<gallery> | |||
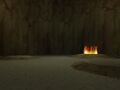
File:Savage Labyrinth Room 2.jpg|The flames that cover the hole to the next level do not extinguish until all the enemies have been defeated | |||
</gallery> | |||
==Trivia== | ==Trivia== | ||
Revision as of 04:12, 22 January 2011
The Savage Labyrinth is a mini-dungeon in The Wind Waker.
Entrance to the Labyrinth
The place is located on a cliff on the far east side of Outset Island and can be accessed by a Deku Leaf and the Power Bracelets (to remove the Stone Head covering the entrance), or with the Hookshot. In this labyrinth, there are fifty-one floors, each with enemies that get more difficult the further you descend into its depths.
The Savage Labyrinth is a hidden cave that Link must enter to obtain a Triforce Chart. The chart is located on floor thirty-one. To move on past that floor, the Mirror Shield is required, although moving on is completely optional. Floors beyond thirty-one are far more difficult and were made to provide a challenge for the more skilled players. The only recovery items are at every tenth floor. Also foes do not drop items of any kind. However, hearts, rupees, arrows, bombs, and spoils can be stolen from opponents with the Grappling Hook. A Piece of Heart is the reward for completing the labyrinth.
The Savage Labyrinth is made more difficult after completion. After obtaining the Piece of Heart, several more enemies are added to many floors. Most significantly, there are many more Darknuts than the first time. This makes floor fifty very difficult to beat.
Enemies and their floor number
- Entrance
- Keese x10
- Miniblin x6
- Bokoblin x4
- Red ChuChu x6
- Magtail x4
- Keese x4, Miniblin x4
- Fire Keese x4, Magtail x4
- Bokoblin x4, Fire Keese x2
- Moblin x2
- Recovery Floor, Optional Exit
- Peahat x6
- Green ChuChu x4
- Boko Baba x5
- Bokoblin x4
- Mothula x5
- Boko Baba x3, Peahat x3
- Bokoblin x4, Green ChuChu x4

- Mothula x3, Bokoblin x2
- Winged Mothula x2
- Recovery Floor, Optional Exit
- Wizzrobe x3
- Armos x4
- Armos Knight x2
- Yellow ChuChu x6
- Red Bubble x4
- Bokoblin x2, Darknut x1
- Armos x3, Wizzrobe x1
- Armos Knight x2, Red Bubble x2
- Darknut x2
- Recovery Floor, Triforce Chart #6, Optional Exit
- ReDead x6
- Blue Bubble x5
- Purple ChuChu x6
- Poe x5
- Winged Mothula x3
- ReDead x3, Moblin x2
- Purple ChuChu x5, Winged Mothula x1
- Poe x5, Moblin x2
- Blue Bubble x4, Stalfos x2
- Recovery Floor, Optional Exit
- Miniblin x24
- Red ChuChu x10, Green ChuChu x10, Yellow ChuChu x10
- Wizzrobe x5
- Bokoblin x16
- ReDead x4, Stalfos x2
- Moblin x3, Darknut x2
- Wizzrobe x3, Darknut x2
- Stalfos x3
- Mighty Darknut x4
- Piece of Heart, Exit
Gallery
-
The flames that cover the hole to the next level do not extinguish until all the enemies have been defeated

Trivia
- The Savage Labyrinth plays a similar role as the Cave of Ordeals of Twilight Princess, only unlike its Twilight Princess counterpart, it is necessary to beat at least the first thirty floors of the labyrinth to advance in the game. It also resembles the Take 'Em All On Game from Spirit Tracks.