Puzzle Key: Difference between revisions
Jump to navigation
Jump to search
No edit summary |
JumbledLimes (talk | contribs) mNo edit summary |
||
| (31 intermediate revisions by 9 users not shown) | |||
| Line 1: | Line 1: | ||
{{Item | {{Infobox Item | ||
| | |image= File:SSHD Golden Carving Model.png | ||
| | |caption= The {{Term|SSHD|Golden Carving}} from {{SSHD|-}} | ||
| | |pronunciation= | ||
| | |plural= | ||
|game = {{ | |game= SS | ||
| | |other= | ||
| | |cost= | ||
|comp = | |value= | ||
|location= Inside {{Plural|SSHD|Dungeon|link}} | |||
|uses= Unlocking {{Plural|SSHD|Big Door|link}} | |||
|strength= | |||
|durability= | |||
|comp= {{Term|Series|Big Key|link}} | |||
|sample= | |||
|theme= | |||
}} | }} | ||
{{Term/Store|Puzzle Key|Puzzle Keys|Series, SS|plural}} are {{Plural|SSHD|Item|link}} in {{SS}}.<ref>{{Cite Guide|quote= |game= SS|publisher= Prima|page=28}}</ref> {{Plural|Series|Puzzle Key}} go unnamed in {{SSHD}}. | |||
==Location and Uses== | |||
Puzzle Keys are found in [[Treasure Chest]]s inside all dungeons aside from the [[Sky Keep]]. They are used to unlock the door leading to the dungeon's [[Boss]]. In order to unlock a door, Puzzle Keys must be rotated into an orientation that will allow it to fit into the shape of the key slot by using the Wii Remote. Doing so is often a small puzzle, requiring multiple rotations to find the correct placement. | |||
{| class="wikitable" style="text-align:center; <!--float:left;-->" | |||
|+Types of Puzzle Keys | |||
{| class="wikitable | |||
|- | |- | ||
! | !Key | ||
!Dungeon | |||
! | !Placement | ||
! | |||
|- | |- | ||
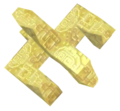
| | |{{Section|Golden Carving|[[File:SSHD Golden Carving Icon.png]]<br/>'''{{Term|SSHD|Golden Carving|link}}'''}} | ||
| {{Term|SSHD|Skyview Temple|link}} | |||
| | | [[File:GoldenCarvingPlacementSS.png|200px]] | ||
| | |||
|- | |- | ||
| | | {{Section|Dragon Sculpture|[[File:SSHD Dragon Sculpture Icon.png]]<br/>'''{{Term|SSHD|Dragon Sculpture|link}}'''}} | ||
| {{Term|SSHD|Earth Temple|link}} | |||
| | | [[File:DragonSculpturePlacementSS.png|200px]] | ||
| | |||
|- | |- | ||
| | | {{Section|Ancient Circuit|[[File:SSHD Ancient Circuit Icon.png]]<br/>'''{{Term|SSHD|Ancient Circuit|link}}'''}} | ||
| {{Term|SSHD|Lanayru Mining Facility|link}} | |||
| | | [[File:SS Ancient Circuit Placement.png|200px]] | ||
| | |||
|- | |- | ||
| | | {{Section|Blessed Idol|[[File:SSHD Blessed Idol Icon.png]]<br/>'''{{Term|SSHD|Blessed Idol|link}}'''}} | ||
| {{Term|SSHD|Ancient Cistern|link}} | |||
| | | [[File:BlessedIdolPlacementSS.png|200px]] | ||
| | |||
|- | |- | ||
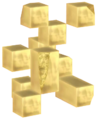
| | | {{Section|Squid Carving|[[File:SSHD Squid Carving Icon.png]]<br/>'''{{Term|SSHD|Squid Carving|link}}'''}} | ||
| {{Term|SSHD|Sandship|link}} | |||
| | | [[File:SquidCarvingPlacementSS.png|200px]] | ||
| | |||
|- | |- | ||
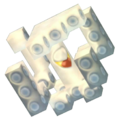
| | | {{Section|Mysterious Crystals|[[File:SSHD Mysterious Crystals Icon.png]]<br/>'''{{Term|SSHD|Mysterious Crystals|link}}'''}} | ||
| {{Term|SSHD|Fire Sanctuary (Dungeon)|link}} | |||
| | | [[File:MysteriousCrystalsPlacementSS.png|200px]] | ||
| | |||
|} | |} | ||
== | ==Nomenclature== | ||
{{Nomenclature}} | |||
{{ | |||
| | ==Gallery== | ||
| | <gallery> | ||
| | File:SS Dragon Sculpture Model.png|The {{Term|SS|Dragon Sculpture}} from {{SS|-}} | ||
| | File:SS Ancient Circuit Model.png|The {{Term|SS|Ancient Circuit}} from {{SS|-}} | ||
| | File:SS Blessed Idol Model.png|The {{Term|SS|Blessed Idol}} from {{SS|-}} | ||
| | File:SS Squid Carving Model.png|The {{Term|SS|Squid Carving}} from {{SS|-}} | ||
File:SS Mysterious Crystals Model.png|The {{Term|SS|Mysterious Crystals}} from {{SS|-}} | |||
</gallery> | |||
==See Also== | |||
* [[Lock]] | |||
{{Ref}} | |||
{{Categories | |||
|Keys | |||
|items= SS, SSHD | |||
| | |||
| | |||
}} | }} | ||
Latest revision as of 19:29, 7 July 2023
Puzzle Keys are Items in Skyward Sword.[1] Puzzle Keys go unnamed in Skyward Sword HD.
Location and Uses
Puzzle Keys are found in Treasure Chests inside all dungeons aside from the Sky Keep. They are used to unlock the door leading to the dungeon's Boss. In order to unlock a door, Puzzle Keys must be rotated into an orientation that will allow it to fit into the shape of the key slot by using the Wii Remote. Doing so is often a small puzzle, requiring multiple rotations to find the correct placement.
| Key | Dungeon | Placement |
|---|---|---|
Golden Carving |
Skyview Temple | 
|
Dragon Sculpture |
Earth Temple | 
|
Ancient Circuit |
Lanayru Mining Facility | 
|
Blessed Idol |
Ancient Cistern | 
|
Squid Carving |
Sandship | 
|
Mysterious Crystals |
Fire Sanctuary | 
|
Nomenclature
| Language | Names | |
|---|---|---|
| This table was generated using translation pages. To request an addition, please contact a staff member with a reference. | ||
Gallery
-

The Dragon Sculpture from Skyward Sword
-
The Ancient Circuit from Skyward Sword
-
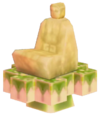
The Blessed Idol from Skyward Sword
-
The Squid Carving from Skyward Sword
-
The Mysterious Crystals from Skyward Sword


See Also
References
- ↑ The Legend of Zelda: Skyward Sword—Prima Official Game Guide, Prima Games, pg. 28