Twilight Field: Difference between revisions
m (→Gallery) |
|||
| (41 intermediate revisions by 13 users not shown) | |||
| Line 1: | Line 1: | ||
{{ | {{Noncanon}} | ||
{{ | {{Infobox HW Stage | ||
| | |image= | ||
{{Media | |||
| | |Screenshot HW= File:HW Land of Twilight.jpg | ||
| | |Screenshot HWL= File:HWL Twilight Field.png | ||
| | |Screenshot HWDE= File:HWDE Twilight Field.png | ||
}} | }} | ||
''' | |era= [[Era of Twilight]] | ||
|theme= "{{Term|HWDE|Hyrule Field:TP|link}}" | |||
|scenario 1= Land of Twilight | |||
|characters 1= [[Lana]] | |||
|mini-boss 1= | |||
|boss 1= [[Midna]] | |||
|unlock 1= Midna<br/>[[Shackle|Cursed Shackle]] | |||
|map= <imagemap> | |||
File:HW Twilight Field Map.png | |||
poly 56 37 85 37 85 8 74 8 74 4 67 4 67 8 56 8 [[##|Bridge Keep]] | |||
rect 259 150 288 179 [[##|North Field Keep]] | |||
rect 371 150 400 179 [[##|Sorceress's Keep]] | |||
rect 56 218 85 247 [[##|West Field Keep]] | |||
rect 221 240 250 269 [[##|Central Keep]] | |||
rect 386 240 415 269 [[##|East Field Keep]] | |||
rect 101 308 130 337 [[##|Outskirts Keep]] | |||
rect 319 345 348 374 [[##|South Field Keep]] | |||
rect 154 383 183 412 [[##|Rocky Square]] | |||
rect 4 391 33 420 [[##|Village Keep]] | |||
desc none | |||
</imagemap> | |||
<center><small>'''Hover over a region to view its name.'''</small></center> | |||
|strategy 1= | |||
}} | |||
{{Term/Store|Twilight Field||Series, HW, HWL, HWDE}} is a {{Term|HWDE|Stage|link}} in {{HW}}. It contains the {{Term|HWDE|Scenario|link}} "{{Term|HWDE|Land of Twilight|link}}" in {{Term|HWDE|Legend Mode|link}}. | |||
==Features and Overview== | |||
Twilight Field is set in the [[Eldin Province]] from {{TP}}, and holds the [[Bridge of Eldin]], [[Kakariko Village]], and the [[Hidden Village]]. | |||
===Areas=== | |||
{{Gallery List|Locations | |||
|HW= Central Keep, East Field Keep, Eldin Bridge, North Field Keep, Outskirts Keep, Outskirts Keep Gate, Rocky Square, Sorceress's Keep | |||
}} | |||
After Lana steps through one of the portals opened up by [[Cia]], the young sorceress finds herself in the [[Era of Twilight]], when [[Hyrule]] was completely covered in [[Twilight|shadows]]. Although her primary mission consists of closing the [[Gate of Souls]], Lana stumbles into a [[Kakariko Village|a village]] being overrun by monsters and decides to help immediately.<ref>{{ | ==Land of Twilight== | ||
After Lana steps through one of the portals opened up by [[Cia]], the young sorceress finds herself in the [[Era of Twilight]], when [[Hyrule]] was completely covered in [[Twilight|shadows]]. Although her primary mission consists of closing the [[Gate of Souls]], Lana stumbles into a [[Kakariko Village|a village]] being overrun by monsters and decides to help immediately.<ref>{{Cite|Lana stepped through her portal and found a jarring sight. Wherever she looked, the kingdom was consumed by shadow. Though she knew of the Twilight Realm, she had never seen it firsthand. Lana's sorcery could not reveal who or what was causing the Twilight to cover Hyrule so completely. She soon came upon a small village beset by monsters. Her mission to close the Gate of Souls would have to wait.|N/A|HW}}</ref> | |||
Upon arriving to [[Hyrule Field]], Lana hears screams calling for help coming from a young girl in a nearby village.<ref>{{Cite|Eeek! I'm in big trouble!|Agitha|HW}}</ref> The sorceress hurries over to the source of the screams and finds [[Agitha]] surrounded by [[Bulblin]]s.<ref>{{Cite|I just heard someone screaming! We've got to go check it out!|Lana|HW}}</ref> Easily defeating the monsters with her magic, Lana introduces herself and mentions that she is looking for the Gate of Souls but is unsure on where to look due to the land being covered in [[Twilight]].<ref>{{Cite|I'm looking for the Gate of Souls. I just...don't know where to look...|Lana|HW}}</ref><ref>{{Cite|With the land covered as it is, I can't really pinpoint the Gate of Souls. Always something...|Lana|HW}}</ref> Agitha offers to help her rescuer by using a [[Goddess Butterfly]] to guide them through the Twilight Realm and thus reach their destination.<ref>{{Cite|Gate of Souls..? Never seen one. But I can take you right to where you want to go! [...] With this Goddess Butterfly, of course! It will guide us through the Twilight Realm.|Agitha|HW}}</ref> Following Agitha and the butterfly through the twilight, Lana and her companions eventually stumble upon [[Midna]], who has captured the flying insect upon thinking that it will poison her forces.<ref>{{Cite|Let it go! That insect is important!|Lana|HW}}</ref><ref>{{Cite|Why? So it can fly around and spread poison on my forces?|Midna|HW}}</ref> Agitha intervenes and assures her that the butterfly is not of a poisonous genus, and explains that it can take a person anywhere they want to go as long as it is asked kindly.<ref>{{Cite|This is a Goddess Butterfly. Ask it kindly, and it will guide you anywhere you want to go. Isn't that nice?|Agitha|HW}}</ref> Realizing that the butterfly can take her to Cia, who turned her into an imp, Midna asks the insect for guidance and begins to follow it, leaving her forces behind to hold Lana and her allies from getting in her way while she confronts Cia.<ref>{{Cite|Guide me anywhere, huh? Hey! Butterfly! take me to that ugly witch!|Midna|HW}}</ref><ref>{{Cite|I'll take care of that black witch! Underlings! Hold them back!|Midna|HW}}</ref> With the butterfly leading Midna, Agitha grows concerned about the insect and seeks to retrieve it,<ref>{{Cite|Oh no! Mister Butterfly, come back! That angry cat just drove Mister Butterfly away!|Agitha|HW}}</ref> but Lana insists that she will get it back and asks that Agitha return to Kakariko Village for the moment.<ref>{{Cite|I'll get the butterfly back. Agitha, you need to get back to the village for now.|Agitha|HW}}</ref> | |||
Upon arriving to [[Hyrule Field]], Lana hears screams calling for help coming from a young girl in a nearby village.<ref>{{ | |||
Cia, noticing Midna's advance towards her [[Keep]], orders her [[Dark Forces]] to intercept and begin an attack against Midna's Forces.<ref>{{ | Cia, noticing Midna's advance towards her [[Keep]], orders her [[Dark Forces]] to intercept and begin an attack against Midna's Forces.<ref>{{Cite|Do I hear some mangy stray caterwauling about me? Then maybe it needs a playmate! Why don't you go in my stead and give that...ugh, thing...a taste of fun?|Cia|HW}}</ref><ref>{{Cite|Dark Forces have intercepted and begun attacking Midna's Forces!|N/A|HW}}</ref> Meanwhile, Lana chases after the Twilight Princess in an attempt to retrieve the Goddess Butterfly, but finds that she is much more powerful than she thought due to the influence of the Twilight that is covering Hyrule.<ref>{{Cite|Man, she's a lot stronger than I thought! I don't think I can take her in a fair fight... Maybe if I can take the Twilight keeps, her power will weaken...|Lana|HW}}</ref> Although Midna is successful in reaching Cia's keep despite Lana's intervention, the evil sorceress quickly flees upon the princess's arrival, angering Midna.<ref>{{Cite|Welcome to a time of Twilight! But, so sorry, I don't have time to play with you!|Cia|HW}}</ref> Thinking that Lana and her allies are on Cia's side,<ref>{{Cite|Are you kidding?! She escaped because you got in my way! Are you on her side?!|Midna|HW}}</ref> she begins to attack the [[Hyrulean Forces]] despite the sorceress's insistance that she just wishes to get the Goddess Butterfly back.<ref>{{Cite|Wait! We're not enemies! I just came to get that butterfly back!|Lana|HW}}</ref> To prepare for her counterattack at the [[Eldin Bridge]],<ref>{{Cite|Midna is preparing a counterattack at Eldin Bridge!|N/A|HW}}</ref> Midna momentarily retreats to the Bridge Keep as Lana realizes that she has no other option but to fight against the Twilight Princess.<ref>{{Cite|Great. I've got no choice but to withdraw for now. I just need a few minutes...|Midna|HW}}</ref><ref>{{Cite|Midna retreated to Bridge Keep!|N/A|HW}}</ref> Meanwhile, Agitha grows desperate over the fact that the Goddess Butterfly has not been rescued yet and so begins to search for Midna,<ref>{{Cite|I simply couldn't sit around doing nothing! I'm going to get Mister Butterfly back now!|Agitha|HW}}</ref><ref>{{Cite|Agitha is searching for Midna!|N/A|HW}}</ref> ignoring Lana's advice to stay in Kakariko Village.<ref>{{Cite|Dang it, I told her to stay in the village. Ugh, fine. I can't leave her alone out there.|Lana|HW}}</ref> | ||
With Agitha now in the battlefield and in possible danger, Lana reluctantly seeks out Midna and promptly defeats her,<ref>{{ | With Agitha now in the battlefield and in possible danger, Lana reluctantly seeks out Midna and promptly defeats her,<ref>{{Cite|Fine. I didn't want to fight you, but I need that butterfly and I don't have time to talk.|Lana|HW}}</ref> successfully retrieving the flying insect from the princess's grasp after Agitha asks nicely for it.<ref>{{Cite|Oh, Miss Kitty, please? Pretty please, can you give back Mister Butterfly?|Agitha|HW}}</ref> It is then that Midna realizes that Lana and her allies are not with Cia and decides to join the Hyrulean Forces on their quest to stop the evil sorceress and close the Gate of Souls.<ref>{{Cite|Fine, take the butterfly, but... Wait. You're not with the witch?|Midna|HW}}</ref><ref>{{Cite|No. Completely the opposite. We're heading to the Gate of Souls to try to stop her.|Lana|HW}}</ref><ref>{{Cite|You should have led with that! She and I still have some unfinished business.|Midna|HW}}</ref> | ||
After the Scenario finishes, Midna becomes a playable character and her weapon, the Cursed Shackle, becomes available for use. | |||
=== | ===Combatants=== | ||
< | {| class=wikitable style="text-align:center; width:100%; max-width:40em;" | ||
File: | !width="33%"| Hyrulean Forces | ||
File: | !width="33%"| Dark Forces | ||
File: | !width="33%"| Midna's Forces | ||
File: | |- | ||
| [[File:HWDE Hylian Captain Mini Map Icon.png]]<br/>'''[[Hylian Captain]]s''' | |||
File: | | [[File:HWDE Aeralfos Mini Map Icon.png]]<br/>'''[[Aeralfos]]''' | ||
File: | | [[File:HWDE Dark Darknut Mini Map Icon.png]]<br/>'''[[Dark Darknut]]s''' | ||
File: | |- | ||
File: | | [[File:HWDE Hylian Soldier Mini Map Icon.png]]<br/>'''[[Hylian Soldier]]s''' | ||
File: | | '''[[Bulblin]]s''' | ||
File: | | [[File:HWDE Darknut Mini Map Icon.png]]<br/>'''[[Darknut]]s''' | ||
</ | |- | ||
|style="background-color:#0c2236" rowspan="3"| | |||
File: | | [[File:HWDE Bulblin Captain Mini Map Icon.png]]<br/>'''[[Bulblin Captain]]s''' | ||
| '''[[Stalchild]]ren''' | |||
|- | |||
| [[File:HWDE Dark Aeralfos Mini Map Icon.png]]<br/>'''[[Dark Aeralfos]]''' | |||
| [[File:HWDE Stalchild Captain Mini Map Icon.png]]<Br>'''[[Stalchild Captain]]s''' | |||
|- | |||
| [[File:HWDE Deku Baba Mini Map Icon.png]]<br/>'''[[Deku Baba]]s''' | |||
|style="background-color:#0c2236"| | |||
|- | |||
!colspan="3"| Commanders | |||
|- | |||
|style="background-color:#163d5f"| [[File:HWDE Agitha Mini Map Icon.png]]<br/>'''[[Agitha]]''' | |||
|style="background-color:#163d5f"| [[File:HWDE Cia Mini Map Icon.png]]<br/>'''[[Cia]]''' | |||
|style="background-color:#163d5f"| [[File:HWDE Midna Mini Map Icon.png]]<br/>'''[[Midna]]''' | |||
|- | |||
|style="background-color:#17456e"| [[File:HWDE Lana Mini Map Icon.png]]<br/>'''[[Lana]]''' | |||
|style="background-color:#0c2236" colspan="2"| | |||
|} | |||
==Collectibles== | |||
{| class=wikitable style="width:100%" | {| class=wikitable style="width:100%" | ||
! colspan=2 | Item | ! colspan=2 | Item | ||
| Line 61: | Line 92: | ||
! colspan=1 | Condition | ! colspan=1 | Condition | ||
|- | |- | ||
| [[File:Gold Skulltula.png|45px]] | | <center>[[File:HW Gold Skulltula Icon.png|45px]]</center> | ||
| [[Gold Skulltula]] | | [[Gold Skulltula]] | ||
| West of Rocky Square on the corner of a building | | West of Rocky Square on the corner of a building | ||
| Defeat 1000 enemies | | Defeat 1000 enemies | ||
|- | |- | ||
| [[File:Gold Skulltula.png|45px]] | | <center>[[File:HW Gold Skulltula Icon.png|45px]]</center> | ||
| Gold Skulltula<br>(Hard Mode) | | Gold Skulltula<br/>(Hard Mode) | ||
| Inside the Bridge Keep | | Inside the Bridge Keep | ||
| As [[Lana]] equipped with the | | As [[Lana]] equipped with the Book of Sorcery, defeat Midna before Cia flees from the battlefield, then capture the Bridge Keep. | ||
|- | |- | ||
| [[File:Heart | | <center>[[File:HW Piece of Heart Icon.png|45px]]</center> | ||
| [[ | | [[Piece of Heart]] | ||
| | | Capture Sorceress's Keep | ||
| Play as Lana | | Play as Lana | ||
|- | |- | ||
| [[File:Heart Container Icon | | <center>[[File:HW Heart Container Icon.png|45px]]</center> | ||
| [[Heart Container]] | | [[Heart Container]] | ||
| | | Use [[Hookshot]] to go on ledge southwest of Outskirts Keep | ||
| Play as Lana | | Play as Lana | ||
|} | |} | ||
{{ | ==Nomenclature== | ||
{{Nomenclature}} | |||
==Gallery== | |||
<gallery> | |||
File:HWDE Twilight Field Promotional Screenshot.png|A promotional screenshot of {{Term|HWDE|Twilight Field}} from {{HWDE|-}} | |||
File:HWDE Twilight Field Map.png|The level map from {{HWDE|-}} | |||
</gallery> | |||
{{Ref}} | |||
{{HW Stages}} | |||
{{Categories | |||
|Fields | |||
|stages= HW, HWL, HWDE | |||
}} | |||
Latest revision as of 01:06, 16 April 2024
Twilight Field | |||
|---|---|---|---|
Screenshot    HWHWLHWDE | |||
| Era | Era of Twilight | ||
| Main Theme Music | |||
| | |||
| Playable Character(s) | Lana | ||
| Boss | Midna | ||
| Completion Reward(s) | Midna Cursed Shackle | ||
| |||

Twilight Field is a Stage in Hyrule Warriors. It contains the Scenario "Land of Twilight" in Legend Mode.
Features and Overview
Twilight Field is set in the Eldin Province from Twilight Princess, and holds the Bridge of Eldin, Kakariko Village, and the Hidden Village.
Areas
Land of Twilight
After Lana steps through one of the portals opened up by Cia, the young sorceress finds herself in the Era of Twilight, when Hyrule was completely covered in shadows. Although her primary mission consists of closing the Gate of Souls, Lana stumbles into a a village being overrun by monsters and decides to help immediately.[1]
Upon arriving to Hyrule Field, Lana hears screams calling for help coming from a young girl in a nearby village.[2] The sorceress hurries over to the source of the screams and finds Agitha surrounded by Bulblins.[3] Easily defeating the monsters with her magic, Lana introduces herself and mentions that she is looking for the Gate of Souls but is unsure on where to look due to the land being covered in Twilight.[4][5] Agitha offers to help her rescuer by using a Goddess Butterfly to guide them through the Twilight Realm and thus reach their destination.[6] Following Agitha and the butterfly through the twilight, Lana and her companions eventually stumble upon Midna, who has captured the flying insect upon thinking that it will poison her forces.[7][8] Agitha intervenes and assures her that the butterfly is not of a poisonous genus, and explains that it can take a person anywhere they want to go as long as it is asked kindly.[9] Realizing that the butterfly can take her to Cia, who turned her into an imp, Midna asks the insect for guidance and begins to follow it, leaving her forces behind to hold Lana and her allies from getting in her way while she confronts Cia.[10][11] With the butterfly leading Midna, Agitha grows concerned about the insect and seeks to retrieve it,[12] but Lana insists that she will get it back and asks that Agitha return to Kakariko Village for the moment.[13]
Cia, noticing Midna's advance towards her Keep, orders her Dark Forces to intercept and begin an attack against Midna's Forces.[14][15] Meanwhile, Lana chases after the Twilight Princess in an attempt to retrieve the Goddess Butterfly, but finds that she is much more powerful than she thought due to the influence of the Twilight that is covering Hyrule.[16] Although Midna is successful in reaching Cia's keep despite Lana's intervention, the evil sorceress quickly flees upon the princess's arrival, angering Midna.[17] Thinking that Lana and her allies are on Cia's side,[18] she begins to attack the Hyrulean Forces despite the sorceress's insistance that she just wishes to get the Goddess Butterfly back.[19] To prepare for her counterattack at the Eldin Bridge,[20] Midna momentarily retreats to the Bridge Keep as Lana realizes that she has no other option but to fight against the Twilight Princess.[21][22] Meanwhile, Agitha grows desperate over the fact that the Goddess Butterfly has not been rescued yet and so begins to search for Midna,[23][24] ignoring Lana's advice to stay in Kakariko Village.[25]
With Agitha now in the battlefield and in possible danger, Lana reluctantly seeks out Midna and promptly defeats her,[26] successfully retrieving the flying insect from the princess's grasp after Agitha asks nicely for it.[27] It is then that Midna realizes that Lana and her allies are not with Cia and decides to join the Hyrulean Forces on their quest to stop the evil sorceress and close the Gate of Souls.[28][29][30]
After the Scenario finishes, Midna becomes a playable character and her weapon, the Cursed Shackle, becomes available for use.
Combatants
| Hyrulean Forces | Dark Forces | Midna's Forces |
|---|---|---|
Hylian Captains |
Aeralfos |
Dark Darknuts |
Hylian Soldiers |
Bulblins | Darknuts |
Bulblin Captains |
Stalchildren | |
Dark Aeralfos |
Stalchild Captains | |
Deku Babas |
||
| Commanders | ||
Agitha |
Cia |
Midna |
Lana |
||
Collectibles
| Item | Location | Condition | |
|---|---|---|---|
| Gold Skulltula | West of Rocky Square on the corner of a building | Defeat 1000 enemies | |
| Gold Skulltula (Hard Mode) |
Inside the Bridge Keep | As Lana equipped with the Book of Sorcery, defeat Midna before Cia flees from the battlefield, then capture the Bridge Keep. | |
| Piece of Heart | Capture Sorceress's Keep | Play as Lana | |
| Heart Container | Use Hookshot to go on ledge southwest of Outskirts Keep | Play as Lana | |
Nomenclature
| Language | Names | Meanings |
|---|---|---|
Japanese | 黄昏の大地 (Tasogare no Daichi) (HW) | |
FrenchCA | Terres du Crépuscule (HWDE) | Land of Twilight |
FrenchEU | Terres du Crépuscule (HWDE)[33] | Land of Twilight |
German | Schattenebene (HWDE)[32] | Shadow Plain |
Italian | Piana del crepuscolo (HWDE)[34] | Plain of twilight |
SpanishLA | Llanura del Crepúsculo (HWDE)[31] | Plain of Twilight |
SpanishEU | Llanura del Crepúsculo (HWDE) | Plain of Twilight |
| This table was generated using translation pages. To request an addition, please contact a staff member with a reference. | ||
Gallery
-
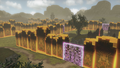
A promotional screenshot of Twilight Field from Hyrule Warriors: Definitive Edition
-
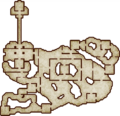
The level map from Hyrule Warriors: Definitive Edition


References
- ↑ "Lana stepped through her portal and found a jarring sight. Wherever she looked, the kingdom was consumed by shadow. Though she knew of the Twilight Realm, she had never seen it firsthand. Lana's sorcery could not reveal who or what was causing the Twilight to cover Hyrule so completely. She soon came upon a small village beset by monsters. Her mission to close the Gate of Souls would have to wait." — N/A (Hyrule Warriors)
- ↑ "Eeek! I'm in big trouble!" — Agitha (Hyrule Warriors)
- ↑ "I just heard someone screaming! We've got to go check it out!" — Lana (Hyrule Warriors)
- ↑ "I'm looking for the Gate of Souls. I just...don't know where to look..." — Lana (Hyrule Warriors)
- ↑ "With the land covered as it is, I can't really pinpoint the Gate of Souls. Always something..." — Lana (Hyrule Warriors)
- ↑ "Gate of Souls..? Never seen one. But I can take you right to where you want to go! [...] With this Goddess Butterfly, of course! It will guide us through the Twilight Realm." — Agitha (Hyrule Warriors)
- ↑ "Let it go! That insect is important!" — Lana (Hyrule Warriors)
- ↑ "Why? So it can fly around and spread poison on my forces?" — Midna (Hyrule Warriors)
- ↑ "This is a Goddess Butterfly. Ask it kindly, and it will guide you anywhere you want to go. Isn't that nice?" — Agitha (Hyrule Warriors)
- ↑ "Guide me anywhere, huh? Hey! Butterfly! take me to that ugly witch!" — Midna (Hyrule Warriors)
- ↑ "I'll take care of that black witch! Underlings! Hold them back!" — Midna (Hyrule Warriors)
- ↑ "Oh no! Mister Butterfly, come back! That angry cat just drove Mister Butterfly away!" — Agitha (Hyrule Warriors)
- ↑ "I'll get the butterfly back. Agitha, you need to get back to the village for now." — Agitha (Hyrule Warriors)
- ↑ "Do I hear some mangy stray caterwauling about me? Then maybe it needs a playmate! Why don't you go in my stead and give that...ugh, thing...a taste of fun?" — Cia (Hyrule Warriors)
- ↑ "Dark Forces have intercepted and begun attacking Midna's Forces!" — N/A (Hyrule Warriors)
- ↑ "Man, she's a lot stronger than I thought! I don't think I can take her in a fair fight... Maybe if I can take the Twilight keeps, her power will weaken..." — Lana (Hyrule Warriors)
- ↑ "Welcome to a time of Twilight! But, so sorry, I don't have time to play with you!" — Cia (Hyrule Warriors)
- ↑ "Are you kidding?! She escaped because you got in my way! Are you on her side?!" — Midna (Hyrule Warriors)
- ↑ "Wait! We're not enemies! I just came to get that butterfly back!" — Lana (Hyrule Warriors)
- ↑ "Midna is preparing a counterattack at Eldin Bridge!" — N/A (Hyrule Warriors)
- ↑ "Great. I've got no choice but to withdraw for now. I just need a few minutes..." — Midna (Hyrule Warriors)
- ↑ "Midna retreated to Bridge Keep!" — N/A (Hyrule Warriors)
- ↑ "I simply couldn't sit around doing nothing! I'm going to get Mister Butterfly back now!" — Agitha (Hyrule Warriors)
- ↑ "Agitha is searching for Midna!" — N/A (Hyrule Warriors)
- ↑ "Dang it, I told her to stay in the village. Ugh, fine. I can't leave her alone out there." — Lana (Hyrule Warriors)
- ↑ "Fine. I didn't want to fight you, but I need that butterfly and I don't have time to talk." — Lana (Hyrule Warriors)
- ↑ "Oh, Miss Kitty, please? Pretty please, can you give back Mister Butterfly?" — Agitha (Hyrule Warriors)
- ↑ "Fine, take the butterfly, but... Wait. You're not with the witch?" — Midna (Hyrule Warriors)
- ↑ "No. Completely the opposite. We're heading to the Gate of Souls to try to stop her." — Lana (Hyrule Warriors)
- ↑ "You should have led with that! She and I still have some unfinished business." — Midna (Hyrule Warriors)
- ↑ "Llanura del Crepúsculo" — Select Scenario (Hyrule Warriors: Definitive Edition)
- ↑ "Schattenebene" — Select Scenario (Hyrule Warriors: Definitive Edition)
- ↑ "Terres du Crépuscule" — Select Scenario (Hyrule Warriors: Definitive Edition)
- ↑ "Piana del crepuscolo" — Select Scenario (Hyrule Warriors: Definitive Edition)