Bosses in Ocarina of Time: Difference between revisions
TriforceTony (talk | contribs) No edit summary |
|||
| Line 1: | Line 1: | ||
<noinclude>{{DISPLAYTITLE: Bosses in {{OoT|-}}}} | <noinclude>{{DISPLAYTITLE: Bosses in {{OoT|-}}}} | ||
The following is a list of {{Plural|OoT3D|Sub-Boss|link}} and {{Plural|OoT3D|Boss|link}} that appear in {{OoT}} and {{OoT3D}}. The information is presented here in two ways: first with a generalized listing placed by chronological encounter order, and then a detailed breakdown of every fight ordered by location. The {{MQ}} mode of {{OoT|-}} is displayed separately from the normal mode in every listing. | |||
{{OTOC}} | {{OTOC}} | ||
</noinclude><onlyinclude> | |||
=={{Plural|OoT3D|Sub-Boss}}== | |||
<includeonly>{{Main|Bosses in Ocarina of Time}}</includeonly> | |||
;{{OoT|-}} | |||
{{Gallery List|Enemies | |||
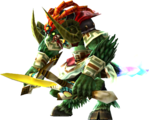
|OoT= Lizalfos<br/>{{Small|{{·}} {{Term|OoT|Dodongo's Cavern|link}}}}, Big Octo<br/>{{Small|{{·}} {{Term|OoT|Inside Jabu-Jabu's Belly|link}}}}, Stalfos<br/>{{Small|{{·}} {{Term|OoT|Forest Temple|link}}}}, Beth<br/>{{Small|{{·}} {{Term|OoT|Forest Temple|link}}}}, Joelle<br/>{{Small|{{·}} {{Term|OoT|Forest Temple|link}}}}, Amy<br/>{{Small|{{·}} {{Term|OoT|Forest Temple|link}}}}, Meg<br/>{{Small|{{·}} {{Term|OoT|Forest Temple|link}}}}, Flare Dancer<br/>{{Small|{{·}} {{Term|OoT|Fire Temple|link}}}}, White Wolfos<br/>{{Small|{{·}} {{Term|OoT|Ice Cavern|link}}}}, Dark Link<br/>{{Small|{{·}} {{Term|OoT|Water Temple|link}}}}, Dead Hand<br/>{{Small|{{·}} {{Term|OoT|Bottom of the Well|link}}<br/>{{·}} {{Term|OoT|Shadow Temple|link}}}}, Dead Hand's Hand<br/>{{Small|{{·}} {{Term|OoT|Bottom of the Well|link}}<br/>{{·}} {{Term|OoT|Shadow Temple|link}}}}, Iron Knuckle<br/>{{Small|{{·}} {{Term|OoT|Spirit Temple|link}}}}, Iron Knuckle [2]<br/>{{Small|{{·}} {{Term|OoT|Spirit Temple|link}}}} | |||
|OoT3D= Lizalfos<br/>{{Small|{{·}} {{Term|OoT3D|Dodongo's Cavern|link}}}}, Big Octo<br/>{{Small|{{·}} {{Term|OoT3D|Inside Jabu-Jabu's Belly|link}}}}, Stalfos<br/>{{Small|{{·}} {{Term|OoT3D|Forest Temple|link}}}}, Beth<br/>{{Small|{{·}} {{Term|OoT3D|Forest Temple|link}}}}, Joelle<br/>{{Small|{{·}} {{Term|OoT3D|Forest Temple|link}}}}, Amy<br/>{{Small|{{·}} {{Term|OoT3D|Forest Temple|link}}}}, Meg<br/>{{Small|{{·}} {{Term|OoT3D|Forest Temple|link}}}}, Flare Dancer<br/>{{Small|{{·}} {{Term|OoT3D|Fire Temple|link}}}}, White Wolfos<br/>{{Small|{{·}} {{Term|OoT3D|Ice Cavern|link}}}}, Dark Link<br/>{{Small|{{·}} {{Term|OoT3D|Water Temple|link}}}}, Dead Hand<br/>{{Small|{{·}} {{Term|OoT3D|Bottom of the Well|link}}<br/>{{·}} {{Term|OoT3D|Shadow Temple|link}}}}, Dead Hand's Hand<br/>{{Small|{{·}} {{Term|OoT3D|Bottom of the Well|link}}<br/>{{·}} {{Term|OoT3D|Shadow Temple|link}}}}, Iron Knuckle<br/>{{Small|{{·}} {{Term|OoT3D|Spirit Temple|link}}}}, Iron Knuckle [2]<br/>{{Small|{{·}} {{Term|OoT3D|Spirit Temple|link}}}} | |||
}} | |||
;{{MQ|-}} | |||
{{Gallery List|Enemies | |||
|OoT= Lizalfos<br/>{{Small|{{·}} {{Term|OoT|Dodongo's Cavern|link}}}}, Big Octo<br/>{{Small|{{·}} {{Term|OoT|Inside Jabu-Jabu's Belly|link}}}}, Stalfos<br/>{{Small|{{·}} {{Term|OoT|Forest Temple|link}}<br/>{{·}} {{Term|OoT|Ice Cavern|link}}<br/>{{·}} {{Term|OoT|Water Temple|link}}<br/>{{·}} {{Term|OoT|Fire Temple|link}}<br/>{{·}} {{Term|OoT|Inside Ganon's Castle|link}}}}, Beth<br/>{{Small|{{·}} {{Term|OoT|Forest Temple|link}}}}, Joelle<br/>{{Small|{{·}} {{Term|OoT|Forest Temple|link}}}}, Amy<br/>{{Small|{{·}} {{Term|OoT|Forest Temple|link}}}}, Meg<br/>{{Small|{{·}} {{Term|OoT|Forest Temple|link}}}}, Dark Link<br/>{{Small|{{·}} {{Term|OoT|Water Temple|link}}}}, Iron Knuckle<br/>{{Small|{{·}} {{Term|OoT|Fire Temple|link}}<br/>{{·}} {{Term|OoT|Spirit Temple|link}}<br/>{{·}} {{Term|OoT|Gerudo Training Ground|link}}<br/>{{·}} {{Term|OoT|Inside Ganon's Castle|link}}}}, Flare Dancer<br/>{{Small|{{·}} {{Term|OoT|Fire Temple|link}}}}, Dead Hand<br/>{{Small|{{·}} {{Term|OoT|Bottom of the Well|link}}<br/>{{·}} {{Term|OoT|Shadow Temple|link}}}}, Dead Hand's Hand<br/>{{Small|{{·}} {{Term|OoT|Bottom of the Well|link}}<br/>{{·}} {{Term|OoT|Shadow Temple|link}}}}, Iron Knuckle [3]<br/>{{Small|{{·}} {{Term|OoT|Spirit Temple|link}}<br/>{{·}} {{Term|OoT|Gerudo Training Ground|link}}}}, Iron Knuckle [2]<br/>{{Small|{{·}} {{Term|OoT|Spirit Temple|link}}}} | |||
|OoT3D= Lizalfos<br/>{{Small|{{·}} {{Term|OoT3D|Dodongo's Cavern|link}}}}, Big Octo<br/>{{Small|{{·}} {{Term|OoT3D|Inside Jabu-Jabu's Belly|link}}}}, Stalfos<br/>{{Small|{{·}} {{Term|OoT3D|Forest Temple|link}}<br/>{{·}} {{Term|OoT3D|Ice Cavern|link}}<br/>{{·}} {{Term|OoT3D|Water Temple|link}}<br/>{{·}} {{Term|OoT3D|Fire Temple|link}}<br/>{{·}} {{Term|OoT3D|Inside Ganon's Castle|link}}}}, Beth<br/>{{Small|{{·}} {{Term|OoT3D|Forest Temple|link}}}}, Joelle<br/>{{Small|{{·}} {{Term|OoT3D|Forest Temple|link}}}}, Amy<br/>{{Small|{{·}} {{Term|OoT3D|Forest Temple|link}}}}, Meg<br/>{{Small|{{·}} {{Term|OoT3D|Forest Temple|link}}}}, Dark Link<br/>{{Small|{{·}} {{Term|OoT3D|Water Temple|link}}}}, Iron Knuckle<br/>{{Small|{{·}} {{Term|OoT3D|Fire Temple|link}}<br/>{{·}} {{Term|OoT3D|Spirit Temple|link}}<br/>{{·}} {{Term|OoT3D|Gerudo Training Ground|link}}<br/>{{·}} {{Term|OoT3D|Inside Ganon's Castle|link}}}}, Flare Dancer<br/>{{Small|{{·}} {{Term|OoT3D|Fire Temple|link}}}}, Dead Hand<br/>{{Small|{{·}} {{Term|OoT3D|Bottom of the Well|link}}<br/>{{·}} {{Term|OoT3D|Shadow Temple|link}}}}, Dead Hand's Hand<br/>{{Small|{{·}} {{Term|OoT3D|Bottom of the Well|link}}<br/>{{·}} {{Term|OoT3D|Shadow Temple|link}}}}, Iron Knuckle [3]<br/>{{Small|{{·}} {{Term|OoT3D|Spirit Temple|link}}<br/>{{·}} {{Term|OoT3D|Gerudo Training Ground|link}}}}, Iron Knuckle [2]<br/>{{Small|{{·}} {{Term|OoT3D|Spirit Temple|link}}}} | |||
}} | |||
=={{Plural|OoT|Boss}}== | |||
<includeonly>{{Main|Bosses in Ocarina of Time}}</includeonly> | |||
{{Gallery List|Enemies|widths= 160 | |||
|OoT= | |||
Gohma [File:OoT Gohma Artwork.png]<br/>''Parasitic Armored Arachnid''<br/>{{Small|{{·}} {{Term|OoT|Inside the Deku Tree|link}}}}, | |||
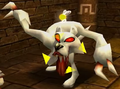
King Dodongo [File:OoT King Dodongo Artwork.png]<br/>''Infernal Dinosaur''<br/>{{Small|{{·}} {{Term|OoT|Dodongo's Cavern|link}}}}, | |||
Barinade [File:OoT Barinade Artwork.png]<br/>''Bio-Electric Anemone''<br/>{{Small|{{·}} {{Term|OoT|Inside Jabu-Jabu's Belly|link}}}}, | |||
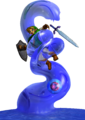
Phantom Ganon [File:OoT Phantom Ganon Artwork.png]<br/>''Evil Spirit from Beyond''<br/>{{Small|{{·}} {{Term|OoT|Forest Temple|link}}}}, | |||
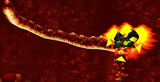
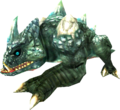
Volvagia [File:OoT Volvagia Artwork.png]<br/>''Subterranean Lava Dragon''<br/>{{Small|{{·}} {{Term|OoT|Fire Temple|link}}}}, | |||
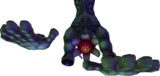
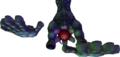
Morpha [File:OoT Morpha Artwork.png]<br/>''Giant Aquatic Amoeba''<br/>{{Small|{{·}} {{Term|OoT|Water Temple|link}}}}, | |||
Bongo Bongo [File:OoT Bongo Bongo Artwork.png]<br/>''Phantom Shadow Beast''<br/>{{Small|{{·}} {{Term|OoT|Shadow Temple|link}}}}, | |||
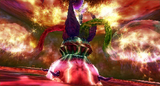
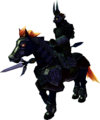
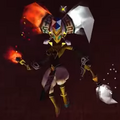
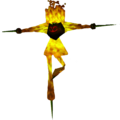
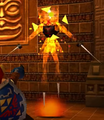
Twinrova [File:OoT Twinrova Artwork.png]<br/>''Sorceress Sisters''<br/>{{Small|{{·}} {{Term|OoT|Spirit Temple|link}}}}, | |||
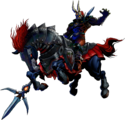
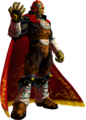
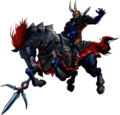
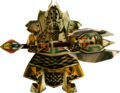
Ganondorf [File:OoT Ganondorf Artwork.png]<br/>''Great King of Evil''<br/>{{Small|{{·}} {{Term|OoT|Inside Ganon's Castle|link}}}}, | |||
Ganon [File:OoT Ganon Artwork.png]<br/>{{Small|{{·}} {{Term|OoT|Ganon's Castle|link}}}} | |||
|OoT3D= | |||
Gohma<br/>''Parasitic Armored Arachnid''<br/>{{Small|{{·}} {{Term|OoT3D|Inside the Deku Tree|link}}}}, | |||
King Dodongo<br/>''Infernal Dinosaur''<br/>{{Small|{{·}} {{Term|OoT3D|Dodongo's Cavern|link}}}}, | |||
Barinade<br/>''Bio-Electric Anemone''<br/>{{Small|{{·}} {{Term|OoT3D|Inside Jabu-Jabu's Belly|link}}}}, | |||
Phantom Ganon<br/>''Evil Spirit from Beyond''<br/>{{Small|{{·}} {{Term|OoT3D|Forest Temple|link}}}}, | |||
Volvagia<br/>''Subterranean Lava Dragon''<br/>{{Small|{{·}} {{Term|OoT3D|Fire Temple|link}}}}, | |||
Morpha<br/>''Giant Aquatic Amoeba''<br/>{{Small|{{·}} {{Term|OoT3D|Water Temple|link}}}}, | |||
Bongo Bongo<br/>''Phantom Shadow Beast''<br/>{{Small|{{·}} {{Term|OoT3D|Shadow Temple|link}}}}, | |||
Twinrova<br/>''Sorceress Sisters''<br/>{{Small|{{·}} {{Term|OoT3D|Spirit Temple|link}}}}, | |||
Ganondorf [File:OoT3D Ganondorf Artwork.png]<br/>''Great King of Evil''<br/>{{Small|{{·}} {{Term|OoT3D|Inside Ganon's Castle|link}}}}, | |||
Ganon<br/>{{Small|{{·}} {{Term|OoT3D|Ganon's Castle|link}}}} | |||
}}</onlyinclude><noinclude> | |||
=={{OoT|-}}== | =={{OoT|-}}== | ||
| Line 415: | Line 455: | ||
|OoT3D= Ganondorf [File:OoT3D Ganondorf Artwork.png][Qty:1]<br/>''Great King of Evil'' | |OoT3D= Ganondorf [File:OoT3D Ganondorf Artwork.png][Qty:1]<br/>''Great King of Evil'' | ||
}} | }} | ||
<noinclude> | |||
{{Ref}} | {{Ref}} | ||
Revision as of 18:28, 26 August 2023
The following is a list of Sub-Bosses and Bosses that appear in Ocarina of Time and Ocarina of Time 3D. The information is presented here in two ways: first with a generalized listing placed by chronological encounter order, and then a detailed breakdown of every fight ordered by location. The Master Quest mode of Ocarina of Time is displayed separately from the normal mode in every listing.
Sub-Bosses
- Ocarina of Time


- Master Quest


Bosses
-
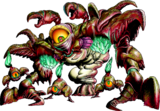
Gohma
Parasitic Armored Arachnid
• Inside the Deku Tree -
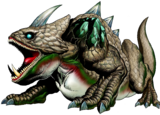
King Dodongo
Infernal Dinosaur
• Dodongo's Cavern -
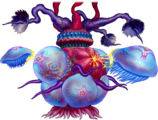
Barinade
Bio-Electric Anemone
• Inside Jabu-Jabu's Belly -
Phantom Ganon
Evil Spirit from Beyond
• Forest Temple -
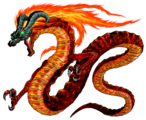
Volvagia
Subterranean Lava Dragon
• Fire Temple -
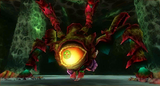
Morpha
Giant Aquatic Amoeba
• Water Temple -
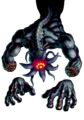
Bongo Bongo
Phantom Shadow Beast
• Shadow Temple -
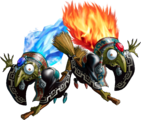
Twinrova
Sorceress Sisters
• Spirit Temple -
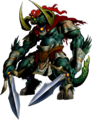
Ganondorf
Great King of Evil
• Inside Ganon's Castle -


-
Gohma
Parasitic Armored Arachnid
• Inside the Deku Tree -
King Dodongo
Infernal Dinosaur
• Dodongo's Cavern -
Barinade
Bio-Electric Anemone
• Inside Jabu-Jabu's Belly -
Phantom Ganon
Evil Spirit from Beyond
• Forest Temple -
Volvagia
Subterranean Lava Dragon
• Fire Temple -

Morpha
Giant Aquatic Amoeba
• Water Temple -
Bongo Bongo
Phantom Shadow Beast
• Shadow Temple -
Twinrova
Sorceress Sisters
• Spirit Temple -
Ganondorf
Great King of Evil
• Inside Ganon's Castle -


Ocarina of Time
Inside the Deku Tree
Dodongo's Cavern
- Sub-Bosses
- Boss
-
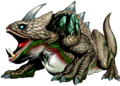
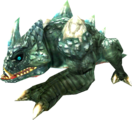
King Dodongo ×1
Infernal Dinosaur
-
King Dodongo ×1
Infernal Dinosaur
Inside Jabu-Jabu's Belly
- Sub-Boss
- Boss
Forest Temple
- Sub-Bosses
- ↑ 1.0 1.1 Though Beth does not have the standard Sub-Boss music, The Legend of Zelda: Ocarina of Time—Prima's Official Strategy Guide by Prima Games confirms that she is a Sub-Boss.[1]
- ↑ 1.0 1.1 Though Joelle does not have the standard Sub-Boss music, Encyclopedia confirms that she is a Sub-Boss.[2]
- ↑ 1.0 1.1 Though Amy does not have the standard Sub-Boss music, Encyclopedia confirms that she is a Sub-Boss.[3]
- Boss
-
Phantom Ganon ×1
Evil Spirit from Beyond
-
Phantom Ganon ×1
Evil Spirit from Beyond
Fire Temple
- Sub-Bosses
-
Flare Dancer ×1
-
Flare Dancer ×1
-
Flare Dancer ×1
-
Flare Dancer ×1
- Boss
Ice Cavern
- Sub-Boss
-
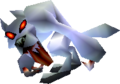
White Wolfos ×1
-
White Wolfos ×1
Water Temple
- Sub-Boss
- Boss
Bottom of the Well
- Sub-Bosses
Shadow Temple
- Sub-Bosses
- Boss
-
Bongo Bongo ×1
Phantom Shadow Beast
-
Bongo Bongo ×1
Phantom Shadow Beast
Spirit Temple
- Sub-Bosses
-
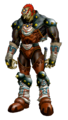
Iron Knuckle ×1
-
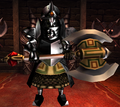
Iron Knuckle ×1
-
Iron Knuckle ×1
-
Iron Knuckle ×1
- Boss
- Phase 1
- Phase 2

Inside Ganon's Castle
- Boss
Ganon's Castle
- Boss
Master Quest
Inside the Deku Tree
- Boss
Dodongo's Cavern
- Sub-Bosses
- Boss
-
King Dodongo ×1
Infernal Dinosaur
-
King Dodongo ×1
Infernal Dinosaur
Inside Jabu-Jabu's Belly
- Sub-Boss
- Boss
Forest Temple
- Sub-Bosses
- Boss
Ice Cavern
- Sub-Boss
Water Temple
- Sub-Bosses
- Boss
Fire Temple
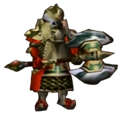
- Sub-Bosses
-
Iron Knuckle ×1
-
Iron Knuckle ×1
-
Flare Dancer ×1
-
Flare Dancer ×1
-
Flare Dancer ×1
-
Flare Dancer ×1
- Boss
Shadow Temple
- Sub-Bosses
- Boss
-
Bongo Bongo ×1
-
Bongo Bongo ×1
Spirit Temple
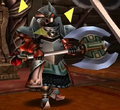
- Sub-Bosses
-
Iron Knuckle ×1
-
Iron Knuckle ×1
-
Iron Knuckle ×1
-
Iron Knuckle ×1
-
Iron Knuckle ×1
-

Iron Knuckle ×1
-
Iron Knuckle ×1
-
Iron Knuckle ×1
- Boss
- Phase 1
- Phase 2
Gerudo Training Ground
- Sub-Boss
-
Iron Knuckle ×1
-
Iron Knuckle ×1
-
Iron Knuckle ×1
-
Iron Knuckle ×1
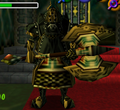
Inside Ganon's Castle
- Sub-Boss
-
Iron Knuckle ×1
-
Iron Knuckle ×1
- Boss
References
- ↑ The Legend of Zelda: Ocarina of Time—Prima's Official Strategy Guide, Prima Games, pg. 51
- ↑ Encyclopedia, Dark Horse Books, pg. 186
- ↑ Encyclopedia, Dark Horse Books, pg. 162
