Silver Shrine
Silver Shrine is a Level in Tri Force Heroes.[1] It is the third Level of the Ice Cavern Area, preceded by Snowball Ravine and followed by Ice Temple.
Silver Shrine serves as the last stretch to the Ice Temple, where the Links climb the remainder of the mountain. The Level features numerous Moles that are used to climb to higher ledges by pounding them with the Magic Hammer. The Magic Hammer can also be used to shatter Ice Stalagmites, which may conceal Items such as Hearts and Energy Potions.

In Stage 1, the Links begin at a snowy field with trees with crystallized leaves. Up ahead are three Magic Hammers surrounded by Stakes. As these Stakes normally require the Magic Hammer to pound down, the Links must instead throw each other over to acquire the Magic Hammers. To the east of the Items is an ice rink with a Squiddy, and to the west are a group of Moles which can spring the Links up to a higher ledge. From here, the heroes cross a narrow, curving bridge of ice tiles above a small lake, which takes the Links back to the starting area should they fall off. After the bridge is another set of Moles; a row of tall Stakes prevent the Links from springing up to the ledge from the left Mole, but two of the Links can be thrown onto a smaller ledge to the right, where they can spring through an opening. These two Links can then form a Totem to pound the tall Stakes, allowing the third Link to spring up and reunite with them. From here, climbing several more ledges using Moles will lead to the Triforce Gateway. Two Treasure Chests encountered along the way, which contain a Blue Rupee and a Red Rupee.

In Stage 2, the Links reappear higher up the mountain. Upon using the Moles to spring themselves up to the next platform, the Links face off against a group of Terrorpins. These Enemies can be flipped onto their backs and their vulnerable underbellies exposed by using the Magic Hammer, which will also work to break up the Terrorpins stacked on top of each other. After they are defeated, a lift will lower and raise the Links to the next platform, where they face more Terrorpins atop a sheet of ice tiles over a pit. The Links must be careful while attacking the Terrorpins, as the Magic Hammer will cause the ice flooring to break more quickly as well. However, once any ice tiles are broken, the Terrorpins can be knocked into the pits below. After they are defeated, a large wall lowers, revealing another set of Moles that will spring the Links to the Triforce Gateway.

Stage 3 begins with a snowy walkway. Up ahead is a cliff that the heroes are unable to climb, due to its icy, sloping face. In front of it is a narrow set of stairs leading to three Moles, which spring the Links a bit short of the top of the cliff. Along the edge of the cliff, a small platform slides continually back and forth; the Links must time their strike so the Moles will spring them onto this platform. Just ahead, a Big Switch on the ground opens a gateway when stepped on by all three Links. They enter an ice rink covered with Ice Stalagmites, where more Terrorpins and sliding Mini Freezards are found. A Treasure Chest behind one of the Ice Stalagmites contains a Red Rupee. Moles at the north end are used to spring the Links out of the rink to the next ledge, where they find a much taller Mole next to a raised Shock Switch. Two of the Links must form a Totem to pound the Mole and hit the Shock Switch, which will create a timed platform at the next ledge ahead, then the third Link must lift the other two into a full Totem and spring onto the platform before it disappears. This is done more easily if the Switch is triggered after the Mole is pounded. On the final ledge is another Big Switch, which will open a gateway to the next Triforce Gateway.

In Stage 4, the Links appear at the very top of the mountain, where they fight three Deadrocks on a platform. While these Enemies can be stunned with the Sword, briefly turning them to stone, they can only be defeated with the Magic Hammer. After they are defeated, a bridge appears leading to an ice-covered platform where three more Deadrocks are fought. The Links must be cautious, as the icy floor will cause them to lost traction, often slipping out of reach after striking a Deadrock with their Sword. This makes it helpful for two or more of the Links to team up against a Deadrock, with one Link ready to quickly smash it with the Magic Hammer. Another strategy is to throw one of the numerous Jars on the platform at a Deadrock, stunning it without causing Link to slide away. After the last of the Deadrocks are defeated, a gate lowers to another set of Moles leading to the last Triforce Gateway.
Drablands Challenges
Once the Boss of the Ice Cavern has been defeated, Silver Shrine can be replayed with the following Drablands Challenges: "Win without using a sword!", "Evade the Wallmaster!", and "Halved attack and defense!".
Materials
At the end of the Level, three Treasure Chests can be opened. Two contain the same Material, and one contains another, more valuable Material.
| Drablands Challenge | — |
|---|---|
| Magical Materials | |
| Drablands Challenge | Win without using a sword! |
| Magical Materials | |
| Drablands Challenge | Halved attack and defense! |
| Magical Materials | |
| Drablands Challenge | Evade the Wallmaster! |
| Magical Materials |
| Drablands Challenge | Magical Materials |
|---|---|
— | |
Win without using a sword! | |
Halved attack and defense! | |
Evade the Wallmaster! |
Enemies and Traps

![Terrorpin ×15[a]](/wiki/File:TFH_Terrorpin_Model.png)


![Wallmaster ×1[a]](/wiki/File:TFH_Wallmaster_Model.png)
Treasure Chests
| Treasure Chest | |
|---|---|
| Contents | |
| Notes | Inside an Ice Stalagmite on the hill south of the Triforce Gateway in Stage 1 |
| Treasure Chest | |
| Contents | |
| Notes | Behind the Ice Stalagmites on the hill east of the Triforce Gateway in Stage 1 |
| Treasure Chest | |
| Contents | |
| Notes | Behind an Ice Stalagmite in the icy area of Stage 3 |

| Treasure Chest | Contents | Notes |
|---|---|---|
Inside an Ice Stalagmite on the hill south of the Triforce Gateway in Stage 1 | ||
Behind the Ice Stalagmites on the hill east of the Triforce Gateway in Stage 1 | ||
Behind an Ice Stalagmite in the icy area of Stage 3 |
Trivia
- As described in Vol. 6 of the Drablands Diary, a snow princess is hidden in each Level of the Ice Cavern. One can be found in Stage 2 of Silver Shrine by shifting the camera to the right from the Triforce Gateway.
Nomenclature
| Language | Names | |
|---|---|---|
Japanese | 白銀のほこら (Shirogane no Hokora)[3] | |
FrenchCA | Sanctuaire d'argent | |
FrenchEU | Sanctuaire d'argent[5] | |
German | Silberschrein[4] | |
Italian | Santuario d'argento[2] | |
SpanishLA | Santuario de plata[6] | |
SpanishEU | Santuario de Plata[7] | |
| This table was generated using translation pages. To request an addition, please contact a staff member with a reference. | ||
Gallery
-
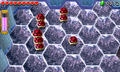
The second wave of Terrorpins on Ice, Stage 2
-
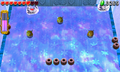
The large Ice rink in Stage 3
-
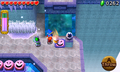
The Mole and Shock Switch to the end of Stage 3 require a Totem of two, then three Links
-
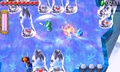
The second wave of Deadrocks on Ice, Stage 4


References
- ↑ Encyclopedia, Dark Horse Books, pg. 160
- ↑ "Santuario d'argento" — Level Selection (Tri Force Heroes)
- ↑ "白銀のほこら" — Level Selection (Tri Force Heroes)
- ↑ "Silberschrein" — Level Selection (Tri Force Heroes)
- ↑ "Sanctuaire d'argent" — Level Selection (Tri Force Heroes)
- ↑ "Santuario de plata" — Level Selection (Tri Force Heroes)
- ↑ "Santuario de Plata" — Level Selection (Tri Force Heroes)