Road to the Ancient Lab: Difference between revisions
No edit summary |
mNo edit summary |
||
| (One intermediate revision by one other user not shown) | |||
| Line 24: | Line 24: | ||
==Overview== | ==Overview== | ||
{{Collapsible | |||
|header= Map | |||
|frame= true | |||
|collapse= true | |||
|stretch= false | |||
|content= {{Tabs | |||
|tab1= Layer 1 | |||
|content1= [[File:HWAoC Road to the Ancient Lab Map.png|link=]] | |||
|tab2= Layer 2 | |||
|content2= [[File:HWAoC Road to the Ancient Lab Map 2.png|link=]] | |||
}} | |||
}} | |||
The {{Term|HWAoC|Road to the Ancient Lab}} is the second {{Term|HWAoC|Scenario|link}} in {{HWAoC}}. After fighting off the {{Plural|HWAoC|Enemy|link}} in {{Term|HWAoC|The Battle of Hyrule Field|link}}, {{Term|HWAoC|Link|link}}, {{Term|HWAoC|Zelda|link}}, and {{Term|HWAoC|Impa|link}} head to the {{Term|HWAoC|Ancient Research Institute|link}} to investigate the strange {{Term|HWAoC|Terrako|link|display=Guardian}}. However, a {{Term|HWAoC|Guardian Stalker|link}} becomes possessed by {{Term|HWAoC|Malice|link}} and attacks the group in the {{Term|HWAoC|Breach of Demise|link}}. | The {{Term|HWAoC|Road to the Ancient Lab}} is the second {{Term|HWAoC|Scenario|link}} in {{HWAoC}}. After fighting off the {{Plural|HWAoC|Enemy|link}} in {{Term|HWAoC|The Battle of Hyrule Field|link}}, {{Term|HWAoC|Link|link}}, {{Term|HWAoC|Zelda|link}}, and {{Term|HWAoC|Impa|link}} head to the {{Term|HWAoC|Ancient Research Institute|link}} to investigate the strange {{Term|HWAoC|Terrako|link|display=Guardian}}. However, a {{Term|HWAoC|Guardian Stalker|link}} becomes possessed by {{Term|HWAoC|Malice|link}} and attacks the group in the {{Term|HWAoC|Breach of Demise|link}}. | ||
The {{Term|HWAoC|Diminutive Guardian}} activates a {{Term|HWAoC|Decayed Guardian|link}} in order to attack, which damages the possessed {{Term|HWAoC|Guardian Stalker}}, though does not destroy it. | The {{Term|HWAoC|Diminutive Guardian}} activates a {{Term|HWAoC|Decayed Guardian|link}} in order to attack, which damages the possessed {{Term|HWAoC|Guardian Stalker}}, though does not destroy it. | ||
Two other {{Plural|HWAoC| | Two other {{Plural|HWAoC|Guardian}} are activated, each of them will shoot a laser to the {{Term|HWAoC|Guardian Stalker}}, which will make it possible for {{Term|HWAoC|Link}} and the others to destroy it. | ||
{{Term|HWAoC|Link}} and the others can defeat the {{Term|HWAoC|Guardian Stalker}} without activating any of the {{Plural|HWAoC|Decayed Guardian}}. | {{Term|HWAoC|Link}} and the others can defeat the {{Term|HWAoC|Guardian Stalker}} without activating any of the {{Plural|HWAoC|Decayed Guardian}}. | ||
Revision as of 11:15, 18 April 2024
Road to the Ancient Lab | |
|---|---|
 | |
| Game | Hyrule Warriors: Age of Calamity |
| Stage | Breach of Demise |
| Playable Character(s) | |
| Mini-boss(es) | Moblins |
| Boss | Guardian |
| Completion Reward(s) | Zelda |
| |
| |
| Main Theme Music | |
| Previous Scenario | Next Scenario |
| The Battle of Hyrule Field | Mipha, the Zora Princess[note 1] |
| | |
"Road to the Ancient Lab" is the second and final Scenario of Chapter 1 and second overall in Hyrule Warriors: Age of Calamity.[1]
Overview


The Road to the Ancient Lab is the second Scenario in Hyrule Warriors: Age of Calamity. After fighting off the Enemies in The Battle of Hyrule Field, Link, Zelda, and Impa head to the Royal Ancient Lab to investigate the strange Guardian. However, a Guardian becomes possessed by Malice and attacks the group in the Breach of Demise.
The Diminutive Guardian activates a Decayed Guardian in order to attack, which damages the possessed Guardian, though does not destroy it.
Two other Guardians are activated, each of them will shoot a laser to the Guardian, which will make it possible for Link and the others to destroy it.
Link and the others can defeat the Guardian without activating any of the Decayed Guardians.
Collectibles
- 6 Korok Seeds
- 6 Treasure Chests
Battlefield-Specific Materials
Nomenclature
| Language | Names | Meanings |
|---|---|---|
Dutch | Naar het laboratorium[3] | To the Lab |
FrenchEU | Vers le laboratoire royal[2] | |
German | Zum Königlichen Institut | |
| This table was generated using translation pages. To request an addition, please contact a staff member with a reference. | ||
Gallery
-

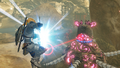
Link fighting the Guardian Stalker
-
Link fighting the Guardian Stalker


Notes
- ↑ Interchangeable chronology with Scenarios "Daruk, the Goron Hero", "Revali, the Rito Warrior", "Urbosa, the Gerudo Chief", but listed sequentially under the Chapter 2 list of Scenarios.
References
- ↑ "Road to the Ancient Lab" — Chapters (Hyrule Warriors: Age of Calamity)
- ↑ "Vers le laboratoire royal" — Chapters (Hyrule Warriors: Age of Calamity)
- ↑ "Naar het laboratorium" — Chapters (Hyrule Warriors: Age of Calamity)