Dig Cavern: Difference between revisions
MannedTooth (talk | contribs) |
m (→Minor Enemies) |
||
| (30 intermediate revisions by 12 users not shown) | |||
| Line 1: | Line 1: | ||
{{Images|OoT | {{Split|Dig Cavern, Secret Grotto}} | ||
{{Infobox | {{Lacking Images|OoT, TP}} | ||
|image= File:TP Dig Cavern. | {{Infobox Location | ||
|caption= | |image= | ||
{{Media | |||
|Model OoT3D= File:OoT3D Secret Grotto Model.png | |||
|Model TWW= File:TWW Secret Cave Model.png | |||
|Sprite TMC= File:TMC Secret Cave Sprite.png | |||
|Screenshot TP= File:TP Dig Cavern.png | |||
}} | |||
|caption= | |||
|pronunciation= | |pronunciation= | ||
|game= | |game= OoT, MM, TWW, TMC, TP | ||
|other= | |other= | ||
|inhab= | |inhab= | ||
| Line 13: | Line 20: | ||
|related= | |related= | ||
}} | }} | ||
{{Term/Store|Dig Cavern|Dig Caverns|Series, TP, TPHD|plural}},{{Exp Game|TP}}<ref>{{Cite Guide|quote= |game= TPHD|publisher= Prima|page= 437}}</ref> also known as {{Term/Store|Secret Grotto|Secret Grottoes|OoT, OoT3D}},{{Exp Game|OoT}}<ref>{{Cite Guide|quote= |game= OoT3D|publisher= Prima|page= 195}}</ref> | {{Term/Store|Dig Cavern|Dig Caverns|Series, TP, TPHD|plural}},{{Exp Game|TP}}<ref>{{Cite Guide|quote= |game= TPHD|publisher= Prima|page= 437}}</ref> also known as {{Term/Store|Secret Grotto|Secret Grottoes|OoT, OoT3D, MM, MM3D|plural}},{{Exp Game|OoT, MM}}<ref>{{Cite Guide|quote= |game= OoT3D|publisher= Prima|page= 195}}</ref><ref name="MM CE">{{Cite Guide|game= CE |publisher= Nintendo |page= 116}}</ref> '''Grottoes''',{{Exp Game|MM}}<ref name="MM CE"/> {{Term/Store|Secret Cave|Secret Caves|TMC, TWW, TWWHD|plural}},{{Exp Game|TWW, TMC}}<ref name= "TWW">{{Cite|You got the {{Color|TWWHD Red|Secret Cave Chart}}! Now you know where to find the {{Color|TWWHD Red|secret caverns}}!|N/A|TWWHD}}</ref><ref>{{Cite Guide|quote= |game= TMC|publisher= Nintendo|page= Insert Map}}</ref> and '''Secret Caverns''',{{Exp Game|TWW}}<ref name= "TWW"/> are a recurring location in {{TLoZ|Series}}. | ||
==Features and Overview== | ==Features and Overview== | ||
| Line 19: | Line 26: | ||
Secret Grottoes are underground caverns accessed through holes in the ground in {{OoT}}. Some of them must be unearthed by placing a [[Bomb]], playing the "[[Song of Storms]]", or smashing the ground with the [[Megaton Hammer]]. Others may be covered by tall grass, with Butterflies flying above to mark their locations. The [[Stone of Agony]], or [[Shard of Agony]] in {{OoT3D}}, will activate whenever a Secret Grotto is nearby. They are usually small and may only house small [[Treasure Chest]]s, [[Bug]]s, [[Fish]], [[Beehive]]s, and [[Gossip Stone]]s. [[Link]] can exit a Secret Grotto by stepping into the beam of light that shines through the entrance hole. | Secret Grottoes are underground caverns accessed through holes in the ground in {{OoT}}. Some of them must be unearthed by placing a [[Bomb]], playing the "[[Song of Storms]]", or smashing the ground with the [[Megaton Hammer]]. Others may be covered by tall grass, with Butterflies flying above to mark their locations. The [[Stone of Agony]], or [[Shard of Agony]] in {{OoT3D}}, will activate whenever a Secret Grotto is nearby. They are usually small and may only house small [[Treasure Chest]]s, [[Bug]]s, [[Fish]], [[Beehive]]s, and [[Gossip Stone]]s. [[Link]] can exit a Secret Grotto by stepping into the beam of light that shines through the entrance hole. | ||
====Minor | ====Minor {{Plural|OoT3D|Enemy}}==== | ||
{{Gallery List|Enemies | |||
|OoT= Gold Skulltula, ReDead, Skulltula, Wolfos | |||
}} | |||
==={{MM|-}}=== | ==={{MM|-}}=== | ||
| Line 31: | Line 35: | ||
====Minor Enemies==== | ====Minor Enemies==== | ||
{{Gallery List|Enemies | |||
|MM= Bio Deku Baba, Dodongo, Mini Baba, Peahat, Skullwalltula | |||
}} | |||
==={{TWW|-}}=== | ==={{TWW|-}}=== | ||
| Line 44: | Line 44: | ||
The most common type of Secret Cave is a large, pillared, central room surrounded by four rooms full of enemies. Each time Link completes a room by defeating the enemies within, a candle is lit above its door. After lighting all four candles, Link will fight a group of powerful enemies in the central room. This unlocks a back room containing a Treasure Chest. The second most common type of Secret Cave is a large central room surrounded by three high perches from which enemies appear. Usually, Link will have to defeat the enemies in order to make a Treasure Chest appear in the center of the room. On [[Angular Isles]], Link must build a tall block tower to reflect light into a Treasure Chest with the [[Mirror Shield]]. | The most common type of Secret Cave is a large, pillared, central room surrounded by four rooms full of enemies. Each time Link completes a room by defeating the enemies within, a candle is lit above its door. After lighting all four candles, Link will fight a group of powerful enemies in the central room. This unlocks a back room containing a Treasure Chest. The second most common type of Secret Cave is a large central room surrounded by three high perches from which enemies appear. Usually, Link will have to defeat the enemies in order to make a Treasure Chest appear in the center of the room. On [[Angular Isles]], Link must build a tall block tower to reflect light into a Treasure Chest with the [[Mirror Shield]]. | ||
====Minor | ====Minor {{Plural|TWWHD|Enemy}}==== | ||
{{Gallery List|Enemies | |||
|TWW= Armos, Armos Knight, Boko Baba, Bokoblin, Darknut, Fire Keese, Floormaster, Green Chuchu, Kargaroc, Keese, Magtail, Miniblin, Moblin, Morth, Mothula, Peahat, Red Bubble, Red Chuchu, Shield Bokoblin, Stalfos, Tentacle, Wizzrobe, Yellow Wizzrobe | |||
}} | |||
==={{TMC|-}}=== | ==={{TMC|-}}=== | ||
{{Plural|TMC|Secret Cave}} appear throughout {{Term|TMC|Hyrule|link}} in {{TMC}}, and can only be accessed once {{Term|TMC|Link|link}} obtains the {{Term|TMC|Mole Mitts|link}} from the {{Term|TMC|Fortress of Winds|link}}. Some rest on the edge of water, and are inaccessible until {{Term|TMC|Link}} is able to {{Term|TMC|Kinstone Fusion|link|display=Fuse}} {{Plural|TMC|Kinstone|link}} with the correct person in {{Term|TMC|Hyrule}}. | 13 different {{Plural|TMC|Secret Cave}} appear throughout {{Term|TMC|Hyrule|link}} in {{TMC}}, and can only be accessed once {{Term|TMC|Link|link}} obtains the {{Term|TMC|Mole Mitts|link}} from the {{Term|TMC|Fortress of Winds|link}}. Some rest on the edge of water, and are inaccessible until {{Term|TMC|Link}} is able to {{Term|TMC|Kinstone Fusion|link|display=Fuse}} {{Plural|TMC|Kinstone|link}} with the correct person in {{Term|TMC|Hyrule}}. | ||
{{Plural|TMC|Mysterious Wall|link}} are found in {{Plural|TMC|Secret Cave}}. | {{Plural|TMC|Mysterious Wall|link}} are found in {{Plural|TMC|Secret Cave}}. | ||
{| class="wikitable" style="text-align:center" | |||
|- | |||
!style="text-align:left"|Location | |||
!Number of {{Plural|TMC|Secret Cave}} | |||
|- | |||
|style="text-align:left"|{{Term|TMC|Castor Wilds|link}} | |||
|1 | |||
|- | |||
|style="text-align:left"|{{Term|TMC|Eastern Hills|link}} | |||
|1 | |||
|- | |||
|style="text-align:left"|{{Term|TMC|Hyrule Town|link}} | |||
|1 | |||
|- | |||
|style="text-align:left"|{{Term|TMC|Lake Hylia|link}} | |||
|2 | |||
|- | |||
|style="text-align:left"|{{Term|TMC|Lon Lon Ranch|link}} | |||
|1 | |||
|- | |||
|style="text-align:left"|{{Term|TMC|Minish Woods|link}} | |||
|2 | |||
|- | |||
|style="text-align:left"|{{Term|TMC|Mount Crenel|link}} | |||
|1 | |||
|- | |||
|style="text-align:left"|{{Term|TMC|Trilby Highlands|link}} | |||
|2 | |||
|- | |||
|style="text-align:left"|{{Term|TMC|Veil Falls|link}} | |||
|2 | |||
|} | |||
====Minor Enemies==== | ====Minor Enemies==== | ||
{{Gallery List|Enemies | |||
|TMC= Black Beetle, Like Like, Rupee Like, Spark | |||
}} | |||
==={{TP|-}}=== | ==={{TP|-}}=== | ||
| Line 89: | Line 96: | ||
====Minor Enemies==== | ====Minor Enemies==== | ||
{{Gallery List|Enemies | |||
|TP= Beamos, Bombfish, Bubble, Deku Baba, Dodongo, Ice Keese, Imp Poe, Keese, Rat, Shadow Deku Baba, Shadow Insect, Skullfish, Skulltula, Tektite, Torch Slug, Yellow Chu | |||
}} | |||
==Nomenclature== | |||
{{Nomenclature}} | |||
==Gallery== | ==Gallery== | ||
<gallery> | <gallery> | ||
File:SecretGrotto1.jpg|A Grotto from {{MM|-}} | File:SecretGrotto1.jpg|A Grotto from {{MM|-}} | ||
File:MM Peahat Grotto.png|The interior of a Grotto from {{MM|-}} | File:MM Peahat Grotto.png|The interior of a Grotto from {{MM|-}} | ||
| Line 117: | Line 111: | ||
File:Secret Cave 2.jpg|The interior of a Secret Cave from {{TWW|-}} | File:Secret Cave 2.jpg|The interior of a Secret Cave from {{TWW|-}} | ||
File:Secret Cave 3.jpg|The interior of a Secret Cave from {{TWW|-}} | File:Secret Cave 3.jpg|The interior of a Secret Cave from {{TWW|-}} | ||
File:Cliff Plateau | File:TWW Cliff Plateau Isles Secret Cave.png|The interior of a Secret Cave from {{TWW|-}} | ||
File:StoneHeadTWW4.png|The interior of a Secret Cave from {{TWW|-}} | File:StoneHeadTWW4.png|The interior of a Secret Cave from {{TWW|-}} | ||
File:TMC Secret Cave Sprite 2.png|A {{Term|TMC|Secret Cave}} in {{Term|TMC|Hyrule Town}} from {{TMC|-}} | |||
File:TMC Secret Cave Sprite 3.png|A {{Term|TMC|Secret Cave}} on {{Term|TMC|Mount Crenel}} from {{TMC|-}} | |||
File:TMC Secret Cave Sprite 4.png|A {{Term|TMC|Secret Cave}} at {{Term|TMC|Lake Hylia}} from {{TMC|-}} | |||
File:TMC Secret Cave Sprite 5.png|A {{Term|TMC|Secret Cave}} in {{Term|TMC|Minish Woods}} from {{TMC|-}} | |||
File:TMC Secret Cave Sprite 6.png|A {{Term|TMC|Secret Cave}} in {{Term|TMC|Castor Wilds}} from {{TMC|-}} | |||
File:TMC Secret Cave Sprite 7.png|A {{Term|TMC|Secret Cave}} at {{Term|TMC|Veil Falls}} from {{TMC|-}} | |||
</gallery> | </gallery> | ||
| Line 129: | Line 129: | ||
{{Categories | {{Categories | ||
| | |Caverns, Caves | ||
|locations= TP, TPHD | |||
}} | }} | ||
Latest revision as of 08:24, 18 July 2023

Dig Caverns,(TP)[1] also known as Secret Grottoes,(OoT | MM)[2][3] Grottoes,(MM)[3] Secret Caves,(TWW | TMC)[4][5] and Secret Caverns,(TWW)[4] are a recurring location in The Legend of Zelda series.
Features and Overview
Ocarina of Time
Secret Grottoes are underground caverns accessed through holes in the ground in Ocarina of Time. Some of them must be unearthed by placing a Bomb, playing the "Song of Storms", or smashing the ground with the Megaton Hammer. Others may be covered by tall grass, with Butterflies flying above to mark their locations. The Stone of Agony, or Shard of Agony in Ocarina of Time 3D, will activate whenever a Secret Grotto is nearby. They are usually small and may only house small Treasure Chests, Bugs, Fish, Beehives, and Gossip Stones. Link can exit a Secret Grotto by stepping into the beam of light that shines through the entrance hole.
Minor Enemies


Majora's Mask
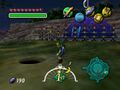
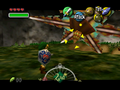
Grottoes are underground caverns accessed through holes in the ground in Majora's Mask. Some of them must be unearthed by placing a Bomb. Others may be covered by tall grass, with Butterflies flying above to mark their locations. The controller will rumble whenever a Grotto is nearby. In Majora's Mask 3D, a hidden Grotto will glow if the Mask of Truth is worn. While using the telescope in the Astral Observatory, Link can spot several men around Termina Field marking the location of Grottoes. They are usually small and may house Pieces of Heart. Link can exit a Grotto by stepping into the beam of light that shines through the entrance hole.
Minor Enemies


The Wind Waker
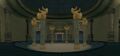
Secret Caves are underground caverns accessed through holes in the ground in The Wind Waker. They usually contain large amounts of Rupees, Treasure Charts, and Pieces of Heart. Link can exit a Secret Cave by stepping into the beam of light that shines through the entrance hole. The Secret Cave Chart shows the location of all Secret Caves in the Great Sea.
The most common type of Secret Cave is a large, pillared, central room surrounded by four rooms full of enemies. Each time Link completes a room by defeating the enemies within, a candle is lit above its door. After lighting all four candles, Link will fight a group of powerful enemies in the central room. This unlocks a back room containing a Treasure Chest. The second most common type of Secret Cave is a large central room surrounded by three high perches from which enemies appear. Usually, Link will have to defeat the enemies in order to make a Treasure Chest appear in the center of the room. On Angular Isles, Link must build a tall block tower to reflect light into a Treasure Chest with the Mirror Shield.
Minor Enemies


The Minish Cap
13 different Secret Caves appear throughout Hyrule in The Minish Cap, and can only be accessed once Link obtains the Mole Mitts from the Fortress of Winds. Some rest on the edge of water, and are inaccessible until Link is able to Fuse Kinstones with the correct person in Hyrule.
Mysterious Walls are found in Secret Caves.
| Location | Number of Secret Caves |
|---|---|
| Castor Wilds | 1 |
| Eastern Hills | 1 |
| Hyrule Town | 1 |
| Lake Hylia | 2 |
| Lon Lon Ranch | 1 |
| Minish Woods | 2 |
| Mount Crenel | 1 |
| Trilby Highlands | 2 |
| Veil Falls | 2 |
Minor Enemies
Twilight Princess
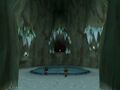
Dig Caverns are underground caverns accessed through digging in the ground as Wolf Link in Twilight Princess. They can be found with Wolf Link's Senses, appearing as large, dark markings on the ground that sparkle. They are usually small and may house Treasure Chests or water where Link can fish. Link can exit a Cavern by stepping on a rock with a beam of light that shines through the entrance hole.
Minor Enemies


Nomenclature
| Language | Names | Meanings |
|---|---|---|
Italian | Caverna segreta (TWW)[6] | Secret cavern |
| This table was generated using translation pages. To request an addition, please contact a staff member with a reference. | ||
Gallery
-
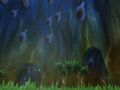
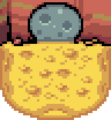
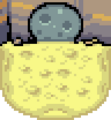
A Grotto from Majora's Mask
-
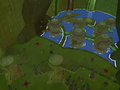
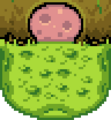
The interior of a Grotto from Majora's Mask
-
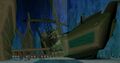
The interior of a Secret Cave from The Wind Waker
-
The interior of a Secret Cave from The Wind Waker
-
The interior of a Secret Cave from The Wind Waker
-
The interior of a Secret Cave from The Wind Waker
-
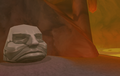
The interior of a Secret Cave from The Wind Waker
-
The interior of a Secret Cave from The Wind Waker
-

A Secret Cave in Hyrule Town from The Minish Cap
-
A Secret Cave on Mount Crenel from The Minish Cap
-

A Secret Cave at Lake Hylia from The Minish Cap
-

A Secret Cave in Minish Woods from The Minish Cap
-
A Secret Cave in Castor Wilds from The Minish Cap
-
A Secret Cave at Veil Falls from The Minish Cap


See Also
References
- ↑ The Legend of Zelda: Twilight Princess HD—PRIMA Official Game Guide, Prima Games, pg. 437
- ↑ The Legend of Zelda: Ocarina of Time 3D—Prima Official Game Guide, Prima Games, pg. 195
- ↑ 3.0 3.1 The Legend of Zelda: Collector's Edition—The Official Nintendo Player's Guide, Nintendo of America, pg. 116
- ↑ 4.0 4.1 "You got the Secret Cave Chart! Now you know where to find the secret caverns!" — N/A (The Wind Waker HD)
- ↑ The Legend of Zelda: The Minish Cap—The Official Nintendo Player's Guide, Nintendo of America, pg. Insert Map
- ↑ "Accedi alla carta nautica e guarda dove sono nascosce le caverne segrete!" — N/A (The Wind Waker, Italian localization)