Level 8 (Ancient Stone Tablets): Difference between revisions
MannedTooth (talk | contribs) m (Text replacement - "ALttP Stalfos Blue Sprite.png" to "ALttP Blue Stalfos Sprite.png") |
TriforceTony (talk | contribs) No edit summary |
||
| (17 intermediate revisions by 6 users not shown) | |||
| Line 1: | Line 1: | ||
{{DISPLAYTITLE: Level 8 ({{AST|-}})}} | {{DISPLAYTITLE: Level 8 ({{AST|-}})}} | ||
{{ | {{Noncanon}} | ||
{{ | {{Merge|Level 8}} | ||
| | {{Infobox Dungeon | ||
|type = | |type = | ||
|image = [[File:AST Level 8 Entrance.png]] | |image = [[File:AST Level 8 Entrance.png]] | ||
|caption = The entrance room of Level 8 | |caption = The entrance room of Level 8 | ||
|location = Northern | |location = Northern {{Term|AST|Hyrule|link}} | ||
|game = | |game = AST | ||
|other = | |other = | ||
|item = | |item = | ||
|quest = | {{List| | ||
{{Term|AST|Mirror Shield|link}}, | |||
{{Term|AST|Ice Rod|link}} | |||
}} | |||
|quest = {{Term|AST|Stone Tablet|link}} | |||
|mini-boss = | |mini-boss = | ||
|boss = | |boss = {{Term|AST|Trinexx|link}} | ||
|theme music = | |theme music = | ||
|strategy = | |strategy= {{StrategyWiki|BS The Legend of Zelda: Inishie no Sekiban/Week 4/Dungeon 8|Level 8}} | ||
}} | }} | ||
{{Name|Japanese|Level 8}} is the final | {{Name|Japanese|Level 8}} is the final {{Term|AST|Dungeon|link}} in {{AST}}. | ||
==Entrance to the Dungeon== | ==Entrance to the {{Term|AST|Dungeon}}== | ||
Level 8 is located in a cave northwest of the | {{Term|AST|Level 8}} is located in a cave northwest of the {{Term|AST|Sanctuary|link}}, where the path to {{Term|ALttP|Death Mountain|link}} is located in {{ALttP}}. In order to access it, the {{Term|AST|Hero of Light|link}} must lift a dark {{Term|AST|Rock|link}} by using the {{Term|AST|Titan's Mitt|link}}. | ||
==Themes and Navigation== | ==Themes and Navigation== | ||
Level 8 makes use of most of the | {{Term|AST|Level 8}} makes use of most of the {{Plural|AST|Item|link}} gathered throughout the game. The {{Term|AST|Mirror Shield|link}}, one of the {{Term|AST|Dungeon|link}}'s {{Plural|AST|Item}}, can be used to reflect the attacks of {{Plural|AST|Wizzrobe|link}} and {{Plural|AST|Laser Eye|link}}. Many walls can be blown with {{Plural|AST|Bomb|link}}, revealing hidden rooms filled with {{Plural|AST|Treasure Chest|link}} containing {{Plural|AST|Rupee|link}}. A {{Term|AST|Thief|link}} can also be found selling an {{Term|AST|Arrow|link}} upgrade for 200 {{Plural|AST|Rupee}}. {{Term|AST|Trinexx|link}}, the {{Term|AST|Dungeon}}'s {{Term|AST|Boss|link}}, can only be damaged by using the {{Term|AST|Ice Rod|link}}, found inside the {{Term|AST|Dungeon}}, and the {{Term|AST|Fire Rod|link}}. Once defeated, it drops a {{Term|AST|Heart Container|link}}, followed by a {{Term|AST|Stone Tablet|link}}. | ||
==Minor | ===Minor {{Plural|AST|Enemy}}=== | ||
{{Gallery List|Enemies | |||
|AST= Blue Bari, Red Bari, Biri, Bubble, Floor Spikes, Blue Hardhat Beetle, Red Hardhat Beetle, Helmasaur, Keese, Kodongo, Laser Eye, Medusa, Mole, Popo, Sluggula, Spark, Blue Stalfos, Red Stalfos, Wizzrobe, Yomo Medusa, Zazak | |||
}} | |||
==Gallery== | ==Gallery== | ||
| Line 54: | Line 38: | ||
</gallery> | </gallery> | ||
{{Categories | |||
|dungeons= AST | |||
}} | |||
Revision as of 03:02, 13 February 2024

Level 8 is the final Dungeon in Ancient Stone Tablets.
Entrance to the Dungeon
Level 8 is located in a cave northwest of the Sanctuary, where the path to Death Mountain is located in A Link to the Past. In order to access it, the Hero of Light must lift a dark Rock by using the Titan's Mitt.
Level 8 makes use of most of the Items gathered throughout the game. The Mirror Shield, one of the Dungeon's Items, can be used to reflect the attacks of Wizzrobes and Laser Eyes. Many walls can be blown with Bombs, revealing hidden rooms filled with Treasure Chests containing Rupees. A Thief can also be found selling an Arrow upgrade for 200 Rupees. Trinexx, the Dungeon's Boss, can only be damaged by using the Ice Rod, found inside the Dungeon, and the Fire Rod. Once defeated, it drops a Heart Container, followed by a Stone Tablet.
Minor Enemies
Gallery
-
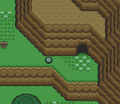
The exterior of Level 8
