Bomb Storage
Bomb Storage is a Level in Tri Force Heroes.[1] It is the second Level in the Fortress Area, preceded by Sealed Gateway and followed by Training Ground.
The Level takes place within the walls of a giant castle towering high up in the air, filled with many traps and obstacles. As its name implies, it is a storage hold of Bombs, although this only becomes obvious once the Links reach the Level's Bosses, the Hinox Brothers, who actively throw Bombs during their fight. Bombs are also one of the Level's usable Items, and are used to solve a variety of puzzles.

In Stage 1, the Links appear in a corner section. Bombs and a pair of Gust Jars are immediately provided for use. To move on from the area, the Links must cross over the large gap by propelling each other across using the Gust Jar. The two Links who cross the gap then step on a pair of Floor Switches, which creates a bridge for the third Link. The heroes then notice a cracked window within a balcony. A Bomb Flower growing nearby must be propelled with the Gust Jar towards it, which will shatter the glass and reveal a Shock Switch. Using the same method, the Switch is activated and lowers the bridge to the next area. In this same area, the Links can collect a string of green Rupees floating over some gaps by having one Link propel another across, or simply swinging their Swords to collect them from the sides. Over the bridge, another balcony window conceals a Shock Switch. As there is no Bomb Flower, one Link must place a Bomb so that another can propel it across. Hitting the Switch activates three platforms that form a bridge to the Triforce Gateway. A nearby Treasure Chest containing 20 Rupees can be reached by throwing one of the Links onto the ledge.

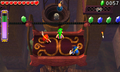
In Stage 2, the area splits into three paths, each with a Floor Switch and a large gate barricading the way. The Links must move onto these paths individually, by again propelling themselves across using the Gust Jar, preferably so that the Link with the Bombs is on the furthest left, and the two Links with the Gust Jars are on the middle and right paths. Pressing the three Floor Switches opens the gate, however the right and middle paths are blocked by Cracked Blocks, and the leftmost path is blocked by a Flame Wall. The Links then have to work together to help each other cross their respective paths, using Bombs to demolish the Blocks, and the Gust Jar to blow out the flames.
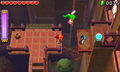
The Links walk down their respective paths, while fighting Hardhat Beetles along the way. Eventually the middle and right paths combine, reuniting these two Links, and the paths become more narrow. One of the Links can be propelled over to the left path, which leads to a raised platform with a Shock Switch nearby. The Link with Bombs should throw a Bomb over the gap to hit it; this becomes easier to achieve by forming a Totem with a second Link. Hitting this Switch activates a moving platform that allows the right path to continue forward. Two of the Links must ride this platform ahead, so that they can form a Totem to reach another Shock Switch that activates another moving platform for the other Link on the left path. Once all three Links are reunited, they can form a Totem of three to hit a Switch that lowers a bridge to the Triforce Gateway.

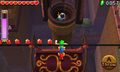
Stage 3 features an aerial lift attached to an overhead cable hanging over a long pit, which the Links must operate by propelling it forward with the Gust Jars. Rupees can be found along the cable, which can be grabbed by forming a Totem of three and carefully throwing the top Link at them. Arrow Traps on the rear walls will fire Arrows as the Links move the lift forward. The lift brings them to a tower with an opening and closing Shock Switch, which can be hit by throwing a Bomb over. This activates a tower with spinning shields holding another Switch. The Links must then form a Totem of three and throw another Bomb into this tower to activate its Switch, lowering the bridge to the Triforce Gateway. On the other side of the pit is a Squiddy and several Jars with Hearts and Rupees, plus a lever Switch which can be struck to immediately move the lift from one side of the long pit to the other, should any of the Links get stuck.

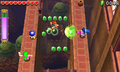
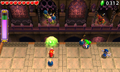
Stage 4 is where the Hinox Brothers are fought. It features a large, rectangular platform with no walls to keep the Links from falling off into the pit below. On the left and right sides are elevated platforms each with several Jars filled with Hearts. Across from the Links are five gated balconies in which the Hinox Brothers appear and throw Bombs in the Links' direction.
Drablands Challenges
Once the Bosses of the Fortress have been defeated, Bomb Storage can be replayed with the following Drablands Challenges: "Win without using a sword!", "Transport the orb quickly!", and "Don't fall at all!". Each Challenge features the same configuration of Enemies.
In "Transport the orb quickly!", the Links are given a timer of two minutes in Multiplayer, or two minutes and 45 seconds in single-player. This timer can be increased by collecting Hourglasses or wearing Linebeck's Uniform. In Stage 2, the orb appears at the point where the middle and right paths convene, rather than the beginning of the Stage.
Materials
At the end of the Level, three Treasure Chests can be opened. Two contain the same Material, and one contains another, more valuable Material.
| Drablands Challenge | — |
|---|---|
| Magical Materials | |
| Drablands Challenge | Win without using a sword! |
| Magical Materials | |
| Drablands Challenge | Transport the orb quickly! |
| Magical Materials | |
| Drablands Challenge | Don't fall at all! |
| Magical Materials |
| Drablands Challenge | Magical Materials |
|---|---|
— | |
Win without using a sword! | |
Transport the orb quickly! | |
Don't fall at all! |
Enemies and Traps
- Stage 1

- Stage 2

- Stage 3

- Stage 4


- ↑ These periodically spawn in pairs.
Treasure Chests
| Treasure Chest | |
|---|---|
| Contents | |
| Notes | On a ledge left of the bridge to the Triforce Gateway in Stage 1 |

| Treasure Chest | Contents | Notes |
|---|---|---|
On a ledge left of the bridge to the Triforce Gateway in Stage 1 |
Trivia
- Bomb Storage was one of the Level included in the E3 demo and in the distributed demo version. In the former, it was formerly known as The Fortress.
- As described in Vol. 4 of the Drablands Diary, a scarab is hidden on a wall in each Level of the Fortress. One can be found in Stage 1 of Bomb Storage, directly above and to the right of the only Treasure Chest.
Nomenclature
| Language | Names | Meanings |
|---|---|---|
Japanese | バクダン保管庫 (Bakudan Hokan-ko)[3] | Bomb Storage |
FrenchEU | Réserve de bombes[5] | |
FrenchCA | Réserve de bombes | |
German | Sprengstofflager[4] | |
Italian | Deposito delle bombe[2] | |
SpanishLA | Almacén de bombas[6] | |
SpanishEU | Almacén de bombas | |
| This table was generated using translation pages. To request an addition, please contact a staff member with a reference. | ||
Other Names
| Name | The Fortress[7] |
|---|---|
| Applies to | |
| Source | Tri Force Heroes E3 2015 demo |
| Superseded by |
| Name | Applies to | Source | Superseded by |
|---|---|---|---|
The Fortress[7] | Tri Force Heroes E3 2015 demo |
Gallery
-
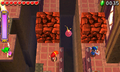
Passing a Bomb to destroy the Cracked Blocks, Stage 2
-
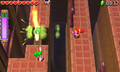
Putting out the Flame Wall in Stage 2
-
Propelling a Doppel to the left pathway, Stage 2
-
Throwing a Doppel back to the right pathway after hitting the Shock Switch, Stage 2
-
Activating the first Shock Switch in Stage 3
-
Activating the second Shock Switch in Stage 3
-

Collecting Rupees on the tightrope in Stage 3
-
Battling the Hinox Brothers in Stage 4


References
- ↑ Encyclopedia, Dark Horse Books, pg. 160
- ↑ "Deposito delle bombe" — Level Selection (Tri Force Heroes)
- ↑ "バクダン保管庫" — Level Selection (Tri Force Heroes)
- ↑ "Sprengstofflager" — Level Selection (Tri Force Heroes)
- ↑ "Réserve de bombes" — Level Selection (Tri Force Heroes)
- ↑ "Almacén de bombas" — Level Selection (Tri Force Heroes)
- ↑ The Legend of Zelda: Tri Force Heroes - The Forest (Direct Gampelay), @GameXplain on YouTube, Uploaded August 2, 2015 (Archive)