Sealed Room: Difference between revisions
TriforceTony (talk | contribs) m (Text replacement - "|book= HH|" to "|book= HH |") |
Tags: Mobile edit Mobile web edit |
||
| (15 intermediate revisions by 8 users not shown) | |||
| Line 1: | Line 1: | ||
{{Infobox | {{Infobox Location | ||
|image= File: | |image= | ||
| | {{Media | ||
<!-- Uses Series term -->|Screenshot MM= File:MM Portal.png | |||
|Screenshot MM3D= File:MM3D Sealed Room.png | |||
}} | |||
|caption= | |||
|pronunciation= | |pronunciation= | ||
|game= | |game= MM | ||
|other= | |other= | ||
|inhab= [[Deku Butler's Son]] | |inhab= [[Deku Butler's Son]] | ||
| Line 10: | Line 14: | ||
|temperature= | |temperature= | ||
|theme= | |theme= | ||
|related= [[Lost Woods]] | |related= | ||
{{List| | |||
[[Lost Woods]], | |||
[[Clock Tower]] | |||
}} | }} | ||
The {{Term/Store| | }} | ||
The {{Term/Store|Sealed Room||Series, MM3D}} is a location in {{MM}}.{{Exp Game|MM3D}}<ref>{{Cite eGuide|quote= |game= MM3D |guide= Prima |page= {{Small|Chapter 1: The Mischievous Skull Kid}}<br/>Lost Woods}}</ref> | |||
==Features and Overview== | ==Features and Overview== | ||
The | The {{Term|MM3D|Sealed Room}} is the pathway that connects the {{Term|MM3D|Lost Woods|link}} with {{Term|MM3D|Termina|link}}. It features three chambers, the last of which includes a {{Term|MM3D|Treasure Chest|link}} containing {{Plural|MM3D|Deku Nut|link}}. {{Term|MM3D|Link|link}} accidentally wanders into the {{Term|MM3D|Sealed Room}} after pursuing {{Term|MM3D|Skull Kid|link}} accompanied by two {{Plural|MM3D|Fairy|link}}, hoping to retrieve his {{Term|MM3D|Ocarina of Time (Item)|link}} and {{Term|MM3D|Epona|link}} from them. He enters a large {{Term|MM3D|Tree}} and falls into a deep chasm, landing on a {{Term|MM3D|Deku Flower|link}} in a large chamber with the {{Term|MM3D|Skull Kid}} hovering in the distance. It is revealed then that he had gotten rid of {{Term|MM3D|Epona}},<ref>{{Cite|What's with that stupid horse of yours?! It doesn't listen to a word that's said to it... There's no point in riding a thing like that, so I did you a favor and got rid of it... Hee, hee...|Skull Kid|MM}}</ref> and he then proceeds to lay a curse on {{Term|MM3D|Link}}, turning him into a {{Term|MM3D|Deku Scrub|link}}. {{Term|MM3D|Skull Kid}} subsequently departs with {{Term|MM3D|Tael|link}}; however, they accidentally leave behind {{Term|MM3D|Tatl|link}}, who apologizes to {{Term|MM3D|Link}} and offers her assistance to help him find a solution to his dilemma. {{Term|MM3D|Link}} and {{Term|MM3D|Tatl}} make their way through a few chambers that serve as a way to get {{Term|MM3D|Link}} acquainted to his new-found flying abilities as a {{Term|MM3D|Deku Scrub}}. | ||
There is a lonely, withered | There is a lonely, withered {{Term|MM3D|Tree}} near the exit in the final area of the {{Term|MM3D|Sealed Room}}. {{Term|MM3D|Tatl}} brings attention to it, drawing a comparison between its appearance and that of {{Term|MM3D|Deku Link|link}}.<ref>{{Cite|Come over to this tree and check it out! It's strange, but the way you look right now sort of looks like this tree... It looks all dark and gloomy... almost like it could start crying any second now... How sad...|Tatl|MM}}</ref> This {{Term|MM3D|Tree}} is actually the deceased {{Term|MM3D|Deku Butler's Son|link}},<ref>{{Cite Book|quote= Link's transformation into a Deku Scrub is caused by the spirit of a member of the Deku tribe that died in the forest connecting Hyrule and Termina.|book= HH |publisher= |page= 112}}</ref> and he is seen grieving over it after the defeat of {{Term|MM3D|Majora's Mask (Item)|link}}. Once Link exits the Sealed Room beyond the withered Tree, [[Unrevisitable Area|he will never be able to revisit the area again]] as the door will close behind him for the remainder of the game upon entering the [[Clock Tower]]. | ||
While Link is falling down the chasm, 10 different types of colored images are seen floating past. The images seen are different between {{MM}} and {{MM3D}}. Some images were simply updated in the remake to better match a particular object while others were replaced entirely. | While {{Term|MM3D|Link}} is falling down the chasm, 10 different types of colored images are seen floating past. The images seen are different between {{MM}} and {{MM3D}}. Some images were simply updated in the remake to better match a particular object while others were replaced entirely. | ||
{| | {{Data Table | ||
|game= MM | |||
|storeAs= | |||
|sortable= false | |||
|stretch= false | |||
|columns= {{MM|-}}, {{MM3D|-}}, Subject [Description] | |||
| [[File:MM Majora's Mask Falling Icon.png|85px]] | | [[File:MM Majora's Mask Falling Icon.png|85px]] | ||
| [[File:MM3D Majora's Mask Falling Icon.png| | | [[File:MM3D Majora's Mask Falling Icon.png|64px]] | ||
| | | {{Term|MM3D|Majora's Mask (Item)|link}} | ||
|- | |- | ||
| [[File:MM Deku Mask Falling Icon.png|85px]] | | [[File:MM Deku Mask Falling Icon.png|85px]] | ||
| [[File:MM3D Deku Mask Falling Icon.png| | | [[File:MM3D Deku Mask Falling Icon.png|64px]] | ||
| | | {{Term|MM3D|Deku Mask|link}} | ||
|- | |- | ||
| [[File:MM Goron Mask Falling Icon.png|85px]] | | [[File:MM Goron Mask Falling Icon.png|85px]] | ||
| [[File:MM3D Goron Mask Falling Icon.png| | | [[File:MM3D Goron Mask Falling Icon.png|64px]] | ||
| | | {{Term|MM3D|Goron Mask|link}} | ||
|- | |- | ||
| [[File:MM Zora Mask Falling Icon.png|85px]] | | [[File:MM Zora Mask Falling Icon.png|85px]] | ||
| [[File:MM3D Zora Mask Falling Icon.png| | | [[File:MM3D Zora Mask Falling Icon.png|64px]] | ||
| | | {{Term|MM3D|Zora Mask|link}} | ||
|- | |- | ||
| [[File:MM Ocarina Falling Icon.png|85px]] | | [[File:MM Ocarina Falling Icon.png|85px]] | ||
| [[File:MM3D Ocarina Falling Icon.png| | | [[File:MM3D Ocarina Falling Icon.png|64px]] | ||
| | | {{Term|MM3D|Ocarina|link}} | ||
|- | |- | ||
| [[File:MM Mirror Shield Falling Icon.png|85px]] | | [[File:MM Mirror Shield Falling Icon.png|85px]] | ||
| [[File:MM3D Mirror Shield Falling Icon.png| | | [[File:MM3D Mirror Shield Falling Icon.png|64px]] | ||
| | | {{Term|MM3D|Igos du Ikana|link}}'s face on the {{Term|MM3D|Mirror Shield|link}} | ||
|- | |- | ||
| [[File:MM Clock Falling Icon.png|85px]] | | [[File:MM Clock Falling Icon.png|85px]] | ||
| [[File:MM3D Clock Falling Icon.png| | | [[File:MM3D Clock Falling Icon.png|64px]] | ||
| Clock | | {{Term|MM3D|Clock|link}} | ||
|- | |- | ||
| [[File:MM Moon Falling Icon.png|85px]] | | [[File:MM Moon Falling Icon.png|85px]] | ||
| — | | — | ||
| The | | The {{Term|MM3D|Moon|link}}'s face | ||
|- | |- | ||
| [[File:MM Blue Falling Icon.png|85px]] | | [[File:MM Blue Falling Icon.png|85px]] | ||
| Line 67: | Line 76: | ||
|- | |- | ||
| — | | — | ||
| [[File:MM3D Moon's Mask Falling Icon.png| | | [[File:MM3D Moon's Mask Falling Icon.png|64px]] | ||
| | | {{Term|MM3D|Moon Mask|link}} | ||
|- | |- | ||
| — | | — | ||
| [[File:MM3D Grey Falling Icon.png| | | [[File:MM3D Grey Falling Icon.png|64px]] | ||
| Mask on | | {{Term|MM3D|Mask}} on {{Term|MM3D|Mayor Dotour|link}}'s chair | ||
|- | |- | ||
| — | | — | ||
| [[File:MM3D Purple Falling Icon.png| | | [[File:MM3D Purple Falling Icon.png|64px]] | ||
| — | | — | ||
|} | }} | ||
==={{Plural|MM3D|Treasure Chest}}=== | |||
{{Treasure Chests|game= MM3D | |||
|- | |||
| Treasure Chest<!-- Large --> | |||
| Deku Nut {{Qty|10}} | |||
| Atop the pillar on the opposite side of the gap from the {{Term|MM3D|Deku Butler's Son|link}} | |||
}} | |||
==Nomenclature== | |||
{{Nomenclature}} | |||
===Other Names=== | |||
{{Other Names | |||
|- | |||
| {{Term/Store|Portal||MM}}<ref>{{Cite Guide|quote= |game= MM |guide= Nintendo |page= 22}}</ref> | |||
| {{MM}} | |||
| {{Guide|MM|Nintendo}} | |||
| {{eGuide|MM3D|Prima}} | |||
}} | |||
==Gallery== | ==Gallery== | ||
<gallery> | <gallery> | ||
File:MM Portal | File:MM Portal 2.png|The third chamber of the {{Term|MM|Sealed Room}} from {{MM|-}} | ||
File:Dekutree.jpg|The Deku Butler and his son in the {{Term|MM|Sealed Room}} from {{MM|-}} | |||
File:Dekutree.jpg|The Deku Butler and his son in the | |||
</gallery> | </gallery> | ||
| Line 89: | Line 117: | ||
{{Categories | {{Categories | ||
| | |Rooms | ||
|locations= MM<!-- Uses Series term -->, MM3D | |||
}} | }} | ||
Latest revision as of 20:53, 7 March 2024
The Sealed Room is a location in Majora's Mask.(MM3D)[1]
Features and Overview
The Sealed Room is the pathway that connects the Lost Woods with Termina. It features three chambers, the last of which includes a Treasure Chest containing Deku Nuts. Link accidentally wanders into the Sealed Room after pursuing Skull Kid accompanied by two Fairies, hoping to retrieve his Ocarina of Time and Epona from them. He enters a large Tree and falls into a deep chasm, landing on a Deku Flower in a large chamber with the Skull Kid hovering in the distance. It is revealed then that he had gotten rid of Epona,[2] and he then proceeds to lay a curse on Link, turning him into a Deku Scrub. Skull Kid subsequently departs with Tael; however, they accidentally leave behind Tatl, who apologizes to Link and offers her assistance to help him find a solution to his dilemma. Link and Tatl make their way through a few chambers that serve as a way to get Link acquainted to his new-found flying abilities as a Deku Scrub.
There is a lonely, withered Tree near the exit in the final area of the Sealed Room. Tatl brings attention to it, drawing a comparison between its appearance and that of Deku Link.[3] This Tree is actually the deceased Deku Butler's Son,[4] and he is seen grieving over it after the defeat of Majora's Mask. Once Link exits the Sealed Room beyond the withered Tree, he will never be able to revisit the area again as the door will close behind him for the remainder of the game upon entering the Clock Tower.
While Link is falling down the chasm, 10 different types of colored images are seen floating past. The images seen are different between Majora's Mask and Majora's Mask 3D. Some images were simply updated in the remake to better match a particular object while others were replaced entirely.
| Majora's Mask | |
|---|---|
| Majora's Mask 3D | |
| Subject | |
| Majora's Mask | |
| Majora's Mask 3D | |
| Subject | |
| Majora's Mask | |
| Majora's Mask 3D | |
| Subject | |
| Majora's Mask | |
| Majora's Mask 3D | |
| Subject | |
| Majora's Mask | |
| Majora's Mask 3D | |
| Subject | |
| Majora's Mask | |
| Majora's Mask 3D | |
| Subject | Igos du Ikana's face on the Mirror Shield |
| Majora's Mask | |
| Majora's Mask 3D | |
| Subject | |
| Majora's Mask | |
| Majora's Mask 3D | — |
| Subject | The Moon's face |
| Majora's Mask | |
| Majora's Mask 3D | — |
| Subject | — |
| Majora's Mask | |
| Majora's Mask 3D | — |
| Subject | — |
| Majora's Mask | — |
| Majora's Mask 3D | |
| Subject | |
| Majora's Mask | — |
| Majora's Mask 3D | |
| Subject | Mask on Mayor Dotour's chair |
| Majora's Mask | — |
| Majora's Mask 3D | |
| Subject | — |
| Majora's Mask | Majora's Mask 3D | Subject |
|---|---|---|
Igos du Ikana's face on the Mirror Shield | ||
— | The Moon's face | |
— | — | |
— | — | |
— | ||
— | Mask on Mayor Dotour's chair | |
— | — |
Treasure Chests
| Treasure Chest | |
|---|---|
| Contents |
|
| Notes | Atop the pillar on the opposite side of the gap from the Deku Butler's Son |

| Treasure Chest | Contents | Notes |
|---|---|---|
| Atop the pillar on the opposite side of the gap from the Deku Butler's Son |
Nomenclature
| Language | Names | |
|---|---|---|
| This table was generated using translation pages. To request an addition, please contact a staff member with a reference. | ||
Other Names
| Name | Portal[5] |
|---|---|
| Applies to | |
| Source | |
| Superseded by |
| Name | Applies to | Source | Superseded by |
|---|---|---|---|
Portal[5] |
Gallery
-
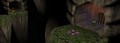
The third chamber of the Portal from Majora's Mask
-
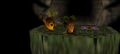
The Deku Butler and his son in the Portal from Majora's Mask

References
- ↑ (The Legend of Zelda: Majora's Mask 3D—Official Digital Strategy Guide for 3DS by Prima Games, pg. Chapter 1: The Mischievous Skull Kid
Lost Woods) - ↑ "What's with that stupid horse of yours?! It doesn't listen to a word that's said to it... There's no point in riding a thing like that, so I did you a favor and got rid of it... Hee, hee..." — Skull Kid (Majora's Mask)
- ↑ "Come over to this tree and check it out! It's strange, but the way you look right now sort of looks like this tree... It looks all dark and gloomy... almost like it could start crying any second now... How sad..." — Tatl (Majora's Mask)
- ↑ "Link's transformation into a Deku Scrub is caused by the spirit of a member of the Deku tribe that died in the forest connecting Hyrule and Termina." (Hyrule Historia, Dark Horse Books, pg. 112)
- ↑ The Legend of Zelda: Majora's Mask—Official Nintendo Player's Guide, Nintendo of America, pg. 22