Shrine of Destiny: Difference between revisions
No edit summary |
m (→Gallery) |
||
| (13 intermediate revisions by 8 users not shown) | |||
| Line 1: | Line 1: | ||
{{Noncanon}} | {{Noncanon}} | ||
{{Dungeon | {{Infobox Dungeon | ||
| | |image= File:ZA Shrine of Destiny.png | ||
|caption= | |||
|caption = | |location= {{Term|ZA|Ubato Hills|link}} | ||
|location = | |game= ZA | ||
|game = | |item= | ||
|item = | |mini-boss= | ||
|mini-boss = | |boss= {{Term|ZA|Malmord|link}} | ||
|boss = | |quest= | ||
|quest = | {{List| | ||
{{Term|ZA|Celestial Sign|link}}, | |||
{{Term|ZA|Heart Container|link}} | |||
}} | }} | ||
The '''Shrine of Destiny''' is the fourth | }} | ||
The '''Shrine of Destiny''' is the fourth {{Term|ZA|Dungeon|link}} in {{ZA}}. Its Shrine Keeper and {{Term|ZA|Boss|link}} is {{Term|ZA|Malmord}}, who taunts {{Term|ZA|Princess Zelda|display=Zelda|link}} as controlling her fate and destiny. | |||
==Entrance to the Temple== | ==Entrance to the Temple== | ||
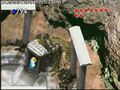
The Shrine of Destiny's entrance is located in northern | The {{Term|ZA|Shrine of Destiny}}'s entrance is located in northern {{Term|ZA|Ubato Hills|link}}, between the {{Term|ZA|Forest of Torian|link}} and {{Term|ZA|North Gubasha Desert|link}}. Its entrance lies within a stone henge of white pillars. If Zelda comes across the entrance before clearing the {{Term|ZA|Shrine of Air|link}}, she will find that the entrance is blocked by {{Plural|ZA|Floor Spike|link}}, as the Shrines must be completed in order. | ||
==Themes and Navigation== | ==Themes and Navigation== | ||
The Shrine of Destiny features floors and walls made of marble and stone, as well as abstract decorations and designs. Its interior is stylized in either the appearance of a palace or an old mansion. It is known to house undead and magical | The {{Term|ZA|Shrine of Destiny}} features floors and walls made of marble and stone, as well as abstract decorations and designs. Its interior is stylized in either the appearance of a palace or an old mansion. It is known to house undead and magical {{Plural|ZA|Enemy|link}}, such as {{Plural|ZA|Gibdo|link}} and {{Plural|ZA|Wizzrobe|link}}, respectively. It is notably the only Shrine where its {{Term|ZA|Map|link}} cannot be not found inside the {{Term|ZA|Dungeon|link}}; instead the Map is given by a {{Term|ZA|Characters in Zelda's Adventure|section=Link's Guide|display=woman|link}} in the {{Term|ZA|Vendoss|link}} swamp. | ||
The first room of the | The first room of the {{Term|ZA|Dungeon}} is a circular foyer, and contains two passages. The passage on the left is the correct path; the right path ultimately leads to a dead end containing {{Plural|ZA|Gibdo}}. This split is the only one featured in the Shrine, which is otherwise a straight-forward curve. While moving through the path on the left, Zelda encounters a room of moving {{Plural|ZA|Blade Trap|display=Spike Block|link}}, which can be removed by hitting an out-of-reach switch with a projectile. The passage eventually leads to a twisting corridor, which leads to a room with {{Plural|ZA|Gibdo}} and a {{Term|ZA|Bubble|link}}. The {{Plural|ZA|Gibdo}} must be defeated to proceed ahead, and defeating them will also drop the {{Term|ZA|Dungeon}} {{Term|ZA|Compass|link}}. The second room has Zelda fight off more {{Plural|ZA|Gibdo}}, with a {{Term|ZA|Bubble}} spawning for every {{Term|ZA|Gibdo}} she has defeated. Eventually Zelda reaches another curved hall, which enters into the second half of the {{Term|ZA|Dungeon}}. | ||
A small fleet of stairs leads to a room with narrow walkways over a large pit. | A small fleet of stairs leads to a room with narrow walkways over a large pit. {{Plural|ZA|Wizzrobe}} attempt to attack Zelda from afar with their spells. Zelda must carefully traverse to the east side where the exit is. The next room has a small puzzle where Zelda must hit the left and right switches and turn them red to remove the {{Plural|ZA|Floor Spike|link}} blocking the next passage. She must then pass a final room by also removing its {{Plural|ZA|Floor Spike}}, before finally facing {{Term|ZA|Malmord|link}} in the {{Term|ZA|Boss|link}} room. After {{Term|ZA|Malmord}} is defeated, Zelda retrieves the fourth {{Term|ZA|Celestial Sign|link}}. | ||
==Minor | ===Minor {{Plural|ZA|Enemy}}=== | ||
{{Gallery List|Enemies | |||
|ZA= Floor Spikes, Gibdo, Jack, Pols Voice, Romraven, Blade Trap, Wizzrobe | |||
}} | |||
==Trivia== | ==Trivia== | ||
*The Shrine of Destiny features two music tracks, which change as Zelda enters the twisted corridors. | *The {{Term|ZA|Shrine of Destiny}} features two music tracks, which change as Zelda enters the twisted corridors. | ||
==Gallery== | ==Gallery== | ||
<gallery> | <gallery> | ||
File:Shrine of | File:ZA Shrine of Destiny Entrance.jpg|Entrance to the {{Term|ZA|Shrine of Destiny}} | ||
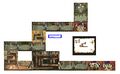
File:Shrine of | File:ZA Shrine of Destiny 2.jpg|Entrance foyer of the {{Term|ZA|Shrine of Destiny}} | ||
File: | File:ZA Shrine of Destiny 3.png|Zelda fighting {{Plural|ZA|Gibdo|link}} in the {{Term|ZA|Shrine of Destiny}} | ||
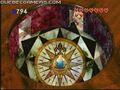
File: | File:ZA Shrine Of Destiny Map.jpg|{{Term|ZA|Map|link}} of the {{Term|ZA|Shrine of Destiny}} | ||
</gallery> | </gallery> | ||
{{Zelda's Adventure Dungeons}} | {{Zelda's Adventure Dungeons}} | ||
{{Categories | |||
|Shrines | |||
|dungeons= ZA | |||
}} | |||
Latest revision as of 01:43, 7 April 2024
The Shrine of Destiny is the fourth Dungeon in Zelda's Adventure. Its Shrine Keeper and Boss is Malmord, who taunts Zelda as controlling her fate and destiny.
Entrance to the Temple
The Shrine of Destiny's entrance is located in northern Ubato Hills, between the Forest of Torian and North Gubasha Desert. Its entrance lies within a stone henge of white pillars. If Zelda comes across the entrance before clearing the Shrine of Air, she will find that the entrance is blocked by Floor Spike, as the Shrines must be completed in order.
The Shrine of Destiny features floors and walls made of marble and stone, as well as abstract decorations and designs. Its interior is stylized in either the appearance of a palace or an old mansion. It is known to house undead and magical Enemies, such as Gibdos and Wizzrobes, respectively. It is notably the only Shrine where its Map cannot be not found inside the Dungeon; instead the Map is given by a woman in the Vendoss swamp.
The first room of the Dungeon is a circular foyer, and contains two passages. The passage on the left is the correct path; the right path ultimately leads to a dead end containing Gibdos. This split is the only one featured in the Shrine, which is otherwise a straight-forward curve. While moving through the path on the left, Zelda encounters a room of moving Spike Block, which can be removed by hitting an out-of-reach switch with a projectile. The passage eventually leads to a twisting corridor, which leads to a room with Gibdos and a Bubble. The Gibdos must be defeated to proceed ahead, and defeating them will also drop the Dungeon Compass. The second room has Zelda fight off more Gibdos, with a Bubble spawning for every Gibdo she has defeated. Eventually Zelda reaches another curved hall, which enters into the second half of the Dungeon.
A small fleet of stairs leads to a room with narrow walkways over a large pit. Wizzrobes attempt to attack Zelda from afar with their spells. Zelda must carefully traverse to the east side where the exit is. The next room has a small puzzle where Zelda must hit the left and right switches and turn them red to remove the Floor Spike blocking the next passage. She must then pass a final room by also removing its Floor Spike, before finally facing Malmord in the Boss room. After Malmord is defeated, Zelda retrieves the fourth Celestial Sign.
Minor Enemies
Trivia
- The Shrine of Destiny features two music tracks, which change as Zelda enters the twisted corridors.
Gallery
-
Entrance to the Shrine of Destiny
-
Entrance foyer of the Shrine of Destiny
-
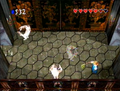
Zelda fighting Gibdos in the Shrine of Destiny
-
Map of the Shrine of Destiny


| Dungeons in Zelda's Adventure |
|---|
|
Shrine of Earth • Shrine of Illusion • Shrine of Air • Shrine of Destiny • Shrine of Water • Shrine of Strength • Shrine of Fire |