Illusory Mansion: Difference between revisions
Htwretched (talk | contribs) (Screenshots! Still needs proofreading.) |
Htwretched (talk | contribs) mNo edit summary |
||
| (4 intermediate revisions by the same user not shown) | |||
| Line 5: | Line 5: | ||
|location= {{Term|TFH|The Ruins|link}} | |location= {{Term|TFH|The Ruins|link}} | ||
|game= TFH | |game= TFH | ||
|item= | |item= {{Term|TFH|Boomerang|link}} ×3 | ||
|quest= | |quest= | ||
|mini-boss= | |mini-boss= | ||
| Line 12: | Line 12: | ||
|strategy= | |strategy= | ||
}} | }} | ||
{{Term/Store|Illusory Mansion||Series, TFH}} is a {{Term|TFH|Level|link}} in {{TFH}}. It is the first {{Term|TFH|Level}} of {{Term|TFH|The Ruins|link}} {{Term|TFH|Area}}. | {{Term/Store|Illusory Mansion||Series, TFH}} is a {{Term|TFH|Level|link}} in {{TFH}}.<ref>{{Cite Book|quote= |book= E |publisher= |page= 160}}</ref> It is the first {{Term|TFH|Level}} of {{Term|TFH|The Ruins|link}} {{Term|TFH|Area}}, and is followed by {{Term|TFH|Palace Noir|link}}. | ||
==Themes and Navigation== | ==Themes and Navigation== | ||
{{Term|TFH|Illusory Mansion}} takes place in a haunted, garden courtyard outside of an abandoned palace. The Level notably features several floating, colored platforms which only the {{Term|TFH|Links|link}} whose color matches it can stand on. If | {{Term|TFH|Illusory Mansion}} takes place in a haunted, garden courtyard outside of an abandoned palace. The {{Term|TFH|Level}} notably features several floating, colored platforms which only the {{Term|TFH|Links|link}} whose color matches it can stand on. If any {{Term|TFH|Links}} walks onto a platform that does not match his color, he will fall through. The matching {{Term|TFH|Links}} can pick up the other {{Plural|TFH|Links}} as he walks across, allowing them to cross over these platforms as a unit. | ||
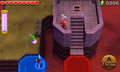
[[File:TFH Illusory Mansion Stage 1.png|250px|right|thumb|Crossing the colored platforms, Stage 1]] | [[File:TFH Illusory Mansion Stage 1.png|250px|right|thumb|Crossing the colored platforms, Stage 1]] | ||
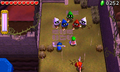
In '''Stage 1''', the {{Plural|TFH|Links}} appear on a ledge over a great pit. Three sets of colored platforms lie ahead of them, which the matching {{Plural|TFH|Links}} must use to cross over to the other side. The next ledge has two {{Plural|TFH|Poe|link}} and three {{Plural|TFH|Boomerang|link}}. Immediately after the second ledge is a bridge of green platforms, leading to blue | In '''Stage 1''', the {{Plural|TFH|Links}} appear on a ledge over a great pit. Three sets of colored platforms lie ahead of them, which the matching {{Plural|TFH|Links}} must use to cross over to the other side. The next ledge has two {{Plural|TFH|White Poe|link}} and three {{Plural|TFH|Boomerang|link}}. Immediately after the second ledge is a bridge of green platforms, leading to a blue one. A gap lies between the blue platforms and the next ground area. To cross this gap, the blue {{Term|TFH|Link}} should first pick up the red {{Term|TFH|Link}} as a {{Term|TFH|Totem|link}}. The green {{Term|TFH|Link}} then picks up the blue {{Term|TFH|Link}}, and crosses the green platforms to throw him to the blue one. The blue {{Term|TFH|Link}} then simply has to throw the red {{Term|TFH|Link}} over the gap, who can then bring the others back using the Boomerang. In the next area, the {{Plural|TFH|Links}} encounter three more {{Plural|TFH|White Poe}} and a locked gate barricading the {{Term|TFH|Triforce Gateway|link}}. Its {{Term|TFH|Small Key|link}} rests inside a {{Term|TFH|Treasure Chest|link}} atop a small tower to the south. A pair of blue and red platforms lead to its staircase, requiring that blue {{Term|TFH|Link}} throws the red {{Term|TFH|Link}} over. Red {{Term|TFH|Link}} can then toss the {{Term|TFH|Small Key}} over to blue {{Term|TFH|Link}}, or throw it over the tower onto the ground for one of the other {{Plural|TFH|Link}} to collect. Blue {{Term|TFH|Link}} will have to retrieve red {{Term|TFH|Link}} from his platform using the {{Term|TFH|Boomerang}}. | ||
{{Clear}} | {{Clear}} | ||
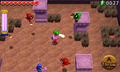
[[File:TFH Illusory Mansion Stage 2 2.png|250px|right|thumb|Ambushed by White Poes at the gate, Stage 2]] | [[File:TFH Illusory Mansion Stage 2 2.png|250px|right|thumb|Ambushed by White Poes at the gate, Stage 2]] | ||
In '''Stage 2''', the {{Plural|TFH|Links}} enter the mansion's hedge garden. They soon encounter a set of three unlit {{Plural|TFH| | In '''Stage 2''', the {{Plural|TFH|Links}} enter the mansion's hedge garden. They soon encounter a set of three unlit {{Plural|TFH|Torchlight|link}}, which spawns three differently-colored {{Plural|TFH|Poe}}. These {{Plural|TFH|Poe}} can only be attacked by the {{Term|TFH|Link}} whose tunic matches with their color. Their defeat will light the {{Plural|TFH|Torchlight}} and drop the {{Term|TFH|Small Key}} that unlocks the next gate. As the {{Plural|TFH|Link}} approach the gate, two {{Plural|TFH|White Poe}} appear next to the {{Term|TFH|Squiddy|link}}. The gate opens to the next garden with several stone podiums; when all the {{Plural|TFH|Links}} enter, six more colored {{Plural|TFH|Poe}}—two green, two blue, and two red—arrive to fight them. All of the {{Plural|TFH|Poe}} are floating beyond their reach, and require the {{Plural|TFH|Links}} to form {{Plural|TFH|Totem}} of different heights to fight them. After they are defeated, the {{Term|TFH|Triforce Gateway}} appears. On the right side of the area is a {{Term|TFH|Floor Switch|link}} in some tall grass that can be pressed down to lower a gate, revealing a {{Term|TFH|Treasure Chest}} which contains a {{Term|TFH|Silver Rupee|link}}. | ||
{{Clear}} | {{Clear}} | ||
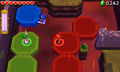
[[File:TFH Illusory Mansion Stage 3.png|250px|right|thumb|Colored platforms rising, Stage 3]] | [[File:TFH Illusory Mansion Stage 3.png|250px|right|thumb|Colored platforms rising, Stage 3]] | ||
In '''Stage 3''', the {{Plural|TFH|Links}} appear in a fenced enclosure next to a ledge. A | In '''Stage 3''', the {{Plural|TFH|Links}} appear in a fenced enclosure next to a ledge. A {{Term|TFH|Cracked Block|link}} to the left blocks the {{Plural|TFH|Links}}' passage. The northern ledge has a small blue platform, as well as a {{Term|TFH|Chasupa|link}} that will attack if the {{Plural|TFH|Links}} get close. A {{Term|TFH|Bomb Flower|link}} sits on a pillar, which can be grabbed by any {{Term|TFH|Links}} using the {{Term|TFH|Boomerang}} and used to demolish the {{Term|TFH|Cracked Block}}. This reveals a {{Term|TFH|Big Switch|link}} which, after being pressed with all three {{Plural|TFH|Links}}, reveals more colored platforms to the north side and spawns more {{Plural|TFH|Chasupa}}. The {{Plural|TFH|Links}} must cross these platforms to the other side, while throwing each other onto the matching platforms and using the {{Plural|TFH|Boomerang}} to carry each other over. On the other side are a pair of {{Plural|TFH|Cracked Block}} which must be demolished. This can be achieved by having red {{Term|TFH|Link}} pick up the {{Term|TFH|Bomb Flower}} from his platforms and throw it over to the ledge, allowing another {{Term|TFH|Link}} to pick it up and throw to the Blocks. | ||
The next | The next area features two {{Plural|TFH|White Poe}} and more colored platforms to the right side, as well as a {{Term|TFH|Life Like|link}} disguised as a {{Term|TFH|Heart|link}} in the north-west among some grass. The blue and red platforms continuously move, requiring the {{Plural|TFH|Links}} to time their throws. The red platform moves close to a ledge above, which can only be reached with a {{Term|TFH|Totem}} of three. This is made possible by having blue {{Term|TFH|Link}} carry green {{Term|TFH|Link}} while standing close to the edge of the blue platform, then having red {{Term|TFH|Link}} pick them both up when his platform moves close. The top {{Term|TFH|Link}} can then be thrown up to the ledge, where the {{Term|TFH|Triforce Gateway}} and a {{Term|TFH|Floor Switch}} lie. Pressing the Switch raises a drawbridge, allowing the other two {{Plural|TFH|Links}} to walk to the {{Term|TFH|Triforce Gateway}}. | ||
{{Clear}} | {{Clear}} | ||
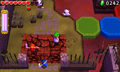
[[File:TFH Illusory Mansion Stage 4.png|250px|right|thumb|Crossing the colored platforms, Stage 4]] | [[File:TFH Illusory Mansion Stage 4.png|250px|right|thumb|Crossing the colored platforms, Stage 4]] | ||
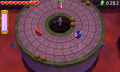
In '''Stage 4''', the {{Plural|TFH|Links}} appear on another ledge with more colored platforms, which also move. The {{Plural|TFH|Links}} must again use a combination of throwing each other across and using the {{Term|TFH|Boomerang}} to get to the other side. As the {{Plural|TFH|Links}} approach the staircase, {{Plural|TFH|Poe}} suddenly appear, three of which are colored. Defeating them reveals a Chest containing three {{Plural|TFH|Heart | In '''Stage 4''', the {{Plural|TFH|Links}} appear on another ledge with more colored platforms, which also move. The {{Plural|TFH|Links}} must again use a combination of throwing each other across and using the {{Term|TFH|Boomerang}} to get to the other side. As the {{Plural|TFH|Links}} approach the staircase, five {{Plural|TFH|Poe}} suddenly appear, three of which are colored. Defeating them all reveals a {{Term|TFH|Treasure Chest}} containing three {{Plural|TFH|Heart}}. The {{Plural|TFH|Links}} then arrive to a circular platform with a pit in its center, and three {{Plural|TFH|Floor Switch}} to be pressed. The {{Plural|TFH|Floor Switch}} will lower the bridge leading to the platform, and a group of {{Plural|TFH|Prankster Poe|link}} will appear. These {{Plural|TFH|Enemy|link}} will attack the {{Plural|TFH|Links}} by sneaking up to them, then grabbing them to throw off the ledge, so it is best that the {{Plural|TFH|Link}} stay close together to be able to save one another. Once the {{Plural|TFH|Prankster Poe}} are defeated, the bridge to the {{Term|TFH|Triforce Gateway}} appears. | ||
{{Clear}} | {{Clear}} | ||
===Drablands Challenge=== | ==={{Plural|TFH|Drablands Challenge}}=== | ||
Illusory Mansion | Once the {{Term|TFH|Boss|link}} of {{Term|TFH|The Ruins|link}} has been defeated, {{Term|TFH|Illusory Mansion|link}} can be replayed with the following {{Plural|TFH|Drablands Challenge|link}}: "{{Term|TFH|Drablands Challenge|section=Fewer Heart Containers!|display=Fewer Heart Containers!|link}}", "{{Term|TFH|Drablands Challenge|section=Clear within the time limit!|display=Clear within the time limit!|link}}", and "{{Term|TFH|Drablands Challenge|section=Don't fall at all!|display=Don't fall at all!|link}}". Each {{Term|TFH|Drablands Challenge|display=Challenge}} features the same configuration of {{Plural|TFH|Enemy|link}}. | ||
In "Clear within the time limit!", the {{Plural|TFH|Links|link}} are given a timer of one minute in [[Multiplayer]], or one minute and 30 seconds in single-player. This timer can be increased by collecting {{Plural|TFH|Hourglass|link}} or wearing {{Term|TFH|Linebeck's Uniform|link}}. | |||
=== | ==={{Plural|TFH|Material}}=== | ||
At the end of the {{Term|TFH|Level}}, three {{Plural|TFH|Treasure Chest|link}} can be opened. Two contain the same {{Term|TFH|Material|link}}, and one contains another, more valuable {{Term|TFH|Material}}. | |||
== | {{Data Table | ||
|game= TFH | |||
|columns= {{Term|TFH|Drablands Challenge}}, {{Plural|TFH|Magical Material}} [Amounts] | |||
|- | |||
| N/A | |||
| 2 Carrumpkin, 1 Mystery Extract | |||
|- | |||
| [[File:TFH Fewer Heart Containers Icon.png]]<br/>'''Fewer Heart Containers!''' | |||
| 2 Carrumpkin, 1 Spider Silk Lace | |||
|- | |||
| [[File:TFH No Falls Icon.png]]<br/>'''Don't fall at all!''' | |||
| 2 Mystery Extract, 1 Poe Soul | |||
|- | |||
| [[File:TFH Hourglass Icon.png]]<br/>'''Clear within the time limit!''' | |||
| 2 Spider Silk Lace, 1 Twisted Twig | |||
}} | |||
=== | ==={{Plural|TFH|Enemy}} and Traps=== | ||
;{{Term|TFH|Stage}} 1 | |||
{{Gallery List|Enemies | |||
|TFH= White Poe [Qty:5] | |||
}} | |||
== | ;{{Term|TFH|Stage}} 2 | ||
{{Gallery List|Enemies | |||
|TFH= Blue Poe [Qty:3]{{List Note|name= Heights|One at ground level; one at a height of two {{Plural|TFH|Links|link}}; one at a height of three {{Plural|TFH|Links}}.}}, Green Poe [Qty:3]{{List Note|name= Heights}}, Red Poe [Qty:3]{{List Note|name= Heights}}, Squiddy, White Poe [Qty:2] | |||
}} | |||
;{{Term|TFH|Stage}} 3 | |||
{{Gallery List|Enemies | {{Gallery List|Enemies | ||
|TFH= | |TFH= Chasupa [Qty:4], Life Like [Qty:1]{{List Note|Disguised as a {{Term|TFH|Heart|link}}.}}, White Poe [Qty:2] | ||
}} | }} | ||
;{{Term|TFH|Stage}} 4 | |||
{{Gallery List|Enemies | |||
|TFH= Blue Poe [Qty:1], Green Poe [Qty:1], Prankster Poe [Qty:4], Red Poe [Qty:1], White Poe [Qty:2] | |||
}} | |||
{{List Notes}} | |||
==={{Plural|TFH|Treasure Chest}}=== | |||
{{Treasure Chests|game= TFH | |||
|- | |||
| Treasure Chest | |||
| Small Key [File:TFH Key Icon.png] | |||
| Atop the small tower in {{Term|TFH|Stage}} 1 | |||
|- | |||
| Treasure Chest | |||
| Silver Rupee | |||
| Behind the gate east of the {{Term|TFH|Triforce Gateway}} in {{Term|TFH|Stage}} 2 | |||
|- | |||
| Treasure Chest | |||
| Heart [File:TFH Three Hearts Sprite.png] {{Qty|3}} | |||
| Appears after defeating the five {{Plural|TFH|Poe}} in {{Term|TFH|Stage}} 4 | |||
}} | |||
==Trivia== | |||
*As described in Vol. 5 of the {{Term|TFH|Drablands Diary|link}}, a set of green handprints is hidden in each {{Term|TFH|Level|link}} of {{Term|TFH|The Ruins|link}}. They can be found on a window in {{Term|TFH|Stage}} 4 of {{Term|TFH|Illusory Mansion}}, to the left of the bridge leading to the {{Term|TFH|Triforce Gateway|link}}. | |||
==Nomenclature== | ==Nomenclature== | ||
Latest revision as of 21:33, 4 December 2023
Illusory Mansion is a Level in Tri Force Heroes.[1] It is the first Level of The Ruins Area, and is followed by Palace Noir.
Illusory Mansion takes place in a haunted, garden courtyard outside of an abandoned palace. The Level notably features several floating, colored platforms which only the Link whose color matches it can stand on. If any Link walks onto a platform that does not match his color, he will fall through. The matching Link can pick up the other Links as he walks across, allowing them to cross over these platforms as a unit.

In Stage 1, the Links appear on a ledge over a great pit. Three sets of colored platforms lie ahead of them, which the matching Links must use to cross over to the other side. The next ledge has two White Poes and three Boomerangs. Immediately after the second ledge is a bridge of green platforms, leading to a blue one. A gap lies between the blue platforms and the next ground area. To cross this gap, the blue Link should first pick up the red Link as a Totem. The green Link then picks up the blue Link, and crosses the green platforms to throw him to the blue one. The blue Link then simply has to throw the red Link over the gap, who can then bring the others back using the Boomerang. In the next area, the Links encounter three more White Poes and a locked gate barricading the Triforce Gateway. Its Key rests inside a Treasure Chest atop a small tower to the south. A pair of blue and red platforms lead to its staircase, requiring that blue Link throws the red Link over. Red Link can then toss the Key over to blue Link, or throw it over the tower onto the ground for one of the other Links to collect. Blue Link will have to retrieve red Link from his platform using the Boomerang.

In Stage 2, the Links enter the mansion's hedge garden. They soon encounter a set of three unlit Torches, which spawns three differently-colored Poes. These Poes can only be attacked by the Link whose tunic matches with their color. Their defeat will light the Torches and drop the Key that unlocks the next gate. As the Links approach the gate, two White Poes appear next to the Squiddy. The gate opens to the next garden with several stone podiums; when all the Links enter, six more colored Poes—two green, two blue, and two red—arrive to fight them. All of the Poes are floating beyond their reach, and require the Links to form Totems of different heights to fight them. After they are defeated, the Triforce Gateway appears. On the right side of the area is a Floor Switch in some tall grass that can be pressed down to lower a gate, revealing a Treasure Chest which contains a Silver Rupee.

In Stage 3, the Links appear in a fenced enclosure next to a ledge. A Cracked Block to the left blocks the Links' passage. The northern ledge has a small blue platform, as well as a Chasupa that will attack if the Links get close. A Bomb Flower sits on a pillar, which can be grabbed by any Link using the Boomerang and used to demolish the Cracked Block. This reveals a Big Switch which, after being pressed with all three Links, reveals more colored platforms to the north side and spawns more Chasupa. The Links must cross these platforms to the other side, while throwing each other onto the matching platforms and using the Boomerangs to carry each other over. On the other side are a pair of Cracked Blocks which must be demolished. This can be achieved by having red Link pick up the Bomb Flower from his platforms and throw it over to the ledge, allowing another Link to pick it up and throw to the Blocks.
The next area features two White Poes and more colored platforms to the right side, as well as a Life Like disguised as a Heart in the north-west among some grass. The blue and red platforms continuously move, requiring the Links to time their throws. The red platform moves close to a ledge above, which can only be reached with a Totem of three. This is made possible by having blue Link carry green Link while standing close to the edge of the blue platform, then having red Link pick them both up when his platform moves close. The top Link can then be thrown up to the ledge, where the Triforce Gateway and a Floor Switch lie. Pressing the Switch raises a drawbridge, allowing the other two Links to walk to the Triforce Gateway.

In Stage 4, the Links appear on another ledge with more colored platforms, which also move. The Links must again use a combination of throwing each other across and using the Boomerang to get to the other side. As the Links approach the staircase, five Poes suddenly appear, three of which are colored. Defeating them all reveals a Treasure Chest containing three Hearts. The Links then arrive to a circular platform with a pit in its center, and three Floor Switches to be pressed. The Floor Switches will lower the bridge leading to the platform, and a group of Prankster Poes will appear. These Enemies will attack the Links by sneaking up to them, then grabbing them to throw off the ledge, so it is best that the Links stay close together to be able to save one another. Once the Prankster Poes are defeated, the bridge to the Triforce Gateway appears.
Drablands Challenges
Once the Boss of The Ruins has been defeated, Illusory Mansion can be replayed with the following Drablands Challenges: "Fewer Heart Containers!", "Clear within the time limit!", and "Don't fall at all!". Each Challenge features the same configuration of Enemies.
In "Clear within the time limit!", the Links are given a timer of one minute in Multiplayer, or one minute and 30 seconds in single-player. This timer can be increased by collecting Hourglasses or wearing Linebeck's Uniform.
Materials
At the end of the Level, three Treasure Chests can be opened. Two contain the same Material, and one contains another, more valuable Material.
| Drablands Challenge | — |
|---|---|
| Magical Materials | |
| Drablands Challenge | Fewer Heart Containers! |
| Magical Materials | |
| Drablands Challenge | Don't fall at all! |
| Magical Materials | |
| Drablands Challenge | Clear within the time limit! |
| Magical Materials |
| Drablands Challenge | Magical Materials |
|---|---|
— | |
Fewer Heart Containers! | |
Don't fall at all! | |
Clear within the time limit! |
Enemies and Traps
- Stage 1
-

White Poe ×5

- Stage 2
![Blue Poe ×3[a]](/wiki/File:TFH_Blue_Poe_Model.png)
![Green Poe ×3[a]](/wiki/File:TFH_Green_Poe_Model.png)
![Red Poe ×3[a]](/wiki/File:TFH_Red_Poe_Model.png)

- Stage 3
![Life Like ×1[b]](/wiki/File:TFH_Life_Like_Model.png)
- Stage 4

Treasure Chests
| Treasure Chest | |
|---|---|
| Contents | |
| Notes | Atop the small tower in Stage 1 |
| Treasure Chest | |
| Contents | |
| Notes | Behind the gate east of the Triforce Gateway in Stage 2 |
| Treasure Chest | |
| Contents |
|
| Notes | Appears after defeating the five Poes in Stage 4 |

| Treasure Chest | Contents | Notes |
|---|---|---|
Atop the small tower in Stage 1 | ||
Behind the gate east of the Triforce Gateway in Stage 2 | ||
| Appears after defeating the five Poes in Stage 4 |
Trivia
- As described in Vol. 5 of the Drablands Diary, a set of green handprints is hidden in each Level of The Ruins. They can be found on a window in Stage 4 of Illusory Mansion, to the left of the bridge leading to the Triforce Gateway.
Nomenclature
| Language | Names | |
|---|---|---|
Japanese | まやかし屋敷 (Mayakashi Yashiki)[3] | |
FrenchCA | Maison des illusions | |
FrenchEU | Maison des illusions[5] | |
German | Schwindelhaus[4] | |
Italian | Casa dispettosa[2] | |
SpanishLA | Mansión del engaño[6] | |
SpanishEU | Mansión del Engaño[7] | |
| This table was generated using translation pages. To request an addition, please contact a staff member with a reference. | ||
Gallery
-
Obtaining the Key in Stage 1
-
Battling the many colored Poes in Stage 2
-
Crossing the colored platforms in Stage 3
-
The northern section of Stage 3
-
Five Poes appear in Stage 4
-
The platform where Prankster Poes are battled in Stage 4


References
- ↑ Encyclopedia, Dark Horse Books, pg. 160
- ↑ "Casa dispettosa" — Level Selection (Tri Force Heroes)
- ↑ "まやかし屋敷" — Level Selection (Tri Force Heroes)
- ↑ "Schwindelhaus" — Level Selection (Tri Force Heroes)
- ↑ "Maison des illusions" — Level Selection (Tri Force Heroes)
- ↑ "Mansión del engaño" — Level Selection (Tri Force Heroes)
- ↑ "Mansión del Engaño" — Level Selection (Tri Force Heroes)