Palace Noir
Palace Noir is a Level in Tri Force Heroes.[1] It is the second Level of The Ruins Area, preceded by Illusory Mansion and followed by Lone Labyrinth.
Palace Noir is a dark mansion haunted by ghosts. Nearly all its chambers are pitch dark, with only a few Torches lighting its corridors. It is home to several large libraries, including a great central hall where the Grim Repoe is fought. Because of how dark its rooms are, the Light Armor and the Fire Blazer become very useful here.

In Stage 1, the Links enter the mansion's dark foyer. A Lantern Poe floats around the room, but is invulnerable to the Links' attacks. To the north, the Links will find the Bow, while the Fire Gloves are found to the right side, and the Gust Jar to the left. Taking these items will activate the Triforce Gateway, however it is barricaded by double doors that will only open once all the room's Torches are lit and the Lantern Poe defeated. Two Torches by the door can be lit with the Fire Gloves. Two more Torches rest on tall pillars, whose height can be reached by taking the stairs north. To light the Torch on the right side, one Link must form a fireball with his Fire Gloves while another Link shoots an Arrow through it, setting the Arrow on fire. In a single-player game, this can be done by sending a fireball bouncing up the stairs, then switching to the Doppel with the Bow and firing an Arrow as the fireball passes by. The left side of the upstairs can be reached by having one Link propel the others across using the Gust Jar, then one of those Links throwing the other across the smaller gap. Here, two Torches can be lit, and an Arrow shot through the second Torch to light the one on top of the pillar. Once all the Torches are lit, the entire room lights up, defeating the Lantern Poe and opening the doors to the Triforce Gateway.

In Stage 2, the Links appear in another dark room inhabited by Dark Ghini as well as several Rats and Ropes sneaking around narrow pathways. A large pit lies in the middle of the room. Just ahead of the Links is a Big Switch, which pressing will drop a Key onto the center platform in the middle of the pit. Moving platforms on the left and right sides pass by it, however a Flame Wall also appears around the Key and prevents the Links from taking it. The Links instead must take one of the moving platforms, form a Totem of two Links' height, and use the Gust Jar to push the Key onto the other platform as it moves. If the Key falls down the pit, it will reappear back within the Flame Wall. The Links can retrieve it from the other platform and take it north across a narrow pathway. To the east side is a red platform and a large gap before the final ledge. One Link can be propelled across to the ledge using the Gust Jar; there he can press a Floor Switch to make the platform move for the other Links. The locked door that the Key opens can be found on this side, opening the way to the Triforce Gateway. A Treasure Chest can also be found on the left side, containing a Silver Rupee.

In Stage 3, the Links enter a dark, maze-like library with walls of bookshelves and bottomless dead ends. A few lit Torches are provided for little light, and several Jars containing Hearts are scattered throughout the room. The maze is filled with Key Bandit Poes that race throughout the maze, three of which are carrying Keys that the Links need in order to open a set of doors in the north end. These Poes will flee from the Links while carrying Keys, and can be dispatched with a Sword strike once a Link gets close enough. However, more Poes will spawn and chase after the Link to steal back the Key, and even have the ability to pass through bookshelves, so it is helpful to have another Link defending the one with the Key. Each time a Key is brought back to the doors, it can be used to unlock a door and reveal the next one; the final door requires a Totem to reach its lock. Once all the doors are opened, the Links can access the Triforce Gateway, and a Squiddy appears nearby.

In Stage 4, the Links find themselves in a great library hall with circular sets of bookshelves, lit by three massive Torches. When the Links approach the room's center, a Green Poe, and Blue Poe, and a Red Poe all appear and quickly flee from the Links. They can only be defeated when several Links team up to corner them, allowing the Link with the matching color to attack them. After they are all defeated, the Grim Repoe appears. Once it is defeated, the Triforce Gateway appears in the center of the room.
Drablands Challenges
Once the Boss of The Ruins has been defeated, Palace Noir can be replayed with the following Drablands Challenges: "Pop all balloons!", "Transport the orb quickly!", and "Halved attack and defense!". Each Challenge features the same configuration of Enemies.
In "Pop all balloons!", the four Stages contain seven, ten, ten, and eight Balloons respectively, for a total of 35 Balloons. Several of them require the extra height afforded by a fireball from the Fire Gloves, in addition to the Links forming a Totem, to be popped.
In "Transport the orb quickly!", the Links are given a timer of 30 seconds in Multiplayer, or three minutes and 10 seconds in single-player. This timer can be increased by collecting Hourglasses or wearing Linebeck's Uniform. In Stage 3, the Key Bandit Poes will also target the orb as if it were a Key.
Materials
At the end of the Level, three Treasure Chests can be opened. Two contain the same Material, and one contains another, more valuable Material.
| Drablands Challenge | — |
|---|---|
| Magical Materials | |
| Drablands Challenge | Pop all balloons! |
| Magical Materials | |
| Drablands Challenge | Halved attack and defense! |
| Magical Materials | |
| Drablands Challenge | Transport the orb quickly! |
| Magical Materials |
| Drablands Challenge | Magical Materials |
|---|---|
— | |
Pop all balloons! | |
Halved attack and defense! | |
Transport the orb quickly! |
Enemies and Traps
- Stage 1
-

Lantern Poe ×1
-

Rat ×2
-

Rope ×1


- Stage 2
-

Dark Ghini ×8
-
Rat ×4
-
Rope ×2

- Stage 3
![Key Bandit Poe ×4[a]](/wiki/File:TFH_Key_Bandit_Poe_Model.png)
![Squiddy[b]](/wiki/File:TFH_Squiddy_Model.png)
- Stage 4
![Blue Poe ×1[c]](/wiki/File:TFH_Blue_Poe_Model.png)
![Green Poe ×1[c]](/wiki/File:TFH_Green_Poe_Model.png)

![Red Poe ×1[c]](/wiki/File:TFH_Red_Poe_Model.png)
Treasure Chests
| Treasure Chest | |
|---|---|
| Contents | |
| Notes | To the left and down the stairs from the Triforce Gateway in Stage 2 |

| Treasure Chest | Contents | Notes |
|---|---|---|
To the left and down the stairs from the Triforce Gateway in Stage 2 |
Trivia
- As described in Vol. 5 of the Drablands Diary, a set of green handprints is hidden in each Level of The Ruins. They can be found in Stage 3 of Illusory Mansion, on the Key Bandit Poes painting to the right of the locked doors.
Nomenclature
| Language | Names | Meanings |
|---|---|---|
Japanese | くらやみの館 (Kurayami no Yakata)[3] | Palace of Darkness |
FrenchEU | Demeure des ténèbres[5] | |
FrenchCA | Palace des ténèbres[7] | |
German | Dunkelresidenz[4] | |
Italian | Sala nero pece[2] | |
SpanishLA | Palacio de la oscuridad[6] | |
SpanishEU | Palacio de la Oscuridad[8] | |
| This table was generated using translation pages. To request an addition, please contact a staff member with a reference. | ||
Gallery
-
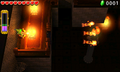
Lighting the final Torch in Stage 1
-
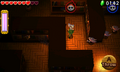
Link being chased by Key Bandit Poes in Stage 3
-
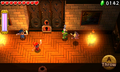
Link about to unlock a door in Stage 3
-
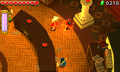
Cornering the Red Poe in Stage 4
-

Painting of a Lantern Poe, as seen in Stage 1
-

Painting of a Light Ghini, as seen in Stage 2
-
Painting of Key Bandit Poes, as seen in Stage 3


References
- ↑ Encyclopedia, Dark Horse Books, pg. 161
- ↑ "Sala nero pece" — Level Selection (Tri Force Heroes)
- ↑ "くらやみの館" — Level Selection (Tri Force Heroes)
- ↑ "Dunkelresidenz" — Level Selection (Tri Force Heroes)
- ↑ "Demeure des ténèbres" — Level Selection (Tri Force Heroes)
- ↑ "Palacio de la oscuridad" — Level Selection (Tri Force Heroes)
- ↑ "Palace des ténèbres" — Level Selection (Tri Force Heroes)
- ↑ "Palacio de la Oscuridad" — Level Selection (Tri Force Heroes)