Locations in Spirit Tracks: Difference between revisions
Jump to navigation
Jump to search
TriforceTony (talk | contribs) m (Text replacement - "Forest Temple" to "{{Term|ST|Forest Temple|link}}") |
TriforceTony (talk | contribs) No edit summary |
||
| Line 1: | Line 1: | ||
__TOC__ | __TOC__ | ||
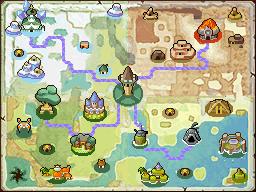
{{STNavMap}} | {{STNavMap}} | ||
== | =={{Term|ST|Tower of Spirits|link}}== | ||
<gallery> | <gallery> | ||
File:TowerofSpirits Ending.png| | File:TowerofSpirits Ending.png|{{Term|ST|Tower of Spirits|link}} | ||
File:TunneltotheTower.png| | File:TunneltotheTower.png|{{Term|ST|Tunnel to the Tower|link}} | ||
File:Tower of Spirits Altar.png| | File:Tower of Spirits Altar.png|{{Term|ST|Altar of the Demon King|link}} | ||
</gallery> | </gallery> | ||
== | =={{Term|ST|Forest Realm|link}}== | ||
<gallery widths="150px" heights="150px"> | <gallery widths="150px" heights="150px"> | ||
File:Forest Realm.png| | File:Forest Realm.png|{{Term|ST|Forest Realm|link}} | ||
File:ST Aboda Village.png| | File:ST Aboda Village.png|{{Term|ST|Aboda Village|link}} | ||
File:Links House.png| | File:Links House.png|{{Term|ST|Link's House|link}} | ||
File:Hyrule castle spirit tracks.jpg| | File:Hyrule castle spirit tracks.jpg|{{Term|ST|Hyrule Castle|link}} | ||
File:Castle Town ST.png| | File:Castle Town ST.png|{{Term|ST|Hyrule Castle Town|link}} | ||
File:Castle Town Shop Interior.png| | File:Castle Town Shop Interior.png|{{Term|ST|Castle Town Shop|link}} | ||
File:Whittleton.png| | File:Whittleton.png|{{Term|ST|Whittleton|link}} | ||
File:ST Rabbitland Rescue 2.png| | File:ST Rabbitland Rescue 2.png|{{Term|ST|Rabbitland Rescue|link}} | ||
File:Trading Post.png|{{Term|ST|Trading Post|link}} | File:Trading Post.png|{{Term|ST|Trading Post|link}} | ||
File:Linebeck iii.png| | File:Linebeck iii.png|{{Term|ST|Linebeck Trading Company|link}} | ||
File:ST Forest Sanctuary inside.png| | File:ST Forest Sanctuary inside.png|{{Term|ST|Forest Sanctuary|link}} | ||
File:Forest Temple.png|{{Term|ST|Forest Temple|link}} | File:Forest Temple.png|{{Term|ST|Forest Temple|link}} | ||
File:Dark Realm.png| | File:Dark Realm.png|{{Term|ST|Dark Realm|link}} | ||
</gallery> | </gallery> | ||
== | =={{Term|ST|Snow Realm|link}}== | ||
<gallery widths="150px" heights="150px"> | <gallery widths="150px" heights="150px"> | ||
File:Snow Realm.png| | File:Snow Realm.png|{{Term|ST|Snow Realm|link}} | ||
File:Anouki Village.png| | File:Anouki Village.png|{{Term|ST|Anouki Village|link}} | ||
File:Anouki General Store.png| | File:Anouki General Store.png|{{Term|ST|Anouki General Store|link}} | ||
File:Wellspring Station Map.png| | File:Wellspring Station Map.png|{{Term|ST|Wellspring Station|link}} | ||
File:Bridge Worker's Home.png| | File:Bridge Worker's Home.png|{{Term|ST|Bridge Worker's Home|link}} | ||
File:Snowdrift Station Map Inside.png| | File:Snowdrift Station Map Inside.png|{{Term|ST|Snowdrift Station|link}} | ||
File:Slippery Station Map.png| | File:Slippery Station Map.png|{{Term|ST|Slippery Station|link}} | ||
File:Steem.png| | File:Steem.png|{{Term|ST|Snow Sanctuary|link}} | ||
File:Snow Temple.png| | File:Snow Temple.png|{{Term|ST|Snow Temple|link}} | ||
</gallery> | </gallery> | ||
== | =={{Term|ST|Ocean Realm|link}}== | ||
<gallery widths="150px" heights="150px"> | <gallery widths="150px" heights="150px"> | ||
File:Ocean Realm-Sand Realm.png| | File:Ocean Realm-Sand Realm.png|{{Term|ST|Ocean Realm|link}} | ||
File:Ocean Floor Entrance 2.png| | File:Ocean Floor Entrance 2.png|{{Term|ST|Ocean Floor|link}} | ||
File:Papuchia Village.png| | File:Papuchia Village.png|{{Term|ST|Papuchia Village|link}} | ||
File:Papuchia Shop.png| | File:Papuchia Shop.png|{{Term|ST|Papuchia Shop|link}} | ||
File:Pirate Hideout.png| | File:Pirate Hideout.png|{{Term|ST|Pirate Hideout|link}} | ||
File:PirateShip ST.png| | File:PirateShip ST.png|{{Term|ST|Pirate Ship (Enemy)|link}} | ||
File:Lost at Sea Station Map.png| | File:Lost at Sea Station Map.png|{{Term|ST|Lost at Sea Station|link}} | ||
File:Carben.png| | File:Carben.png|{{Term|ST|Ocean Sanctuary|link}} | ||
File:Ocean Temple.png| | File:Ocean Temple.png|{{Term|ST|Ocean Temple|link}} | ||
</gallery> | </gallery> | ||
== | =={{Term|ST|Fire Realm|link}}== | ||
<gallery widths="150px" heights="150px"> | <gallery widths="150px" heights="150px"> | ||
File:Fire Realm-Sand Realm.png| | File:Fire Realm-Sand Realm.png|{{Term|ST|Fire Realm|link}} | ||
File:Goron Village Map.png| | File:Goron Village Map.png|{{Term|ST|Goron Village|link}} | ||
File:Goron Country Store.png| | File:Goron Country Store.png|{{Term|ST|Goron Country Store|link}} | ||
File:Goron Target Range.png| | File:Goron Target Range.png|{{Term|ST|Goron Target Range|link}} | ||
File:Disorientation Station.png| | File:Disorientation Station.png|{{Term|ST|Disorientation Station|link}} | ||
File:Dark Ore Mine.png| | File:Dark Ore Mine.png|{{Term|ST|Dark Ore Mine|link}} | ||
File:Ends of the Earth Station.png| | File:Ends of the Earth Station.png|{{Term|ST|Ends of the Earth Station|link}} | ||
File:Altar of the Mountain Goddess.png| | File:Altar of the Mountain Goddess.png|{{Term|ST|Altar of the Mountain Goddess|link}} | ||
File:Embrose.png| | File:Embrose.png|{{Term|ST|Fire Sanctuary (Spirit Tracks)|link}} | ||
File:Mountain of Fire 2.png| | File:Mountain of Fire 2.png|{{Term|ST|Mountain of Fire|link}} | ||
File:FireTempleST.png| | File:FireTempleST.png|{{Term|ST|Fire Temple (Spirit Tracks)|link}} | ||
</gallery> | </gallery> | ||
== | =={{Term|ST|Sand Realm|link}}== | ||
<gallery widths="150px" heights="150px"> | <gallery widths="150px" heights="150px"> | ||
File:Sand Realm.png| | File:Sand Realm.png|{{Term|ST|Sand Realm|link}} | ||
File:Rael.png| | File:Rael.png|{{Term|ST|Sand Sanctuary|link}} | ||
File:SandTemple.png| | File:SandTemple.png|{{Term|ST|Sand Temple|link}} | ||
</gallery> | </gallery> | ||
==Shops== | ==Shops== | ||
<gallery widths="150px" heights="150px"> | <gallery widths="150px" heights="150px"> | ||
File:Beedle's Air Shop.png| | File:Beedle's Air Shop.png|{{Term|ST|Beedle's Air Shop|link}} | ||
File:Castle Town Shop Interior.png| | File:Castle Town Shop Interior.png|{{Term|ST|Castle Town Shop|link}} | ||
File:Anouki General Store.png| | File:Anouki General Store.png|{{Term|ST|Anouki General Store|link}} | ||
File:Papuchia Shop.png| | File:Papuchia Shop.png|{{Term|ST|Papuchia Shop|link}} | ||
File:Goron Country Store.png| | File:Goron Country Store.png|{{Term|ST|Goron Country Store|link}} | ||
</gallery> | </gallery> | ||
== | =={{Term|ST|Battle Mode|link}} {{Plural|ST|Stage}}== | ||
{{Images|ST}} | {{Images|ST}} | ||
<gallery> | <gallery> | ||
File:No Image.png| | File:No Image.png|{{Term|ST|Ancient Earth|link}} | ||
File:No Image.png| | File:No Image.png|{{Term|ST|Frozen Plains|link}} | ||
File:No Image.png| | File:No Image.png|{{Term|ST|Fire Arena|link}} | ||
File:No Image.png| | File:No Image.png|{{Term|ST|Icy Plains|link}} | ||
File:No Image.png| | File:No Image.png|{{Term|ST|Scorched Battlefield|link}} | ||
File:No Image.png| | File:No Image.png|{{Term|ST|Shadow Stage|link}} | ||
</gallery> | </gallery> | ||
{{PlacesNav}} | {{PlacesNav}} | ||
Revision as of 01:05, 5 January 2020
| Stations in Spirit Tracks | |
|---|---|
 Click on a station | |


