Deku Forest (Level): Difference between revisions
Htwretched (talk | contribs) (Screenshots!) |
|||
| (10 intermediate revisions by 2 users not shown) | |||
| Line 1: | Line 1: | ||
{{Hatnote|This article is about the {{Term|Series|Level|link}} in {{TFH}}. For the location, see {{Term|Series|Deku Forest|link}}.}} | |||
{{Infobox Dungeon | {{Infobox Dungeon | ||
|type = level | |type = level | ||
|image= File:TFH Deku Forest.png | |image= File:TFH Deku Forest Stage 3 2.png | ||
|caption = | |caption = Stage 3 of Deku Forest | ||
|location = | |location = {{Term|TFH|Woodlands|link}} | ||
|game = TFH | |game = TFH | ||
|item = | |item = {{Term|TFH|Bow}} ×3 | ||
|quest = | |quest = | ||
|mini-boss = | |mini-boss = | ||
| Line 13: | Line 13: | ||
|strategy = | |strategy = | ||
}} | }} | ||
{{Term/Store|Deku Forest||Series, TFH}} is the first Level in {{TFH}},{{ | {{Term/Store|Deku Forest||Series, TFH}} is the first {{Term|TFH|Level|link}} in {{TFH}},<ref>{{Cite Book|quote= |book= E |publisher= |page= 159}}</ref> and the first {{Term|TFH|Level}} of the {{Term|TFH|Woodlands|link}} {{Term|TFH|Area}}. It is followed by {{Term|TFH|Buzz Blob Cave|link}}. | ||
==Themes and Navigation== | ==Themes and Navigation== | ||
{{Term|TFH|Deku Forest (Level)}} is a large, open woodland with rivers and waterfalls. As the first {{Term|TFH|Level|link}}, it features very basic puzzles which require either {{Term|TFH|Totem|link}} formations or the {{Term|TFH|Bow|link}} to solve. Since all three {{Plural|TFH|Links|link}} must use this {{Term|TFH|Item|link}}, the {{Term|TFH|Kokiri Clothes|link}} are useful in this {{Term|TFH|Level}}. | {{Term|TFH|Deku Forest (Level)}} is a large, open woodland with rivers and waterfalls. As the first {{Term|TFH|Level|link}}, it features very basic puzzles which require either {{Term|TFH|Totem|link}} formations or the {{Term|TFH|Bow|link}} to solve. Since all three {{Plural|TFH|Links|link}} must use this {{Term|TFH|Item|link}}, the {{Term|TFH|Kokiri Clothes|link}} are useful in this {{Term|TFH|Level}}. | ||
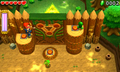
'''{{Term|TFH|Stage|link}} 1''' starts the {{Plural|TFH|Links}} off in a clearing within the {{Term|TFH|Deku Forest (Level)|display=Forest}}, on a dirt ledge. Ahead of them are three {{Plural|TFH|Bow}}, surrounded by bushes. There are also {{Plural|TFH|Jar|link}} and {{Plural|TFH|Grass|link}} that can be cut. To the east is a ledge with several {{Plural|TFH|Rock|link}}, three {{Plural|TFH|Green Rupee|link}}, and one {{Term|TFH|Blue Rupee|link}}, which can only be reached by tossing a {{Term|TFH|Links}} up by forming a {{Term|TFH|Totem}}. A small stream separates the next portion of the {{Term|TFH|Stage}}, and a small bridge crosses over to it. On each side of the bridge are elevated statues with a {{Term|TFH|Blue Rupee}} on them | [[File:TFH Deku Forest Stage 1.png|250px|right|thumb|Obtaining Bows in Stage 1]] | ||
'''{{Term|TFH|Stage|link}} 1''' starts the {{Plural|TFH|Links}} off in a clearing within the {{Term|TFH|Deku Forest (Level)|display=Forest}}, on a dirt ledge. Ahead of them are three {{Plural|TFH|Bow}}, surrounded by bushes. There are also {{Plural|TFH|Jar|link}} and {{Plural|TFH|Grass|link}} that can be cut. To the east is a ledge with several {{Plural|TFH|Rock|link}}, three {{Plural|TFH|Green Rupee|link}}, and one {{Term|TFH|Blue Rupee|link}}, which can only be reached by tossing a {{Term|TFH|Links}} up by forming a {{Term|TFH|Totem}}. A small stream separates the next portion of the {{Term|TFH|Stage}}, and a small bridge crosses over to it. On each side of the bridge are elevated statues with a {{Term|TFH|Blue Rupee}} on top of them, and in the river's west end are three {{Plural|TFH|Green Rupee}}. The next portion of the {{Term|TFH|Stage}} holds the {{Term|TFH|Triforce Gateway|link}}, but it is blocked by a wooden {{Term|TFH|Gate|link}}. In order to open this {{Term|TFH|Gate}}, the three {{Plural|TFH|Links}} must simultaneously stand on {{Plural|TFH|Floor Switch|link}} elevated at three different levels. The right log requires the {{Plural|TFH|Links}} to form a {{Term|TFH|Totem}} of three, and have the middle {{Term|TFH|Links}} throw the top {{Term|TFH|Links}} onto it, whereas the left log only requires a {{Term|TFH|Totem}} of two to reach. Around the {{Term|TFH|Gate|link}} are {{Plural|TFH|Rock|link}} and {{Plural|TFH|Jar|link}}, and behind it are some bushes. | |||
{{Clear}} | |||
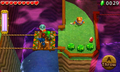
'''{{Term|TFH|Stage}} 2''' places the {{Plural|TFH|Links}} in an area with several ledges and eight {{Plural|TFH|Blob|link}} scattered across them. | [[File:TFH Deku Forest Stage 2.png|250px|right|thumb|Battling Blobs in Stage 2]] | ||
'''{{Term|TFH|Stage}} 2''' places the {{Plural|TFH|Links}} in an area with several ledges and eight {{Plural|TFH|Blob|link}} scattered across them. Every {{Term|TFH|Blob}} must be defeated before the {{Term|TFH|Triforce Gateway}} appears. The ledge on the east side holds three {{Plural|TFH|Green Rupee}} and can be climbed using a ramp, but the {{Plural|TFH|Links}} need to be thrown onto the other ledges. The top ledge holds two {{Plural|TFH|Heart|link}} and two {{Plural|TFH|Treasure Chest|link}}, one containing three more {{Plural|TFH|Heart}}, and one containing a {{Term|TFH|Blue Rupee}}. {{Plural|TFH|Jar}}, {{Plural|TFH|Rock}}, and bushes litter the area. | |||
{{Clear}} | |||
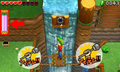
'''{{Term|TFH|Stage}} 3''' tasks the {{Plural|TFH|Links}} with navigating a series of cliffs high above a body of {{Term|TFH|Water (Terrain)|link}}. They begin on one with a {{Term|TFH|Shock Switch|link}} | [[File:TFH Deku Forest Stage 3.png|250px|right|thumb|Crossing a gap in Stage 3]] | ||
'''{{Term|TFH|Stage}} 3''' tasks the {{Plural|TFH|Links}} with navigating a series of cliffs high above a body of {{Term|TFH|Water (Terrain)|link}}. They begin on one with a {{Term|TFH|Shock Switch|link}}; striking it activates a nearby platform to move toward them, allowing them to cross a gap to the next cliff. This cliff has a second, elevated ledge, which two {{Plural|TFH|Links}} must be thrown onto and {{Term|TFH|Totem}} in order to strike a {{Term|TFH|Shock Switch|display=Switch}} across a gap with their {{Term|TFH|Bow}}. This {{Term|TFH|Shock Switch}} activates another platform which takes them to the third cliff. A {{Term|TFH|Treasure Chest}} with a {{Term|TFH|Blue Rupee}} and a {{Term|TFH|Treasure Chest|display=Chest}} with a {{Term|TFH|Red Rupee|link}} can be found here, the latter only reached through tossing the {{Plural|TFH|Links}} up to it. A {{Term|TFH|Blob}} is near each {{Term|TFH|Treasure Chest|display=Chest}}. Between this cliff and the fourth, a platform automatically moves back and forth across a gap, and an elevated {{Term|TFH|Shock Switch}} rests between them in an alcove above. This {{Term|TFH|Shock Switch|display=Switch}} can only be activated by firing an {{Term|TFH|Arrow|link}} at it by the {{Term|TFH|Links}} atop a full {{Term|TFH|Totem}}. Once struck, a bridge between the fourth and final cliffs appears, and the {{Term|TFH|Triforce Gateway}} activates. A {{Term|TFH|Squiddy|link}} rests on the fourth cliff, while two {{Plural|TFH|Heart}} rest on an elevated ledge of the final one. {{Plural|TFH|Jar}}, {{Plural|TFH|Rock}}, and {{Plural|TFH|Grass|link}} litter the whole {{Term|TFH|Stage}}. | |||
{{Clear}} | |||
'''{{Term|TFH|Stage}} 4''' | [[File:TFH Deku Forest Stage 4.png|250px|right|thumb|Battling Totem Dekus in Stage 4]] | ||
'''{{Term|TFH|Stage}} 4''' takes place in another forest clearing. The {{Plural|TFH|Links}} begin on an elevated ledge, with four {{Plural|TFH|Totem Deku|link}} below. These {{Plural|TFH|Enemy|link}} must be attacked with {{Plural|TFH|Bow}}, as they retreat underground when approached. One {{Term|TFH|Totem Deku}} rests at ground level, while two require a two-{{Term|TFH|Links}} {{Term|TFH|Totem}} to reach, and the last requires a full {{Term|TFH|Totem}}. Once they are all defeated, a closed {{Term|TFH|Gate}} opens, revealing the area in which the {{Term|TFH|Triforce Gateway}} then appears. Twelve {{Plural|TFH|Green Rupee}}, {{Plural|TFH|Grass}}, and {{Plural|TFH|Jar}} can be found around the {{Term|TFH|Stage}}. | |||
{{Clear}} | |||
===Drablands | ==={{Plural|TFH|Drablands Challenge}}=== | ||
Deku Forest | Once the {{Term|TFH|Boss|link}} of the {{Term|TFH|Woodlands|link}} has been defeated, {{Term|TFH|Deku Forest (Level)}} can be replayed with the following {{Plural|TFH|Drablands Challenge|link}}: "[[Drablands Challenge#Fewer Heart Containers!|Fewer Heart Containers!]]", "[[Drablands Challenge#Clear within the time limit!|Clear within the time limit!]]", and "[[Drablands Challenge#Guard the Orb!|Guard the Orb!]]". In each of the {{Plural|TFH|Drablands Challenge}}, more {{Plural|TFH|Enemy|link}} appear throughout the {{Term|TFH|Level|link}}. The first {{Term|TFH|Stage}} features {{Plural|TFH|Blob|link}}, with two notably appearing on top of the two logs where the {{Plural|TFH|Floor Switch|link}} are, making it harder to throw the {{Plural|TFH|Links}} onto them as the {{Plural|TFH|Enemy}} can knock them off. A strategy to defeat these {{Plural|TFH|Blob}} is to form a {{Term|TFH|Totem}} of three and shoot down the {{Term|TFH|Blob}} on the shortest log first, then throw two {{Plural|TFH|Links}} onto that log to shoot the {{Term|TFH|Blob}} off the tallest log. | ||
In "Fewer Heart Containers!", the {{Plural|TFH|Heart|link}} on the ledge behind the {{Term|TFH|Triforce Gateway|link}} in {{Term|TFH|Stage}} 3 are replaced with {{Plural|TFH|Blue Rupee|link}}. | |||
In " | In "Clear within the time limit!", the {{Plural|TFH|Links}} are given a timer of 30 seconds in [[Multiplayer]], or 50 seconds in single-player. This timer can be increased by collecting {{Plural|TFH|Hourglass|link}} or wearing {{Term|TFH|Linebeck's Uniform|link}}. | ||
In " | In "Guard the Orb!", the {{Term|TFH|Treasure Chest|link}} containing a {{Term|TFH|Red Rupee|link}} in {{Term|TFH|Stage}} 2 is absent. In its place is the pedestal where the Orb must be placed. | ||
==={{Plural|TFH|Material}}=== | |||
At the end of the {{Term|TFH|Level}}, three {{Plural|TFH|Treasure Chest|link}} can be opened. Two contain the same {{Term|TFH|Material|link}}, and one contains another, more valuable {{Term|TFH|Material}}. | |||
=== | |||
At the end of the Level, three | |||
{{Data Table | {{Data Table | ||
| Line 47: | Line 53: | ||
| 2 Blob Jelly, 1 Armos Spirit | | 2 Blob Jelly, 1 Armos Spirit | ||
|- | |- | ||
| [[File:TFH Fewer Heart Containers Icon.png]]<br/>'''Fewer | | [[File:TFH Fewer Heart Containers Icon.png]]<br/>'''Fewer Heart Containers!''' | ||
| 2 Blob Jelly, 1 Tektite Shell | | 2 Blob Jelly, 1 Tektite Shell | ||
|- | |- | ||
| Line 57: | Line 63: | ||
}} | }} | ||
==={{Plural|TFH|Enemy}}=== | ==={{Plural|TFH|Enemy}} and Traps=== | ||
{{Tabs | |||
|tab1= No Challenge | |||
|content1= | |||
;{{Term|TFH|Stage}} 1 | |||
There are no {{Plural|TFH|Enemy}} in this {{Term|TFH|Stage}}. | |||
;{{Term|TFH|Stage}} 2 | |||
{{Gallery List|Enemies | |||
|TFH= Blob [Qty:8] | |||
}} | |||
;{{Term|TFH|Stage}} 3 | |||
{{Gallery List|Enemies | |||
|TFH= Blob [Qty:2], Squiddy | |||
}} | |||
;{{Term|TFH|Stage}} 4 | |||
{{Gallery List|Enemies | {{Gallery List|Enemies | ||
|TFH= | |TFH= Totem Deku [Qty:1], Totem Deku [2] [Qty:2], Totem Deku [3] [Qty:1] | ||
}} | }} | ||
|tab2= "Fewer Heart Containers!" | |||
|content2= | |||
;{{Term|TFH|Stage}} 1 | |||
{{Gallery List|Enemies | {{Gallery List|Enemies | ||
|TFH= Blob | |TFH= Blob [Qty:5] | ||
}} | }} | ||
; | ;{{Term|TFH|Stage}} 2 | ||
{{Gallery List|Enemies | {{Gallery List|Enemies | ||
|TFH= Blob [Qty: | |TFH= Buzz Blob [Qty:7], Totem Deku [2] [Qty:1] | ||
}} | |||
;{{Term|TFH|Stage}} 3 | |||
{{Gallery List|Enemies | |||
|TFH= Buzz Blob [Qty:1], Crow [Qty:2], Life Like [Qty:1]{{List Note|name= Heart|Disguised as a {{Term|TFH|Heart|link}}.}}, Spear Throwing Moblin [Qty:5], Squiddy, Totem Deku [2] [Qty:1] | |||
}} | |||
{{List Notes}} | |||
;{{Term|TFH|Stage}} 4 | |||
{{Gallery List|Enemies | |||
|TFH= Crow [Qty:3], Tektite [Qty:3], Totem Deku [2] [Qty:3], Totem Deku [3] [Qty:1] | |||
}} | |||
|tab3= "Clear within the time limit!", "Guard the Orb!" | |||
|content3= | |||
;{{Term|TFH|Stage}} 1 | |||
{{Gallery List|Enemies | |||
|TFH= Blob [Qty:5] | |||
}} | |||
;{{Term|TFH|Stage}} 2 | |||
{{Gallery List|Enemies | |||
|TFH= Buzz Blob [Qty:7], Totem Deku [2] [Qty:1] | |||
}} | |||
;{{Term|TFH|Stage}} 3 | |||
{{Gallery List|Enemies | |||
|TFH= Buzz Blob [Qty:1], Life Like [Qty:1]{{List Note|name= Heart|Disguised as a {{Term|TFH|Heart|link}}.}}, Spear Throwing Moblin [Qty:5], Squiddy, Totem Deku [2] [Qty:1] | |||
}} | |||
{{List Notes}} | |||
;{{Term|TFH|Stage}} 4 | |||
{{Gallery List|Enemies | |||
|TFH= Tektite [Qty:3], Totem Deku [2] [Qty:3], Totem Deku [3] [Qty:1] | |||
}} | |||
}} | }} | ||
| Line 80: | Line 140: | ||
|- | |- | ||
| Treasure Chest | | Treasure Chest | ||
| Heart {{Qty|3}} | | Heart [File:TFH Three Hearts Sprite.png] {{Qty|3}} | ||
| On the bottom-left corner of the highest ledge behind the {{Plural|TFH|Blob}} in {{Term|TFH|Stage}} 2 | | On the bottom-left corner of the highest ledge behind the {{Plural|TFH|Blob}} in {{Term|TFH|Stage}} 2 | ||
|- | |- | ||
| Line 91: | Line 151: | ||
| On the furthest-back ledge on the third cliff in {{Term|TFH|Stage}} 3 | | On the furthest-back ledge on the third cliff in {{Term|TFH|Stage}} 3 | ||
}} | }} | ||
==Trivia== | |||
*As described in Vol. 1 of the {{Term|TFH|Drablands Diary|link}}, a bright green {{Term|TFH|Butterfly|link}} is hidden in each {{Term|TFH|Level|link}} of the {{Term|TFH|Woodlands|link}}. One can be found on a tree in {{Term|TFH|Stage}} 4 of {{Term|TFH|Deku Forest (Level)}} by shifting the camera directly to the right of the {{Plural|TFH|Links}}' starting position. | |||
==Nomenclature== | ==Nomenclature== | ||
{{Nomenclature}} | {{Nomenclature}} | ||
==Gallery== | |||
<gallery> | |||
File:TFH Deku Forest Stage 1 2.png|The locked gate in {{Term|TFH|Stage}} 1 ("Fewer Heart Containers!" {{Term|TFH|Drablands Challenge}}) | |||
File:TFH Deku Forest Stage 3 3.png|Crossing a gap in {{Term|TFH|Stage}} 3 ("Guard the Orb!" {{Term|TFH|Drablands Challenge}}) | |||
File:TFH Energy Gauge Promotional Screenshot.png|Promotional Screenshot of shooting a {{Term|TFH|Shock Switch}} in {{Term|TFH|Stage}} 3 | |||
</gallery> | |||
{{Ref}} | {{Ref}} | ||
Latest revision as of 06:16, 17 January 2024
Deku Forest is the first Level in Tri Force Heroes,[1] and the first Level of the Woodlands Area. It is followed by Buzz Blob Cave.
Deku Forest is a large, open woodland with rivers and waterfalls. As the first Level, it features very basic puzzles which require either Totem formations or the Bow to solve. Since all three Links must use this Item, the Kokiri Clothes are useful in this Level.

Stage 1 starts the Links off in a clearing within the Forest, on a dirt ledge. Ahead of them are three Bows, surrounded by bushes. There are also Jars and Grass that can be cut. To the east is a ledge with several Rocks, three Green Rupees, and one Blue Rupee, which can only be reached by tossing a Link up by forming a Totem. A small stream separates the next portion of the Stage, and a small bridge crosses over to it. On each side of the bridge are elevated statues with a Blue Rupee on top of them, and in the river's west end are three Green Rupees. The next portion of the Stage holds the Triforce Gateway, but it is blocked by a wooden Gate. In order to open this Gate, the three Links must simultaneously stand on Floor Switches elevated at three different levels. The right log requires the Links to form a Totem of three, and have the middle Link throw the top Link onto it, whereas the left log only requires a Totem of two to reach. Around the Gate are Rocks and Jars, and behind it are some bushes.

Stage 2 places the Links in an area with several ledges and eight Blobs scattered across them. Every Blob must be defeated before the Triforce Gateway appears. The ledge on the east side holds three Green Rupees and can be climbed using a ramp, but the Links need to be thrown onto the other ledges. The top ledge holds two Hearts and two Treasure Chests, one containing three more Hearts, and one containing a Blue Rupee. Jars, Rocks, and bushes litter the area.

Stage 3 tasks the Links with navigating a series of cliffs high above a body of Water. They begin on one with a Shock Switch; striking it activates a nearby platform to move toward them, allowing them to cross a gap to the next cliff. This cliff has a second, elevated ledge, which two Links must be thrown onto and Totem in order to strike a Switch across a gap with their Bow. This Shock Switch activates another platform which takes them to the third cliff. A Treasure Chest with a Blue Rupee and a Chest with a Red Rupee can be found here, the latter only reached through tossing the Links up to it. A Blob is near each Chest. Between this cliff and the fourth, a platform automatically moves back and forth across a gap, and an elevated Shock Switch rests between them in an alcove above. This Switch can only be activated by firing an Arrow at it by the Link atop a full Totem. Once struck, a bridge between the fourth and final cliffs appears, and the Triforce Gateway activates. A Squiddy rests on the fourth cliff, while two Hearts rest on an elevated ledge of the final one. Jars, Rocks, and Grass litter the whole Stage.

Stage 4 takes place in another forest clearing. The Links begin on an elevated ledge, with four Totem Dekus below. These Enemies must be attacked with Bows, as they retreat underground when approached. One Totem Deku rests at ground level, while two require a two-Link Totem to reach, and the last requires a full Totem. Once they are all defeated, a closed Gate opens, revealing the area in which the Triforce Gateway then appears. Twelve Green Rupees, Grass, and Jars can be found around the Stage.
Drablands Challenges
Once the Boss of the Woodlands has been defeated, Deku Forest can be replayed with the following Drablands Challenges: "Fewer Heart Containers!", "Clear within the time limit!", and "Guard the Orb!". In each of the Drablands Challenges, more Enemies appear throughout the Level. The first Stage features Blobs, with two notably appearing on top of the two logs where the Floor Switches are, making it harder to throw the Links onto them as the Enemies can knock them off. A strategy to defeat these Blobs is to form a Totem of three and shoot down the Blob on the shortest log first, then throw two Links onto that log to shoot the Blob off the tallest log.
In "Fewer Heart Containers!", the Hearts on the ledge behind the Triforce Gateway in Stage 3 are replaced with Blue Rupees.
In "Clear within the time limit!", the Links are given a timer of 30 seconds in Multiplayer, or 50 seconds in single-player. This timer can be increased by collecting Hourglasses or wearing Linebeck's Uniform.
In "Guard the Orb!", the Treasure Chest containing a Red Rupee in Stage 2 is absent. In its place is the pedestal where the Orb must be placed.
Materials
At the end of the Level, three Treasure Chests can be opened. Two contain the same Material, and one contains another, more valuable Material.
| Drablands Challenge | — |
|---|---|
| Magical Materials | |
| Drablands Challenge | Fewer Heart Containers! |
| Magical Materials | |
| Drablands Challenge | Clear within the time limit! |
| Magical Materials | |
| Drablands Challenge | Guard the orb! |
| Magical Materials |
| Drablands Challenge | Magical Materials |
|---|---|
— | |
Fewer Heart Containers! | |
Clear within the time limit! | |
Guard the orb! |
Enemies and Traps
- Stage 1
There are no Enemies in this Stage.
- Stage 2
-

Blob ×8

- Stage 3

- Stage 4
-

Totem Deku ×1
-

Totem Deku ×2
-

Totem Deku ×1


- Stage 1
-
Blob ×5
- Stage 2
-

Buzz Blob ×7
-
Totem Deku ×1

- Stage 3
-
Buzz Blob ×1
-
Crow ×2
-
![Life Like ×1[a]](//cdn.wikimg.net/en/zeldawiki/images/thumb/4/49/TFH_Life_Like_Model.png/87px-TFH_Life_Like_Model.png)
-

-

-
Totem Deku ×1

![Life Like ×1[a]](/wiki/File:TFH_Life_Like_Model.png)

- Stage 4
-
Crow ×3
-

Tektite ×3
-
Totem Deku ×3
-
Totem Deku ×1

- Stage 1
-
Blob ×5
- Stage 2
-
Buzz Blob ×7
-
Totem Deku ×1
- Stage 3
-
Buzz Blob ×1
-
-
-
-
Totem Deku ×1
- Stage 4
-
Tektite ×3
-
Totem Deku ×3
-
Totem Deku ×1
Treasure Chests
| Treasure Chest | |
|---|---|
| Contents | |
| Notes | On the right side of the highest ledge behind the Blobs in Stage 2 |
| Treasure Chest | |
| Contents |
|
| Notes | On the bottom-left corner of the highest ledge behind the Blobs in Stage 2 |
| Treasure Chest | |
| Contents | |
| Notes | In the middle of the third cliff in Stage 3 |
| Treasure Chest | |
| Contents | |
| Notes | On the furthest-back ledge on the third cliff in Stage 3 |

| Treasure Chest | Contents | Notes |
|---|---|---|
On the right side of the highest ledge behind the Blobs in Stage 2 | ||
| On the bottom-left corner of the highest ledge behind the Blobs in Stage 2 | |
In the middle of the third cliff in Stage 3 | ||
On the furthest-back ledge on the third cliff in Stage 3 |
Trivia
- As described in Vol. 1 of the Drablands Diary, a bright green Butterfly is hidden in each Level of the Woodlands. One can be found on a tree in Stage 4 of Deku Forest by shifting the camera directly to the right of the Links' starting position.
Nomenclature
| Language | Names | Meanings |
|---|---|---|
Japanese | デクの森 (Deku no Mori)[3] | Deku Forest |
FrenchCA | Forêt mojo | |
FrenchEU | Forêt mojo[5] | |
German | Deku-Wald[4] | |
Italian | Bosco Deku[2] | |
SpanishLA | Bosque deku[6] | |
SpanishEU | Bosque Deku[7] | |
| This table was generated using translation pages. To request an addition, please contact a staff member with a reference. | ||
Gallery
-
The locked gate in Stage 1 ("Fewer Heart Containers!" Drablands Challenge)
-
Crossing a gap in Stage 3 ("Guard the Orb!" Drablands Challenge)
-
Promotional Screenshot of shooting a Shock Switch in Stage 3


References
- ↑ Encyclopedia, Dark Horse Books, pg. 159
- ↑ "Bosco Deku" — Level Selection (Tri Force Heroes)
- ↑ "デクの森" — Level Selection (Tri Force Heroes)
- ↑ "Deku-Wald" — Level Selection (Tri Force Heroes)
- ↑ "Forêt mojo" — Level Selection (Tri Force Heroes)
- ↑ "Bosque deku" — Level Selection (Tri Force Heroes)
- ↑ "Bosque Deku" — Level Selection (Tri Force Heroes)