Training Ground: Difference between revisions
mNo edit summary |
Htwretched (talk | contribs) mNo edit summary |
||
| (21 intermediate revisions by 7 users not shown) | |||
| Line 1: | Line 1: | ||
{{Dungeon | {{Infobox Dungeon | ||
|type= level | |type= level | ||
|image= | |image= File:TFH Training Ground.png | ||
|caption= | |caption= Stage 1 of Training Ground | ||
|location= | |location= {{Term|TFH|Fortress|link}} | ||
|game= {{TFH}} | |game= TFH | ||
| | |item= {{List|{{Term|TFH|Bow|link}}, {{Term|TFH|Gripshot|link}}, {{Term|TFH|Gust Jar|link}}}} | ||
|quest= | |quest= | ||
|mini-boss= | |mini-boss= | ||
|boss= | |boss= | ||
|theme | |theme= | ||
|strategy= | |strategy= | ||
}} | }} | ||
{{Term/Store|Training Ground||Series, TFH}} is a {{Term|TFH|Level|link}} in {{TFH}}.<ref>{{Cite Book|quote= |book= E |publisher= |page= 160}}</ref> It is the third {{Term|TFH|Level}} of the {{Term|TFH|Fortress|link}} {{Term|TFH|Area}}, preceded by {{Term|TFH|Bomb Storage|link}} and followed by {{Term|TFH|The Lady's Lair|link}}. | |||
==Themes and Navigation== | ==Themes and Navigation== | ||
{{Term|Series|Training Ground}} takes place in a chamber filled with numerous traps and obstacles, likely used for training for the {{Term|TFH|Fortress}}'s {{Plural|TFH|Soldier (Enemy)|link}}, hence the {{Term|TFH|Level}}'s name. The {{Term|TFH|Level}} notably features several parked {{Plural|TFH|Totem Armos|link}}, which the {{Plural|TFH|Links|link}} can ride on to reach other sections of the {{Plural|TFH|Stage}} and do battle with {{Plural|TFH|Enemy}}. | |||
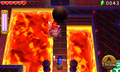
In '''Stage 1''', the Links appear in a room with a pit of | [[File:TFH Training Ground Stage 1 2.png|250px|right|thumb|One method of activating the Switches in Stage 1]] | ||
In '''Stage 1''', the {{Plural|TFH|Links}} appear in a room with a pit of {{Term|TFH|Lava}}. In the center of the room is a {{Term|TFH|Big Switch|link}}, which after pressing with all three {{Plural|TFH|Links}}, will make a {{Term|TFH|Totem Armos}} rise out of a trap door in the floor. This {{Term|TFH|Totem Armos}} can be used to cross the pit of {{Term|TFH|Lava}} ahead or to the left of them; on the other side, a {{Term|TFH|Gust Jar|link}} and a {{Term|TFH|Gripshot|link}} can be found near several {{Plural|TFH|Shock Switch|link}} and {{Plural|TFH|Floor Switch|link}}. If the {{Plural|TFH|Links}} go right from the starting area, they will find a {{Term|TFH|Bow|link}} up a staircase. To clear the {{Term|TFH|Stage}}, at least two of the {{Plural|TFH|Links}} must first cross the {{Term|TFH|Lava}} pit using the {{Term|TFH|Totem Armos}}, then step on the two {{Plural|TFH|Floor Switch}} to make a bridge appear across the pit. Then the {{Plural|TFH|Links}} must then hit all three of the {{Plural|TFH|Shock Switch}} with their {{Plural|TFH|Item}} in a very short time, but must do so from a distance as the {{Plural|TFH|Switch}} will cover up if they get too close. The elevated center {{Term|TFH|Switch}} can be hit by quickly forming a {{Term|TFH|Totem|link}} after hitting the other two, or by having one {{Term|TFH|Links}} ride the {{Term|TFH|Totem Armos}}. Once the three {{Plural|TFH|Switch}} are activated, a door opens to four more {{Plural|TFH|Floor Switch}}, one of which is inside a green panel. One of the {{Plural|TFH|Links}} must park the {{Term|TFH|Totem Armos}} on top of this {{Term|TFH|Switch}} while the other three are stepped on. This will open the second door to the {{Term|TFH|Triforce Gateway|link}}. | |||
{{Clear}} | |||
In '''Stage 2''', the Links ride an elevator to a room containing another Totem Armos. | [[File:TFH Training Ground Stage 2.png|250px|right|thumb|Stage 2]] | ||
In '''Stage 2''', the {{Plural|TFH|Links}} ride an elevator to a room containing another {{Term|TFH|Totem Armos}} in the center. As they approach it, {{Plural|TFH|Blue Sword Soldier|link}} suddenly appear and {{Plural|TFH|Red Hardhat Beetle|link}} slide down the sloped walls; all the {{Plural|TFH|Enemy}} be easily defeated with the {{Term|TFH|Totem Armos}}. The {{Plural|TFH|Blue Sword Soldier}}' shields will protect them from the {{Term|TFH|Totem Armos}}, however their shields can be removed with the {{Term|TFH|Gripshot}}. After all {{Plural|TFH|Enemy}} are defeated, the doors to the {{Term|TFH|Triforce Gateway}} open. | |||
{{Clear}} | |||
In '''Stage 3''', the Links enter another chamber filled with pits of | [[File:TFH Training Ground Stage 3.png|250px|right|thumb|The beginning of Stage 3]] | ||
In '''Stage 3''', the {{Plural|TFH|Links}} enter another chamber filled with pits of {{Term|TFH|Lava}}. To the right side is a narrow walkway surrounded by {{Term|TFH|Lava}}, however, {{Plural|TFH|Gargantuan Ball|link}} will roll down the path and prevent the {{Plural|TFH|Links}} from crossing. A {{Term|TFH|Totem Armos}} sits nearby, but a {{Term|TFH|Beamos|link}} sitting on top of it will fire beams at any of the {{Plural|TFH|Links}} who approach. The {{Term|TFH|Beamos}} can be destroyed by forming a {{Term|TFH|Totem}} and firing an {{Term|TFH|Arrow|link}} into its eye, blasting it onto the floor with the {{Term|TFH|Gust Jar}}, or by stunning it and striking it with the {{Term|TFH|Sword|link}}. With the {{Term|TFH|Totem Armos}} freed, one of the {{Plural|TFH|Links}} can ride it down the narrow pathway, clearing a path for the others as the {{Term|TFH|Totem Armos}} destroys the {{Plural|TFH|Gargantuan Ball}} it comes in contact with. A {{Term|TFH|Beamos}} will threaten to fire beams at them along the way. Once they cross the pathway, another {{Term|TFH|Beamos}} awaits, followed by a green panel for the Totem Armos to park at. On a nearby ledge is a {{Term|TFH|Treasure Chest|link}} containing three {{Plural|TFH|Heart|link}}. | |||
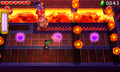
To the right | To the right is a pathway with a complex trap made up of four stationary {{Plural|TFH|Guruguru Bar|link}} firing streams of flames, and {{Plural|TFH|Shock Switch}} in between them. To get all of the {{Plural|TFH|Links}} safely past the flames, one of them must ride the {{Term|TFH|Totem Armos}} straight to the right, which blocks the streams of flames momentarily, allowing the other two {{Plural|TFH|Links}} to pass. However, the floor gives way to a pool of {{Term|TFH|Lava}} for the {{Term|TFH|Link}} riding the {{Term|TFH|Totem Armos}}. The {{Plural|TFH|Links}} on foot can strike one of the {{Plural|TFH|Shock Switch}} to alternately raise and lower a grated platform out of the {{Term|TFH|Lava}}. Before the {{Term|TFH|Totem Armos}} reaches the second stream of flames, the grated platform needs to be raised so that the {{Term|TFH|Links}} riding it does not get burned. The third {{Term|TFH|Guruguru Bar}} is elevated, so the grated platform must be lowered again. Before the fourth stream of flames, the platform must be raised again. Essentially: the {{Plural|TFH|Links}} on foot should stay below the {{Term|TFH|Totem Armos}} to keep safe from the flames, and strike the {{Term|TFH|Shock Switch}} in between each pair of {{Plural|TFH|Guruguru Bar}}. Should they fail at any point and need to try again, they can fall off the pathway to the south, where an elevator takes them back to the start. Once they pass the trap, the {{Plural|TFH|Links}} come to a small room with a {{Term|TFH|Squiddy|link}}, a rising lift in the floor, and a green panel. Parking the {{Term|TFH|Totem Armos}} will launch the {{Term|TFH|Links}}(s) riding it toward the {{Term|TFH|Triforce Gateway}}. In order to get all of the {{Plural|TFH|Links}} there together, the ones on foot must stand on the lift, ride it upward as the {{Term|TFH|Totem Armos}} hops nearby, then drop off of it into a {{Term|TFH|Totem}}. | ||
{{Clear}} | |||
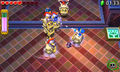
In '''Stage 4''', the Links fight a | [[File:TFH Training Ground Stage 4.png|250px|right|thumb|The first wave of Soldiers in Stage 4]] | ||
In '''Stage 4''', the {{Plural|TFH|Links}} each appear on a ledge above a parked {{Term|TFH|Totem Armos}} and must fight a pair of {{Plural|TFH|Soldier (Enemy)|display=Sword Soldiers}} and a {{Term|TFH|Spear Throwing Soldier|link}} aboard {{Plural|TFH|Totem Armos}} of their own. The {{Plural|TFH|Soldier (Enemy)}} can be attacked with {{Plural|TFH|Arrow}} and well-placed {{Term|TFH|Sword}} strikes, or knocked off their {{Plural|TFH|Totem Armos}} with the {{Term|TFH|Gust Jar}} and easily defeated by trampling them. The {{Term|TFH|Blue Sword Soldier}} is much more durable, but its shield can be stolen with the {{Term|TFH|Gripshot}}. Once they are defeated, a wall lowers revealing another {{Term|TFH|Blue Sword Soldier}} and a {{Term|TFH|Grey Ball and Chain Soldier|link}} riding {{Plural|TFH|Totem Armos}}, and a {{Term|TFH|Bomb Soldier|link}} riding two stacked {{Plural|TFH|Totem Armos}}. The {{Term|TFH|Soldier (Enemy)}} riding the two {{Plural|TFH|Totem Armos}} can be defeated by attacking it from one of the ledges along the sides of the {{Term|TFH|Stage}}. Once the {{Plural|TFH|Enemy}} are defeated, a door opens to three green panels and the {{Term|TFH|Triforce Gateway}}. | |||
{{Clear}} | |||
===Drablands Challenge=== | ==={{Plural|TFH|Drablands Challenge}}=== | ||
Training Ground | Once the {{Plural|TFH|Boss|link}} of the {{Term|TFH|Fortress|link}} have been defeated, {{Term|TFH|Training Ground}} can be replayed with the following {{Plural|TFH|Drablands Challenge|link}}: "[[Drablands Challenge#Clear within the time limit!|Clear within the time limit!]]", "[[Drablands Challenge#Halved attack and defense!|Halved attack and defense!]]", and "[[Drablands Challenge#Don't drop the pot!|Don't drop the pot!]]". Each {{Term|TFH|Drablands Challenge|display=Challenge}} features the same configuration of {{Plural|TFH|Enemy|link}}. | ||
In "Clear within the time limit!", the {{Plural|TFH|Links|link}} are given a timer of two minutes in [[Multiplayer]], or two minutes and 40 seconds in single-player. This timer can be increased by collecting {{Plural|TFH|Hourglass|link}} or wearing {{Term|TFH|Linebeck's Uniform|link}}. | |||
In "Don't drop the pot!", a {{Term|TFH|Bomb Flower|link}} can be found near the {{Plural|TFH|Shock Switch|link}} in {{Term|TFH|Stage}} 1 to assist in activating them all. However, the {{Plural|TFH|Links}} can simply unlock the doors to the {{Term|TFH|Triforce Gateway|link}} before picking up the pot. | |||
=== | ==={{Plural|TFH|Material}}=== | ||
At the end of the {{Term|TFH|Level}}, three {{Plural|TFH|Treasure Chest|link}} can be opened. Two contain the same {{Term|TFH|Material|link}}, and one contains another, more valuable {{Term|TFH|Material}}. | |||
== | {{Data Table | ||
|game= TFH | |||
|columns= {{Term|TFH|Drablands Challenge}}, {{Plural|TFH|Magical Material}} [Amounts] | |||
|- | |||
| N/A | |||
| 2 Silver Thread, 1 Antique Coin | |||
|- | |||
| [[File:TFH Hourglass Icon.png]]<br/>'''Clear within the time limit!''' | |||
| 2 Royal Ring, 1 Fancy Fabric | |||
|- | |||
| [[File:TFH Halved Attack Defense Icon.png]]<br/>'''Halved attack and defense!''' | |||
| 2 Antique Coin, 1 Exquisite Lace | |||
|- | |||
| [[File:TFH Drop the Pot Icon.png]]<br/>'''Don't drop the pot!''' | |||
| 2 Fancy Fabric, 1 Vibrant Brooch | |||
}} | |||
==={{Plural|TFH|Enemy}} and Traps=== | |||
;{{Term|TFH|Stage}} 1 | |||
{{Gallery List|Enemies | |||
|TFH= Green Sword Soldier [Qty:2], Totem Armos [Qty:1]{{List Note|name= Armos1|This is provided for the {{Plural|TFH|Links|link}} to use.}} | |||
}} | |||
;{{Term|TFH|Stage}} 2 | |||
{{Gallery List|Enemies | |||
|TFH= Blue Sword Soldier [Qty:2], Red Hardhat Beetle [Qty:6], Totem Armos [Qty:1]{{List Note|name= Armos1}} | |||
}} | |||
;{{Term|TFH|Stage}} 3 | |||
{{Gallery List|Enemies | |||
|TFH= Beamos [Qty:3], Gargantuan Ball{{List Note|These appear endlessly from one chute.}}, Guruguru Bar [Qty:4]{{List Note|All four are stationary.}}, Squiddy, Totem Armos [Qty:1]{{List Note|name= Armos1}} | |||
}} | |||
== | ;{{Term|TFH|Stage}} 4 | ||
{{Gallery List|Enemies | |||
|TFH= Blue Sword Soldier [Qty:2]{{List Note|name= Armos2|Each of these {{Plural|TFH|Enemy}} rides on a {{Term|TFH|Totem Armos}}.}}, Bomb Soldier [Qty:1]{{List Note|This {{Term|TFH|Enemy}} rides on two {{Plural|TFH|Totem Armos}}.}}, Green Sword Soldier [Qty:1]{{List Note|name= Armos2}}, Grey Ball and Chain Soldier [Qty:1]{{List Note|name= Armos2}}, Spear Throwing Soldier [Qty:1]{{List Note|name= Armos2}}, Totem Armos [Qty:10]{{List Note|Three are provided for the {{Plural|TFH|Links}} to use; the rest are ridden by {{Plural|TFH|Enemy}}.}} | |||
}} | |||
{{List Notes}} | |||
=== | ==={{Plural|TFH|Treasure Chest}}=== | ||
{{Treasure Chests|game= TFH | |||
|- | |||
| Treasure Chest | |||
| Heart [File:TFH Three Hearts Sprite.png] {{Qty|3}} | |||
| On a ledge south of the second {{Term|TFH|Totem Armos}} parking spot in {{Term|TFH|Stage}} 3 | |||
|- | |||
| Treasure Chest | |||
| Silver Rupee | |||
| Behind the {{Term|TFH|Triforce Gateway}} in {{Term|TFH|Stage}} 4 | |||
}} | |||
==Trivia== | |||
*As described in Vol. 4 of the {{Term|TFH|Drablands Diary|link}}, a scarab is hidden on a wall in each {{Term|TFH|Level|link}} of the {{Term|TFH|Fortress|link}}. One can be found in {{Term|TFH|Stage}} 4 of {{Term|TFH|Training Ground}}, on the ledge behind where the first {{Plural|TFH|Enemy}} appear, directly above the northernmost {{Term|TFH|Pot|link}}. | |||
==Nomenclature== | |||
{{Nomenclature}} | |||
==Gallery== | |||
<gallery> | <gallery> | ||
File:TFH | File:TFH Training Ground Stage 3 2.png|Using the {{Term|TFH|Totem Armos}} to pass rolling {{Plural|TFH|Gargantuan Ball}} in {{Term|TFH|Stage}} 3 | ||
File:TFH | File:TFH Training Ground Stage 3 3.png|Passing the {{Plural|TFH|Guruguru Bar}} in {{Term|TFH|Stage}} 3 | ||
File:TFH Training Ground Stage 4 2.png|The second wave of {{Plural|TFH|Soldier (Enemy)}} in {{Term|TFH|Stage}} 4 | |||
File:TFH | File:TFH Training Ground Stage 4 3.png|Using a thrown {{Term|TFH|Bomb}} against a {{Term|TFH|Soldier}} in {{Term|TFH|Stage}} 4 | ||
File:TFH | |||
</gallery> | </gallery> | ||
{{Ref}} | |||
{{ | |||
{{Categories | |||
|levels= TFH | |||
}} | |||
Latest revision as of 21:35, 4 December 2023
Training Ground is a Level in Tri Force Heroes.[1] It is the third Level of the Fortress Area, preceded by Bomb Storage and followed by The Lady's Lair.
Training Ground takes place in a chamber filled with numerous traps and obstacles, likely used for training for the Fortress's Soldiers, hence the Level's name. The Level notably features several parked Totem Armos, which the Links can ride on to reach other sections of the Stages and do battle with Enemies.

In Stage 1, the Links appear in a room with a pit of Lava. In the center of the room is a Big Switch, which after pressing with all three Links, will make a Totem Armos rise out of a trap door in the floor. This Totem Armos can be used to cross the pit of Lava ahead or to the left of them; on the other side, a Gust Jar and a Gripshot can be found near several Shock Switches and Floor Switches. If the Links go right from the starting area, they will find a Bow up a staircase. To clear the Stage, at least two of the Links must first cross the Lava pit using the Totem Armos, then step on the two Floor Switches to make a bridge appear across the pit. Then the Links must then hit all three of the Shock Switches with their Items in a very short time, but must do so from a distance as the Switches will cover up if they get too close. The elevated center Switch can be hit by quickly forming a Totem after hitting the other two, or by having one Link ride the Totem Armos. Once the three Switches are activated, a door opens to four more Floor Switches, one of which is inside a green panel. One of the Links must park the Totem Armos on top of this Switch while the other three are stepped on. This will open the second door to the Triforce Gateway.

In Stage 2, the Links ride an elevator to a room containing another Totem Armos in the center. As they approach it, Blue Sword Soldiers suddenly appear and Red Hardhat Beetles slide down the sloped walls; all the Enemies be easily defeated with the Totem Armos. The Blue Sword Soldiers' shields will protect them from the Totem Armos, however their shields can be removed with the Gripshot. After all Enemies are defeated, the doors to the Triforce Gateway open.

In Stage 3, the Links enter another chamber filled with pits of Lava. To the right side is a narrow walkway surrounded by Lava, however, Gargantuan Balls will roll down the path and prevent the Links from crossing. A Totem Armos sits nearby, but a Beamos sitting on top of it will fire beams at any of the Links who approach. The Beamos can be destroyed by forming a Totem and firing an Arrow into its eye, blasting it onto the floor with the Gust Jar, or by stunning it and striking it with the Sword. With the Totem Armos freed, one of the Links can ride it down the narrow pathway, clearing a path for the others as the Totem Armos destroys the Gargantuan Balls it comes in contact with. A Beamos will threaten to fire beams at them along the way. Once they cross the pathway, another Beamos awaits, followed by a green panel for the Totem Armos to park at. On a nearby ledge is a Treasure Chest containing three Hearts.
To the right is a pathway with a complex trap made up of four stationary Guruguru Bars firing streams of flames, and Shock Switches in between them. To get all of the Links safely past the flames, one of them must ride the Totem Armos straight to the right, which blocks the streams of flames momentarily, allowing the other two Links to pass. However, the floor gives way to a pool of Lava for the Link riding the Totem Armos. The Links on foot can strike one of the Shock Switches to alternately raise and lower a grated platform out of the Lava. Before the Totem Armos reaches the second stream of flames, the grated platform needs to be raised so that the Link riding it does not get burned. The third Guruguru Bar is elevated, so the grated platform must be lowered again. Before the fourth stream of flames, the platform must be raised again. Essentially: the Links on foot should stay below the Totem Armos to keep safe from the flames, and strike the Shock Switch in between each pair of Guruguru Bars. Should they fail at any point and need to try again, they can fall off the pathway to the south, where an elevator takes them back to the start. Once they pass the trap, the Links come to a small room with a Squiddy, a rising lift in the floor, and a green panel. Parking the Totem Armos will launch the Link(s) riding it toward the Triforce Gateway. In order to get all of the Links there together, the ones on foot must stand on the lift, ride it upward as the Totem Armos hops nearby, then drop off of it into a Totem.

In Stage 4, the Links each appear on a ledge above a parked Totem Armos and must fight a pair of Sword Soldiers and a Spear Throwing Soldier aboard Totem Armos of their own. The Soldiers can be attacked with Arrows and well-placed Sword strikes, or knocked off their Totem Armos with the Gust Jar and easily defeated by trampling them. The Blue Sword Soldier is much more durable, but its shield can be stolen with the Gripshot. Once they are defeated, a wall lowers revealing another Blue Sword Soldier and a Grey Ball and Chain Soldier riding Totem Armos, and a Bomb Soldier riding two stacked Totem Armos. The Soldier riding the two Totem Armos can be defeated by attacking it from one of the ledges along the sides of the Stage. Once the Enemies are defeated, a door opens to three green panels and the Triforce Gateway.
Drablands Challenges
Once the Bosses of the Fortress have been defeated, Training Ground can be replayed with the following Drablands Challenges: "Clear within the time limit!", "Halved attack and defense!", and "Don't drop the pot!". Each Challenge features the same configuration of Enemies.
In "Clear within the time limit!", the Links are given a timer of two minutes in Multiplayer, or two minutes and 40 seconds in single-player. This timer can be increased by collecting Hourglasses or wearing Linebeck's Uniform.
In "Don't drop the pot!", a Bomb Flower can be found near the Shock Switches in Stage 1 to assist in activating them all. However, the Links can simply unlock the doors to the Triforce Gateway before picking up the pot.
Materials
At the end of the Level, three Treasure Chests can be opened. Two contain the same Material, and one contains another, more valuable Material.
| Drablands Challenge | — |
|---|---|
| Magical Materials | |
| Drablands Challenge | Clear within the time limit! |
| Magical Materials | |
| Drablands Challenge | Halved attack and defense! |
| Magical Materials | |
| Drablands Challenge | Don't drop the pot! |
| Magical Materials |
| Drablands Challenge | Magical Materials |
|---|---|
— | |
Clear within the time limit! | |
Halved attack and defense! | |
Don't drop the pot! |
Enemies and Traps
- Stage 1

![Totem Armos ×1[a]](/wiki/File:TFH_Totem_Armos_Model.png)
- Stage 2


- Stage 3

![Gargantuan Ball[b]](/wiki/File:TFH_Gargantuan_Ball_Model.png)
![Guruguru Bar ×4[c]](/wiki/File:TFH_Guruguru_Bar_Model.png)

- Stage 4
-
![Blue Sword Soldier ×2[d]](//cdn.wikimg.net/en/zeldawiki/images/thumb/d/d0/TFH_Blue_Sword_Soldier_Model.png/106px-TFH_Blue_Sword_Soldier_Model.png)
-
![Bomb Soldier ×1[e]](//cdn.wikimg.net/en/zeldawiki/images/thumb/c/c4/TFH_Bomb_Soldier_Model.png/107px-TFH_Bomb_Soldier_Model.png)
-
![Green Sword Soldier ×1[d]](//cdn.wikimg.net/en/zeldawiki/images/thumb/c/ce/TFH_Green_Sword_Soldier_Model.png/105px-TFH_Green_Sword_Soldier_Model.png)
-
![Grey Ball and Chain Soldier ×1[d]](//cdn.wikimg.net/en/zeldawiki/images/thumb/3/3e/TFH_Grey_Ball_and_Chain_Soldier_Model.png/120px-TFH_Grey_Ball_and_Chain_Soldier_Model.png)
-
![Spear Throwing Soldier ×1[d]](//cdn.wikimg.net/en/zeldawiki/images/thumb/c/c2/TFH_Spear_Throwing_Soldier_Model.png/68px-TFH_Spear_Throwing_Soldier_Model.png)
-
![Totem Armos ×10[f]](//cdn.wikimg.net/en/zeldawiki/images/thumb/3/39/TFH_Totem_Armos_Model.png/91px-TFH_Totem_Armos_Model.png)
Totem Armos ×10[f]
![Bomb Soldier ×1[e]](/wiki/File:TFH_Bomb_Soldier_Model.png)
![Grey Ball and Chain Soldier ×1[d]](/wiki/File:TFH_Grey_Ball_and_Chain_Soldier_Model.png)
![Spear Throwing Soldier ×1[d]](/wiki/File:TFH_Spear_Throwing_Soldier_Model.png)
Treasure Chests
| Treasure Chest | |
|---|---|
| Contents |
|
| Notes | On a ledge south of the second Totem Armos parking spot in Stage 3 |
| Treasure Chest | |
| Contents | |
| Notes | Behind the Triforce Gateway in Stage 4 |

| Treasure Chest | Contents | Notes |
|---|---|---|
| On a ledge south of the second Totem Armos parking spot in Stage 3 | |
Behind the Triforce Gateway in Stage 4 |
Trivia
- As described in Vol. 4 of the Drablands Diary, a scarab is hidden on a wall in each Level of the Fortress. One can be found in Stage 4 of Training Ground, on the ledge behind where the first Enemies appear, directly above the northernmost Jar.
Nomenclature
| Language | Names | Meanings |
|---|---|---|
Japanese | アモス訓練所 (Amosu Kunrensho)[3] | Armos Training Center |
FrenchCA | Centre d'entraînement | |
FrenchEU | Centre d'entraînement[5] | |
German | Armos-Übungsplatz[4] | |
Italian | Accademia armos[2] | |
SpanishLA | Sala armos[6] | |
SpanishEU | Sala armos | |
| This table was generated using translation pages. To request an addition, please contact a staff member with a reference. | ||
Gallery
-
Using the Totem Armos to pass rolling Gargantuan Balls in Stage 3
-
Passing the Guruguru Bars in Stage 3
-
The second wave of Soldiers in Stage 4
-
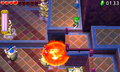
Using a thrown Bomb against a Soldier in Stage 4


References
- ↑ Encyclopedia, Dark Horse Books, pg. 160
- ↑ "Accademia armos" — Level Selection (Tri Force Heroes)
- ↑ "アモス訓練所" — Level Selection (Tri Force Heroes)
- ↑ "Armos-Übungsplatz" — Level Selection (Tri Force Heroes)
- ↑ "Centre d'entraînement" — Level Selection (Tri Force Heroes)
- ↑ "Sala armos" — Level Selection (Tri Force Heroes)