Lost Maiamai
- This article is about the group of characters in A Link Between Worlds. For the Item Card in Hyrule Warriors Legends, see Baby Maiamai.
The Lost Maiamai are Items and characters in A Link Between Worlds.[1] They are the 100 identical children of Mother Maiamai.[1]
Biography
The Lost Maiamai are first introduced when Link meets Mother Maiamai in a Cave next to Lake Hylia. There, she pleads for Link to find and collect her missing children and return them,[2] promising rewards in exchange. To aid him in his search, Mother Maiamai also gives Link the Maiamai Map, which tracks the number of Lost Maiamai remaining in each region.
Following this meeting with Mother Maiamai, 100 Lost Maiamai will appear scattered throughout the worlds; 50 in Hyrule and 50 in Lorule, many of them well-hidden, and each one crying for their mother. Their squeaking will be audible if the Lost Maiamai is within the screen's view, and if Link stands close enough to a Lost Maiamai, he will turn his head and stare in the direction of the squeaking, providing a hint towards its exact location.
Most of the Lost Maiamai require certain abilities or Items to rescue. Some Lost Maiamai may be found under Rocks or in Grass. Some are found underwater, requiring Link to dive with the Zora's Flippers to retrieve them. Lost Maiamai hidden in Trees or sitting atop statues can be jostled out by Dashing into the structure with the Pegasus Boots. Lost Maiamai stuck on walls are too strongly suctioned for Link to pull off by hand; he can instead push them off by Wall Merging into the wall, then emerging from the wall when he is beneath the Lost Maiamai. Once Link can use the Sand Rod, he can use it to unearth Lost Maiamai from sand as well.
For every ten Lost Maiamai Link finds and returns, Mother Maiamai will upgrade one of his Items into a "Nice" weapon, provided he owns the Item and is not merely renting it from Ravio. After all Lost Maiamai have been found, she will "upgrade" Link himself, turning his Spin Attack into the Great Spin. Mother Maiamai will then leave her Cave with her children to journey to a different dimension.[3] However, a single Maiamai will stay behind in the Cave, telling Link that she is the 72nd that he saved,[4] and asking the young hero to wish her luck on being as good of a mother as Mother Maiamai.[5]
Locations
-
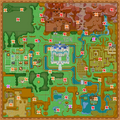
Map of all Lost Maiamai in Hyrule
-
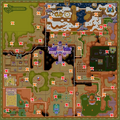
Map of all Lost Maiamai in Lorule


Hyrule
| Map |  |
|---|---|
| Number | 1 |
| Visible | |
| Description | From the summit's Weather Vane, go southeast and lift the lone Rock. |
| Map | |
| Number | 2 |
| Visible | |
| Description | From the Cave with rolling Boulders, take the second exit to the Treasure Chest, then Wall Merge to the right. |
| Map | |
| Number | 3 |
| Visible | |
| Description | In the Lava-filled Cave with floating platforms, take the south platform from the main pillar with the Black Lynels. Once outside, lift the small Rock. |
| Map | |
| Number | 4 |
| Visible | |
| Description | Hookshot west across the bridge from Rosso's Ore Mine, then lift the northernmost Rock. |
| Map | |
| Number | 5 |
| Visible | |
| Description | Wall Merge to the right of the Treasure Hunter Cave entrance. |
| Map | Number | Visible | Description |
|---|---|---|---|
| 1 | From the summit's Weather Vane, go southeast and lift the lone Rock. | |
2 | From the Cave with rolling Boulders, take the second exit to the Treasure Chest, then Wall Merge to the right. | ||
3 | In the Lava-filled Cave with floating platforms, take the south platform from the main pillar with the Black Lynels. Once outside, lift the small Rock. | ||
4 | Hookshot west across the bridge from Rosso's Ore Mine, then lift the northernmost Rock. | ||
5 | Wall Merge to the right of the Treasure Hunter Cave entrance. |
| Map |  |
|---|---|
| Number | 1 |
| Visible | |
| Description | In the area connected to the Southern Ruins, use the Titan's Mitt to lift the second large Rock south of the Fissure. |
| Map | |
| Number | 2 |
| Visible | |
| Description | Use the Sand Rod northwest of the two pillars with Fissures. |
| Map | |
| Number | 3 |
| Visible | |
| Description | Use the Sand Rod south of the Weather Vane. |
| Map | Number | Visible | Description |
|---|---|---|---|
| 1 | In the area connected to the Southern Ruins, use the Titan's Mitt to lift the second large Rock south of the Fissure. | |
2 | Use the Sand Rod northwest of the two pillars with Fissures. | ||
3 | Use the Sand Rod south of the Weather Vane. |
| Map |  |
|---|---|
| Number | 1 |
| Visible | |
| Description | Dash into the easternmost rock formation in this field. |
| Map | |
| Number | 2 |
| Visible | |
| Description | Dash into the fifth Tree. |
| Map | |
| Number | 3 |
| Visible | |
| Description | From Lake Hylia, swim north along the river, then Dive to the east of the bridge. |
| Map | |
| Number | 4 |
| Visible | |
| Description | From the Crystal Switches, Wall Merge into a small alcove to the east. |
| Map | |
| Number | 5 |
| Visible | |
| Description | Dash into the lone yellow Tree. |
| Map | |
| Number | 6 |
| Visible | |
| Description | In the southeast area, Wall Merge at the top of the hill beside the Fissure and go left onto the next platform; lift the large Rock with the Titan's Mitt. |
| Map | Number | Visible | Description |
|---|---|---|---|
| 1 | Dash into the easternmost rock formation in this field. | |
2 | Dash into the fifth Tree. | ||
3 | From Lake Hylia, swim north along the river, then Dive to the east of the bridge. | ||
4 | From the Crystal Switches, Wall Merge into a small alcove to the east. | ||
5 | Dash into the lone yellow Tree. | ||
6 | In the southeast area, Wall Merge at the top of the hill beside the Fissure and go left onto the next platform; lift the large Rock with the Titan's Mitt. |
| Map |  |
|---|---|
| Number | 1 |
| Visible | |
| Description | Dash into the Tree at the northwest of Hyrule Castle. |
| Map | |
| Number | 2 |
| Visible | |
| Description | Dash into the Tree near the center of this area. |
| Map | |
| Number | 3 |
| Visible | |
| Description | Use the Tornado Rod on the panels beside the Blacksmith's Forge. |
| Map | |
| Number | 4 |
| Visible | |
| Description | Use the Tornado Rod on the panels on the ground. |
| Map | |
| Number | 5 |
| Visible | |
| Description | Dash into the lone Tree that does not touch any other Trees. |
| Map | |
| Number | 6 |
| Visible | |
| Description | Wall Merge on the rear wall of Link's House. |
| Map | |
| Number | 7 |
| Visible | |
| Description | Dash into the northernmost Tree in the Haunted Grove. |
| Map | |
| Number | 8 |
| Visible | |
| Description | From Lorule's equivalent area, travel through the southwest Fissure, then lift the large Rock with the Titan's Mitt. |
| Map | Number | Visible | Description |
|---|---|---|---|
| 1 | Dash into the Tree at the northwest of Hyrule Castle. | |
2 | Dash into the Tree near the center of this area. | ||
3 | Use the Tornado Rod on the panels beside the Blacksmith's Forge. | ||
4 | Use the Tornado Rod on the panels on the ground. | ||
5 | Dash into the lone Tree that does not touch any other Trees. | ||
6 | Wall Merge on the rear wall of Link's House. | ||
7 | Dash into the northernmost Tree in the Haunted Grove. | ||
8 | From Lorule's equivalent area, travel through the southwest Fissure, then lift the large Rock with the Titan's Mitt. |
| Map |  |
|---|---|
| Number | 1 |
| Visible | |
| Description | Destroy the Bush within the small fence. |
| Map | |
| Number | 2 |
| Visible | |
| Description | Use a Cucco to glide from Sahasrahla's house to this roof; lift the small Rock. |
| Map | |
| Number | 3 |
| Visible | |
| Description | Go through the Young Woman's house then use the Sand Rod in her backyard. |
| Map | |
| Number | 4 |
| Visible | |
| Description | Dash into the Tree to the right of the Cucco Ranch. |
| Map | |
| Number | 5 |
| Visible | |
| Description | * Play the Rupee Rush Mini-Game. |
| Map | Number | Visible | Description |
|---|---|---|---|
| 1 | Destroy the Bush within the small fence. | |
2 | Use a Cucco to glide from Sahasrahla's house to this roof; lift the small Rock. | ||
3 | Go through the Young Woman's house then use the Sand Rod in her backyard. | ||
4 | Dash into the Tree to the right of the Cucco Ranch. | ||
5 | * Play the Rupee Rush Mini-Game. |
| Map |  |
|---|---|
| Number | 1 |
| Visible | |
| Description | Wall Merge beside the entrance to Mother Maiamai's Cave. |
| Map | |
| Number | 2 |
| Visible | |
| Description | Dive into the center hole in the shallow water south of the House of Gales. |
| Map | |
| Number | 3 |
| Visible | |
| Description | Use the Tornado Rod on the single panel behind the House of Gales. |
| Map | |
| Number | 4 |
| Visible | |
| Description | Dive underwater to the west of the ladder. |
| Map | |
| Number | 5 |
| Visible | |
| Description | From the platform in the northeast corner, Wall Merge and go right to the large Rock; lift it with the Titan's Mitt. |
| Map | Number | Visible | Description |
|---|---|---|---|
| 1 | Wall Merge beside the entrance to Mother Maiamai's Cave. | |
2 | Dive into the center hole in the shallow water south of the House of Gales. | ||
3 | Use the Tornado Rod on the single panel behind the House of Gales. | ||
4 | Dive underwater to the west of the ladder. | ||
5 | From the platform in the northeast corner, Wall Merge and go right to the large Rock; lift it with the Titan's Mitt. |
| Map |  |
|---|---|
| Number | 1 |
| Visible | |
| Description | South from the forest's northeast entrance, lift the pair of small Rocks. |
| Map | |
| Number | 2 |
| Visible | |
| Description | Dash into the Tree near the forest's southeast entrance. |
| Map | |
| Number | 3 |
| Visible | |
| Description | Destroy the western Bush outside the entrance to the Lost Woods. |
| Map | |
| Number | 4 |
| Visible | |
| Description | Wall Merge south of the Miner's House. |
| Map | |
| Number | 5 |
| Visible | |
| Description | In the Death Mountain Path, lift the large Rock with the Titan's Mitt and follow the path to an alternate exit. Outside, Wall Merge beside the Cave. |
| Map | |
| Number | 6 |
| Visible | |
| Description | Dive into the west side of this small pond. |
| Map | |
| Number | 7 |
| Visible | |
| Description | Wall Merge onto the Fortune Teller's tent. |
| Map | |
| Number | 8 |
| Visible | |
| Description | In the eastern of the two clearings between Kakariko Village and the forest, lift the small Rock in between the fences. |
| Map | Number | Visible | Description |
|---|---|---|---|
| 1 | South from the forest's northeast entrance, lift the pair of small Rocks. | |
2 | Dash into the Tree near the forest's southeast entrance. | ||
3 | Destroy the western Bush outside the entrance to the Lost Woods. | ||
4 | Wall Merge south of the Miner's House. | ||
5 | In the Death Mountain Path, lift the large Rock with the Titan's Mitt and follow the path to an alternate exit. Outside, Wall Merge beside the Cave. | ||
6 | Dive into the west side of this small pond. | ||
7 | Wall Merge onto the Fortune Teller's tent. | ||
8 | In the eastern of the two clearings between Kakariko Village and the forest, lift the small Rock in between the fences. |
| Map |  |
|---|---|
| Number | 1 |
| Visible | |
| Description | Wall Merge onto the cliff wall southwest of the Sanctuary. |
| Map | |
| Number | 2 |
| Visible | |
| Description | Climb the equivalent rock structure in the Lorule Graveyard, travel through the Fissure, then Wall Merge to the west. |
| Map | |
| Number | 3 |
| Visible | |
| Description | Jump into the river flowing from Zora's Domain, exit at this ladder, then climb up and Wall Merge. |
| Map | |
| Number | 4 |
| Visible | |
| Description | Jump into the river, then Dive underwater directly south of the bridge. |
| Map | |
| Number | 5 |
| Visible | |
| Description | * Enter the Witch's House. |
| Map | |
| Number | 6 |
| Visible | |
| Description | Wall Merge onto the southern wall from outside of the pit. |
| Map | |
| Number | 7 |
| Visible | |
| Description | From the entrance to Zora's Domain, Dive into the first deep water you reach, just northwest of the underwater Rupees. |
| Map | Number | Visible | Description |
|---|---|---|---|
| 1 | Wall Merge onto the cliff wall southwest of the Sanctuary. | |
2 | Climb the equivalent rock structure in the Lorule Graveyard, travel through the Fissure, then Wall Merge to the west. | ||
3 | Jump into the river flowing from Zora's Domain, exit at this ladder, then climb up and Wall Merge. | ||
4 | Jump into the river, then Dive underwater directly south of the bridge. | ||
5 | * Enter the Witch's House. | ||
6 | Wall Merge onto the southern wall from outside of the pit. | ||
7 | From the entrance to Zora's Domain, Dive into the first deep water you reach, just northwest of the underwater Rupees. |
| Map |  |
|---|---|
| Number | 1 |
| Visible | |
| Description | Dash into the stone statue surrounded by shallow water. |
| Map | |
| Number | 2 |
| Visible | |
| Description | * Enter the Cave to the south. |
| Map | |
| Number | 3 |
| Visible | |
| Description | Dive into a hole in the shallow water east of the Treasure Hunter Cave's entrance. |
| Map | Number | Visible | Description |
|---|---|---|---|
| 1 | Dash into the stone statue surrounded by shallow water. | |
2 | * Enter the Cave to the south. | ||
3 | Dive into a hole in the shallow water east of the Treasure Hunter Cave's entrance. |
Lorule
| Map |  |
|---|---|
| Number | 1 |
| Visible | |
| Description | Enter via Fissure from Hyrule's equivalent area. Climb the ladder to the west, Wall Merge and go left onto the grassy hill, then slash the grass. |
| Map | |
| Number | 2 |
| Visible | |
| Description | Continue Wall Merging left from #1 toward Ku's Domain. Dive into the southwest corner of the pond. |
| Map | |
| Number | 3 |
| Visible | |
| Description | Jump into the water and Dive underwater at the top of the chasm waterfall. |
| Map | |
| Number | 4 |
| Visible | |
| Description | Dive underwater directly in front of the Fissure. |
| Map | |
| Number | 5 |
| Visible | |
| Description | Dash into the rock formation southeast of the pillar with a Fissure. |
| Map | |
| Number | 6 |
| Visible | |
| Description | Dash into the Tree in the southwest corner. |
| Map | |
| Number | 7 |
| Visible | |
| Description | Dash into the first Tree on the left. |
| Map | |
| Number | 8 |
| Visible | |
| Description | Wall Merge straight ahead of the Dark Ruins' entrance. |
| Map | |
| Number | 9 |
| Visible | |
| Description | After passing the elevated platform, Wall Merge north of the twin green flames. |
| Map | |
| Number | 10 |
| Visible | |
| Description | In the southeast area, Wall Merge at the top of the hill beside the Fissure and go left onto the Rupee-covered platform. Further along the south wall, Wall Merge again. |
| Map | Number | Visible | Description |
|---|---|---|---|
| 1 | Enter via Fissure from Hyrule's equivalent area. Climb the ladder to the west, Wall Merge and go left onto the grassy hill, then slash the grass. | |
2 | Continue Wall Merging left from #1 toward Ku's Domain. Dive into the southwest corner of the pond. | ||
3 | Jump into the water and Dive underwater at the top of the chasm waterfall. | ||
4 | Dive underwater directly in front of the Fissure. | ||
5 | Dash into the rock formation southeast of the pillar with a Fissure. | ||
6 | Dash into the Tree in the southwest corner. | ||
7 | Dash into the first Tree on the left. | ||
8 | Wall Merge straight ahead of the Dark Ruins' entrance. | ||
9 | After passing the elevated platform, Wall Merge north of the twin green flames. | ||
10 | In the southeast area, Wall Merge at the top of the hill beside the Fissure and go left onto the Rupee-covered platform. Further along the south wall, Wall Merge again. |
| Map |  |
|---|---|
| Number | 1 |
| Visible | |
| Description | |
| Map | |
| Number | 2 |
| Visible | |
| Description | Use the Hammer to squash the pegs, then lift the westernmost large Rock with the Titan's Mitt. |
| Map | |
| Number | 3 |
| Visible | |
| Description | Lift one of the large Rocks with the Titan's Mitt. |
| Map | |
| Number | 4 |
| Visible | |
| Description | Wall Merge onto the east wall near the Cave entrance and Sign, then go right toward the southeast corner. |
| Map | |
| Number | 5 |
| Visible | |
| Description | In the Cave with floating platforms, take the south or west platform from the central pillar with the Big Ice Gimos. Outside, destroy the Skull. |
| Map | |
| Number | 6 |
| Visible | |
| Description | Wall Merge onto the north wall of the Ice Ruins' entrance. |
| Map | Number | Visible | Description |
|---|---|---|---|
| 1 | ||
2 | Use the Hammer to squash the pegs, then lift the westernmost large Rock with the Titan's Mitt. | ||
3 | Lift one of the large Rocks with the Titan's Mitt. | ||
4 | Wall Merge onto the east wall near the Cave entrance and Sign, then go right toward the southeast corner. | ||
5 | In the Cave with floating platforms, take the south or west platform from the central pillar with the Big Ice Gimos. Outside, destroy the Skull. | ||
6 | Wall Merge onto the north wall of the Ice Ruins' entrance. |
| Map |  |
|---|---|
| Number | 1 |
| Visible | |
| Description | From the Philosopher's Cave's exit, lift the large Rock to the west with the Titan's Mitt. |
| Map | |
| Number | 2 |
| Visible | |
| Description | Wall Merge onto the left side of the rock structure. |
| Map | |
| Number | 3 |
| Visible | |
| Description | Dash into the lone Tree north of the long grass and Treasure Chest. |
| Map | Number | Visible | Description |
|---|---|---|---|
| 1 | From the Philosopher's Cave's exit, lift the large Rock to the west with the Titan's Mitt. | |
2 | Wall Merge onto the left side of the rock structure. | ||
3 | Dash into the lone Tree north of the long grass and Treasure Chest. |
| Map |  |
|---|---|
| Number | 1 |
| Visible | |
| Description | Wall Merge on the wall south from the Lakeside Item Shop. |
| Map | |
| Number | 2 |
| Visible | |
| Description | On the southwest shore, lift the large Rock with the Titan's Mitt. |
| Map | |
| Number | 3 |
| Visible | |
| Description | Dive in the center of the rock formation. |
| Map | |
| Number | 4 |
| Visible | |
| Description | Wall Merge in the southeast corner. |
| Map | |
| Number | 5 |
| Visible | |
| Description | From the platform in the northeast corner, Wall Merge and go left to the next platform, then destroy the Skull. |
| Map | Number | Visible | Description |
|---|---|---|---|
| 1 | Wall Merge on the wall south from the Lakeside Item Shop. | |
2 | On the southwest shore, lift the large Rock with the Titan's Mitt. | ||
3 | Dive in the center of the rock formation. | ||
4 | Wall Merge in the southeast corner. | ||
5 | From the platform in the northeast corner, Wall Merge and go left to the next platform, then destroy the Skull. |
| Map |  |
|---|---|
| Number | 1 |
| Visible | |
| Description | Use the Titan's Mitt to lift the second large Rock south of the Fissure. |
| Map | |
| Number | 2 |
| Visible | |
| Description | Wall Merge directly behind the Weather Vane. |
| Map | |
| Number | 3 |
| Visible | |
| Description | Dive in the deep water near the west end of the swamp. |
| Map | Number | Visible | Description |
|---|---|---|---|
| 1 | Use the Titan's Mitt to lift the second large Rock south of the Fissure. | |
2 | Wall Merge directly behind the Weather Vane. | ||
3 | Dive in the deep water near the west end of the swamp. |
| Map |  |
|---|---|
| Number | 1 |
| Visible | |
| Description | Wall Merge on the west wall of the long house. |
| Map | |
| Number | 2 |
| Visible | |
| Description | In the eastern of the two clearings south of the forest, lift the large Rock with the Titan's Mitt. |
| Map | |
| Number | 3 |
| Visible | |
| Description | Go east from the pillar with a Fissure and slash the grass to the south. |
| Map | |
| Number | 4 |
| Visible | |
| Description | In the northwest corner of the forest, destroy the Skull in the ring of grass. |
| Map | |
| Number | 5 |
| Visible | |
| Description | Dash into the Tree south of the Abandoned Shack. |
| Map | |
| Number | 6 |
| Visible | |
| Description | Slash the grass in the center of the "V" formation of Trees. |
| Map | |
| Number | 7 |
| Visible | |
| Description | Wall Merge on the east wall of the small pit. |
| Map | |
| Number | 8 |
| Visible | |
| Description | Wall Merge just west of the Thieves' Town arch. |
| Map | Number | Visible | Description |
|---|---|---|---|
| 1 | Wall Merge on the west wall of the long house. | |
2 | In the eastern of the two clearings south of the forest, lift the large Rock with the Titan's Mitt. | ||
3 | Go east from the pillar with a Fissure and slash the grass to the south. | ||
4 | In the northwest corner of the forest, destroy the Skull in the ring of grass. | ||
5 | Dash into the Tree south of the Abandoned Shack. | ||
6 | Slash the grass in the center of the "V" formation of Trees. | ||
7 | Wall Merge on the east wall of the small pit. | ||
8 | Wall Merge just west of the Thieves' Town arch. |
| Map |  |
|---|---|
| Number | 1 |
| Visible | |
| Description | Wall Merge on the east wall of the Blacksmith's Forge and move right to the west wall. |
| Map | |
| Number | 2 |
| Visible | |
| Description | Lift the southwestern of the two large Rocks with the Titan's Mitt. |
| Map | |
| Number | 3 |
| Visible | |
| Description | Dash into the Tree just north of the Thieves' Town arch. |
| Map | |
| Number | 4 |
| Visible | |
| Description | Wall Merge into the small, walled structure in the southwest corner. |
| Map | |
| Number | 5 |
| Visible | |
| Description | Slash the northernmost piece of grass in the ring around the Big Bomb Flower. |
| Map | |
| Number | 6 |
| Visible | |
| Description | * Play the Rupee Rush Mini-Game. |
| Map | |
| Number | 7 |
| Visible | |
| Description | Destroy the Skulls in the southwest corner of the Octoball Derby area. |
| Map | |
| Number | 8 |
| Visible | |
| Description | |
| Map | |
| Number | 9 |
| Visible | |
| Description | In the northeast corner, Wall Merge into the eastern structure before the bridge to Lorule Castle. |
| Map | |
| Number | 10 |
| Visible | |
| Description | Dash into the Tree along the east edge. |
| Map | |
| Number | 11 |
| Visible | |
| Description | Wall Merge into the hill just northwest of the Vacant House. |
| Map | |
| Number | 12 |
| Visible | |
| Description | Lift the large Rock next to the tree stump using the Titan's Mitt. |
| Map | |
| Number | 13 |
| Visible | |
| Description | Wall Merge at the northeast corner. |
| Map | |
| Number | 14 |
| Visible | |
| Description | Dive into the "C"-shaped rock formation. |
| Map | |
| Number | 15 |
| Visible | |
| Description | Dash into the center of three stone statues. |
| Map | Number | Visible | Description |
|---|---|---|---|
| 1 | Wall Merge on the east wall of the Blacksmith's Forge and move right to the west wall. | |
2 | Lift the southwestern of the two large Rocks with the Titan's Mitt. | ||
3 | Dash into the Tree just north of the Thieves' Town arch. | ||
4 | Wall Merge into the small, walled structure in the southwest corner. | ||
5 | Slash the northernmost piece of grass in the ring around the Big Bomb Flower. | ||
6 | * Play the Rupee Rush Mini-Game. | ||
7 | Destroy the Skulls in the southwest corner of the Octoball Derby area. | ||
8 | |||
9 | In the northeast corner, Wall Merge into the eastern structure before the bridge to Lorule Castle. | ||
10 | Dash into the Tree along the east edge. | ||
11 | Wall Merge into the hill just northwest of the Vacant House. | ||
12 | Lift the large Rock next to the tree stump using the Titan's Mitt. | ||
13 | Wall Merge at the northeast corner. | ||
14 | Dive into the "C"-shaped rock formation. | ||
15 | Dash into the center of three stone statues. |
Nomenclature
| Language | Names | |
|---|---|---|
| This table was generated using translation pages. To request an addition, please contact a staff member with a reference. | ||
Gallery
-
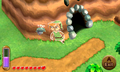
A Lost Maiamai stuck to a wall beside Mother Maiamai's Cave

See Also
References
- ↑ 1.0 1.1 Encyclopedia, Dark Horse Books, pg. 130
- ↑ "Could you find all of them? You'll hear my children crying—calling for their Mother Maiamai!" — Mother Maiamai (A Link Between Worlds)
- ↑ "It's a bit sudden, but we must bid you good-bye. I'm off to a different dimension with my Maiamais!" — Mother Maiamai (A Link Between Worlds)
- ↑ "Hello there, Link! I'm the 72nd Maiamai you saved! Thanks for all your help. Mom and the others have gone off. But I—? Well, I stayed behind. Time for me to be my own Maiamai." — Maiamai (A Link Between Worlds)
- ↑ "Hopefully I'll learn to be as good of a mother as my Mother Maiamai. Wish me luck, Link!" — Maiamai (A Link Between Worlds)