Shadow Zone
The Shadow Zone is a Level in Tri Force Heroes.[1] It is the seventh proper Level of the Den of Trials, preceded by the Desert Zone and followed by the Baneful Zone.
Features and Overview
| Items | Materials |
|---|---|
| 2× | |
| 1× | |
The Shadow Zone comprises Floors B31 to B35 of the Den of Trials, and it is based on the scenery and Enemies of The Ruins, an Area of the Drablands. It is initially unlocked and accessed by completing the prior Desert Zone; if all three Links have already unlocked the Shadow Zone, they can access it directly by standing on the seventh Triforce Gateway in the Den's hub Level.
Each Floor of the Shadow Zone is an octagonal stage enclosed by a fence, with some manner of bottomless pits and unique platform traps. The only solid ground common to each Floor is a stone ledge in the south corner where the Links appear, one in the north corner where the Triforce Gateway appears once all Enemies are defeated, and smaller ledges in the four diagonal corners. Floor B31 also has additional stone ledges in between all the others, making the stage mostly traversable around it edges, as well as a series of floating grey platforms crossing the stage horizontally. On these grey platforms, the Links find a Boomerang, a Bow, and Fire Gloves for the taking; once each Item is claimed, a number of flying Enemies suddenly appear, and the grey platforms begin to vanish and reappear every few seconds, forcing the Links to stay on the move or stick to the smaller stone ledges.
Floor B32 has a single stone ledge in its center, surrounded by floating colored platforms that only the Link with the matching color can stand on. Stationary red and blue platforms sit to the left and right of the ledge, while two green, two blue, and two red platforms rotate around them in a counter-clockwise path. As the Links approach the center ledge to battle the White Poes hovering at ground level, a Prankster Poe intercepts them and threatens to throw them into the pit, making it wise for the Links to stick together and defeat them. The three colored Poes float at a higher level, requiring a Totem of two Links to venture onto the platforms to battle them.

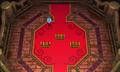
Floor B33 first appears to be a massive pit with just three unlit Torches sitting on tiny stone ledges, but several Hardhat Beetles seem to be walking on air, indicating that some invisible platforms are spread across the pit to connect the ledges. These platforms become visible when touched by a fireball from the Fire Gloves, then turn invisible again after several seconds. The Links should not be too hasty when crossing the gaps, as there are several spots where no platform exists, and striking a Hardhat Beetle with the Sword causes them to recoil a great distance.
Floor B34 consists of a solid, fair-sized pathway between the north and south corners, with two more small strips of land along the east and west edges of the stage. Two Gibdos roam the main ground; once they are defeated, and second wave of Enemies appears, including two ReDeads on the main ground and a dark Stalfos on each of the side strips. As the ReDeads are often close to the edge of the ground, one strategy to defeat them is to use the Boomerang repeatedly, knocking them closer to the pit with each throw. The dark Stalfos will throw their bones at the Links despite the gap around their strips of land, and will jump to avoid most of the projectiles that the Links fire back at them. In order to get closer to the Stalfos, a Shock Switch in each of the southwest and northeast corners will make grey platforms briefly appear in their respective sides' gaps.
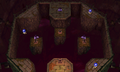
Floor B35 is a safe room with three large Treasure Chests and a Squiddy for regaining Hearts. Two of the Chests contain the same random, bronze-rarity Material from The Ruins (Carrumpkins, Mystery Extracts or Spider Silk Laces) and the other contains a random, silver-rarity Material (Poe Soul, Twisted Twig or Lava Drop). Once the Chests are opened, the Links' progress is Saved; the Triforce Gateway leading to the Baneful Zone and a small Treasure Chest containing an extra Fairy then appear.
Enemies and Traps
- Floor B31
-

Chasupa ×1
-

Fire Keese ×2
-

Ice Keese ×2
-

Keese ×1


- Floor B32


- Floor B33
-

-

Wizzrobe ×3


- Floor B34 (first wave)
-

Gibdo ×2

- Floor B34 (second wave)


- Floor B35
-

Squiddy ×1

Nomenclature
| Language | Names | |
|---|---|---|
Japanese | 闇の洞 (Yami no Hora)[3] | |
FrenchCA | Zone obscure[8] | |
FrenchEU | Zone obscure[5] | |
German | Finsternispfad[4] | |
Italian | Antro del buio[2] | |
Korean | 어둠의 동굴 (Eodum-ui Dong-gul)[6] | |
SpanishLA | Zona oscura[7] | |
SpanishEU | Gruta oscura[9] | |
| This table was generated using translation pages. To request an addition, please contact a staff member with a reference. | ||
Gallery
-
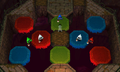
Floor B32
-
Floor B33
-
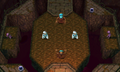
Floor B34
-
Floor B35


See Also
References
- ↑ "Entrance to Floor B31
Shadow Zone" — Stone Tablet (Tri Force Heroes) - ↑ "Entrata del piano -31
Antro del buio" — Stone Tablet (Tri Force Heroes) - ↑ "地下31階層 入口
闇の洞" — Stone Tablet (Tri Force Heroes) - ↑ "Ebene 31
Finsternispfad" — Stone Tablet (Tri Force Heroes) - ↑ "Entrée du niveau -31
Zone obscure" — Stone Tablet (Tri Force Heroes) - ↑ "지하 31층 입구
어둠의 동굴" — Stone Tablet (Tri Force Heroes) - ↑ "Entrada a S31
Zona oscura" — Stone Tablet (Tri Force Heroes) - ↑ "Entrée du niveau SS31
Zone obscure" — Stone Tablet (Tri Force Heroes) - ↑ "Entrada al nivel 31
Gruta oscura" — Stone Tablet (Tri Force Heroes)