Shadow Link Battle
Shadow Link Battles are a game mode in A Link Between Worlds.[name references needed] It allows players to trade A.I.-controlled Shadow versions of their Links via the StreetPass feature of the Nintendo 3DS for the purpose of battling one another.
Overview
Setup

Shadow Link Battles become available once Link has obtained a Sword and proceeds to speak to Gramps in Kakariko Village, who oversees the StreetPass Meadow.[1] Gramps excitedly describes the mode as a way to interact with the people we pass by in our daily lives, adding that there's nothing to lose and everything to gain by playing the mode, and goes on to explain how it works.[2]
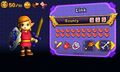
To begin, Link is tasked with creating a profile for a Shadow version of himself that will be transmitted to other players via StreetPass. The Shadow Link is given the same equipment, quest Items, and number of Heart Containers as Link; essentially Link only needs to select up to two Items from his current inventory that the Shadow Link will take into battle. The profile for this Shadow Link also displays Link's chosen name, the number of challenges he has completed, the bounty, which is the amount of Rupees awarded for defeating the Shadow Link and a measure of its abilities and difficulty, and the Player name, which is the nickname of the Nintendo 3DS console from which the Shadow Link originates.
This Shadow Link profile does not automatically update itself when Link acquires new equipment or Heart Containers, so Link must speak to Gramps and perform the setup again in order to update the Shadow Link.
StreetPass

Once the setup is completed, StreetPass will be activated for A Link Between Worlds and will continue to function even after the game is closed.[3] Gramps will commemorate the occasion by planting the StreetPass Tree near Link's House.[4] StreetPasses occur when two or more Nintendo 3DS systems, with wireless communications enabled, pass nearby and electronically "tag" one another. A successful tag is indicated by the system's status light flashing bright green, along with a notice in the Notifications menu.
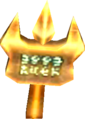
In order to import these tags from the system's memory into A Link Between Worlds, Link simply needs to visit Kakariko Village, where Signs signifying each newly-arrived Shadow Link will appear at the StreetPass Meadow.[5] Each Sign displays the corresponding Shadow Link's name, bounty, number of challenges completed, Player name, and a description of the randomly-selected location where the Shadow Link awaits. Its equipment, Heart Containers and chosen Items are left a secret until the Shadow Link Battle begins.
Once StreetPass functionality for A Link Between Worlds has been enabled, it can only be disabled through the Nintendo 3DS System Settings app. Alternatively, one could choose to avoid StreetPassing by turning off wireless communications. Up to three Shadow Links per copy of A Link Between Worlds can be transmitted in a single StreetPass—one for each saved game, provided that none of the saves are copies of another. The StreetPass Meadow can hold up to 20 signs at a time, while the Nintendo 3DS can store another 20 StreetPasses for A Link Between Worlds in its queue. Link can choose to banish any Shadow Link from the game by pressing the Y button while reading its corresponding Sign.
Battle
When Link encounters a Shadow Link in the overworld, he must speak to it and then choose to review the rules of the battle, view the list of challenges, or begin the battle. Link can only bring the two Items set to the Y and X buttons into the battle, and cannot change Items mid-battle.[6] The competitors will be transported to one of five arenas, roughly based on the Shadow Link's location, and the battle begins instantly. The Shadow Link is controlled by A.I. and will utilize his Sword, Shield, and Items in a tactical manner. The first fighter to deplete his opponent's Heart will win the battle, though either can be revived if they are carrying a Fairy. Battles are fought under a 3-minute time limit; if neither Link has defeated the other by this time, then the one who dealt the most damage to his opponent is declared the winner.
If Link wins the battle, he will be awarded the Shadow Link's bounty in Rupees. Any Life that Link has lost or Items expended during the battle will be replenished afterward, regardless of who wins. If Link is defeated, any rented Items won't be reclaimed by Sheerow,[7] and the loss will not count toward Link's "Times defeated" counter.
Bounty

The bounty for each Shadow Link is scored based on the quality of that Shadow Link's equipment, the quest Items he possesses, and the efficiency of the chosen Items he brings into battle. In addition, each full Heart Container beyond the starting three adds 10 points to the bounty; having all 20 Heart Containers therefore adds 170 points.
The minimum bounty for a Shadow Link is 50, with the maximum being 999. The size and color of each Sign in the StreetPass Meadow reflects its bounty. Items that have no bearing on Shadow Link Battles, such as the Power Glove, Zora's Flippers, and Pendants of Virtue, do not count toward the bounty.
The bounty value of each Item is as follows:
| Equipment / Quest Items | Bounty | Ravio's Items | Bounty | Other Items | Bounty | ||
|---|---|---|---|---|---|---|---|
| 0 | 50 | 10 | |||||
| 100 | 50 | 80 | |||||
| 150 | 50 | 10 | |||||
| 200 | 50 | 80 | |||||
| 0 | 50 | 1 | |||||
| 50 | 50 | 1 | |||||
| 100 | 50 | 40 | |||||
| 50 | 50 | 80 | |||||
| 100 | 50 | 80 | |||||
| 0 | 100 | 80 | |||||
| 50 | 100 | 40 | |||||
| 30 | 100 | 40 | |||||
| 50 | 100 | 10 | |||||
| 100 | 100 | 10 | |||||
| 100 | 30 | ||||||
| 100 | 40 | ||||||
| 100 | 20 | ||||||
| 100 | 60 | ||||||
| 1 | |||||||
| 20 | |||||||
| 1 | |||||||
Challenges

Challenges, also known as records and medals, are a series of 50 tasks that Link can complete by fulfilling certain conditions during Shadow Link Battles. They range from winning set numbers of battles, to using specific Items in battle, to other challenges such as winning within a time limit or without pressing certain buttons. Newly-achieved challenges are tallied after each successful battle, and it is possible to achieve multiple challenges in a single battle.
Completing a challenge involving a Nice Item will also complete the challenge for the regular version of that weapon, therefore no challenges are permanently missable. In order for the challenge to count as completed, the Item must damage or otherwise make contact with the Shadow Link. Likewise, a Shield must deflect at least one of the Shadow Link's attacks for its challenge to count as completed. The challenge "Win after using Ravio's Bracelet!" requires Link to Wall Merge during the battle, which can only be achieved in certain arenas.
After all 50 challenges have been completed, Link can speak to Gramps to find out that he is only the second competitor to achieve the feat—the first being Gramps himself.[8] He will then be given the opportunity to battle Gramps, who possesses all the strongest equipment, 20 Heart Containers, and two random Nice Items, despite carrying a bounty of only 5 Rupees.
- Win your first battle!
- Win 5 times!
- Win 10 times!
- Win 20 times!
- Use the lamp to deal the final blow!
- Use the super lamp to deal the final blow!
- Use the bow to deal the final blow!
- Use the nice bow to deal the final blow!
- Win while using the boomerang!
- Win while using the nice boomerang!
- Win while using the Hookshot!
- Use the Nice Hookshot to deal the final blow!
- Use the hammer to deal the final blow!
- Use the nice hammer to deal the final blow!
- Use a bomb to deal the final blow!
- Use a nice bomb to deal the final blow!
- Use the Fire Rod to deal the final blow!
- Use the Nice Fire Rod to deal the final blow!
- Use the Ice Rod to deal the final blow!
- Use the Nice Ice Rod to deal the final blow!
- Win while using the Tornado Rod!
- Use the Nice Tornado Rod to deal the final blow!
- Win while using the Sand Rod!
- Win while using the Nice Sand Rod!
- Use the net to deal the final blow!
- Use the super net to deal the final blow!
- Win while wearing the Hint Glasses!
- Win after drinking a red potion!
- Win after drinking a blue potion!
- Win while under the effect of a yellow potion!
- Use a purple potion to deal the final blow!
- Win after drinking some milk!
- Win after using a fairy!
- Use a bee to deal the final blow!
- Use a golden bee to deal the final blow!
- Win after eating an apple!
- Win after eating a green apple!
- Win while using a Foul Fruit!
- Win while using a shield!
- Win while using a Hylian Shield!
- Use the Pegasus Boots to deal a dash attack final blow!
- Use a spin attack to deal the final blow!
- Use a sword beam to deal the final blow!
- Use the level 3 Master Sword to deal the final blow!
- Win after using Ravio's bracelet!
- Win without taking damage!
- Win without taking a single step!
- Win within 10 seconds!
- Win without using
 or
or  !
! - Win without using
 , , or !
Arenas
Sky Arena
An arena that is held in the sky and features the Royal Crest in the middle of the stage. While there are no traps, Link and Shadow Link can fall off the edge.
Forest Arena
A clearing in a forest, featuring grass that can be cut for Hearts, Bees, and Fairies. There is also an Apple tree in the center, where Link and Shadow Link can eat Apples to regain health.
Fire Arena

The arena is a grated metal platform over a lake of Lava, where Lava Geysers will burst up and through the floor at random. Link can use Ice Rod to freeze the Geyser and use Ravio's Bracelet to Merge into the resulting column, making the Fire Arena one of the two possible arenas to complete the "Win after using Ravio's Bracelet!" Challenge.
Ice Arena
The arena is a platform made of ice, with breakable ice tiles in the center and several Bumpers near the edges. Both Bombs and the Fire Rod are capable of breaking the tiles, which can be used as a trap.
Desert Arena
The arena is covered in sand, making it possible to use the Sand Rod to create sand pillars which can be Merged into using Ravio's Bracelet. Devalants will emerge from the sand, creating sinkholes that the competitors can fall into.
The Desert Arena is the rarest of the arenas; fights usually occur here only if the Shadow Link is encountered in the Desert of Mystery.
Pre-Generated Shadow Links
Occasionally, a Sign will appear in the StreetPass Meadow without having met another player by StreetPass. This occurs once every five cumulative hours of gameplay, as long as StreetPass is enabled. These Signs represent Shadow Links that come from a supposed Player named Shade and are selected at random from the following list of 20 pre-generated characters, coming in a variety of bounties and Item selections.
| Bounty | Name | Medals | Hearts | Sword | Tunic | Shield | Quest Items | ||
|---|---|---|---|---|---|---|---|---|---|
| 50 | Varnis | 0/50 | 3 | – | – | – | |||
| 120 | Bandle | 5/50 | 7 | – | – | ||||
| 160 | Adom | 2/50 | 5 | – | |||||
| 170 | Barmon | 3/50 | 5 | – | |||||
| 180 | Byll | 10/50 | 10 | – | |||||
| 230 | Tablo | 3/50 | 8 | ||||||
| 280 | Vale | 20/50 | 10 | ||||||
| 340 | Loki | 20/50 | 8 | – | |||||
| 350 | Matti | 15/50 | 10 | ||||||
| 360 | Ecru | 15/50 | 8 | – | |||||
| 390 | Dock | 15/50 | 9 | ||||||
| 410 | Keelo | 20/50 | 10 | ||||||
| 490 | Reita | 25/50 | 11 | – | |||||
| 520 | Burin | 25/50 | 14 | ||||||
| 661 | Ebon | 35/50 | 16 | ||||||
| 670 | Grisa | 40/50 | 3 | ||||||
| 680 | Rasset | 25/50 | 15 | ||||||
| 702 | Slatt | 45/50 | 20 | ||||||
| 720 | Goush | 35/50 | 17 | – | |||||
| 999 | Leef | 49/50 | 20 |
Trivia
- The music that plays during a Shadow Link Battle is an orchestrated remix of the Palace theme from The Adventure of Link.
Gallery
-
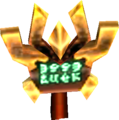
The setup screen for Shadow Link Battle with the maximum bounty of 999 Rupees
-
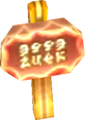
Sign for a Shadow Link with a bounty of less than 400
-
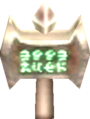
Sign for a Shadow Link with a bounty of at least 400, but less than 700
-
Sign for a Shadow Link with a bounty of at least 700, but less than 999
-
Sign for a Shadow Link with a bounty of 999


See Also
References
- ↑ "Hm... It looks like you don't have a sword of your own yet. You need a sword for StreetPass. Sorry. I don't make the rules. Come back once you get your own sword." — Gramps (A Link Between Worlds)
- ↑ "Ever stop to think how many times we just pass right on by people on the street? You know, all our life? Well, I know a secret that will make passing by people a lot more fun. Because I am in the business of introducing people such as yourself to StreetPass!" — Gramps (A Link Between Worlds)
- ↑ "All right. I've saved your settings. Even if you stop playing this game, StreetPass will continue to function automatically. Just make sure to push the wireless switch to enable wireless communication." — Gramps (A Link Between Worlds)
- ↑ "Today is a day for the history books. Why? Because you are making your StreetPass debut! I'd like to commemorate this special occasion with a gift.
That gift is...an apple tree!
I'll plant it in the garden near your house. Go take a look at it when you get a chance." — Gramps (A Link Between Worlds) - ↑ "When you tag someone via StreetPass, I'll put a sign up here in this field. Come take a look from time to time." — Gramps (A Link Between Worlds)
- ↑ "During the battle, you can only use the items that are currently set to the X and Y Buttons." — Shadow Link (A Link Between Worlds)
- ↑ "Your hearts will be fully replenished before and after the battle. Items you use up will be restored once the battle ends, and you won't lose rented items if defeated." — Shadow Link (A Link Between Worlds)
- ↑ "Well done. It looks like you've finally completed all the challenges. You're only the second person who's ever done that. Want to know who the first person to do it was?
You do, do you?
I see... Then I'm going to give this everything I've got!" — Gramps (A Link Between Worlds)