Moblin Base: Difference between revisions
(AWB clean up) |
Htwretched (talk | contribs) (+3 images) |
||
| (25 intermediate revisions by 8 users not shown) | |||
| Line 1: | Line 1: | ||
{{Dungeon | {{Infobox Dungeon | ||
|image= File:TFH Moblin Base Stage 3.png | |||
|caption= Stage 3 of Moblin Base | |||
|image = | |pronunciation= | ||
|caption = | |location= {{Term|TFH|Woodlands|link}} | ||
| | |game= TFH | ||
| | |other= | ||
| | |item= | ||
| | {{List| | ||
| | {{Term|TFH|Bomb|link}}, | ||
| | {{Term|TFH|Bow|link}} ×2 | ||
| | |||
| | |||
}} | }} | ||
|quest= | |||
|mini-boss= | |||
|boss= | |||
|temperature= | |||
|theme= | |||
|strategy= | |||
|zu= | |||
}} | |||
{{Term/Store|Moblin Base||Series, TFH}} is a {{Term|TFH|Level|link}} in {{TFH}}.<ref>{{Cite Book|quote= |book= E |publisher= |page= 159}}</ref> It is the third {{Term|TFH|Level}} of the {{Term|TFH|Woodlands|link}} {{Term|TFH|Area}}, preceded by {{Term|TFH|Buzz Blob Cave|link}} and followed by the {{Term|TFH|Forest Temple|link}}. | |||
==Themes and Navigation== | ==Themes and Navigation== | ||
The Moblin Base is a fortress situated within a forest, run by [[Moblin]] | The {{Term|TFH|Moblin Base}} is a fortress situated within a forest, run by {{Plural|TFH|Moblin|link}} and various other {{Plural|TFH|Enemy|link}}. | ||
[[File:TFH Moblin Base Stage 1.png|250px|right|thumb|The statue puzzle in Stage 1]] | |||
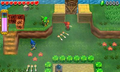
'''Stage 1''' starts the {{Plural|TFH|Links|link}} off in the clearing of a forest, where they each appear standing on a {{Term|TFH|Tree Stump|link}}, below a cliff. The cliff can be climbed using one of the two {{Plural|TFH|Magic Plant|link}} that ascend once a {{Term|TFH|Links}} stands on it, then disappear and soon regrow in their initial spot. Atop the cliff are a pair of {{Plural|TFH|Bow|link}} and a {{Term|TFH|Bomb|link}}, partially surrounded by {{Term|TFH|Grass|link}}. Ahead of the {{Plural|TFH|Link}} is a series of {{Term|TFH|Totem|link}}-like statues blocking the path across a river to the {{Term|TFH|Triforce Gateway|link}}. On each side of the statues is an elevated ledge; the left one can be accessed by a ramp, after using {{Plural|TFH|Bomb}} to blow up the {{Plural|TFH|Cracked Block|link}} at the top, while the right ledge can only be accessed via throwing a {{Term|TFH|Links}} onto it. Ahead of the ledges, across the river, is a pair of elevated {{Plural|TFH|Shock Switch|link}} that are too far and too high to be activated with the {{Term|TFH|Sword|link}}, so the {{Plural|TFH|Links}} must use {{Plural|TFH|Arrow|link}}. By forming a two-{{Term|TFH|Links}} {{Term|TFH|Totem|link}} on either ledge, one of the {{Plural|TFH|Shock Switch}} can be shot at, after which the top {{Term|TFH|Links}} must be quickly thrown to the third {{Term|TFH|Links}} on the other ledge and shoot the second {{Term|TFH|Switch}} before the first deactivates. Done quickly enough, this causes the statues to lower, allowing the {{Plural|TFH|Links}} to walk on top of them to cross the river and reach the {{Term|TFH|Triforce Gateway}}. | |||
{{Clear}} | |||
[[File:TFH Moblin Base Stage 2.png|250px|right|thumb|Enemies on the west side of Stage 2]] | |||
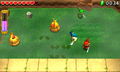
'''Stage 2''' sees the {{Plural|TFH|Links}} appear in the southeast corner of a large, square clearing, with a stone structure standing in the middle of the {{Term|TFH|Stage}} and {{Plural|TFH|Enemy}} all around it. The structure can be entered via a staircase on its south side, and the inactive {{Term|TFH|Triforce Gateway}} and a {{Term|TFH|Squiddy|link}} can be found inside. The south and east parts of the {{Term|TFH|Stage}} both have chasms that must be crossed by walking on a log to reach the other sections from where the {{Plural|TFH|Links}} begin. Along the west side of the {{Term|TFH|Stage}}, four {{Plural|TFH|Buzz Blob|link}} can be found. On its north side, two {{Plural|TFH|Life Like|link}} (disguised among a group of four {{Plural|TFH|Heart|link}}) and another {{Term|TFH|Buzz Blob}} can be found. On the east side, there are three {{Plural|TFH|Totem Deku|link}}; defeating them with {{Plural|TFH|Arrow}} requires the use of {{Plural|TFH|Totem}} of various heights, depending on which of the various ledges or logs the {{Plural|TFH|Link}} stand atop. Once every {{Term|TFH|Enemy}} is defeated, the {{Term|TFH|Triforce Gateway}} activates, and three more staircases appear on the north, east, and west sides of the stone structure. In the north and northeast parts of the {{Term|TFH|Stage}}, two parts of the cliff side can be blown up using {{Plural|TFH|Bomb}}, and both reveal a {{Term|TFH|Treasure Chest|link}} containing a {{Term|TFH|Red Rupee|link}}. | |||
{{Clear}} | |||
[[File:TFH Moblin Base Stage 3 2.png|250px|right|thumb|A river crossing in Stage 3]] | |||
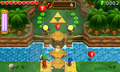
'''Stage 3''' starts the {{Plural|TFH|Links}} off on one side of a river with two {{Plural|TFH|Blob|link}} nearby. The river can be crossed using a small log, and on the other side are two {{Plural|TFH|Buzz Blob}}, a {{Term|TFH|Life Like}} disguised as a {{Term|TFH|Heart}}, and a {{Term|TFH|Totem Deku|link}}. A large bridge can then be used to reach a higher ledge on the first side of the river, where a {{Term|TFH|Spear Moblin|link}} and a locked door can be found. To the east from this ledge, another log can be used to cross the river as it turns; a {{Term|TFH|Spear Moblin}} walks along the log. In this final portion on the east side of the {{Term|TFH|Stage}}, a {{Term|TFH|Shock Switch}} lies under a grate to the northeast, and can only be activated with a {{Term|TFH|Bomb}} blast. Once activated, a gate in front of it opens, revealing five more {{Plural|TFH|Shock Switch}} across the river, which are too far away to be reached with the {{Term|TFH|Sword}}. Three of the {{Plural|TFH|Shock Switch}} can be reached using a two-{{Term|TFH|Links}} {{Term|TFH|Totem}}, while the other two can be reached by one {{Term|TFH|Links}} alone. All five must be activated within a few seconds, and once they are, a {{Term|TFH|Key|link}} appears next to two {{Plural|TFH|Heart}} on a platform in the river, and another platform rises in the middle of the river. The {{Term|TFH|Key}} can only be reached by tossing two {{Plural|TFH|Links}} onto the middle platform, then tossing one {{Term|TFH|Links}} from there. The third {{Term|TFH|Links}} must then throw the {{Term|TFH|Key}} to the {{Term|TFH|Links}} on the middle platform, who must then throw the {{Term|TFH|Key}} to the {{Term|TFH|Links}} on the other side of the river, who can then carry it back across the log to the locked door. If the {{Term|TFH|Key}} happens to fall into the river, it will reappear on its starting platform. Beyond the door is the {{Term|TFH|Triforce Gateway}}. | |||
{{Clear}} | |||
[[File:TFH Moblin Base Stage 4.png|250px|right|thumb|Battling Enemies in Stage 4]] | |||
'''Stage 4''' places the {{Plural|TFH|Links}} in a small, foggy path surrounded by trees. This path leads into a pit-like stone structure below, and once the {{Plural|TFH|Links}} enter, three {{Plural|TFH|Spear Throwing Moblin}} appear; one of them atop a {{Term|TFH|Totem Armos|link}}. On either side of the {{Term|TFH|Stage}} is a series of ledges with several {{Plural|TFH|Heart}} along them, that can only be reached by using all three {{Plural|TFH|Links}} to toss one another up to them. In the middle of these ledges, another {{Term|TFH|Spear Throwing Moblin}} stands atop a wooden lookout tower. Defeating them requires all three {{Term|TFH|Links}} working together, either by tossing the top {{Term|TFH|Links}} up to the towers, or by having him throw {{Plural|TFH|Bomb}}. Once the three {{Plural|TFH|Spear Moblin}} in the main pit area are defeated, three more appear; this time, two of them each ride a {{Term|TFH|Totem Armos}}. Once this second wave is defeated, two more {{Plural|TFH|Spear Moblin}} appear, one of which rides atop two {{Plural|TFH|Totem Armos}}. Once every {{Term|TFH|Moblin}} is defeated, including the two on the lookout towers, a staircase appears at the north edge and a doorway at the top of it opens, revealing the {{Term|TFH|Triforce Gateway}}. At the top of the staircase and to the left, just before reaching the {{Term|TFH|Triforce Gateway}}, a {{Term|TFH|Links}} can be thrown on top of an elevated ledge to find a hidden {{Term|TFH|Treasure Chest}} with a {{Term|TFH|Red Rupee}} inside. | |||
{{Clear}} | |||
==={{Plural|TFH|Drablands Challenge}}=== | |||
Once the {{Term|TFH|Boss|link}} of the {{Term|TFH|Woodlands|link}} has been defeated, {{Term|TFH|Moblin Base}} can be replayed with the following {{Plural|TFH|Drablands Challenge|link}}: "[[Drablands Challenge#Pop all balloons!|Pop all balloons!]]", "[[Drablands Challenge#Defeat all foes san sword!|Defeat all foes sans sword!]]", and "[[Drablands Challenge#Transport the orb quickly!|Transport the orb quickly!]]". | |||
In "Pop all balloons!", each of the four {{Plural|TFH|Stage|link}} contains 10 {{Plural|TFH|Balloon|link}}, for a total of 40. Several of the {{Plural|TFH|Balloon}} are out of the {{Plural|TFH|Links}}' reach even when performing a full {{Term|TFH|Totem|link}}, requiring the top {{Term|TFH|Links}} to either throw a {{Term|TFH|Bomb|link}} with precise timing, or charge up a {{Term|TFH|Spin Attack|link}} and be thrown by the middle {{Term|TFH|Links}} for added height. | |||
In "Defeat all foes sans sword!", the {{Plural|TFH|Links}} are unable to use their {{Plural|TFH|Sword}}, so all {{Plural|TFH|Enemy}} in a {{Term|TFH|Stage}} must be defeated by other means before the {{Term|TFH|Triforce Gateway}} is activated. During this {{Term|TFH|Drablands Challenge|display=Challenge}}, different and more difficult {{Plural|TFH|Enemy}} appear throughout the {{Term|TFH|Level|link}}. This includes an extra wave of {{Plural|TFH|Spear Throwing Moblin}} in the final {{Term|TFH|Stage}}, one of which stands atop three {{Plural|TFH|Totem Armos}}. | |||
In "Transport the orb quickly!", the {{Plural|TFH|Links|link}} are given a timer of one minute in [[Multiplayer]], or one minute and 35 seconds in single-player. This timer can be increased by collecting {{Plural|TFH|Hourglass|link}} or wearing {{Term|TFH|Linebeck's Uniform|link}}. | |||
==={{Plural|TFH|Material}}=== | |||
At the end of the {{Term|TFH|Level}}, three {{Plural|TFH|Treasure Chest|link}} can be opened. Two contain the same {{Plural|TFH|Material|link}}, and one contains another, more valuable {{Term|TFH|Material}}. | |||
{{Data Table | |||
|game= TFH | |||
|columns= {{Term|TFH|Drablands Challenge}}, {{Plural|TFH|Magical Material}} [Amounts] | |||
|- | |||
| N/A | |||
| 2 Armos Spirit, 1 Sweet Shroom | |||
|- | |||
| [[File:TFH Pop All Balloons Icon.png]]<br/>'''Pop all balloons!''' | |||
| 2 Tektite Shell, 1 Blin Bling | |||
|- | |||
| [[File:TFH Sans Sword Icon.png]]<br/>'''Defeat all foes sans sword!''' | |||
| 2 Sweet Shroom, 1 Gohma's Eye | |||
|- | |||
| [[File:TFH Transport the Orb Icon.png]]<br/>'''Transport the orb quickly!''' | |||
| 2 Blin Bling, 1 Mystery Jade | |||
}} | |||
=== | ==={{Plural|TFH|Enemy}} and Traps=== | ||
{{Tabs | |||
|tab1= No Challenge, "Pop all balloons!", "Transport the orb quickly!" | |||
|content1= | |||
;{{Term|TFH|Stage}} 1 | |||
There are no {{Plural|TFH|Enemy}} in this {{Term|TFH|Stage}}. | |||
;{{Term|TFH|Stage}} 2 | |||
{{Gallery List|Enemies | |||
|TFH= Buzz Blob [Qty:5], Life Like [Qty:2], Squiddy, Totem Deku [2] [Qty:2], Totem Deku [3] [Qty:1] | |||
}} | |||
;{{Term|TFH|Stage}} 3 | |||
{{Gallery List|Enemies | |||
|TFH= Blob [Qty:2], Buzz Blob [Qty:2], Life Like [Qty:1]{{List Note|name= Hearts|These {{Plural|TFH|Life Like|link}} are disguised as {{Plural|TFH|Heart|link}}.}}, Spear Throwing Moblin [Qty:2], Totem Deku [Qty:1] | |||
}} | |||
;{{Term|TFH|Stage}} 4 | |||
{{Gallery List|Enemies | |||
|TFH= Spear Throwing Moblin [Qty:10]{{List Note|Three ride on a single {{Plural|TFH|Totem Armos|link}}; one rides on two {{Plural|TFH|Totem Armos}}.}}, Totem Armos [Qty:5] | |||
}} | |||
{{List Notes}} | |||
|tab2= "Defeat all foes sans sword!" | |||
|content2= | |||
;{{Term|TFH|Stage}} 1 | |||
{{Gallery List|Enemies | |||
|TFH= Blob [Qty:2], Buzz Blob [Qty:2], Life Like [Qty:1]{{List Note|name= Hearts|These {{Plural|TFH|Life Like|link}} are disguised as {{Plural|TFH|Heart|link}}.}}, Totem Deku [Qty:1], Totem Deku [2] [Qty:1], Totem Deku [3] [Qty:1] | |||
}} | |||
;{{Term|TFH|Stage}} 2 | |||
{{Gallery List|Enemies | |||
|TFH= Buzz Blob [Qty:5], Life Like [Qty:3]{{List Note|name= Hearts}}, Squiddy, Tektite [Qty:5], Totem Deku [2] [Qty:2], Totem Deku [3] [Qty:2] | |||
}} | |||
== | ;{{Term|TFH|Stage}} 3 | ||
{{Gallery List|Enemies | |||
|TFH= Blob [Qty:2], Buzz Blob [Qty:2], Life Like [Qty:1]{{List Note|name= Hearts}}, Spear Throwing Moblin [Qty:3], Totem Deku [Qty:1], Totem Deku [2] [Qty:2], Totem Deku [3] [Qty:1] | |||
}} | |||
= | ;{{Term|TFH|Stage}} 4 | ||
{{Gallery List|Enemies | |||
|TFH= Spear Throwing Moblin [Qty:13]{{List Note|Four ride on a single {{Plural|TFH|Totem Armos|link}}; two ride on two {{Plural|TFH|Totem Armos}}; one rides on three {{Plural|TFH|Totem Armos}}.}}, Totem Armos [Qty:11] | |||
}} | |||
{{List Notes}} | |||
}} | |||
=== | ==={{Plural|TFH|Treasure Chest}}=== | ||
{{Treasure Chests|game= TFH | |||
|- | |||
| Treasure Chest | |||
| Red Rupee | |||
| Behind a {{Term|TFH|Cracked Wall|link}} in the northeast corner of {{Term|TFH|Stage}} 2 | |||
|- | |||
| Treasure Chest | |||
| Red Rupee | |||
| Behind a {{Term|TFH|Cracked Wall}} in the center of the northern wall in {{Term|TFH|Stage}} 2 | |||
|- | |||
| Treasure Chest | |||
| Red Rupee | |||
| On the left ledge of the stairs leading to the {{Term|TFH|Triforce Gateway}} in {{Term|TFH|Stage}} 4 | |||
}} | |||
== | ==Trivia== | ||
*2 | *As described in Vol. 1 of the {{Term|TFH|Drablands Diary|link}}, a bright green {{Term|TFH|Butterfly|link}} is hidden in each {{Term|TFH|Level|link}} of the {{Term|TFH|Woodlands|link}}. One can be found on a tree atop the cliff in {{Term|TFH|Stage}} 2 of {{Term|TFH|Moblin Base}}, directly above the {{Term|TFH|Cracked Wall|link}} in the northeast corner. | ||
==== | ==Nomenclature== | ||
{{Nomenclature}} | |||
== | ==Gallery== | ||
<gallery> | <gallery> | ||
File:TFH | File:TFH Kokiri Clothes Promotional Screenshot 2.png|Using the {{Term|TFH|Kokiri Clothes}} in {{Term|TFH|Stage}} 1 | ||
File:TFH Moblin Base Stage 1 2.png|{{Term|TFH|Stage}} 1 during the "Pop all balloons!" {{Term|TFH|Drablands Challenge}} | |||
File:TFH Moblin | File:TFH Moblin Base Stage 2 2.png|{{Plural|TFH|Enemy}} on the north side of {{Term|TFH|Stage}} 2 | ||
File:TFH | |||
</gallery> | </gallery> | ||
{{Ref}} | |||
{{ | |||
{{Categories | |||
|Bases | |||
|levels= TFH | |||
}} | |||
Latest revision as of 02:03, 23 January 2024
Moblin Base is a Level in Tri Force Heroes.[1] It is the third Level of the Woodlands Area, preceded by Buzz Blob Cave and followed by the Forest Temple.
The Moblin Base is a fortress situated within a forest, run by Moblins and various other Enemies.

Stage 1 starts the Links off in the clearing of a forest, where they each appear standing on a Tree Stump, below a cliff. The cliff can be climbed using one of the two Magic Plants that ascend once a Link stands on it, then disappear and soon regrow in their initial spot. Atop the cliff are a pair of Bows and a Bomb, partially surrounded by Grass. Ahead of the Links is a series of Totem-like statues blocking the path across a river to the Triforce Gateway. On each side of the statues is an elevated ledge; the left one can be accessed by a ramp, after using Bombs to blow up the Cracked Blocks at the top, while the right ledge can only be accessed via throwing a Link onto it. Ahead of the ledges, across the river, is a pair of elevated Shock Switches that are too far and too high to be activated with the Sword, so the Links must use Arrows. By forming a two-Link Totem on either ledge, one of the Shock Switches can be shot at, after which the top Link must be quickly thrown to the third Link on the other ledge and shoot the second Switch before the first deactivates. Done quickly enough, this causes the statues to lower, allowing the Links to walk on top of them to cross the river and reach the Triforce Gateway.

Stage 2 sees the Links appear in the southeast corner of a large, square clearing, with a stone structure standing in the middle of the Stage and Enemies all around it. The structure can be entered via a staircase on its south side, and the inactive Triforce Gateway and a Squiddy can be found inside. The south and east parts of the Stage both have chasms that must be crossed by walking on a log to reach the other sections from where the Links begin. Along the west side of the Stage, four Buzz Blobs can be found. On its north side, two Life Likes (disguised among a group of four Hearts) and another Buzz Blob can be found. On the east side, there are three Totem Dekus; defeating them with Arrows requires the use of Totems of various heights, depending on which of the various ledges or logs the Links stand atop. Once every Enemy is defeated, the Triforce Gateway activates, and three more staircases appear on the north, east, and west sides of the stone structure. In the north and northeast parts of the Stage, two parts of the cliff side can be blown up using Bombs, and both reveal a Treasure Chest containing a Red Rupee.

Stage 3 starts the Links off on one side of a river with two Blobs nearby. The river can be crossed using a small log, and on the other side are two Buzz Blobs, a Life Like disguised as a Heart, and a Totem Deku. A large bridge can then be used to reach a higher ledge on the first side of the river, where a Spear Moblin and a locked door can be found. To the east from this ledge, another log can be used to cross the river as it turns; a Spear Moblin walks along the log. In this final portion on the east side of the Stage, a Shock Switch lies under a grate to the northeast, and can only be activated with a Bomb blast. Once activated, a gate in front of it opens, revealing five more Shock Switches across the river, which are too far away to be reached with the Sword. Three of the Shock Switches can be reached using a two-Link Totem, while the other two can be reached by one Link alone. All five must be activated within a few seconds, and once they are, a Key appears next to two Hearts on a platform in the river, and another platform rises in the middle of the river. The Key can only be reached by tossing two Links onto the middle platform, then tossing one Link from there. The third Link must then throw the Key to the Link on the middle platform, who must then throw the Key to the Link on the other side of the river, who can then carry it back across the log to the locked door. If the Key happens to fall into the river, it will reappear on its starting platform. Beyond the door is the Triforce Gateway.

Stage 4 places the Links in a small, foggy path surrounded by trees. This path leads into a pit-like stone structure below, and once the Links enter, three Spear Throwing Moblins appear; one of them atop a Totem Armos. On either side of the Stage is a series of ledges with several Hearts along them, that can only be reached by using all three Links to toss one another up to them. In the middle of these ledges, another Spear Throwing Moblin stands atop a wooden lookout tower. Defeating them requires all three Link working together, either by tossing the top Link up to the towers, or by having him throw Bombs. Once the three Spear Moblins in the main pit area are defeated, three more appear; this time, two of them each ride a Totem Armos. Once this second wave is defeated, two more Spear Moblins appear, one of which rides atop two Totem Armos. Once every Moblin is defeated, including the two on the lookout towers, a staircase appears at the north edge and a doorway at the top of it opens, revealing the Triforce Gateway. At the top of the staircase and to the left, just before reaching the Triforce Gateway, a Link can be thrown on top of an elevated ledge to find a hidden Treasure Chest with a Red Rupee inside.
Drablands Challenges
Once the Boss of the Woodlands has been defeated, Moblin Base can be replayed with the following Drablands Challenges: "Pop all balloons!", "Defeat all foes sans sword!", and "Transport the orb quickly!".
In "Pop all balloons!", each of the four Stages contains 10 Balloons, for a total of 40. Several of the Balloons are out of the Links' reach even when performing a full Totem, requiring the top Link to either throw a Bomb with precise timing, or charge up a Spin Attack and be thrown by the middle Link for added height.
In "Defeat all foes sans sword!", the Links are unable to use their Swords, so all Enemies in a Stage must be defeated by other means before the Triforce Gateway is activated. During this Challenge, different and more difficult Enemies appear throughout the Level. This includes an extra wave of Spear Throwing Moblins in the final Stage, one of which stands atop three Totem Armos.
In "Transport the orb quickly!", the Links are given a timer of one minute in Multiplayer, or one minute and 35 seconds in single-player. This timer can be increased by collecting Hourglasses or wearing Linebeck's Uniform.
Materials
At the end of the Level, three Treasure Chests can be opened. Two contain the same Materials, and one contains another, more valuable Material.
| Drablands Challenge | — |
|---|---|
| Magical Materials | |
| Drablands Challenge | Pop all balloons! |
| Magical Materials | |
| Drablands Challenge | Defeat all foes sans sword! |
| Magical Materials | |
| Drablands Challenge | Transport the orb quickly! |
| Magical Materials |
| Drablands Challenge | Magical Materials |
|---|---|
— | |
Pop all balloons! | |
Defeat all foes sans sword! | |
Transport the orb quickly! |
Enemies and Traps
- Stage 1
There are no Enemies in this Stage.
- Stage 2
-

Buzz Blob ×5
-

Life Like ×2
-

-

Totem Deku ×2
-

Totem Deku ×1


- Stage 3
-

Blob ×2
-
Buzz Blob ×2
-
-

-

Totem Deku ×1


- Stage 4

- ↑ These Life Likes are disguised as Hearts.
- ↑ Three ride on a single Totem Armos; one rides on two Totem Armos.
- Stage 1
-
Blob ×2
-
Buzz Blob ×2
-
-
Totem Deku ×1
-
Totem Deku ×1
-
Totem Deku ×1
- Stage 2
-
Buzz Blob ×5
-
-
-

Tektite ×5
-
Totem Deku ×2
-
Totem Deku ×2

- Stage 3
-
Blob ×2
-
Buzz Blob ×2
-
-
-
Totem Deku ×1
-
Totem Deku ×2
-
Totem Deku ×1
- Stage 4
-
-

Totem Armos ×11
- ↑ 1.0 1.1 1.2 These Life Likes are disguised as Hearts.
- ↑ Four ride on a single Totem Armos; two ride on two Totem Armos; one rides on three Totem Armos.
Treasure Chests
| Treasure Chest | |
|---|---|
| Contents | |
| Notes | Behind a Cracked Wall in the northeast corner of Stage 2 |
| Treasure Chest | |
| Contents | |
| Notes | Behind a Cracked Wall in the center of the northern wall in Stage 2 |
| Treasure Chest | |
| Contents | |
| Notes | On the left ledge of the stairs leading to the Triforce Gateway in Stage 4 |

| Treasure Chest | Contents | Notes |
|---|---|---|
Behind a Cracked Wall in the northeast corner of Stage 2 | ||
Behind a Cracked Wall in the center of the northern wall in Stage 2 | ||
On the left ledge of the stairs leading to the Triforce Gateway in Stage 4 |
Trivia
- As described in Vol. 1 of the Drablands Diary, a bright green Butterfly is hidden in each Level of the Woodlands. One can be found on a tree atop the cliff in Stage 2 of Moblin Base, directly above the Cracked Wall in the northeast corner.
Nomenclature
| Language | Names | Meanings |
|---|---|---|
Japanese | モリブリンの砦 (Moriburin no Toride)[3] | Moriblin Fort |
FrenchCA | Fort moblin | |
FrenchEU | Fort moblin[5] | |
German | Moblin-Festung[4] | |
Italian | Fortezza grublin[2] | |
SpanishLA | Fortaleza moblin[6] | |
SpanishEU | Fortaleza Moblin[7] | |
| This table was generated using translation pages. To request an addition, please contact a staff member with a reference. | ||
Gallery
-
Using the Kokiri Clothes in Stage 1
-
Stage 1 during the "Pop all balloons!" Drablands Challenge
-
Enemies on the north side of Stage 2


References
- ↑ Encyclopedia, Dark Horse Books, pg. 159
- ↑ "Fortezza grublin" — Level Selection (Tri Force Heroes)
- ↑ "モリブリンの砦" — Level Selection (Tri Force Heroes)
- ↑ "Moblin-Festung" — Level Selection (Tri Force Heroes)
- ↑ "Fort moblin" — Level Selection (Tri Force Heroes)
- ↑ "Fortaleza moblin" — Level Selection (Tri Force Heroes)
- ↑ "Fortaleza Moblin" — Level Selection (Tri Force Heroes)