Deception Castle
Deception Castle is a Level in Tri Force Heroes.[1] It is the second Level of the Sky Realm Area, preceded by Floating Garden and followed by Dragon Citadel.
Deception Castle, as its name suggests, takes place in a decrepit, castle-like structure in the sky filled with dangerous mechanisms.

Stage 1 starts the Links on an elevated portion of a floating castle-like structure. Left of them are two Gripshots and a Gust Jar, while a few Jars rest behind them. Picking up the Items causes the Triforce Gateway to activate; a Sky Bomb Soldier and a Sky Spear Soldier also appear on a larger platform below them, riding atop one and two Totem Armos, respectively. Three large windows open behind the Soldiers, releasing strong Winds that threaten to blow the Links off of the Stage. Once both Enemies are defeated, the windows close and a door to the northeast opens, allowing the Links to proceed. The platform ahead holds two Hearts, a few Jars, and a Floor Switch, while two more Floor Switches can be seen across a gap. In order to reach them, the Links with the Gripshots must use them one-by-one to attach themselves to the nearby grated wall, which flips them to the other side; then the Link with the Gust Jar must propel them each forward to a platform ahead. There, the second Floor Switch and a Blue Rupee can be reached. In order to reach the final Floor Switch, the two Links must Totem so the top one can Gripshot onto a second, moving grated wall. This will take him to the platform on which the third Floor Switch and a Red Rupee can be found. When all three Floor Switches are stepped on simultaneously, platforms appear that allow the three Links to reunite and reach the activated Triforce Gateway.

Stage 2 places the Links on a platform attached to a grated Fan. The Links can use the Updraft being produced to reach a higher, spinning platform. Once they all get to it, several Enemies appear: a Vulture, a Sky Ball and Chain Soldier, a Sky Bomb Soldier, and a Sky Spear Soldier. Once the Vulture is defeated, a second one appears. The Sky Soldiers all stand on far platforms and cannot be reached with the Sword. The Bombs thrown by the Sky Bomb Soldier can be thrown at the other Enemies in order to damage them; the Bomb Flower growing in front of the Sky Ball and Chain Soldier can also be propelled at him using the Gust Jar, or grabbed with the Gripshot and used as a weapon. The Sky Bomb Soldier is on a higher platform, but another Bomb Flower grows in front of him, so a Link atop a full Totem can use it to attack him. Once every Enemy is defeated, the Triforce Gateway appears in the middle of the platform. Using a two-Link Totem, a Silver Rupee, an Energy Potion, and a Heart at the outer edges of the Stage can be reached with the Gripshot, while a single Link can use it to grab lower Hearts, an Energy Potion, and a Red Rupee.

Stage 3 tasks the Links with navigating a series of teetering platforms high above the sky. Without anything on them, the platforms are stable, but if more weight is on one side than another, it will lose balance, causing whoever is on it to slide downward and fall off if they stay there for too long. The Links either need to move quickly or work together and balance the platforms in order to proceed ahead. A Blue Rupee to the right can be grabbed with the Gripshot, and a Heart to the left can be grabbed the same way. If one Link is unable to get across the platforms, he may use the Gripshot to reach a Link who has already gotten across. The Gust Jar can also be used to propel the Links across. Ahead of the first platform is a small, stone platform with a Heart, a Blue Rupee, and a Red Rupee on it, and another teetering platform ahead of that. Two Beamos sit on elevated columns nearby, and will shoot at the Links if they are too close and in their line of sight. Once past them, the Links reach the stone platform ahead, while continuing to the left on the teetering platform, they'll find a Silver Rupee. Just ahead of the stone platform, two smaller, connected teetering platforms can be seen, along with four Mini-Margos; two on the left side which continuously move east/west along tracks, and two on the right side which move north/south. A locked door lies on a final stone platform ahead, and two Bomb Flowers grow on floating platforms to the right. A Link with a Gripshot must board the right platform, grab a Bomb Flower, and throw it to a Link on the left platform, who must then throw it into the Mini-Margos when they are close enough. The Link with the Gust Jar must also use it to blow the second Bomb Flower into the Mini-Margos on the right when they are in place. Destroying all four Mini-Margos causes a Key to appear between the two platforms. In order to cross a small gap to the final platform and reach the door, the Link with the Gust Jar must be thrown, and the remaining Links can Gripshot onto him. Unlocking the door reveals a Squiddy and the Triforce Gateway.

Stage 4 places the Links on a stone pathway that leads to the arena in which Gigaleon is fought. Jars containing Hearts can be found on this path. Once all of the Links reach this arena, the Mini-Boss of the Sky Realm appears and the path behind them breaks away. Several Jars, Hearts, and an Energy Potion can be found on this platform as well as on the pillars around it. Several Bomb Flowers grow on two platforms on either side of the arena, which are necessary to defeat Gigaleon; however these platforms fall midway through the battle. In each corner of the arena is a grated Fan which can be momentarily activated with the Gust Jar. Once Gigaleon is defeated, three more grated Fans appear ahead, allowing the Links passage to a stone platform on which the Triforce Gateway appears.
Drablands Challenges
Once the Boss of the Sky Realm has been defeated, Deception Castle can be replayed with the following Drablands Challenges: "Clear within the time limit!", "Don’t fall at all!", and "Don’t pop any balloons!". Each Challenge features the same configuration of Enemies.
In "Clear within the time limit!", the Links are given a timer of one minute and 30 seconds in Multiplayer, or two minutes and 30 seconds in single-player. This timer can be increased by collecting Hourglasses or wearing Linebeck's Uniform.
Materials
At the end of the Level, three Treasure Chests can be opened. Two contain the same Material, and one contains another, more valuable Material.
| Drablands Challenge | — |
|---|---|
| Magical Materials | |
| Drablands Challenge | Clear within the time limit! |
| Magical Materials | |
| Drablands Challenge | Don't fall at all! |
| Magical Materials | |
| Drablands Challenge | Don't pop any balloons! |
| Magical Materials |
| Drablands Challenge | Magical Materials |
|---|---|
— | |
Clear within the time limit! | |
Don't fall at all! | |
Don't pop any balloons! |
Enemies and Traps
- Stage 1
![Sky Bomb Soldier ×1[a]](/wiki/File:TFH_Sky_Bomb_Soldier_Model.png)
![Sky Spear Soldier ×1[b]](/wiki/File:TFH_Sky_Spear_Soldier_Model.png)

- Stage 2


- Stage 3
-
Beamos ×2
-
Mini-Margo ×4
-


- Stage 4

- ↑ Rides on a single Totem Armos.
- ↑ Rides on two Totem Armos.
Trivia
- Though it is not mentioned in the Drablands Diary like each of the prior Areas, a bird's nest is hidden in each Level of the Sky Realm. One can be found near the end of Stage 3 of Floating Garden, on top of the wall just left of the large locked doors.
Nomenclature
| Language | Names | |
|---|---|---|
Japanese | カラクリ浮遊城 (Karakuri Fuyū-jō)[3] | |
FrenchCA | Fort du dépit[7] | |
FrenchEU | Fort aux fourberies[5] | |
German | Maschinenfestung[4] | |
Italian | Castello trappola[2] | |
SpanishLA | Castillo de las trampas[6] | |
SpanishEU | Castillo de las Trampas[8] | |
| This table was generated using translation pages. To request an addition, please contact a staff member with a reference. | ||
Gallery
-
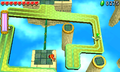
Stage 3: Crossing the second tilting platform
-

Stage 3: Clearing out the moving Mini-Margos


References
- ↑ Encyclopedia, Dark Horse Books, pg. 161
- ↑ "Castello trappola" — Level Selection (Tri Force Heroes)
- ↑ "カラクリ浮遊城" — Level Selection (Tri Force Heroes)
- ↑ "Maschinenfestung" — Level Selection (Tri Force Heroes)
- ↑ "Fort aux fourberies" — Level Selection (Tri Force Heroes)
- ↑ "Castillo de las trampas" — Level Selection (Tri Force Heroes)
- ↑ "Fort du dépit" — Level Selection (Tri Force Heroes)
- ↑ "Castillo de las Trampas" — Level Selection (Tri Force Heroes)