Lever Switch: Difference between revisions
(for transparent images, we don't use the thumb thingy :D) |
TriforceTony (talk | contribs) No edit summary |
||
| (36 intermediate revisions by 13 users not shown) | |||
| Line 1: | Line 1: | ||
{{Infobox Object | |||
|image= | |||
{{Media | |||
<!-- Uses Series term -->|Artwork ALttP= File:ALttP Link Pulling Artwork.png | |||
<!-- Uses Series term -->|Model LANS= File:LANS Lever Switch Model.png | |||
<!-- Uses Series term -->|Model TP= File:TP Lever Switch Model.png | |||
<!-- Uses Series term -->|Model TPHD= File:TPHD Lever Switch Model.png | |||
<!-- Uses Series term -->|Model PH= File:PH Lever Switch Model.png | |||
<!-- Uses Series term -->|Model ST= File:ST Lever Switch Model.png | |||
|Model SS= File:SS Lever Switch Model.png | |||
|Model SSHD= File:SSHD Lever Switch Model.png | |||
|Model ALBW= File:ALBW Lever Model.png | |||
|Sprite ALttP= File:ALttP Lever Switch Sprite.png | |||
<!-- Uses Series term -->|Sprite LA= File:LA Lever Switch Sprite.png | |||
<!-- Uses Series term -->|Sprite LADX= File:LADX Lever Switch Sprite.png | |||
<!-- Uses Series term -->|Sprite OoS= File:OoS Lever Switch Sprite.png | |||
<!-- Uses Series term -->|Sprite OoA= File:OoA Lever Switch Sprite.png | |||
|Sprite FS= File:FS Lever Sprite.png | |||
|Sprite FSA= File:FSA Pull Lever Sprite.png | |||
|Sprite TMC= File:TMC Lever Sprite.png | |||
}} | |||
|caption= | |||
|pronunciation= | |||
|plural= | |||
|game= ALttP, LA, OoS, OoA, FS, FSA, TMC, TP, PH, ST, SS, ALBW | |||
|other= | |||
|location= | |||
|uses= | |||
|comp= {{Term|Series|Switch|link}} | |||
|theme= | |||
}} | |||
{{Term/Store|Lever Switch|Lever Switches|Series, SS, SSHD|plural}},{{Exp Game|SS}}<ref>{{Cite|This mechanism can be described as a sort of a {{Color|SSHD Blue|lever switch}}. {{Color|SSHD Green|Pull}} the curled tip to activate it.|Fi|SSHD}}</ref>{{Name Ref|ALttP, LANS, OoS, OoA, TPHD, PH, ST}} also known as {{Term/Store|Lever|Levers|FS, TMC, ALBW|plural}},{{Exp Game|FS, TMC, ALBW}}<ref>{{Cite Guide|game= ALttP&FS |guide= Prima |page=179 {{Exp Game|FS}}}}</ref><ref>{{Cite|Great. Now, just pull the {{Color|TMC Blue|lever}} on the {{Color|TMC Blue|figure-dispensing machine}} over there.|Carlov|TMC}}</ref><ref>{{Cite Guide|quote= |game= ALBW |publisher= Prima |page= 16}}</ref> and {{Term/Store|Pull Lever|Pull Levers|FSA|plural}},{{Exp Game|FSA}}<ref>{{Cite Manual|game= FSA |page= 32}}</ref> are recurring {{Plural|Series|Object|link}} in {{TLoZ|Series}}. | |||
== | ==Overview== | ||
Levers commonly exist in dungeons across the Zelda universe; in their simplest form, they yield an open passageway when pulled. In {{ALttP}}, {{LA}}, {{OoA}}, and {{OoS}} it is quite commonplace to see two levers in the same room, one of which activates a door, yields a key, reveals a passageway, et cetera, while the other acts as a roof drop - once the latter is pulled, a large amount of enemies fall from the ceiling. In {{OoS|-}} and {{OoA|-}}, and unlike the other versions, the "real Lever" and the "monster Lever" will randomly switch function, making choosing the "real Lever" a matter of luck, whenever two such levers exist in the same room. Such pull levers exist in {{FSA}} as well, however some must be pulled with the strength of all four Links, instead of just one. Levers often open a new path for Link to access an item. However, some of these are timed, and will deactivate if Link takes too long to reach the effect of the pull lever. | |||
Pull levers are sometimes hidden under debris piles in | Pull levers are sometimes hidden under debris piles in {{TP}}, requiring [[Wolf Link]] to dig them up. These levers could be grappled with the [[Clawshot]] to pull them across dangerous flooring. The pulleys in {{PH}} and {{ST}} can be pulled with the [[Grappling Hook]] and the [[Whip]], respectively, and will sometimes slowly retract back into the wall as a visual indicator of how much time remains before their effects expire. However, the statued incarnations in {{ST|-}} incorporate a pull lever that can be completely removed from its statue and placed in another. Unique to {{PH|-}} and {{ST|-}}, when multiple switches are found they must be pulled in the correct order. Like in {{ALttP|-}}, and especially in {{ST|-}}, pull levers are sometimes disguised as statue tongues. | ||
==={{ALttP|-}}=== | |||
{{Stub|ALttP}} | |||
==={{LA|-}}=== | |||
{{Stub|LA}} | |||
==={{OoS|-}}=== | |||
{{Stub|OoS}} | |||
==={{OoA|-}}=== | |||
{{Stub|OoA}} | |||
==={{FS|-}}=== | |||
{{Stub|FS}} | |||
==={{FSA|-}}=== | |||
{{Manual|FSA|Pull Levers|Activate these switches by hitting them with items like the boomerang or the bow.}} | |||
{{Stub|FSA}} | |||
==={{TMC|-}}=== | |||
{{Plural|TMC|Lever}} appear in {{Plural|TMC|Dungeon|link}} in {{TMC}}, and pulling them will often produce a {{Term|TMC|Small Key|link}}, extend a bridge, or make an {{Term|TMC|Enemy|link}} appear. One {{Term|TMC|Lever}} appears in the {{Term|TMC|Figurine Gallery|link}} in {{Term|TMC|Hyrule Town|link}}; after {{Term|TMC|Link|link}} trades a number of {{Plural|TMC|Mysterious Shell|link}} to {{Term|TMC|Carlov|link}}, pulling the {{Term|TMC|Lever}} will deposit an egg containing a {{Term|TMC|Figurine|link}} from the {{Term|TMC|Figure-Dispensing Machine|link}}. | |||
==={{TP|-}}=== | |||
{{Stub|TP}} | |||
==={{PH|-}}=== | |||
{{Stub|PH}} | |||
==={{ST|-}}=== | |||
{{Stub|ST}} | |||
==={{SS|-}}=== | |||
{{Stub|SSHD}} | |||
{{Plural|SSHD|Lever Switch}} are {{Plural|SSHD|Switch}} controlled by the {{Term|SSHD|Whip|link}}. Another type of {{Term|SSHD|Lever Switch}} known as {{Plural|SSHD|Hang Lever Switch|link}} also appear | |||
==={{ALBW|-}}=== | |||
{{Stub|ALBW}} | |||
==Nomenclature== | |||
{{Nomenclature}} | |||
==Gallery== | |||
<gallery> | |||
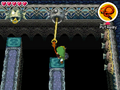
File:Grappling Hook Tongue.png|Using the {{Term|PH|Grappling Hook}} to pull a {{Term|PH|Lever}} disguised as a statue's tongue from {{PH|-}} | |||
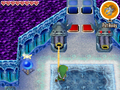
File:Ocean Temple Puzzle.png|Pulling a {{Term|ST|Lever}} with the {{Term|ST|Whip}} from {{ST|-}} | |||
</gallery> | |||
==See Also== | ==See Also== | ||
* | * {{Term|Series|Hang Lever Switch|link}} | ||
* {{Term|Series|Switch|link}} | |||
{{Ref}} | |||
{{Categories | |||
|Switches | |||
|objects= ALttP<!-- Uses Series term -->, LA<!-- Uses Series term -->, LADX<!-- Uses Series term -->, LANS<!-- Uses Series term -->, OoS<!-- Uses Series term -->, OoA<!-- Uses Series term -->, TP<!-- Uses Series term -->, TPHD<!-- Uses Series term -->, ST<!-- Uses Series term -->, SS, SSHD | |||
}} | |||
Latest revision as of 09:30, 18 July 2023
Lever Switches,(SS)[1][name references needed] also known as Levers,(FS | TMC | ALBW)[2][3][4] and Pull Levers,(FSA)[5] are recurring Objects in The Legend of Zelda series.
Overview
Levers commonly exist in dungeons across the Zelda universe; in their simplest form, they yield an open passageway when pulled. In A Link to the Past, Link's Awakening, Oracle of Ages, and Oracle of Seasons it is quite commonplace to see two levers in the same room, one of which activates a door, yields a key, reveals a passageway, et cetera, while the other acts as a roof drop - once the latter is pulled, a large amount of enemies fall from the ceiling. In Oracle of Seasons and Oracle of Ages, and unlike the other versions, the "real Lever" and the "monster Lever" will randomly switch function, making choosing the "real Lever" a matter of luck, whenever two such levers exist in the same room. Such pull levers exist in Four Swords Adventures as well, however some must be pulled with the strength of all four Links, instead of just one. Levers often open a new path for Link to access an item. However, some of these are timed, and will deactivate if Link takes too long to reach the effect of the pull lever.
Pull levers are sometimes hidden under debris piles in Twilight Princess, requiring Wolf Link to dig them up. These levers could be grappled with the Clawshot to pull them across dangerous flooring. The pulleys in Phantom Hourglass and Spirit Tracks can be pulled with the Grappling Hook and the Whip, respectively, and will sometimes slowly retract back into the wall as a visual indicator of how much time remains before their effects expire. However, the statued incarnations in Spirit Tracks incorporate a pull lever that can be completely removed from its statue and placed in another. Unique to Phantom Hourglass and Spirit Tracks, when multiple switches are found they must be pulled in the correct order. Like in A Link to the Past, and especially in Spirit Tracks, pull levers are sometimes disguised as statue tongues.
A Link to the Past
Link's Awakening
Oracle of Seasons
Oracle of Ages
Four Swords
Four Swords Adventures
The Minish Cap
Levers appear in Dungeons in The Minish Cap, and pulling them will often produce a Small Key, extend a bridge, or make an Enemy appear. One Lever appears in the Figurine Gallery in Hyrule Town; after Link trades a number of Mysterious Shells to Carlov, pulling the Lever will deposit an egg containing a Figurine from the Figure-Dispensing Machine.
Twilight Princess
Phantom Hourglass
Spirit Tracks
Skyward Sword
Lever Switches are Switches controlled by the Whip. Another type of Lever Switch known as Hang Lever Switchs also appear
A Link Between Worlds
Nomenclature
| Language | Names | Meanings |
|---|---|---|
Japanese | 引っぱりレバー (Hippari rebā)[6] | Pull Lever |
| This table was generated using translation pages. To request an addition, please contact a staff member with a reference. | ||
Gallery
-
Using the Grappling Hook to pull a Lever Switch disguised as a statue's tongue from Phantom Hourglass
-
Pulling a Lever Switch with the Whip from Spirit Tracks


See Also
References
- ↑ "This mechanism can be described as a sort of a lever switch. Pull the curled tip to activate it." — Fi (Skyward Sword HD)
- ↑ The Legend of Zelda: A Link to the Past & Four Swords—Prima's Official Strategy Guide, Prima Games, pg. 179 (FS)
- ↑ "Great. Now, just pull the lever on the figure-dispensing machine over there." — Carlov (The Minish Cap)
- ↑ The Legend of Zelda: A Link Between Worlds Prima Official Game Guide, Prima Games, pg. 16
- ↑ Four Swords Adventures manual, pg. 32
- ↑ Nintendo Official Guidebook—The Legend of Zelda: The Minish Cap, Shogakukan, pg. 34
- Switches
- Objects
- Objects in A Link to the Past
- Objects in Link's Awakening
- Objects in Link's Awakening DX
- Objects in Link's Awakening (Nintendo Switch)
- Objects in Oracle of Seasons
- Objects in Oracle of Ages
- Objects in Twilight Princess
- Objects in Twilight Princess HD
- Objects in Spirit Tracks
- Objects in Skyward Sword
- Objects in Skyward Sword HD