Big Switch: Difference between revisions
Htwretched (talk | contribs) (Adding TFH) |
Htwretched (talk | contribs) (TFH info) |
||
| Line 28: | Line 28: | ||
==={{TFH|-}}=== | ==={{TFH|-}}=== | ||
{{ | {{Plural|TFH|Big Switch}} in {{TFH}} require all three {{Plural|TFH|Links|link}} to stand on them at once in order to be activated, as indicated by their etchings depicting three pairs of footprints. In most cases, {{Plural|TFH|Big Switch}} cause a door to open, or spawn a wave of {{Plural|TFH|Enemy|link}} that must be defeated to continue. In the {{Term|TFH|Level|link}} {{Term|TFH|Illusory Mansion|link}}, a {{Term|TFH|Big Switch}} causes a series of colored platforms to appear over a large area of bottomless pit, allowing it to be crossed. In {{Term|TFH|The Lady's Lair|link}} and {{Term|TFH|Dragon Citadel|link}}, {{Plural|TFH|Big Switch}} act as elevators that raise the platforms they appear on to higher ledges. | ||
{{Plural|TFH|Big Switch}} also appear in the {{Plural|TFH|Level}} {{Term|TFH|Buzz Blob Cave|link}}, {{Term|TFH|Forest Temple|link}}, {{Term|TFH|Secret Fortress|link}}, {{Term|TFH|Water Temple|link}}, {{Term|TFH|Blazing Trail|link}}, {{Term|TFH|Silver Shrine|link}}, {{Term|TFH|Training Ground|link}}, and {{Term|TFH|Desert Temple|link}}. | |||
==={{BotW|-}}=== | ==={{BotW|-}}=== | ||
| Line 40: | Line 42: | ||
<gallery> | <gallery> | ||
File:FS Big Switch Death Mountain Sprite.png|A {{Term|FS|Big Switch}} within {{Term|FS|Death Mountain}} from {{FS|-}} | File:FS Big Switch Death Mountain Sprite.png|A {{Term|FS|Big Switch}} within {{Term|FS|Death Mountain}} from {{FS|-}} | ||
File:TFH Lone Labyrinth Stage 2 3.png|A pressed {{Term|TFH|Big Switch}} in the {{Term|TFH|Lone Labyrinth}} from {{TFH|-}} | |||
</gallery> | </gallery> | ||
Latest revision as of 04:43, 16 October 2023
Big Switches are recurring Objects in The Legend of Zelda series.(FS | FSA)[1][2] Big Switches go unnamed in Tri Force Heroes and Breath of the Wild.
Location and Uses
Four Swords
Big Switches appear in various areas in Four Swords and usually have different functions that occur when all Links step on them. Sometimes, stepping on a Big Switch will block all exits in a room, forcing the Links to battle Enemies before they can proceed. Big Switches can also cause several Rupees to appear, occasionally showing the correct way to go. Big Switches can also simply open paths forward.[how?]
Four Swords Adventures
Big Switches in Four Swords Adventures function similarly to how they do in Four Swords.
Tri Force Heroes
Big Switches in Tri Force Heroes require all three Links to stand on them at once in order to be activated, as indicated by their etchings depicting three pairs of footprints. In most cases, Big Switches cause a door to open, or spawn a wave of Enemies that must be defeated to continue. In the Level Illusory Mansion, a Big Switch causes a series of colored platforms to appear over a large area of bottomless pit, allowing it to be crossed. In The Lady's Lair and Dragon Citadel, Big Switches act as elevators that raise the platforms they appear on to higher ledges.
Big Switches also appear in the Levels Buzz Blob Cave, Forest Temple, Secret Fortress, Water Temple, Blazing Trail, Silver Shrine, Training Ground, and Desert Temple.
Breath of the Wild
Big Switches appear in Ancient Shrines. They cannot be weighed down by Link's weight alone, and typically require a large stone Ball in order to be pressed.
Nomenclature
| Language | Names | |
|---|---|---|
| This table was generated using translation pages. To request an addition, please contact a staff member with a reference. | ||
Gallery
-

A Big Switch within Death Mountain from Four Swords
-
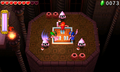
A pressed Big Switch in the Lone Labyrinth from Tri Force Heroes

See Also
References
- ↑ The Legend of Zelda: A Link to the Past & Four Swords—Prima's Official Strategy Guide, Prima Games, pg. 177 (FS)
- ↑ Four Swords Adventures manual, pg. 32