Sand Rod: Difference between revisions
No edit summary |
EzloSpirit (talk | contribs) m (fixed location in infobox) |
||
| (62 intermediate revisions by 14 users not shown) | |||
| Line 1: | Line 1: | ||
{{Item | {{Infobox Item | ||
| | |image= | ||
| | {{Media | ||
| | |Render ALBW= File:ALBW Sand Rod.png | ||
| | |Model ST= File:ST Sand Wand Model.png | ||
| | |Model ALBW= File:ALBW Sand Rod Model.png | ||
| | |Sprite ST= File:ST Sand Wand Icon.png | ||
|Sprite ALBW= File:ALBW Sand Rod Icon.png | |||
}} | }} | ||
|caption= | |||
|type= | |||
|game= ST, ALBW | |||
|other= HWL | |||
|cost= | |||
|location= | |||
{{Infobox Game Blocks | |||
|ST= {{Term|ST|Sand Temple|link}} | |||
|ALBW= {{Term|ALBW|Ravio's Shop|link}} | |||
}} | |||
|uses= Creating walls of sand | |||
|comp= | |||
|sample= | |||
|theme= | |||
}} | |||
{{Term/Store|Sand Rod|Sand Rods|Series, ALBW, HWL, HWDE|plural}},{{Exp Game|ALBW, HWL}}<ref name="E 137">{{Cite Book|quote= |book= E |publisher= |page= 137 {{Exp Game|ST, ALBW}}}}</ref><ref>{{Cite|{{Color|HWDE Green|Sand Rod}}: Adds Fire to recommended elements. Use on sand mounds to reveal treasure.|Tutorial|HWDE}}</ref> also known as {{Term/Store|Sand Wand|Sand Wands|ST|plural}},{{Exp Game|ST, HW}}<ref name="E 137"/><ref>{{Cite|Sand Wand|Smithy|HWDE}}</ref> are recurring {{Plural|Series|Item|link}} in {{TLoZ|Series}}. They allow the wielder to construct walls of {{Term|Series|Sand|link}} to act as barriers. | |||
==Location and Uses== | ==Location and Uses== | ||
=== | ==={{ST|-}}=== | ||
The Sand Wand is obtained after beating three [[Stalfos Warriors]] in the [[Sand Temple]]. It can raise walls wherever the green orb of the Sand Wand touches, which is controlled by the [[Stylus]].<ref>{{Cite|You got the Sand Wand! Tap any sandy area to raise the sand into a wall!|N/A|ST}}</ref> Each cube-shaped segment of the sand walls will stay intact for four seconds. Link can use it below his feet to raise himself to higher ground, as well as to roll boulders, flip puzzle blocks, trap certain enemies, find items hidden beneath sand, and allow [[Phantom Zelda]] to move across sand where she would normally sink. The Sand Wand's utility is also quicksand-proof, allowing the young hero to avoid sinking in deep-rooted sand. The Sand Wand is also extensively used to solve various block puzzles in the [[Ends of the Earth Station]] located in the [[Fire Realm]]. | |||
=== | ==={{ALBW|-}}=== | ||
In contrast with its incarnation from {{ST|-}}, the Sand Rod can only allow Link to make solid walls of sand rise in a straight line front of him. Additionally, Link cannot create sand beneath him. Consequently, the Sand Rod is useless on any other type of terrain, but invaluable on patches of sand. It is useful for creating passageways for Link to cross, both by walking on top of them and by [[Wall Merging|merging with their sides]]; unearthing sand-dwelling enemies and stunning them; revealing buried [[Treasure Chest]]s and hidden [[Maiamai]]s; and elevating enemies. It is notably mandatory for both reaching and subsequently traversing the {{Term|ALttP|Desert Palace|link}}. | |||
In contrast with its incarnation from | |||
[[File:ALBW Rented Sand Rod Icon.png|40px|right]] | [[File:ALBW Rented Sand Rod Icon.png|40px|right]] | ||
The Sand Rod can be obtained as soon as the | The Sand Rod can be obtained as soon as the {{Term|ALBW|Thieves' Hideout (Dungeon)|link}} is cleared. The Rod was originally rented from [[Ravio]] by [[Osfala]],<ref>{{Cite|Someone else is already renting the Sand Rod. He rented it when I was in the village seeing if that was a good place to set up my shop. He was in such a rush that I didn’t get his name. Said he had important business somewhere. Anyway, I’ve got only one of each item, so you’ll have to wait for that item to come home to roost.|Ravio|ALBW}}</ref> who intended to use it to traverse the Eastern Palace.<ref>{{Cite|I even got myself a Sand Rod, so I’m more or less invincible. Bold talk, you might say, but it’s simply the truth. I’ll get to the bottom of all this Yuga nonsense. Now, farewell to you, Link.|Osfala|ALBW}}</ref> The Rod remained with him after he was turned into a painting by [[Yuga]], until Link saved Osfala after traversing the {{Term|ALBW|Thieves' Hideout (Dungeon)}}. Osfala returns the Sand Rod to Link, asking him to bring it back to Ravio's Shop.<ref>{{Cite|Ah, and I suppose if you’re the hero, then you have more need of this Sand Rod than have I. I wish I could give it to you as a gift, but truth be told, it’s not mine. It belongs to a merchant named Ravio. I rented it, and the deal was that if I fell in battle… Well, never mind. I need to get it back to him, but I seem to be...stuck here.|Osfala|ALBW}}</ref><ref>{{Cite|You got the Sand Rod, but you’ll have to return it to Ravio. At least then you can find it at his shop!|N/A|ALBW}}</ref> From this point on, the young hero can rent it for 50 [[Rupee]]s or buy the Sand Rod himself for 800 {{Plural|ALBW|Rupee}}.{{Note|If it is the first {{Term|ALBW|Item}} that {{Term|ALBW|Link}} purchases from {{Term|ALBW|Ravio's Shop}}, it will be discounted to 400 {{Plural|ALBW|Rupee}}.}} | ||
[[File:ALBW Nice Sand Rod Icon.png|40px|left]] | [[File:ALBW Nice Sand Rod Icon.png|40px|left]] | ||
If Link has bought the Sand Rod and has located 10 Lost Maiamais, [[Mother Maiamai]] can upgrade the Sand Rod to the '''Nice Sand Rod'''. Unlike the regular Sand Rod, the sand pillars from the Nice Sand Rod will not disappear over time. Instead, the Rod has to be used again in order to collapse them. | If Link has bought the Sand Rod and has located 10 Lost Maiamais, [[Mother Maiamai]] can upgrade the Sand Rod to the '''Nice Sand Rod'''. Unlike the regular Sand Rod, the sand pillars from the Nice Sand Rod will not disappear over time. Instead, the Rod has to be used again in order to collapse them. | ||
== | ==Other Appearances== | ||
{{ | ==={{HW|-}}=== | ||
{{Noncanon|Start}} | |||
{{ | {{Stub|HWDE}} | ||
{{ImageCaption | {{ImageCaption | ||
|image = | |image= HWS Toon Link Sand Wand and Spirit Train Artwork.png | ||
|size = 200px | |size= 200px | ||
|align = right | |align= right | ||
|caption = Toon Link wielding the Sand Wand | |caption= Toon Link wielding the Sand Wand | ||
|captionalign = center | |captionalign= center | ||
}} | }} | ||
In {{HW | In {{HW}}, the Sand Wand is a class of Weapon used by [[Toon Link]]. It was added to {{HW|-}} and {{HWL}} with the {{PH|-}} & {{ST|-}} Pack Downloadable Content and can be unlocked in the [[Grand Travels Map]] in {{HWDE}}. It is associated with {{Term|HWDE|Element|link|display=Fire}}. Toon Link can use it to summon sand pillars and the [[Spirit Train]] to attack enemies. | ||
A variation known as the {{Term|HWDE|Sand Rod}} appears as an {{Term|HWDE|Item Card|link}}. | |||
====Variations==== | ====Variations==== | ||
The default Sand Wand is the '''Sand Wand''' | The default form of the Sand Wand is also named the '''Sand Wand'''. The second form is the '''Jeweled Sand Wand''', taking its appearance from {{ALBW|-}}. It is followed by the '''Nice Sand Wand''', also from {{ALBW|-}}. In {{HWL|-}} and {{HWDE|-}}, the '''Nice Sand Wand +''' can also be obtained. The [[Multi-Element Weapon]], the '''Darkfire Nice Sand Wand''', can only be obtained in {{HWDE|-}} and is associated with {{Term|HWDE|Element|link|display=Darkness}} as well as Fire. | ||
{| class=" | {| class="wikitable" style="text-align:center; width:100%; max-width:40em" | ||
|+Weapon Power | |+Weapon Power | ||
!colspan="3"|Weapon | |||
!colspan=" | |||
!colspan="6"|Number of Stars | !colspan="6"|Number of Stars | ||
|- | |- | ||
! style="width:5%"|Tier | |||
! Icon | ! Icon | ||
! Element(s) | ! Element(s) | ||
| Line 60: | Line 69: | ||
! 5 | ! 5 | ||
|- | |- | ||
| [[File: | ! Lv.1 | ||
| | | [[File:HW Sand Wand Icon.png|link=]]<br/>'''Sand Wand''' | ||
| {{HW Element|Fire}} | |||
| 80 | | 80 | ||
| 88 | | 88 | ||
| Line 69: | Line 79: | ||
| 120 | | 120 | ||
|- | |- | ||
| [[File: | ! Lv.2 | ||
| | | [[File:HW Jeweled Sand Wand Icon.png|link=]]<br/>'''Jeweled Sand Wand''' | ||
| {{HW Element|Fire}} | |||
| 150 | | 150 | ||
| 165 | | 165 | ||
| Line 78: | Line 89: | ||
| 225 | | 225 | ||
|- | |- | ||
| [[File: | ! Lv.3 | ||
| | | [[File:HW Nice Sand Wand Icon.png|link=]]<br/>'''Nice Sand Wand''' | ||
| {{HW Element|Fire}} | |||
| 280 | | 280 | ||
| 308 | | 308 | ||
| Line 87: | Line 99: | ||
| 420 | | 420 | ||
|- | |- | ||
| [[File: | ! Lv.4 {{Exp Game|HWL, HWDE}} | ||
| [[File: | | [[File:HW Nice Sand Wand Icon.png|link=]]<br/>'''Nice Sand Wand +''' | ||
| {{HW Element|Fire}} | |||
| 500 | |||
| 550 | |||
| 600 | |||
| 650 | |||
| 700 | |||
| 750 | |||
|- | |||
! Lv.4+ {{Exp Game|HWDE}} | |||
| [[File:HW Nice Sand Wand Icon.png|link=]]<br/>'''Darkfire Nice Sand Wand''' | |||
| {{HW Element|Fire}}<br/>{{HW Element|Darkness}} | |||
| 500 | | 500 | ||
| 550 | | 550 | ||
| Line 97: | Line 120: | ||
|} | |} | ||
====Attack Combinations==== | |||
{| class="wikitable" style="text-align:center; width:100%;" | |||
== | |- | ||
!Attack Pattern | |||
!Effect | |||
|- | |||
| '''Y X X X''' | |||
| | |||
|- | |||
| | | '''Y Y X X X''' | ||
| | |||
| | |- | ||
| '''Y Y Y X X X''' | |||
| | |||
|- | |||
| | | '''Y Y Y Y X ''' | ||
| | |||
| | |} | ||
| | |||
| | |||
| | |||
| | |||
| | |||
| | |||
| | |||
| | |||
| | |||
| | |||
| | |||
=====Weak Point Smash===== | |||
{{Main|Critical Point#Hyrule Warriors}} | |||
Against an elite enemy, Toon Link strikes the foe by summoning a sand block from the ground beneath them, sending them into the air. He then summons another sand block over their head and slams them down to the ground. Against Giant Bosses, Toon Link raises a large sand block beneath them as an uppercut. He then jumps onto the Spirit Train as it falls from the sky and crashes into the monster's weak spot in a fiery blaze. | |||
=====Special Attack===== | |||
{{Main|Special Attack}} | |||
Toon Link calls the Spirit Train from a portal behind him and sends it crashing into the enemies in front of him. | |||
=====Focus Spirit===== | |||
{{Main|Focus Spirit}} | |||
| | Upon activation, Toon Link momentarily puts the Sand Wand away and gives his enemies a salute before drawing back the wand, bursting in energy as he does so. When deactivating, Toon Link conducts the Spirit Train with his wand to appear from warp portals and crash into his enemies three times; he jumps onto the Spirit Train as it comes in behind him during the finishing blow and strikes his enemies in a fiery blaze. When his Focus Spirit is depleted, the Spirit Train parks right by Toon Link's side and blows its whistle loudly as its conductor gives a yell, subsequently bursting in fiery energy. | ||
{{Noncanon|End}} | |||
==Nomenclature== | |||
{{Nomenclature}} | |||
==Gallery== | ==Gallery== | ||
<gallery> | <gallery> | ||
File:Sand Wand.png|{{Term|ST|Link}} obtaining the {{Term|ST|Sand Wand}} from {{ST|-}} | |||
File:Sand Wand.png|Link obtaining the Sand Wand | File:Sand Temple Quicksand Path.png|{{Term|ST|Link}} using the {{Term|ST|Sand Wand}} to make a path in the quicksand from {{ST|-}} | ||
File:Sand Temple Quicksand Path.png|Link using the Sand Wand to make a path in the | File:Sand Temple Puzzle.png|{{Term|ST|Link}} solving a puzzle with the {{Term|ST|Sand Wand}} from {{ST|-}} | ||
File:Sand Temple Puzzle.png|Link solving a puzzle with the Sand Wand | File:Sand Temple Block Push.png|{{Term|ST|Link}} pushing a heavy object with the {{Term|ST|Sand Wand}} from {{ST|-}} | ||
File:Sand Temple Block Push.png|Link pushing a heavy object with the Sand Wand | File:PH Sand Temple Spiketrap.png|{{Term|ST|Link}} keeping a rolling spike in place using the {{Term|ST|Sand Wand}} from {{ST|-}} | ||
File:Sand Temple | File:Ergtorok Stunned.png|{{Term|ST|Link}} trapping {{Plural|ST|Ergtorok}} with the {{Term|ST|Sand Wand}} from {{ST|-}} | ||
File:Ergtorok Stunned.png|Link trapping | File:Skeldritch Trapped.png|{{Term|ST|Link}} trapping {{Term|ST|Skeldritch}} with the {{Term|ST|Sand Wand}} from {{ST|-}} | ||
File:Skeldritch Trapped.png|Link trapping | File:ALBW Ravio Sand Rod Artwork.png|Ravio demonstrating the Sand Rod's use from {{ALBW|-}} | ||
File:ALBW Nice Sand Rod.png|The Nice Sand Rod | File:ALBW Rented Sand Rod Model.png|The {{Term|ALBW|Rented Sand Rod|link}} from {{ALBW|-}} | ||
File: | File:ALBW Rented Sand Rod Icon.png|The {{Term|ALBW|Rented Sand Rod}} icon from {{ALBW|-}} | ||
File:ALBW Nice Sand Rod Model.png|The {{Term|ALBW|Nice Sand Rod}} from {{ALBW|-}} | |||
File:ALBW Nice Sand Rod Icon.png|The {{Term|ALBW|Nice Sand Rod}} icon from {{ALBW|-}} | |||
File:HW Toon Link Sand Wand Render.png|Render of {{Term|HWDE|Toon Link}} wielding the {{Term|HWDE|Sand Wand}} from {{HW|-}} | |||
File:HWL Sand Rod Sprite.png|A {{Term|HWDE|Sand Rod}} {{Term|HWDE|Item Card}} from {{HWL|-}} | |||
File:HWDE Toon Link Darkfire Nice Sand Wand.png|{{Term|HWDE|Toon Link}} wielding the {{Term|HWDE|Darkfire Nice Sand Wand}} from {{HWDE|-}} | |||
File:HWDE Sand Rod Icon.png|A {{Term|HWDE|Sand Rod}} {{Term|HWDE|Item Card}} from {{HWDE|-}} | |||
</gallery> | </gallery> | ||
==See Also== | |||
* {{Term|Series|Darkfire Nice Sand Wand|link}} | |||
* {{Term|Series|Jeweled Sand Wand|link}} | |||
* {{Term|Series|Nice Sand Rod|link}} | |||
* {{Term|Series|Nice Sand Wand +|link}} | |||
* {{Term|Series|Rented Sand Rod|link}} | |||
{{Notes}} | |||
{{Ref}} | {{Ref}} | ||
{{ | {{Categories | ||
|Item Cards, Rods | |||
|items= ALBW, HWL, HWDE | |||
}} | |||
Latest revision as of 21:48, 16 January 2024
Sand Rods,(ALBW | HWL)[1][2] also known as Sand Wands,(ST | HW)[1][3] are recurring Items in The Legend of Zelda series. They allow the wielder to construct walls of Sand to act as barriers.
Location and Uses
Spirit Tracks
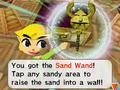
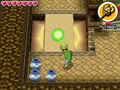
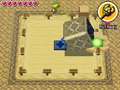
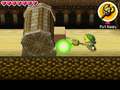
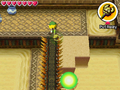
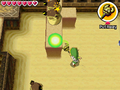
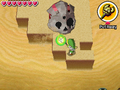
The Sand Wand is obtained after beating three Stalfos Warriors in the Sand Temple. It can raise walls wherever the green orb of the Sand Wand touches, which is controlled by the Stylus.[4] Each cube-shaped segment of the sand walls will stay intact for four seconds. Link can use it below his feet to raise himself to higher ground, as well as to roll boulders, flip puzzle blocks, trap certain enemies, find items hidden beneath sand, and allow Phantom Zelda to move across sand where she would normally sink. The Sand Wand's utility is also quicksand-proof, allowing the young hero to avoid sinking in deep-rooted sand. The Sand Wand is also extensively used to solve various block puzzles in the Ends of the Earth Station located in the Fire Realm.
A Link Between Worlds
In contrast with its incarnation from Spirit Tracks, the Sand Rod can only allow Link to make solid walls of sand rise in a straight line front of him. Additionally, Link cannot create sand beneath him. Consequently, the Sand Rod is useless on any other type of terrain, but invaluable on patches of sand. It is useful for creating passageways for Link to cross, both by walking on top of them and by merging with their sides; unearthing sand-dwelling enemies and stunning them; revealing buried Treasure Chests and hidden Maiamais; and elevating enemies. It is notably mandatory for both reaching and subsequently traversing the Desert Palace.
The Sand Rod can be obtained as soon as the Thieves' Hideout is cleared. The Rod was originally rented from Ravio by Osfala,[5] who intended to use it to traverse the Eastern Palace.[6] The Rod remained with him after he was turned into a painting by Yuga, until Link saved Osfala after traversing the Thieves' Hideout. Osfala returns the Sand Rod to Link, asking him to bring it back to Ravio's Shop.[7][8] From this point on, the young hero can rent it for 50 Rupees or buy the Sand Rod himself for 800 Rupees.[note 1]
If Link has bought the Sand Rod and has located 10 Lost Maiamais, Mother Maiamai can upgrade the Sand Rod to the Nice Sand Rod. Unlike the regular Sand Rod, the sand pillars from the Nice Sand Rod will not disappear over time. Instead, the Rod has to be used again in order to collapse them.
Other Appearances
Hyrule Warriors

In Hyrule Warriors, the Sand Wand is a class of Weapon used by Toon Link. It was added to Hyrule Warriors and Hyrule Warriors Legends with the Phantom Hourglass & Spirit Tracks Pack Downloadable Content and can be unlocked in the Grand Travels Map in Hyrule Warriors: Definitive Edition. It is associated with Fire. Toon Link can use it to summon sand pillars and the Spirit Train to attack enemies.
A variation known as the Sand Rod appears as an Item Card.
Variations
The default form of the Sand Wand is also named the Sand Wand. The second form is the Jeweled Sand Wand, taking its appearance from A Link Between Worlds. It is followed by the Nice Sand Wand, also from A Link Between Worlds. In Hyrule Warriors Legends and Hyrule Warriors: Definitive Edition, the Nice Sand Wand + can also be obtained. The Multi-Element Weapon, the Darkfire Nice Sand Wand, can only be obtained in Hyrule Warriors: Definitive Edition and is associated with Darkness as well as Fire.
| Weapon | Number of Stars | |||||||
|---|---|---|---|---|---|---|---|---|
| Tier | Icon | Element(s) | 0 | 1 | 2 | 3 | 4 | 5 |
| Lv.1 | Sand Wand |
80 | 88 | 96 | 104 | 112 | 120 | |
| Lv.2 | Jeweled Sand Wand |
150 | 165 | 180 | 195 | 210 | 225 | |
| Lv.3 | Nice Sand Wand |
280 | 308 | 336 | 364 | 392 | 420 | |
| Lv.4 (HWL | HWDE) | Nice Sand Wand + |
500 | 550 | 600 | 650 | 700 | 750 | |
| Lv.4+ (HWDE) | Darkfire Nice Sand Wand |
500 | 550 | 600 | 650 | 700 | 750 | |
Attack Combinations
| Attack Pattern | Effect |
|---|---|
| Y X X X | |
| Y Y X X X | |
| Y Y Y X X X | |
| Y Y Y Y X |
Weak Point Smash
Against an elite enemy, Toon Link strikes the foe by summoning a sand block from the ground beneath them, sending them into the air. He then summons another sand block over their head and slams them down to the ground. Against Giant Bosses, Toon Link raises a large sand block beneath them as an uppercut. He then jumps onto the Spirit Train as it falls from the sky and crashes into the monster's weak spot in a fiery blaze.
Special Attack
Toon Link calls the Spirit Train from a portal behind him and sends it crashing into the enemies in front of him.
Focus Spirit
Upon activation, Toon Link momentarily puts the Sand Wand away and gives his enemies a salute before drawing back the wand, bursting in energy as he does so. When deactivating, Toon Link conducts the Spirit Train with his wand to appear from warp portals and crash into his enemies three times; he jumps onto the Spirit Train as it comes in behind him during the finishing blow and strikes his enemies in a fiery blaze. When his Focus Spirit is depleted, the Spirit Train parks right by Toon Link's side and blows its whistle loudly as its conductor gives a yell, subsequently bursting in fiery energy.
Nomenclature
| Language | Names | Meanings |
|---|---|---|
Japanese | サンドロッド (Sando Roddo) (ALBW)[10] | Sand Rod |
FrenchCA | Baguette des sables (ALBW)[16] | |
FrenchEU | Baguette des sables (ALBW)[15] | |
German | Sandstab (ALBW | HWDE)[11][12] | Same as English. |
Italian | Bacchetta delle sabbie (ALBW)[9] | Sand wand |
Korean | 샌드 로드 (Saendeu Rodeu) (ALBW)[13] | |
SpanishLA | Báculo de las Arenas (ALBW)[14] | |
SpanishEU | Báculo de las Arenas (ALBW) | |
| This table was generated using translation pages. To request an addition, please contact a staff member with a reference. | ||
Gallery
-
Link obtaining the Sand Wand from Spirit Tracks
-
Link using the Sand Wand to make a path in the quicksand from Spirit Tracks
-
Link solving a puzzle with the Sand Wand from Spirit Tracks
-
Link pushing a heavy object with the Sand Wand from Spirit Tracks
-
Link keeping a rolling spike in place using the Sand Wand from Spirit Tracks
-
Link trapping Ergtoroks with the Sand Wand from Spirit Tracks
-
Link trapping Skeldritch with the Sand Wand from Spirit Tracks
-

Ravio demonstrating the Sand Rod's use from A Link Between Worlds
-

The Rented Sand Rod from A Link Between Worlds
-

The Rented Sand Rod icon from A Link Between Worlds
-

The Nice Sand Rod from A Link Between Worlds
-

The Nice Sand Rod icon from A Link Between Worlds
-

Render of Toon Link wielding the Sand Wand from Hyrule Warriors
-

A Sand Rod Item Card from Hyrule Warriors Legends
-

Toon Link wielding the Darkfire Nice Sand Wand from Hyrule Warriors: Definitive Edition
-

A Sand Rod Item Card from Hyrule Warriors: Definitive Edition


See Also
Notes
- ↑ If it is the first Item that Link purchases from Ravio's Shop, it will be discounted to 400 Rupees.
References
- ↑ 1.0 1.1 Encyclopedia, Dark Horse Books, pg. 137 (ST | ALBW)
- ↑ "Sand Rod: Adds Fire to recommended elements. Use on sand mounds to reveal treasure." — Tutorial (Hyrule Warriors: Definitive Edition)
- ↑ "Sand Wand" — Smithy (Hyrule Warriors: Definitive Edition)
- ↑ "You got the Sand Wand! Tap any sandy area to raise the sand into a wall!" — N/A (Spirit Tracks)
- ↑ "Someone else is already renting the Sand Rod. He rented it when I was in the village seeing if that was a good place to set up my shop. He was in such a rush that I didn’t get his name. Said he had important business somewhere. Anyway, I’ve got only one of each item, so you’ll have to wait for that item to come home to roost." — Ravio (A Link Between Worlds)
- ↑ "I even got myself a Sand Rod, so I’m more or less invincible. Bold talk, you might say, but it’s simply the truth. I’ll get to the bottom of all this Yuga nonsense. Now, farewell to you, Link." — Osfala (A Link Between Worlds)
- ↑ "Ah, and I suppose if you’re the hero, then you have more need of this Sand Rod than have I. I wish I could give it to you as a gift, but truth be told, it’s not mine. It belongs to a merchant named Ravio. I rented it, and the deal was that if I fell in battle… Well, never mind. I need to get it back to him, but I seem to be...stuck here." — Osfala (A Link Between Worlds)
- ↑ "You got the Sand Rod, but you’ll have to return it to Ravio. At least then you can find it at his shop!" — N/A (A Link Between Worlds)
- ↑ "Bacchetta delle sabbie
Nel deserto può creare una parete di sabbia che però scompare dopo un po'." — Inventory (A Link Between Worlds, Italian localization) - ↑ "サンドロッド
砂地で使えば大きな壁が出現!
ただし壁はしばらくたつと
消滅するので注意が必要!" — Inventory (A Link Between Worlds) - ↑ "Sandstab
Lässt Sand zu einer Wand aufsteigen, die aber nach kurzer Zeit wieder zerfällt!" — Inventory (A Link Between Worlds) - ↑ "Sandstab: Fügt Feuer als empfohlenes Element hinzu und macht an Sandhaufen Schätze sichtbar." — Tutorial (Hyrule Warriors: Definitive Edition)
- ↑ "샌드 로드
모래로 된 땅에서 사용하면
커다린 벽이 생긴다! 하지만 벽은
시간이 지나면 사라지므로 주의!" — Inventory (A Link Between Worlds) - ↑ "Báculo de las Arenas
Forma un muro con la arena que se halle cerca y que, tras un tiempo, desaparece." — Inventory (A Link Between Worlds) - ↑ "Baguette des sables
Grâce à elle, vous pouvez faire jaillir du sable un mur immense pour un moment !" — Inventory (A Link Between Worlds) - ↑ "Baguette des sables
Grâce à elle, vous pouvez faire jaillir du sable un mur immense pour un moment!" — Inventory (A Link Between Worlds)