Category:The Legend of Zelda Series articles with invalid or missing terms
The following articles use the {{Term}} template to call terms in The Legend of Zelda series that do not exist in the cargo table. This can be caused by either a typo causing an invalid term, which the solution would be fixing the typo, or by a term that has yet to be stored, which the solution is to store the term after a name reference is added.
All articles in this category are automatically added by the {{Term}} template and once the terms are fixed or stored, they will automatically be removed. This category is hidden from view in the mainspace.
Subcategories
This category has the following 2 subcategories, out of 2 total.
C
I
- Images of Northwest Gate (empty)
Pages in category "The Legend of Zelda Series articles with invalid or missing terms"
The following 200 pages are in this category, out of 469 total.
(previous page) (next page)A
B
C
D
E
F
G
H
L
M
- Madame Aroma
- Magic
- Magic Honey
- Main Theme / Underworld Theme
- Majora's Mask (Item)
- Malo Mart
- Manual
- Maple
- Marin and Tarin's House
- Mario & Zelda Big Band Live CD
- Mayor
- Milk
- Mini-Game
- Molduga Battle
- Monster Horn
- Moon, 1: Deku Flower Destination
- Moon, 2: Goron Dash Destination
- Moon, 3: Zora Swim Destination
- Mount (Disambiguation)
- Multi-Element Weapon
- Muokuij Lightroot
- Mutoh
- Mystery Island
N
O
P
R
Media in category "The Legend of Zelda Series articles with invalid or missing terms"
The following 200 files are in this category, out of 683 total.
(previous page) (next page)-
 ALBW Dark Ruins Region Maiamais.png 183 × 341; 40 KB
-
 ALBW Desert Region Maiamais.png 183 × 122; 16 KB
-
 ALBW Eastern Ruins Region Maiamais.png 183 × 184; 29 KB
-
 ALBW Graveyard Region Maiamais.png 157 × 108; 13 KB
-
 ALBW Hyrule Castle Region Maiamais.png 183 × 244; 39 KB
-
 ALBW Kakariko Village Region Maiamais.png 122 × 183; 26 KB
-
 ALBW Lake Hylia Region Maiamais.png 183 × 124; 20 KB
-
 ALBW Lorule Lake Region Maiamais.png 183 × 153; 23 KB
-
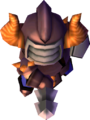 ALBW Lorule Soldier Model.png 381 × 507; 76 KB
-
 ALBW Lost Woods Region 1.png 400 × 240; 120 KB
-
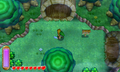 ALBW Lost Woods Region 2.png 400 × 240; 121 KB
-
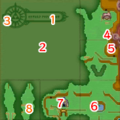 ALBW Lost Woods Region Maiamais.png 183 × 183; 25 KB
-
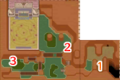 ALBW Misery Mire Region Maiamais.png 183 × 122; 15 KB
-
 ALBW Sanctuary & Zora's Domain Region Maiamais.png 305 × 183; 32 KB
-
 ALBW Southern Ruins Region Maiamais.png 122 × 122; 14 KB
-
 ALBW Thieves' Town & Lorule Castle Region Maiamais.png 305 × 305; 74 KB
-
 ALttP (Cagiva) Ariel Artwork.png 213 × 360; 46 KB
-
 ALttP Blue Sword Soldier Sprite 2.png 44 × 52; 3 KB
-
 An Original Version p105 panel 4.jpg 2,173 × 1,207; 1.11 MB
-
 An Original Version p215 panel 4.jpg 1,547 × 1,303; 897 KB
-
 An Original Version p53 panel 4.jpg 2,181 × 1,583; 1.51 MB
-
 An Original Version p79 panel 1.jpg 1,509 × 1,572; 1.22 MB
-
 Anoukis ST.png 256 × 192; 45 KB
-
 BotW Ability Controls.png 521 × 606; 174 KB
-
 BotW amiibo Icon.png 118 × 74; 14 KB
-
 BotW Ashai House Poster.png 449 × 564; 287 KB
-
 BotW Clam Chowder Icon.png 144 × 144; 24 KB
-
 BotW Collector's Box Ballpoint Pen.png 3,024 × 3,024; 4.29 MB
-
 BotW Collector's Box Journal.png 1,803 × 2,524; 5.42 MB
-
 BotW Collector's Box Messenger Bag.png 2,000 × 2,000; 2.5 MB
-
 BotW Collector's Box Pins.png 2,000 × 2,000; 1.36 MB
-
 BotW Collector's Box Sticker.png 1,497 × 857; 443 KB
-
 BotW Collector's Box Water Bottle.png 2,000 × 2,000; 673 KB
-
 BotW Daruk's Protection + Icon.png 85 × 82; 12 KB
-
 BotW Dragon Statue Dracozu River.jpg 1,280 × 720; 184 KB
-
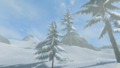 BotW Hebra Mountains.png 2,048 × 1,152; 1.96 MB
-
 BotW Hero's Path Mode.jpg 1,280 × 720; 393 KB
-
 BotW Lost Woods.png 1,280 × 720; 1.19 MB
-
 BotW Map Screen 100%.png 1,280 × 720; 1.62 MB
-
 BotW Mido Swamp.png 1,280 × 720; 537 KB
-
 BotW Mipha's Grace + Icon.png 87 × 96; 14 KB
-
 BotW Northwest Gate.png 1,920 × 1,080; 2.54 MB
-
 BotW Rebonae Bridge.png 1,280 × 720; 1.2 MB
-
 BotW River of the Dead Korok.png 1,920 × 1,080; 2.29 MB
-
 BotW Sasan Model.png 276 × 276; 75 KB
-
 BotW Serenne Stable.png 1,280 × 720; 934 KB
-
 BotW Strock Lake.png 1,280 × 672; 1.08 MB
-
 BotW The Royal White Stallion.png 626 × 352; 268 KB
-
 BotW Vah Medoh Divine Helm.png 1,920 × 1,080; 2.25 MB
-
 BotW Vah Naboris Divine Helm.png 1,920 × 1,080; 2.37 MB
-
 BotW Vah Rudania Divine Helm.png 1,920 × 1,080; 2.32 MB
-
 BotW Vah Ruta Divine Helm.png 1,920 × 1,080; 2.29 MB
-
 BotW Zonai Crest.png 504 × 504; 9 KB
-
 CannonSoldier.png 44 × 62; 3 KB
-
 CannonSoldierback.png 44 × 56; 3 KB
-
 CannonSoldierfire.png 42 × 114; 4 KB
-
 CannonSoldierside.png 56 × 48; 3 KB
-
 CoH Desert Wasteland.png 2,558 × 766; 1.3 MB
-
 CoH Dobongo Sprite.png 44 × 65; 4 KB
-
 CoH Frozen Grotto.png 1,662 × 960; 1.14 MB
-
 CoH Gerudo Arena Interior.png 895 × 720; 410 KB
-
 CoH Gerudo Village (Future).png 2,558 × 766; 1.66 MB
-
 CoH Green Rope Sprite.png 43 × 31; 1 KB
-
 CoH Hero's Medallion Sprite.png 24 × 24; 282 bytes
-
 CoH Lost Swamp.png 1,406 × 768; 1.21 MB
-
 CoH Maracas Sprite.png 27 × 23; 2 KB
-
 CoH Mask Swap Sprite.png 24 × 24; 444 bytes
-
 CoH Obtaining Hero's Medallion.png 1,280 × 720; 256 KB
-
 CoH Phasing Gel Sprite.png 20 × 16; 589 bytes
-
 CoH Phasing Zol Sprite.png 36 × 29; 906 bytes
-
 CoH Purple Poe Sprite.png 43 × 40; 3 KB
-
 CoH Purple Rope Sprite.png 43 × 31; 1 KB
-
 CoH Red Rope Sprite.png 43 × 31; 1 KB
-
 CoH Red Skull Moblin Sprite.png 39 × 39; 2 KB
-
 CoH Skull Electric Wizzrobe Sprite.png 35 × 40; 1 KB
-
 CoH Skull Moblin Sprite.png 39 × 39; 2 KB
-
 CoH Slash Sprite.png 24 × 22; 525 bytes
-
 CoH Titanium Infusion Sprite.png 16 × 22; 5 KB
-
 Count of Black Shadows p179.jpg 1,027 × 1,631; 1.01 MB
-
 Crest of the Rito.png 709 × 809; 14 KB
-
 Elrora.png 326 × 498; 180 KB
-
 EoW Coral Model.png 207 × 209; 44 KB
-
 EoW Flower Grass Model.png 147 × 128; 26 KB
-
 EoW Key Artwork 2.png 1,080 × 1,080; 1.61 MB
-
 EoW Key Artwork 3.png 750 × 1,050; 1.21 MB
-
 EoW Rift Promotional Screenshot 2.png 800 × 450; 136 KB
-
 EoW Rift Promotional Screenshot 3.png 1,920 × 1,080; 2.5 MB
-
 EoW Rift Promotional Screenshot 4.png 1,920 × 1,080; 2.29 MB
-
 EoW Rift Promotional Screenshot 5.png 1,920 × 1,080; 2.79 MB
-
 EoW Rift Promotional Screenshot.png 1,920 × 1,080; 2.26 MB
-
 EoW Tri Rod Promotional Screenshot 3.png 1,920 × 1,080; 2.13 MB
-
 EoW Tri Rod Promotional Screenshot 4.png 1,920 × 1,080; 2.15 MB
-
 EoW Tri Rod Promotional Screenshot 5.png 1,920 × 1,080; 2.18 MB
-
 EoW Tri Rod Promotional Screenshot 6.png 1,920 × 1,080; 2.14 MB
-
 EoW Water Block Promotional Screenshot.png 1,920 × 1,080; 852 KB
-
 EoW Water Block Render.png 207 × 249; 52 KB
-
 EoW Wind Gust Model.png 369 × 569; 202 KB
-
 FPTRR Destructor Axe Sprite.png 24 × 21; 715 bytes
-
 FPTRR Purple Mini Death Bug Sprite 2.png 64 × 60; 4 KB
-
 FPTRR Rupee Tower Concept Artwork.jpg 1,400 × 2,048; 413 KB
-
 FS Rupee Shard Icon.png 9 × 16; 180 bytes
-
 FSA Blue Sword Soldier.png 104 × 140; 9 KB
-
 FSA Green Soldier Sprite.png 52 × 70; 4 KB
-
 Guufo.png 438 × 811; 218 KB
-
 HOH Dunar Concept Art.png 704 × 911; 592 KB
-
 HOH Kori Concept Art.png 690 × 894; 400 KB
-
 HOH Krel Concept Art.png 719 × 939; 477 KB
-
 HOH Seriph Concept Art.png 701 × 908; 460 KB
-
 HW 8-Bit White Sword? Icon.png 179 × 119; 14 KB
-
 HW Bokoblin Summoner Icon.png 168 × 200; 31 KB
-
 HW Brown Cucco Icon.png 168 × 200; 13 KB
-
 HW Bulblin Summoner Icon.png 168 × 200; 31 KB
-
 HW Cia Dark Staff.png 573 × 754; 87 KB
-
 HW Cursed Shackle Render.png 148 × 145; 26 KB
-
 HW Demon Longsword Model.png 2,259 × 395; 429 KB
-
 HW Faron Spear Concept Artwork 2.png 454 × 1,873; 663 KB
-
 HW Faron Spear Concept Artwork.png 454 × 1,906; 611 KB
-
 HW Ghost Captain Icon.png 168 × 200; 34 KB
-
 HW Goron Summoner Icon.png 168 × 200; 27 KB
-
 HW Igneous Hammer Artwork.png 609 × 659; 335 KB
-
 HW Igneous Hammer Model.png 213 × 299; 96 KB
-
 HW Lana as Skull Kid Icon 2.png 168 × 200; 38 KB
-
 HW Lana as Skull Kid Icon 3.png 168 × 200; 38 KB
-
 HW Lana as Skull Kid Icon 4.png 168 × 200; 40 KB
-
 HW Lana as Skull Kid Icon 5.png 168 × 200; 34 KB
-
 HW Lana as Skull Kid Icon.png 168 × 200; 38 KB
-
 HW Lana as Skull Kid Mini Map Icon.png 44 × 44; 5 KB
-
 HW Link Trainee Tunic Icon 2.png 168 × 200; 34 KB
-
 HW Link Trainee Tunic Icon 3.png 168 × 200; 31 KB
-
 HW Link Trainee Tunic Icon 4.png 168 × 200; 36 KB
-
 HW Link Trainee Tunic Icon.png 168 × 200; 33 KB
-
 HW Link Trainee Tunic Mini Map Icon.png 44 × 44; 3 KB
-
 HW Linkle Render.png 1,807 × 3,874; 4.72 MB
-
 HW Scepter of Time Concept Artwork.png 264 × 1,527; 340 KB
-
 HW Silver Cucco Icon.png 168 × 200; 14 KB
-
 HW Stalchild Captain Icon.png 168 × 200; 29 KB
-
 HW Stalchild Summoner Icon.png 168 × 200; 33 KB
-
 HW Swords of Darkness Model.png 856 × 1,904; 1.04 MB
-
 HW Swords of Demise Model.png 664 × 1,886; 935 KB
-
 HW Swords of Despair Model.png 585 × 1,844; 604 KB
-
 HW Triforce Harp Model.png 1,873 × 2,065; 2.1 MB
-
 HW True Demon Blade Model.png 2,248 × 484; 425 KB
-
 HW Typhoon Harp Model.png 2,033 × 1,749; 1.42 MB
-
 HW Zant Swords.png 3,500 × 3,375; 6.26 MB
-
 HWAoC Ancient Part Menu Icon.png 64 × 64; 1 KB
-
 HWAoC Chest Menu Icon.png 64 × 64; 799 bytes
-
 HWAoC Critter Menu Icon.png 64 × 64; 1 KB
-
 HWAoC Eldin Region Map.png 967 × 1,401; 1.62 MB
-
 HWAoC Fairy Fountain Deep Snows.jpg 800 × 450; 60 KB
-
 HWAoC Fairy Fountain Desert Sands.jpg 800 × 450; 57 KB
-
 HWAoC Fairy Fountain Grassy Plains.jpg 400 × 225; 27 KB
-
 HWAoC Faron Region Map.png 2,325 × 894; 1.36 MB
-
 HWAoC Hair Width Trial Beginner.jpg 800 × 450; 64 KB
-
 HWAoC Head Menu Icon.png 64 × 64; 1 KB
-
 HWAoC Kochi Dye Shop.png 576 × 324; 271 KB
-
 HWAoC Leg Menu Icon.png 64 × 64; 613 bytes
-
 HWAoC Restore Original Color Menu Icon.png 100 × 100; 2 KB
-
 HWAoC Special Item Menu Icon.png 64 × 64; 864 bytes
-
 HWAoC Terrako Component Icon.png 200 × 200; 36 KB
-
 HWAoC Weak Point Smash.jpg 1,280 × 643; 182 KB
-
 HWAoC Weapon Icon.png 140 × 140; 3 KB
-
 HWDE 8-Bit Magical Rod? Icon.png 264 × 174; 22 KB
-
 HWDE Agitha, Princess of the Insect Kingdom Thumbnail.png 720 × 408; 246 KB
-
 HWDE Apothecary Thumbnail.png 720 × 408; 216 KB
-
 HWDE Assault Troops Thumbnail.png 720 × 408; 297 KB
-
 HWDE Awakening Bell Icon.png 264 × 174; 26 KB
-
 HWDE Badge Market Thumbnail.png 720 × 408; 166 KB
-
 HWDE Battle Score Thumbnail.png 720 × 408; 288 KB
-
 HWDE Battle-Information Screen Thumbnail.png 720 × 408; 61 KB
-
 HWDE Beetle I Icon.png 192 × 192; 37 KB
-
 HWDE Beetle II Icon.png 192 × 192; 36 KB
-
 HWDE Boss Attack Items Thumbnail.png 720 × 408; 316 KB
-
 HWDE Bug Net I Icon.png 192 × 192; 32 KB
-
 HWDE Bug Net II Icon.png 192 × 192; 30 KB
-
 HWDE Burning Breath Icon.png 300 × 300; 98 KB
-
 HWDE Burning Breath Thumbnail.png 720 × 408; 338 KB
-
 HWDE Captain Power and Engine Power Thumbnail.png 720 × 408; 50 KB
-
 HWDE Cia Crackling Scepter.png 770 × 432; 479 KB
-
 HWDE Classic Green Hood Icon 2.png 128 × 128; 5 KB
-
 HWDE Classic Green Hood Icon.png 512 × 512; 19 KB
-
 HWDE Dark Wizzro Icon.png 252 × 300; 54 KB
-
 HWDE Dark Yuga Icon.png 252 × 300; 35 KB
-
 HWDE Darkness Cost Down Icon.png 96 × 96; 10 KB
-
 HWDE Destination Icon Thumbnail.png 720 × 408; 94 KB
-
 HWDE Digging Mitts I Icon.png 192 × 192; 30 KB
-
 HWDE Digging Mitts II Icon.png 192 × 192; 28 KB
-
 HWDE Digging Mitts III Icon.png 192 × 192; 29 KB
-
 HWDE Din's Fire I Icon.png 192 × 192; 31 KB
-
 HWDE Din's Fire III Icon.png 192 × 192; 31 KB
-
 HWDE Din's Harp Icon.png 264 × 174; 22 KB
-
 HWDE Dining Room Thumbnail.png 720 × 408; 263 KB
-
 HWDE Empty Bottle I Icon.png 192 × 192; 26 KB
-
 HWDE Empty Bottle III Icon.png 192 × 192; 26 KB
-
 HWDE Endless Night Rules Thumbnail.png 720 × 408; 48 KB
-
 HWDE Enemy Icon Thumbnail.png 720 × 408; 106 KB
-
 HWDE Fairy Clothing Thumbnail.png 720 × 408; 289 KB
-
 HWDE Fairy Effects Thumbnail.png 720 × 408; 316 KB
-
 HWDE Fairy Skills Thumbnail.png 720 × 408; 309 KB
-
 HWDE Faron Spear Icon.png 264 × 174; 27 KB
-
 HWDE Farore's Wind I Icon.png 192 × 192; 33 KB


_Ariel_Artwork.png)


.png)