Mountain Passage
The Mountain Passage is a location in Phantom Hourglass.[1]
Features and Overview


Situated in Mercay Island, the Mountain Passage is a small Cave that consists of two floors infested with basic Enemies. It offers a few basic puzzles that Link will encounter throughout the rest of his journey, such as pulling Lever Switches in a certain order, marking notes on the Map,[2] and obtaining Small Keys from Monsters.
After the bridge connecting the west and east sides of Mercay Island is broken in an earthquake, Link is required to go through the Mountain Passage to reach Mercay Village.[3] To get to the Passage, Link must go through a small path northwest of Oshus's House. Once the young hero successfully clears the Passage, he will exit right above the Mercay Tavern. Since the bridge eventually gets fixed, the Mountain Passage becomes unnecessary to access the east side of the Island.
The first floor of the Mountain Passage is divided into two segments, with each containing a Locked Door preventing Link from advancing. The first segment is a simple pathway blocked by Boulders. This pathway ends at a raised floor bearing a Treasure Chest. By taking the Small Key from this Treasure Chest and unlocking the Locked Door, Link can enter the second segment. The second segment features three chambers divided by movable Blocks. Along the far wall of the central chamber, there are four Lever Switches and a Stone Tablet with a vague warning of consequences if they are not pulled in the correct order.[4] A second Stone Tablet to the left offers advice on how to move the Blocks.[5] In the western chamber, there is a single Stone Tablet that says the first Lever Switch to be pulled must be the second from the left.[6] The eastern chamber houses another Stone Tablet and a Treasure Chest. This Stone Tablet clarifies that the second Lever Switch must be the first on the left, and the last one to be pulled must be the second from the right.[7] Thus the order that these must be pulled is as follows:
| First Lever Switch | Pulled second |
|---|---|
| Second Lever Switch | Pulled first |
| Third Lever Switch | Pulled last |
| Fourth Lever Switch | Pulled third |
| First Lever Switch | Second Lever Switch | Third Lever Switch | Fourth Lever Switch |
|---|---|---|---|
Pulled second | Pulled first | Pulled last | Pulled third |
If Link fails to solve the puzzle correctly, Ropes will descend from the ceiling as punishment. However, if it is completed successfully, a Small Key will fall instead. Link will then be able to unlock the Locked Door to the second floor.
The second floor is also divided into two segments, though it only contains one Locked Door. The first segment branches into two dead ends that are infested with Rats. A single Rat with a Small Key runs in a circle through a small tunnel connecting the dead ends. By moving a Block at the far end of this area, Link can block the tunnel and trap the Rat, allowing him to collect the Small Key and move into the end of the Mountain Passage. Beyond this Locked Door there is a simple curved passage that is populated with Boulders and leads out into Mercay Village.
Enemies


- ↑ One does not reappear.
- ↑ Five only spawn if the Lever Switches are pulled in the wrong order.
Treasure Chests
| Treasure Chest | |
|---|---|
| Contents | |
| Notes | On the platform east of the first Locked Door |
| Treasure Chest | |
| Contents | |
| Notes | In the eastern room beyond the first Locked Door |

| Treasure Chest | Contents | Notes |
|---|---|---|
On the platform east of the first Locked Door | ||
In the eastern room beyond the first Locked Door |
Nomenclature
| Language | Names | |
|---|---|---|
| This table was generated using translation pages. To request an addition, please contact a staff member with a reference. | ||
Gallery
-
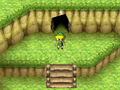
The Mercay Village entrance to the Mountain Passage

See Also
References
- ↑ "Mountain Passage" — Game Screen (Phantom Hourglass)
- ↑ "Pulling four levers... Where might those be, I wonder... Well, I bet this hint will come in handy! How about we write it on our map? To do that, tap the Map icon, then scribble to your heart's content! Or just press down on the +Control Pad or the B Button. Yay, shortcuts!" — Ciela (Phantom Hourglass)
- ↑ "Oh, heavens! That quake just broke the bridge again! So many quakes lately, and the bridge breaks every time there's a big one! There's a second way to get to town, fortunately. Unfortunately, it leads through a frightening cave full of monsters. What to do? Well, wait for the bridge to be fixed, of course!" — Saya (Phantom Hourglass)
- ↑ "Pull the four levers in the correct order. Or else." — Stone Tablet (Phantom Hourglass)
- ↑ "Tap a block to grab it. Then tap the arrows that appear to move it." — Stone Tablet (Phantom Hourglass)
- ↑ "When pulling the levers:
First: 2nd from the left." — Stone Tablet (Phantom Hourglass) - ↑ "When pulling the levers:
Second: 1st on the left.
Last: 2nd from the right." — Stone Tablet (Phantom Hourglass)