Nintendo Gallery: Difference between revisions
PhantomCaleb (talk | contribs) (→The Wind Waker HD: forgot something) |
Htwretched (talk | contribs) (Images) |
||
| (94 intermediate revisions by 36 users not shown) | |||
| Line 1: | Line 1: | ||
[[ | {{Hatnote|This article is about the location in {{TWW}}. For other articles, see [[Gallery (Disambiguation)]].}} | ||
{{Infobox Location | |||
The | |image= | ||
{{Media | |||
|Screenshot TWW= File:TWW Nintendo Gallery.png | |||
|Screenshot TWWHD= File:TWWHD Nintendo Gallery.png | |||
}} | |||
|caption= | |||
|pronunciation= | |||
|game= TWW | |||
|other= | |||
|inhab= {{List|{{Term|TWWHD|Carlov|link}}, {{Term|TWWHD|Manny (The Wind Waker)|link}}}} | |||
|items= | |||
|season= | |||
|temperature= | |||
|theme= | |||
|related= {{Term|TMC|Figurine Gallery|link}} | |||
}} | |||
The {{Term/Store|Nintendo Gallery||Series, TWW, TWWHD}} is a location in {{TWW}}. | |||
==Features== | ==Features and Overview== | ||
The Gallery is located | The Nintendo Gallery is located inside a tall, cylindrical island near the [[Forest Haven]]. Its hatch door can be opened by hitting a [[Switch]] in a tiny alcove on the main island with a [[Seagull]] controlled via [[Hyoi Pear]]. The Gallery is run by [[Carlov]], who will carve a Figurine of nearly every Enemy and Character in the game. After the entrance to the Nintendo Gallery is opened, {{Term|TWWHD|Manny (The Wind Waker)|link}}, who is seen outside of the Gallery before it is opened, will appear next to the main desk, and sometimes inside the rooms looking at the Figurines. To request a Figurine, [[Link]] must show him a color [[Pictograph]] of the subject. Carlov will only accept Pictographs which display a significant amount of the subject's body and which show the subject facing the [[Picto Box]]. After Carlov approves the Pictograph, he will complete the requested Figurine in a day. Link can use the "[[Song of Passing]]" to advance time and speed up this process. Certain characters, such as the [[Fairy Queen]], cannot be Pictographed, so Link can purchase [[Legendary Pictograph]]s of them from [[Lenzo]] on [[Windfall Island]]. | ||
Some Characters and Bosses are encountered only one time, making it possible to leave the Nintendo Gallery [[Permanently Missable Items|incomplete]]. However, it can be completed during a [[Second Quest]], where the [[Deluxe Picto Box]] is available from the beginning and all the Figurines from the previous playthrough are carried over. It is possible to complete the Nintendo Gallery on the first playthrough, as Carlov will accept the Pictograph of the [[Gohma]] rematch in [[Ganon's Castle]]. This is the only Pictograph missed before the Deluxe Picto Box can be obtained. | |||
{{ | In {{TWWHD}}, the Picto Box can hold 12 Pictographs instead of three, plus a golden Carlov icon will appear on a Pictograph that can be used to make a Figurine. Also, Carlov can now make up to 12 Figurines per day, as opposed to only one. As the Deluxe Picto Box is obtained much earlier, it is also possible to take Pictographs of characters and enemies sooner than previously; such as Gohma's, thus eliminating the need to take its Pictograph at Ganon's Castle. Additionally, Pictographs found in a [[Tingle Bottle]] can be saved into the Picto Box, making it possible to obtain Figurines of subjects that were previously missed. The [[Knuckle]] Figurine is also needed to complete the Gallery, unlike the original game.<ref>{{Cite|Supposedly, it used to bother him that this collection was considered complete, even without his figurine.|Figurine|TWWHD}}</ref> | ||
===Rooms=== | |||
The Figurines of the Nintendo Gallery are placed in seven themed rooms located in a ring around the center of the gallery. Going clockwise from Carlov's counter, these rooms are: | |||
{{Term List|TWWHD|listType= bullet|link=| | |||
Forest Haven Room, | |||
Dragon Roost Island Room, | |||
Dungeon Room, | |||
Forsaken Fortress Room, | |||
Outset Island Room, | |||
Windfall Island Room, | |||
Ocean Room | |||
}} | |||
Around the door to each room is a wallpaper that reflects the room's theme. For example, the {{Term|TWWHD|Dungeon Room|link}} wallpaper is based on the first room in {{Term|TWWHD|Dragon Roost Cavern|link}}. The same wallpaper design lines the walls inside each room. | |||
In each room, a note is pinned on the wall to the left of the door walking in. It gives instructions on how to view figurines. | |||
== | <section begin="wall-note"/>{{Collapsible | ||
{{ | |header= Wall Note | ||
|collapse= {{#ifeq:{{PAGENAME}}|Nintendo Gallery|false|true}} | |||
|frame= true | |||
|content= | |||
Viewing your favorite {{Color|TWW Red|figurines}}: | |||
<br/>{{Icon|TWW Control Stick Up Animation}}{{Icon|TWW Control Stick Down Animation}} Move Up and Down | |||
<br/>{{Icon|TWW Control Stick Left Animation}}{{Icon|TWW Control Stick Right Animation}} Rotate | |||
<br/>{{Icon|TWW C-Stick}} Zoom by Tilting Up and Down | |||
<br/>{{Icon|TWW A}} View Explanation | |||
<br/>{{Icon|TWW B}} Quit | |||
Talk about simple! | |||
}}<section end="wall-note"/> | |||
' | ==Trivia== | ||
{{*}} | *{{Term|TWWHD|Carlov}} sculpts his {{Plural|TWWHD|Figurine}} out of a uniquely-colored material called "rainbow stone", which is not encountered anywhere else.<ref>{{Cite|You can make figurines out of many different materials, but I carve mine from {{Color|TWW Vermilion|rainbow stone}}—it's a special type of rock whose colors defy description. Rainbow stone is a very precious material, and it can only be found around here!|Carlov|TWW}}</ref> | ||
*The {{Plural|TWWHD|Figurine}} on display in the {{Term|TWWHD|Nintendo Gallery}} are seen with full shading, in contrast to the cel-shaded graphics in the rest of {{TWW|-}}. In {{TWWHD|-}}, the {{Plural|TWWHD|Figurine}} are given a shiny surface making them resemble smooth clay models. | |||
*Several of the available {{Plural|TWWHD|Figurine}} would be implausible as actual sculptures, as they contain floating or translucent elements. Among these is the {{Term|TWWHD|Fairy Queen|link}} {{Term|TWWHD|Figurine}}, which gradually changes color. | |||
*It is impossible to get a {{Term|TWWHD|Figurine}} of a {{Term|TWWHD|Beamos|link}}. If {{Term|TWWHD|Link}} brings in a successful {{Term|TWWHD|Pictograph}} of one, the resulting {{Term|TWWHD|Figurine}} will be an {{Term|TWWHD|Armos|link}}. | |||
*It is possible to get {{Plural|TWWHD|Pictograph}} of {{Term|TWWHD|Ganondorf}} and {{Term|TWWHD|Princess Zelda}} during the final battle and have them made into {{Plural|TWWHD|Figurine}} without the need of a {{Term|TWWHD|Legendary Pictograph}}. | |||
*{{Term|TWWHD|Carlov}} states that he only accepts {{Plural|TWWHD|Pictograph}} that are in full color. However, he will accept a {{Term|TWWHD|Pictograph}} of any of the {{Plural|TWWHD|Boss|link}} if taken during the rematches against them in {{Term|TWWHD|Ganon's Castle|link}}, even though the {{Term|TWWHD|Boss}} battles are reduced entirely to monochrome in these instances. This is the only way to obtain {{Term|TWWHD|Gohma|link}}'s {{Term|TWWHD|Figurine}} during the First Quest in {{TWW|-}}. | |||
*Several {{TLoZ|Series}} Easter eggs can be found on and behind {{Term|TWWHD|Carlov}}'s desk. These include the {{Term|MM3D|Bunny Hood|link}}, {{Term|MM3D|All-Night Mask|link}}, {{Term|MM3D|Goron Mask|link}}, {{Term|MM3D|Keaton Mask|link}}, one of {{Term|MM3D|Tijo|link}}'s drums, several {{Plural|Series|Bottle|link|display=Bottles}} of {{Term|Series|Lon Lon Milk|link}}, and a {{Term|Series|Cucco|link}}. Some unobtainable {{Plural|TWWHD|Figurine}} can also be seen, such as {{Term|TWWHD|Tetra's Ship|link}}, a {{Term|TWWHD|Submarine|link}}, the {{Term|TWWHD|Salvage Corp|link}}'s boat, a scale model of the windmill and lighthouse on {{Term|TWWHD|Windfall Island|link}}, and both forms of the {{Term|TWWHD|Nayru (Goddess)|link}} statue on {{Term|TWWHD|Southern Triangle Island|link}}. | |||
== | ==Nomenclature== | ||
In the Japanese version, the Gallery is named {{Romanize|ニテン堂|Nitendō}}.<ref>{{Cite Book|book= E |lang= ja |page= 257}}</ref> It may be a pun with {{Romanize|似ている|Niteiru|looking like|2}}, the Figurine's noticeable accuracy. Several localizations translate it as the "Minitendo Gallery" to recreate the similarity between the Gallery's name and Nintendo. | |||
{| | {{Nomenclature}} | ||
| | |||
| | |||
{ | |||
== | ==Gallery== | ||
<gallery> | |||
{| | File:TWW Nintendo Gallery Exterior.png|The island containing the {{Term|TWWHD|Nintendo Gallery}} | ||
| | File:TWW Nintendo Gallery Entrance.png|The {{Term|TWWHD|Nintendo Gallery}}'s entrance hatch | ||
File:TWW Nintendo Gallery Carlov.png|Carlov inside the Nintendo Gallery | |||
File:TWW Nintendo Gallery Behind Counter.png|Behind the counter at the {{Term|TWWHD|Nintendo Gallery}} | |||
File:TWW Nintendo Gallery Behind Counter 2.png|Behind the counter at the {{Term|TWWHD|Nintendo Gallery}} | |||
File:TWW Nintendo Gallery Behind Counter 3.png|Behind the counter at the {{Term|TWWHD|Nintendo Gallery}} | |||
File:TWW Forest Haven Room Exterior.png|The door to the {{Term|TWWHD|Forest Haven Room|link}} | |||
File:TWW Dragon Roost Island Room Exterior.png|The door to the {{Term|TWWHD|Dragon Roost Island Room|link}} | |||
File:TWW Dungeon Room Exterior.png|The door to the {{Term|TWWHD|Dungeon Room|link}} | |||
File:TWW Forsaken Fortress Room Exterior.png|The door to the {{Term|TWWHD|Forsaken Fortress Room|link}} | |||
File:TWW Outset Island Room Exterior.png|The door to the {{Term|TWWHD|Outset Island Room|link}} | |||
File:TWW Windfall Island Room Exterior.png|The door to the {{Term|TWWHD|Windfall Island Room|link}} | |||
File:TWW Ocean Room Exterior.png|The door to the {{Term|TWWHD|Ocean Room|link}} | |||
| | </gallery> | ||
|} | |||
=== | ==See Also== | ||
* [[Figurines in The Wind Waker]] | |||
* {{Term|TMC|Figurine Gallery|link}} | |||
*[[ | |||
* | |||
| | |||
{{Ref}} | {{Ref}} | ||
{{Nintendo Gallery}} | |||
{{ | {{Categories | ||
| | |Great Sea | ||
| | |locations= TWW, TWWHD | ||
| | |side-quests= TWW, TWWHD | ||
}} | |||
Latest revision as of 01:34, 21 April 2024
The Nintendo Gallery is a location in The Wind Waker.
Features and Overview
The Nintendo Gallery is located inside a tall, cylindrical island near the Forest Haven. Its hatch door can be opened by hitting a Switch in a tiny alcove on the main island with a Seagull controlled via Hyoi Pear. The Gallery is run by Carlov, who will carve a Figurine of nearly every Enemy and Character in the game. After the entrance to the Nintendo Gallery is opened, Manny, who is seen outside of the Gallery before it is opened, will appear next to the main desk, and sometimes inside the rooms looking at the Figurines. To request a Figurine, Link must show him a color Pictograph of the subject. Carlov will only accept Pictographs which display a significant amount of the subject's body and which show the subject facing the Picto Box. After Carlov approves the Pictograph, he will complete the requested Figurine in a day. Link can use the "Song of Passing" to advance time and speed up this process. Certain characters, such as the Fairy Queen, cannot be Pictographed, so Link can purchase Legendary Pictographs of them from Lenzo on Windfall Island.
Some Characters and Bosses are encountered only one time, making it possible to leave the Nintendo Gallery incomplete. However, it can be completed during a Second Quest, where the Deluxe Picto Box is available from the beginning and all the Figurines from the previous playthrough are carried over. It is possible to complete the Nintendo Gallery on the first playthrough, as Carlov will accept the Pictograph of the Gohma rematch in Ganon's Castle. This is the only Pictograph missed before the Deluxe Picto Box can be obtained.
In The Wind Waker HD, the Picto Box can hold 12 Pictographs instead of three, plus a golden Carlov icon will appear on a Pictograph that can be used to make a Figurine. Also, Carlov can now make up to 12 Figurines per day, as opposed to only one. As the Deluxe Picto Box is obtained much earlier, it is also possible to take Pictographs of characters and enemies sooner than previously; such as Gohma's, thus eliminating the need to take its Pictograph at Ganon's Castle. Additionally, Pictographs found in a Tingle Bottle can be saved into the Picto Box, making it possible to obtain Figurines of subjects that were previously missed. The Knuckle Figurine is also needed to complete the Gallery, unlike the original game.[1]
Rooms
The Figurines of the Nintendo Gallery are placed in seven themed rooms located in a ring around the center of the gallery. Going clockwise from Carlov's counter, these rooms are:
- Forest Haven Room
- Dragon Roost Island Room
- Dungeon Room
- Forsaken Fortress Room
- Outset Island Room
- Windfall Island Room
- Ocean Room
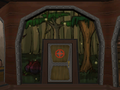
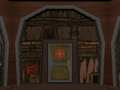
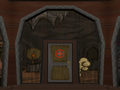
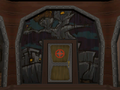
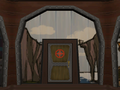
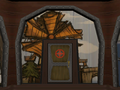
Around the door to each room is a wallpaper that reflects the room's theme. For example, the Dungeon Room wallpaper is based on the first room in Dragon Roost Cavern. The same wallpaper design lines the walls inside each room.
In each room, a note is pinned on the wall to the left of the door walking in. It gives instructions on how to view figurines.
Viewing your favorite figurines:
![]()
![]() Move Up and Down
Move Up and Down
![]()
![]() Rotate
Rotate
![]() Zoom by Tilting Up and Down
Zoom by Tilting Up and Down
![]() View Explanation
View Explanation
![]() Quit
Quit
Trivia
- Carlov sculpts his Figurines out of a uniquely-colored material called "rainbow stone", which is not encountered anywhere else.[2]
- The Figurines on display in the Nintendo Gallery are seen with full shading, in contrast to the cel-shaded graphics in the rest of The Wind Waker. In The Wind Waker HD, the Figurines are given a shiny surface making them resemble smooth clay models.
- Several of the available Figurines would be implausible as actual sculptures, as they contain floating or translucent elements. Among these is the Queen of the Fairies Figurine, which gradually changes color.
- It is impossible to get a Figurine of a Beamos. If Link brings in a successful Pictograph of one, the resulting Figurine will be an Armos.
- It is possible to get Pictographs of Ganondorf and Princess Zelda during the final battle and have them made into Figurines without the need of a Legendary Pictograph.
- Carlov states that he only accepts Pictographs that are in full color. However, he will accept a Pictograph of any of the Bosses if taken during the rematches against them in Ganon's Castle, even though the Boss battles are reduced entirely to monochrome in these instances. This is the only way to obtain Gohma's Figurine during the First Quest in The Wind Waker.
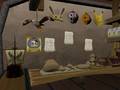
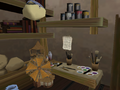
- Several The Legend of Zelda series Easter eggs can be found on and behind Carlov's desk. These include the Bunny Hood, All-Night Mask, Goron Mask, Keaton Mask, one of Tijo's drums, several Bottles of Milk, and a Cucco. Some unobtainable Figurines can also be seen, such as Tetra's Ship, a Submarine, the Salvage Corp.'s boat, a scale model of the windmill and lighthouse on Windfall Island, and both forms of the Nayru statue on Southern Triangle Island.
Nomenclature
In the Japanese version, the Gallery is named ニテン堂 (Nitendō).[3] It may be a pun with 似ている (looking like), the Figurine's noticeable accuracy. Several localizations translate it as the "Minitendo Gallery" to recreate the similarity between the Gallery's name and Nintendo.
| Language | Names | Meanings |
|---|---|---|
Japanese | ニテン堂ギャラリー (Niten-dō Gyararī) (TWW)[5] | |
FrenchEU | Galerie des Figurines Tendo (TWW)[7] | |
German | Minitendo Galerie (TWW)[6] | |
Italian | Galleria Minitendo (TWW)[4] | Minitendo Gallery; portmanteau of miniatura (miniature) and Nintendo |
SpanishEU | Club Minitendo (TWW)[8] | |
| This table was generated using translation pages. To request an addition, please contact a staff member with a reference. | ||
Gallery
-
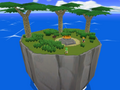
The island containing the Nintendo Gallery
-
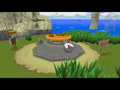
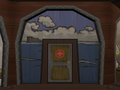
The Nintendo Gallery's entrance hatch
-
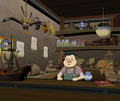
Carlov inside the Nintendo Gallery
-
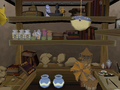
Behind the counter at the Nintendo Gallery
-
Behind the counter at the Nintendo Gallery
-
Behind the counter at the Nintendo Gallery
-
The door to the Forest Haven Room
-
The door to the Dragon Roost Island Room
-
The door to the Dungeon Room
-
The door to the Forsaken Fortress Room
-
The door to the Outset Island Room
-
The door to the Windfall Island Room
-
The door to the Ocean Room


See Also
References
- ↑ "Supposedly, it used to bother him that this collection was considered complete, even without his figurine." — Figurine (The Wind Waker HD)
- ↑ "You can make figurines out of many different materials, but I carve mine from rainbow stone—it's a special type of rock whose colors defy description. Rainbow stone is a very precious material, and it can only be found around here!" — Carlov (The Wind Waker)
- ↑ Hyrule Encyclopedia, Tokuma Shoten Publishing Co., Ltd., pg. 257
- ↑ "SALONE della MINIATURA
GALLERIA MINITENDO
Ingresso consentito solo ai soci." — Sign (The Wind Waker, Italian localization) - ↑ "フィギュアの殿堂
ニテン堂ギャラリー
(会員以外の方は入室お断り)" — Sign (The Wind Waker) - ↑ "Figuren-Paradies
Minitendo Galerie
(Nicht-Mitgliedern ist der Zutritt untersagt!)" — Sign (The Wind Waker) - ↑ "Palais des Figurines
Galerie des Figurines Tendo
Accès interdit à toute personne étrangère au service.)" — Sign (The Wind Waker) - ↑ "CLUB MINITENDO
La meca de las figurillas
Sólo socios" — Sign (The Wind Waker)