Temple of Souls: Difference between revisions
MannedTooth (talk | contribs) |
m (→Gallery) |
||
| (6 intermediate revisions by 5 users not shown) | |||
| Line 1: | Line 1: | ||
{{HW Stage | {{Infobox HW Stage | ||
|image= File:HW Temple of Souls.png | |image= | ||
{{Media | |||
|Screenshot HW= File:HW Temple of Souls.png | |||
|Screenshot HWL= File:HWL Temple of Souls.png | |||
|Screenshot HWDE= File:HWDE Temple of Souls.png | |||
}} | |||
|theme= "{{Term|HWDE|Psychostorm|link}}" | |theme= "{{Term|HWDE|Psychostorm|link}}" | ||
|scenario 1= A War of Spirit | |scenario 1= A War of Spirit | ||
|characters 1= [[Link]]<br>[[Impa]]<br>[[Sheik]]<br>[[Lana]]<br>[[Princess Zelda|Zelda]]<br>[[Darunia]]<br>[[Fi]] | |characters 1= [[Link]]<br/>[[Impa]]<br/>[[Sheik]]<br/>[[Lana]]<br/>[[Princess Zelda|Zelda]]<br/>[[Darunia]]<br/>[[Fi]] | ||
|mini-boss 1= [[Dark Link]]s | |mini-boss 1= [[Dark Link]]s | ||
|boss 1= [[Ganondorf]] | |boss 1= [[Ganondorf]] | ||
| Line 27: | Line 32: | ||
==Features and Overview== | ==Features and Overview== | ||
The Temple of Souls is a palace with twisted corridors and large rose gardens. Its exterior features statues of [[Link]] as a child playing the {{ | The Temple of Souls is a palace with twisted corridors and large rose gardens. Its exterior features statues of [[Link]] as a child playing the {{Term|OoT3D|Ocarina of Time (Item)|link}}, Link holding the [[Master Sword]] skyward, and [[Wolf Link]]. These statues represent the heroes from {{OoT}} and {{MM}}, {{SS}}, and {{TP}}, respectively. [[Cia]]'s chamber, the Sorceress's Room, also features many portraits of Link as well. These depictions of Link are Cia's devotions to him, emphasizing her obsession over him. | ||
===Areas=== | |||
{{Gallery List|Locations | |||
|HW= East Magic Keep, Magic Keep, NE Magic Keep, NW Magic Keep, SE Magic Keep, Sorceress's Room, South Garden, SW Magic Keep, West Garden, West Magic Keep | |||
}} | |||
==Scenarios== | ==Scenarios== | ||
| Line 47: | Line 57: | ||
!width="33%"| Ganondorf's Forces | !width="33%"| Ganondorf's Forces | ||
|- | |- | ||
| [[File:HWDE Goron Mini Map Icon.png]]<br>'''[[Goron]]s''' | | [[File:HWDE Goron Mini Map Icon.png]]<br/>'''[[Goron]]s''' | ||
| [[File:HWDE Beamos Mini Map Icon.png]]<br>'''[[Beamos]]''' | | [[File:HWDE Beamos Mini Map Icon.png]]<br/>'''[[Beamos]]''' | ||
| [[File:HWDE Shield Moblin Mini Map Icon.png]]<br>'''[[Shield Moblin]]s''' | | [[File:HWDE Shield Moblin Mini Map Icon.png]]<br/>'''[[Shield Moblin]]s''' | ||
|- | |- | ||
| [[File:HWDE Goron Captain Mini Map Icon.png]]<br>'''[[Goron Captain]]s''' | | [[File:HWDE Goron Captain Mini Map Icon.png]]<br/>'''[[Goron Captain]]s''' | ||
| '''[[Bulblin]]s''' | | '''[[Bulblin]]s''' | ||
| '''[[Stalchild]]ren''' | | '''[[Stalchild]]ren''' | ||
|- | |- | ||
|style="background-color:#0c2236" rowspan="2"| | |style="background-color:#0c2236" rowspan="2"| | ||
| [[File:HWDE Bulblin Captain Mini Map Icon.png]]<br>'''[[Bulblin Captain]]s''' | | [[File:HWDE Bulblin Captain Mini Map Icon.png]]<br/>'''[[Bulblin Captain]]s''' | ||
| [[File:HWDE Stalchild Captain Mini Map Icon.png]]<br>'''[[Stalchild Captain]]s''' | | [[File:HWDE Stalchild Captain Mini Map Icon.png]]<br/>'''[[Stalchild Captain]]s''' | ||
|- | |- | ||
| [[File:HWDE ReDead Knight Mini Map Icon.png]]<br>'''[[ReDead Knight]]s''' | | [[File:HWDE ReDead Knight Mini Map Icon.png]]<br/>'''[[ReDead Knight]]s''' | ||
|style="background-color:#0c2236"| | |style="background-color:#0c2236"| | ||
|- | |- | ||
!colspan="3"| Commanders | !colspan="3"| Commanders | ||
|- | |- | ||
|style="background-color:#17456e"| [[File:HWDE Zelda Mini Map Icon.png]]<br>'''[[Princess Zelda|Zelda]]''' | |style="background-color:#17456e"| [[File:HWDE Zelda Mini Map Icon.png]]<br/>'''[[Princess Zelda|Zelda]]''' | ||
|style="background-color:#17456e"| [[File:HWDE Cia Mini Map Icon.png]]<br>'''[[Cia]]''' | |style="background-color:#17456e"| [[File:HWDE Cia Mini Map Icon.png]]<br/>'''[[Cia]]''' | ||
|style="background-color:#17456e"| [[File:HWDE Ganondorf Mini Map Icon.png]]<br>'''[[Ganondorf]]''' | |style="background-color:#17456e"| [[File:HWDE Ganondorf Mini Map Icon.png]]<br/>'''[[Ganondorf]]''' | ||
|- | |- | ||
|style="background-color:#163d5f"| [[File:HWDE Link Mini Map Icon.png]]<br>'''[[Link]]''' | |style="background-color:#163d5f"| [[File:HWDE Link Mini Map Icon.png]]<br/>'''[[Link]]''' | ||
|style="background-color:#163d5f"| [[File:HWDE Dark Link Mini Map Icon.png]]<br>'''[[Dark Link]]s''' | |style="background-color:#163d5f"| [[File:HWDE Dark Link Mini Map Icon.png]]<br/>'''[[Dark Link]]s''' | ||
|style="background-color:#0c2236" rowspan="6"| | |style="background-color:#0c2236" rowspan="6"| | ||
|- | |- | ||
|style="background-color:#17456e"| [[File:HWDE Impa Mini Map Icon.png]]<br>'''[[Impa]]''' | |style="background-color:#17456e"| [[File:HWDE Impa Mini Map Icon.png]]<br/>'''[[Impa]]''' | ||
|style="background-color:#0c2236" rowspan="5"| | |style="background-color:#0c2236" rowspan="5"| | ||
|- | |- | ||
|style="background-color:#163d5f"| [[File:HWDE Darunia Mini Map Icon.png]]<br>'''[[Darunia]]''' | |style="background-color:#163d5f"| [[File:HWDE Darunia Mini Map Icon.png]]<br/>'''[[Darunia]]''' | ||
|- | |- | ||
|style="background-color:#17456e"| [[File:HWDE Midna Mini Map Icon.png]]<br>'''[[Midna]]''' | |style="background-color:#17456e"| [[File:HWDE Midna Mini Map Icon.png]]<br/>'''[[Midna]]''' | ||
|- | |- | ||
|style="background-color:#163d5f"| [[File:HWDE Fi Mini Map Icon.png]]<br>'''[[Fi]]''' | |style="background-color:#163d5f"| [[File:HWDE Fi Mini Map Icon.png]]<br/>'''[[Fi]]''' | ||
|- | |- | ||
|style="background-color:#17456e"| [[File:HWDE Lana Mini Map Icon.png]]<br>'''[[Lana]]''' | |style="background-color:#17456e"| [[File:HWDE Lana Mini Map Icon.png]]<br/>'''[[Lana]]''' | ||
|} | |} | ||
| Line 98: | Line 108: | ||
|- | |- | ||
| <center>[[File:HW Gold Skulltula Icon.png|45px]]</center> | | <center>[[File:HW Gold Skulltula Icon.png|45px]]</center> | ||
| Gold Skulltula<br>(Hard Mode) | | Gold Skulltula<br/>(Hard Mode) | ||
| In the East Garden. | | In the East Garden. | ||
| Play as Zelda with the Rapier. Appears after Impa, Lana, Darunia, Midna, and Fi leave the battlefield after Dark Link vanishes. | | Play as Zelda with the Rapier. Appears after Impa, Lana, Darunia, Midna, and Fi leave the battlefield after Dark Link vanishes. | ||
| Line 120: | Line 130: | ||
|- | |- | ||
| <center>[[File:HW Gold Skulltula Icon.png|45px]]</center> | | <center>[[File:HW Gold Skulltula Icon.png|45px]]</center> | ||
| Gold Skulltula<br>(Hard Mode) | | Gold Skulltula<br/>(Hard Mode) | ||
| In the southwest corner of the second circular area south of the Allied Base. | | In the southwest corner of the second circular area south of the Allied Base. | ||
| Play as Link with a Hylian Sword, capture all Keeps within 10 minutes. | | Play as Link with a Hylian Sword, capture all Keeps within 10 minutes. | ||
| Line 140: | Line 150: | ||
==Gallery== | ==Gallery== | ||
<gallery> | <gallery> | ||
File:HW Temple of Souls 2.png|Doors within the Temple of Souls | File:HW Temple of Souls 2.png|Doors within the Temple of Souls from {{HW|-}} | ||
File:HW Temple of Souls 3.png|A hallway within the Temple of Souls | File:HW Temple of Souls 3.png|A hallway within the Temple of Souls from {{HW|-}} | ||
File:HW True Master Sword.png| | File:HW True Master Sword.png|{{Term|HW|Link}}, with the aid of his allies, unlocking the true power of the {{Term|HW|Master Sword}} from {{HW|-}} | ||
File:HWDE Temple of Souls.png|Temple of Souls from {{ | File:HWDE Temple of Souls Promotional Screenshot.png|A promotional screenshot of the {{Term|HWDE|Temple of Souls}} from {{HWDE|-}} | ||
File:HWDE Temple of Souls Map.png|The level map from {{HWDE|-}} | |||
</gallery> | </gallery> | ||
{{Ref}} | {{Ref}} | ||
{{ | {{HW Stages}} | ||
{{Categories | {{Categories | ||
|Temples | |Temples | ||
|stages= HW, HWL, HWDE | |stages= HW, HWL, HWDE | ||
}} | }} | ||
Latest revision as of 01:10, 16 April 2024
Temple of Souls | |||
|---|---|---|---|
Screenshot    HWHWLHWDE | |||
| Main Theme Music | |||
| | |||
| Playable Character(s) | Link Impa Sheik Lana Zelda Darunia Fi | ||
| Mini-boss(es) | Dark Links | ||
| Boss | Ganondorf | ||
| |||

The Temple of Souls is a Stage in Hyrule Warriors.[name references needed] It contains "A War of Spirit," the twelfth Scenario in Legend Mode.
Features and Overview
The Temple of Souls is a palace with twisted corridors and large rose gardens. Its exterior features statues of Link as a child playing the Ocarina of Time, Link holding the Master Sword skyward, and Wolf Link. These statues represent the heroes from Ocarina of Time and Majora's Mask, Skyward Sword, and Twilight Princess, respectively. Cia's chamber, the Sorceress's Room, also features many portraits of Link as well. These depictions of Link are Cia's devotions to him, emphasizing her obsession over him.
Areas
Scenarios
A War of Spirit
After Link successfully retrieves the Master Sword from the Temple of the Sacred Sword, the Hyrulean Forces head for the Temple of Souls where Cia is hiding, after her location was revealed by Wizzro.[1] Cia however had anticipated their arrival, and was especially observant to Link's growing overconfidence as a result of the Hyrulean Forces' string of victories and the Master Sword in his possession.[2][3] However as the two armies prepared to fight, the eyes of a third faction had watched from the shadows.[4]
As the Hyrulean Forces march in to infiltrate the temple, Link enters the fray as he fiercely attacks Cia's troops with the Master Sword, as encouraged by Proxi. His actions however greatly concerns his other allies, and Impa hopes he does not become too reckless. Cia on the other hand welcomes him to her temple, and eagerly beckons for him to come. As Link fights his way, Lana points out that there are be six Magic Keeps, with three in the east and three in the west. These Keeps are indicated by purple borders that surround them and run along the floors of the temple. Zelda orders these Keeps be captured immediately to sever their connection and weaken their magic. ReDead Knights are continuously spawned from and empowered by the Keeps, and proceed to attack Zelda outside. Quickly becoming overwhelmed by their strength, Link's allies press the need to conquer the Keeps. As Link gradually conquers them, Zelda senses an overwhelmingly evil presence from somewhere in the area, however this same presence is not sensed by the others.[5] Eventually Link successfully claims all six Magic Keeps, thus severing their connection and decreasing the ReDead Knights' Morale. Cia however is not bothered by this change of events, and again encourages Link to come to her. She opens the doors to her chamber, the Sorceress's Room Keep.
Link enters the Sorceress's Room fighting the enemies inside, and Cia suddenly appears before him. Using the darkness of Link's arrogance and overconfidence, she summons Dark Link from Link's shadow. Cia temporarily retreats and watches from afar as Dark Link attacks Link. Lana and the Hyrulean Forces immediately rush to the aid of Link. Despite this, Link manages to defeat Dark Link, however four more Dark Links then spawn throughout the temple and attack. Just as the situation turns critical, Ganondorf rides into battle with his own army in the southeast and attacks the Hyrulean Forces. His plan is to take the Triforce once both sides wear out. Cia becomes infuriated by his return. With little choice left, Zelda and her troops retreat towards the palace interior. Midna recommends they move to the rose garden in the west. In that time Link manages to defeat two Dark Links, but the remaining Dark Links retreat, and one is revived back in the Sorceress's Room. Link leaves to combat this Dark Link as well.
However as soon as Link enters the Sorceress's Room, the gates suddenly close behind him and traps him inside. His allies become aggravated by his recklessness and hurry back to fend for him. Immediately after defeating Dark Link, more spawn again and surround him. Now finding himself overwhelmed, Link is unable to fight and is nearly killed by the Dark Links, but is saved by Lana as she teleports in the room. The Dark Links strike back, but are repelled and defeated by Impa, Midna, Darunia, and Fi. Finally realizing his recklessness and seeing all of his friends' support, Link raises the Master Sword as its true strength awakens. The Keep gates are reopened and the Hyrulean Forces' Morale improves. Cia is enraged by her foiled plan, and swears that if she cannot pull the darkness from Link, then she will use her own. Ignoring Lana's pleads, she uses greater magic to summon hordes of monsters before fleeing the battlefield.
With Link now saved, the Hyrulean Forces are forced to make a hasty retreat. However Ganondorf refuses to let them escape, and quickly advances to attack Zelda. Forced to take a detour, Midna teleports to the SW Magic Keep to redirect the Forces. However Zelda suddenly finds herself unable to move by a tremendous power.[6] Proxi tells Link that now is the time to return the favor and protect his friends by defeating Ganondorf. Link defeats him, thus forcing Ganondorf and his army to retreat, though he swears he is not defeated.
Combatants
| Hyrulean Forces | Dark Forces | Ganondorf's Forces |
|---|---|---|
Gorons |
Beamos |
Shield Moblins |
Goron Captains |
Bulblins | Stalchildren |
Bulblin Captains |
Stalchild Captains | |
ReDead Knights |
||
| Commanders | ||
Zelda |
Cia |
Ganondorf |
Link |
Dark Links |
|
Impa |
||
Darunia | ||
Midna | ||
Fi | ||
Lana | ||
Collectibles
| Item | Location | Condition | |
|---|---|---|---|
| A War of Spirit | |||
| Gold Skulltula | Behind the wall west of the SW Magic Keep. | Defeat 1000 enemies | |
| Gold Skulltula (Hard Mode) |
In the East Garden. | Play as Zelda with the Rapier. Appears after Impa, Lana, Darunia, Midna, and Fi leave the battlefield after Dark Link vanishes. | |
| Piece of Heart | Capture the South Garden (after Ganondorf appears) | Play as Fi | |
| Heart Container | Underneath the boulder on the path that leads south from the SE Magic Keep. | Play as Impa | |
| Reclaiming the Darkness | |||
| Gold Skulltula | On a wall northeast of the Allied Base. | Defeat 1000 enemies | |
| Gold Skulltula (Hard Mode) |
In the southwest corner of the second circular area south of the Allied Base. | Play as Link with a Hylian Sword, capture all Keeps within 10 minutes. | |
| Piece of Heart | Capture the West Magic Keep. | Play as King Daphnes | |
| Heart Container | Bomb a boulder north of East Magic Keep. | Play as Tetra | |
Nomenclature
| Language | Names | Meanings |
|---|---|---|
Japanese | 精神の宮殿 (Seishin no Kyūden) (HW) | |
FrenchCA | Temple des âmes (HWDE) | Temple of souls |
FrenchEU | Palais de l'esprit (HWDE)[7] | Palace of spirit |
German | Tempel der Seelen (HWDE) | Temple of Souls |
Italian | Tempio degli spiriti (HWDE)[8] | Temple of spirits |
SpanishLA | Templo de las Almas (HWDE) | Temple of Souls |
SpanishEU | Templo de las Almas (HWDE) | Temple of Souls |
| This table was generated using translation pages. To request an addition, please contact a staff member with a reference. | ||
Gallery
-
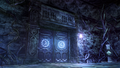
Doors within the Temple of Souls from Hyrule Warriors
-
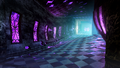
A hallway within the Temple of Souls from Hyrule Warriors
-
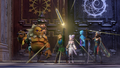
Link, with the aid of his allies, unlocking the true power of the Master Sword from Hyrule Warriors
-
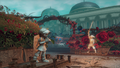
A promotional screenshot of the Temple of Souls from Hyrule Warriors: Definitive Edition
-
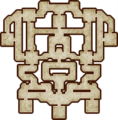
The level map from Hyrule Warriors: Definitive Edition


References
- ↑ "The evil magician's parting words in their ears, Link and his allies set out to confront Cia at the Temple of Souls." — N/A (Hyrule Warriors)
- ↑ "With a string of victories behind them, the Hyrulean Army's morale had improved remarkably. Even Link began to feel that he was invincible while the Master Sword was in his hands. Soon he was allowing overconfidence to cloud his judgment, rushing headlong into hordes of enemies." — N/A (Hyrule Warriors)
- ↑ "Cia had been waiting for Link to overextend himself, giving her a chance to strike." — N/A (Hyrule Warriors)
- ↑ "And as the two sides battled, unknown eyes watched from the shadows..." — N/A (Hyrule Warriors)
- ↑ "An eerie presence? I feel only the aura given off by the witch and her monsters." — Impa (Hyrule Warriors)
- ↑ "By the goddesses... This power... It... My body refuses to move!" — Zelda (Hyrule Warriors)
- ↑ "Palais de l'esprit" — Select Scenario (Hyrule Warriors: Definitive Edition)
- ↑ "Tempio degli spiriti" — Select Scenario (Hyrule Warriors: Definitive Edition)