Lomei Labyrinth Island: Difference between revisions
TriforceTony (talk | contribs) |
|||
| (34 intermediate revisions by 17 users not shown) | |||
| Line 1: | Line 1: | ||
{{ | {{Infobox Location | ||
| | |image= | ||
| | {{Media | ||
|Screenshot BotW= File:BotW Lomei Labyrinth Island.png | |||
|Screenshot TotK= File:TotK Lomei Labyrinth Island.png | |||
}} | |||
|caption= | |caption= | ||
|game= | |pronunciation= | ||
|game= BotW, TotK | |||
|other= | |other= | ||
|inhab= | |inhab= | ||
|items= | |items= | ||
| | {{Infobox Game Blocks | ||
|BotW= {{Term|BotW|Travel Medallion|link}} {{Exp|The Master Trials DLC}} | |||
}} | |||
|services= | |||
|season= | |season= | ||
| | |temperature= | ||
|counter= | |||
{{List| | |||
{{Term|Series|Lomei Depths Labyrinth|link}} {{Small|({{Term|TotK|Depths|link}})}}, | |||
{{Term|Series|Lomei Sky Labyrinth|link}} {{Small|({{Term|TotK|Sky|link}})}} | |||
}} | }} | ||
The | |theme= | ||
|related= | |||
{{List| | |||
{{Term|Series|Lomei Labyrinth Chasm|link}}, | |||
{{Term|Series|North Lomei Labyrinth|link}}, | |||
{{Term|Series|South Lomei Labyrinth|link}} | |||
}} | |||
|strategy= | |||
|zu= | |||
}} | |||
The {{Term/Store|Lomei Labyrinth Island||Series, BotW, TotK}} is a recurring location in {{TLoZ|Series}}.<ref>{{Cite|Lomei Labyrinth Island|Map|BotW}}</ref><ref>{{Cite|Lomei Labyrinth Island|Map|TotK}}</ref> | |||
==Features and Overview== | ==Features and Overview== | ||
The Lomei Labyrinth Island is a | ==={{BotW|-}}=== | ||
The {{Term|BotW|Lomei Labyrinth Island}} is a {{Term|BotW|Lomei Labyrinth|link|display=Labyrinth}} located in the {{Term|BotW|Akkala Sea|link}} off the shore of the {{Term|BotW|North Akkala Beach|link}}.<ref>{{Cite|Have you heard the stories of those labyrinthine ruins in the Akkala region? I just recently learned of them myself. You won't catch me wandering into them. I have enough trouble finding my way out of bed in the morning.|Pitar|Botw}}</ref><ref>{{Cite|You won't find me wandering into Akkala's labyrinthine ruins. Lousy sense of direction… I'd be lost for days.|Pitar|BotW}}</ref> Three {{Plural|BotW|Guardian Skywatcher|link}} patrol the top of the {{Term|BotW|Lomei Labyrinth Island|display=Labyrinth}} walls. Atop the {{Term|BotW|Lomei Labyrinth Island|display=Labyrinth}} walls, strong winds impede {{Term|BotW|Link|link}} from easily {{Term|BotW|Paraglider|link|display=Paragliding}} to the northeast. Upon entering, {{Term|BotW|Link}} hears a voice telling him that he shall receive a blessing at the end of the {{Term|BotW|Lomei Labyrinth Island|display=Labyrinth}} and he is given the "{{Term|BotW|Trial of the Labyrinth|link}}" {{Term|BotW|Shrine Quest|link}}.<ref>{{Cite|You who have reached this point... Proceed onward through the maze, and you will receive reward.|Tu Ka'loh|BotW}}</ref> | |||
In a pyramid across the courtyard, {{Term|BotW|Link}} can see the {{Term|BotW|Ancient Shrine|link}} behind a portcullis. To navigate the maze, {{Term|BotW|Link}} must use {{Term|BotW|Magnesis|link}} to move {{Plural|BotW|Iron Box|link}} and must use {{Term|BotW|Fire|link}} to burn {{Plural|BotW|Thorn|link}} that block his path. Throughout the {{Term|BotW|Lomei Labyrinth Island|display=Labyrinth}}, {{Term|BotW|Link}} will encounter {{Plural|BotW|Guardian Stalker|link}}, {{Plural|BotW|Fire Chuchu|link}}, {{Plural|BotW|Electric Chuchu|link}}, and {{Plural|BotW|Keese|link}}. {{Term|BotW|Link}} can find several {{Plural|BotW|Treasure Chest|link}} containing a {{Term|BotW|Silver Rupee|link}}, a {{Term|BotW|Ruby|link}}, an {{Term|BotW|Opal|link}}, and a {{Term|BotW|Royal Broadsword|link}}. {{Term|BotW|Link}} can also find a {{Term|BotW|Great Flameblade|link}}, a {{Term|BotW|Thunderstorm Rod|link}}, a {{Term|BotW|Torch|link}}, a {{Term|BotW|Knight's Broadsword|link}} together with a {{Term|BotW|Knight's Shield|link}}, a {{Term|BotW|Knight's Halberd|link}}, and a {{Term|BotW|Knight's Bow|link}} hidden within the maze. | |||
Once {{Term|BotW|Link}} reaches the end of the {{Term|BotW|Lomei Labyrinth Island|display=Labyrinth}}, he will discover the {{Term|BotW|Tu Ka'loh Shrine|link}} and the {{Term|BotW|Shrine Quest}} will be complete. In addition, an {{Term|BotW|Updraft|link}} can be found blowing from a shaft in front of the {{Term|BotW|Ancient Shrine|display=Shrine}}; jumping down said shaft brings {{Term|BotW|Link}} to a vast chamber with four {{Plural|BotW|Decayed Guardian|link}}, two {{Plural|BotW|Guardian Stalker}}, a {{Term|BotW|Treasure Chest}} containing a {{Term|BotW|Diamond Circlet|link}} and, in {{TMT}} DLC Pack, a {{Term|BotW|Treasure Chest}} containing the {{Term|BotW|Travel Medallion|link}}. The {{Plural|BotW|Decayed Guardian}} in this chamber will not activate until the {{Term|BotW|Diamond Circlet}} is collected, at which point all four activate simultaneously. If {{Term|BotW|Link}} returns to this chamber after collecting the {{Term|BotW|Diamond Circlet}}, they will simultaneously activate upon entry. The {{Plural|BotW|Guardian Stalker}} activate when approached. | |||
====Areas==== | |||
{{Gallery List|Locations | |||
|BotW= Tu Ka'loh Shrine | |||
}} | |||
====Minor {{Plural|BotW|Enemy}}==== | |||
{{Gallery List|Enemies | |||
|BotW= | |||
Decayed Guardian [Qty:6]{{List Note|Four activate when struck or when the {{Term|BotW|Treasure Chest}} containing the {{Term|BotW|Diamond Circlet|link}} is opened. When the {{Term|BotW|Treasure Chest}} is opened, they subsequently remain permanently active. Two activate when approached.}}, | |||
Guardian Skywatcher [Qty:4], | |||
Guardian Stalker [Qty:3]{{List Note|Three activate when approached.}}, | |||
Keese [Qty:12], | |||
Electric Chuchu [Qty:4], | |||
Electric Chuchu [2][Qty:1], | |||
Fire Chuchu [Qty:2], | |||
Fire Chuchu [2][Qty:2], | |||
Fire Chuchu [3][Qty:1] | |||
}} | |||
{{List Notes}} | |||
;{{Term|BotW|Master Mode}} | |||
{{Gallery List|Enemies | |||
|BotW= | |||
Decayed Guardian [Qty:6]{{List Note|Four activate when struck or when the {{Term|BotW|Treasure Chest}} containing the {{Term|BotW|Diamond Circlet}} is opened. When the {{Term|BotW|Treasure Chest}} is opened, they subsequently remain permanently active. Two activate when approached.}}, | |||
Guardian Skywatcher [Qty:4], | |||
Guardian Stalker [Qty:3]{{List Note|Three activate when approached.}}, | |||
Keese [Qty:12], | |||
Electric Chuchu [2][Qty:4], | |||
Electric Chuchu [3][Qty:1], | |||
Fire Chuchu [2][Qty:2], | |||
Fire Chuchu [3][Qty:3] | |||
}} | |||
{{List Notes}} | |||
====Equipment==== | |||
{{Gallery List|Equipment | |||
|BotW= Arrow, Arrow x10, Great Flameblade, Knight's Bow, Knight's Broadsword, Knight's Shield, Soldier's Bow, Soldier's Shield, Soldier's Spear, Thunderstorm Rod, Torch | |||
}} | |||
===={{Plural|BotW|Treasure Chest}}==== | |||
{{Treasure Chests|game= BotW | |||
|- | |||
| Metal Chest | |||
| Silver Rupee | |||
| In the east column of the antechamber of the {{Term|BotW|Lomei Labyrinth Island|display=Labyrinth}} | |||
|- | |||
| Metal Chest | |||
| Bomb Arrow x5 | |||
| In the west column of the antechamber of the {{Term|BotW|Lomei Labyrinth Island|display=Labyrinth}} | |||
|- | |||
| Metal Chest | |||
| Ancient Shaft | |||
| Near some shutters at the southwestern end of the center-western pathway into the {{Term|BotW|Lomei Labyrinth Island|display=Labyrinth}} | |||
|- | |||
| Stone Chest | |||
| Sapphire | |||
| Behind an {{Term|BotW|Iron Box|link}} near a {{Term|BotW|Decayed Guardian|link}} in the western area of the {{Term|BotW|Lomei Labyrinth Island|display=Labyrinth}} | |||
|- | |||
| Stone Chest | |||
| Ancient Core | |||
| At the end of a passage in the northwestern area of the {{Term|BotW|Lomei Labyrinth Island|display=Labyrinth}} | |||
|- | |||
| Metal Chest | |||
| Giant Ancient Core | |||
| Behind an {{Term|BotW|Iron Box}} at the northern end of the northwestern pathway | |||
|- | |||
| Metal Chest | |||
| Silver Rupee | |||
| In a room at ground level beneath the {{Term|BotW|Ancient Shrine|display=Shrine}} chamber accessible through the northernmost part of the {{Term|BotW|Lomei Labyrinth Island|display=Labyrinth}} | |||
|- | |||
| Stone Chest | |||
| Diamond Circlet | |||
| In the center of the large underground chamber | |||
|- | |||
| Hidden Chest | |||
| Travel Medallion | |||
| In the southern section of the large underground chamber<br/>Only appears with the {{TMT}} [[Downloadable Content]] Pack installed. | |||
}} | |||
== | ==={{TotK|-}}=== | ||
{{Stub|TotK}} | |||
==Nomenclature== | |||
{{Nomenclature}} | |||
==Gallery== | |||
<gallery> | <gallery> | ||
File:BotW | File:BotW Lomei Labyrinth Island Map.png|Map of {{Term|BotW|Lomei Labyrinth Island}} in {{BotW|-}} | ||
File: | File:BotW Lomei Labyrinth Island Chamber.png|The chamber below {{Term|BotW|Lomei Labyrinth Island}} in {{BotW|-}} | ||
</gallery> | </gallery> | ||
==See Also== | |||
* {{Term|Series|Igashuk Shrine|link}} | |||
* {{Term|Series|Lomei Depths Labyrinth|link}} | |||
* {{Term|Series|Lomei Labyrinth Chasm|link}} | |||
* {{Term|Series|Lomei Sky Labyrinth|link}} | |||
* {{Term|Series|North Lomei Labyrinth|link}} | |||
* {{Term|Series|South Lomei Labyrinth|link}} | |||
* {{Term|Series|Tu Ka'loh Shrine|link}} | |||
{{Ref}} | {{Ref}} | ||
{{Categories | |||
|Akkala Sea, Islands, Labyrinths, Zonai Ruins | |||
|locations= BotW, TotK | |||
}} | |||
Latest revision as of 01:53, 16 March 2024
The Lomei Labyrinth Island is a recurring location in The Legend of Zelda series.[1][2]
Features and Overview
Breath of the Wild
The Lomei Labyrinth Island is a Labyrinth located in the Akkala Sea off the shore of the North Akkala Beach.[3][4] Three Guardian Skywatchers patrol the top of the Labyrinth walls. Atop the Labyrinth walls, strong winds impede Link from easily Paragliding to the northeast. Upon entering, Link hears a voice telling him that he shall receive a blessing at the end of the Labyrinth and he is given the "Trial of the Labyrinth" Shrine Quest.[5]
In a pyramid across the courtyard, Link can see the Ancient Shrine behind a portcullis. To navigate the maze, Link must use Magnesis to move Iron Boxes and must use Fire to burn Thorns that block his path. Throughout the Labyrinth, Link will encounter Guardian Stalkers, Fire Chuchus, Electric Chuchus, and Keese. Link can find several Treasure Chests containing a Silver Rupee, a Ruby, an Opal, and a Royal Broadsword. Link can also find a Great Flameblade, a Thunderstorm Rod, a Torch, a Knight's Broadsword together with a Knight's Shield, a Knight's Halberd, and a Knight's Bow hidden within the maze.
Once Link reaches the end of the Labyrinth, he will discover the Tu Ka'loh Shrine and the Shrine Quest will be complete. In addition, an Updraft can be found blowing from a shaft in front of the Shrine; jumping down said shaft brings Link to a vast chamber with four Decayed Guardians, two Guardian Stalkers, a Treasure Chest containing a Diamond Circlet and, in The Master Trials DLC Pack, a Treasure Chest containing the Travel Medallion. The Decayed Guardians in this chamber will not activate until the Diamond Circlet is collected, at which point all four activate simultaneously. If Link returns to this chamber after collecting the Diamond Circlet, they will simultaneously activate upon entry. The Guardian Stalkers activate when approached.
Areas

Minor Enemies
-
![Decayed Guardian ×6[a]](//cdn.wikimg.net/en/zeldawiki/images/thumb/c/c1/BotW_Decayed_Guardian_Model.png/120px-BotW_Decayed_Guardian_Model.png)
-

-
![Guardian Stalker ×3[b]](//cdn.wikimg.net/en/zeldawiki/images/thumb/6/6f/BotW_Guardian_Stalker_Model.png/120px-BotW_Guardian_Stalker_Model.png)
-

Keese ×12
-

-

-

Fire Chuchu ×2
-

Fire Chuchu ×2
-

Fire Chuchu ×1
![Decayed Guardian ×6[a]](/wiki/File:BotW_Decayed_Guardian_Model.png)

![Guardian Stalker ×3[b]](/wiki/File:BotW_Guardian_Stalker_Model.png)


- ↑ Four activate when struck or when the Treasure Chest containing the Diamond Circlet is opened. When the Treasure Chest is opened, they subsequently remain permanently active. Two activate when approached.
- ↑ Three activate when approached.
- Master Mode
-
-
-
-
Keese ×12
-
-

-
Fire Chuchu ×2
-
Fire Chuchu ×3

Equipment


Treasure Chests
| Treasure Chest | |
|---|---|
| Contents | |
| Notes | In the east column of the antechamber of the Labyrinth |
| Treasure Chest | |
| Contents | |
| Notes | In the west column of the antechamber of the Labyrinth |
| Treasure Chest | |
| Contents | |
| Notes | Near some shutters at the southwestern end of the center-western pathway into the Labyrinth |
| Treasure Chest | |
| Contents | |
| Notes | Behind an Iron Box near a Decayed Guardian in the western area of the Labyrinth |
| Treasure Chest | |
| Contents | |
| Notes | At the end of a passage in the northwestern area of the Labyrinth |
| Treasure Chest | |
| Contents | |
| Notes | Behind an Iron Box at the northern end of the northwestern pathway |
| Treasure Chest | |
| Contents | |
| Notes | In a room at ground level beneath the Shrine chamber accessible through the northernmost part of the Labyrinth |
| Treasure Chest | |
| Contents | |
| Notes | In the center of the large underground chamber |
| Treasure Chest | |
| Contents | |
| Notes | In the southern section of the large underground chamber |


| Treasure Chest | Contents | Notes |
|---|---|---|
In the east column of the antechamber of the Labyrinth | ||
In the west column of the antechamber of the Labyrinth | ||
Near some shutters at the southwestern end of the center-western pathway into the Labyrinth | ||
Behind an Iron Box near a Decayed Guardian in the western area of the Labyrinth | ||
At the end of a passage in the northwestern area of the Labyrinth | ||
Behind an Iron Box at the northern end of the northwestern pathway | ||
In a room at ground level beneath the Shrine chamber accessible through the northernmost part of the Labyrinth | ||
In the center of the large underground chamber | ||
In the southern section of the large underground chamber |
Tears of the Kingdom
Nomenclature
| Language | Names | Meanings |
|---|---|---|
Japanese | ローメイとう島 (TotK) | |
ChineseTR | 洛美島 (Luòměi Dǎo) (TotK) | |
ChineseSI | 洛美岛 (Luòměi Dǎo) (TotK) | |
Dutch | Lomei-labyrint (BotW)[6] | Lomei Labyrinth |
FrenchCA | Île d'Edal (TotK) | |
FrenchEU | Île d'Edal (TotK) | |
German | Irrland (TotK) | |
Italian | Isola Dadelo (TotK) | |
Korean | 로미섬 (TotK) | |
SpanishLA | Isla Lomei (BotW)[7] | Lomei Island |
SpanishEU | Isla Lomei (TotK) | |
| This table was generated using translation pages. To request an addition, please contact a staff member with a reference. | ||
Gallery
-
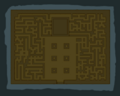
Map of Lomei Labyrinth Island in Breath of the Wild
-
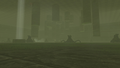
The chamber below Lomei Labyrinth Island in Breath of the Wild


See Also
- Igashuk Shrine
- Lomei Depths Labyrinth
- Lomei Labyrinth Chasm
- Lomei Sky Labyrinth
- North Lomei Labyrinth
- South Lomei Labyrinth
- Tu Ka'loh Shrine
References
- ↑ "Lomei Labyrinth Island" — Map (Breath of the Wild)
- ↑ "Lomei Labyrinth Island" — Map (Tears of the Kingdom)
- ↑ "Have you heard the stories of those labyrinthine ruins in the Akkala region? I just recently learned of them myself. You won't catch me wandering into them. I have enough trouble finding my way out of bed in the morning." — Pitar (Breath of the Wild)
- ↑ "You won't find me wandering into Akkala's labyrinthine ruins. Lousy sense of direction… I'd be lost for days." — Pitar (Breath of the Wild)
- ↑ "You who have reached this point... Proceed onward through the maze, and you will receive reward." — Tu Ka'loh (Breath of the Wild)
- ↑ "Lomei-labyrint" — Map (Breath of the Wild)
- ↑ "Isla Lomei" — Map (Breath of the Wild)