Grim Temple: Difference between revisions
MannedTooth (talk | contribs) m (Text replacement - "\|image= \[\[File:(.*).png\|300px]]" to "|image= File:$1.png") |
Htwretched (talk | contribs) (Name ref, hidden object trivia) |
||
| (13 intermediate revisions by 6 users not shown) | |||
| Line 1: | Line 1: | ||
{{Dungeon | {{Infobox Dungeon | ||
|type= level | |type= level | ||
|image= File:TFH Grim Temple Stage 3.png | |image= File:TFH Grim Temple Stage 3 2.png | ||
|caption= | |caption= Stage 3 of Grim Temple | ||
|location= | |location= {{Term|TFH|The Ruins|link}} | ||
|game= {{TFH}} | |game= TFH | ||
| | |item= {{List|{{Term|TFH|Boomerang|link}}, {{Term|TFH|Fire Gloves|link}}, {{Term|TFH|Gripshot|link}}}} | ||
|quest= | |quest= | ||
|mini-boss= | |mini-boss= | ||
|boss= | |boss= {{Term|TFH|Prismantus|link}} | ||
|theme= | |theme= | ||
|strategy= | |strategy= | ||
}} | }} | ||
{{Term/Store|Grim Temple||Series, TFH}} is a Level in {{TFH}}. It is the fourth and last Level of | {{Term/Store|Grim Temple||Series, TFH}} is a {{Term|TFH|Level|link}} in {{TFH}}.<ref>{{Cite Book|quote= |book= E |publisher= |page= 161}}</ref> It is the fourth and last {{Term|TFH|Level}} of {{Term|TFH|The Ruins|link}} {{Term|TFH|Area}}, and is preceded by {{Term|TFH|Lone Labyrinth|link}}. | ||
==Themes and Navigation== | ==Themes and Navigation== | ||
The Grim Temple is a large, dark crypt filled with the undead and ghosts. The Level features the colored platforms present in | The {{Term|TFH|Grim Temple}} is a large, dark crypt filled with the undead and ghosts. The {{Term|TFH|Level}} features the colored platforms present in {{Term|TFH|Illusory Mansion|link}}, which {{Term|TFH|Link|link}} will fall through if their color does not match his, as well as the vanishing grey platforms that appeared in {{Term|TFH|Lone Labyrinth|link}}. Because of the Temple's abundance of pitfalls, as well as {{Plural|TFH|Enemy|link}} who knock {{Term|TFH|Link}} backwards when struck with his {{Term|TFH|Sword}}, the {{Term|TFH|Tingle Tights|link}} and {{Term|TFH|Fierce Deity Armor|link}} and become useful here. | ||
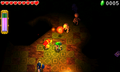
In '''Stage 1''', the | [[File:TFH Grim Temple Stage 1.png|250px|right|thumb|Battling enemies in the darkness, Stage 1]] | ||
In '''Stage 1''', the {{Plural|TFH|Links|link}} begin at the corner of a pitch dark chamber. Ahead of them are a {{Term|TFH|Boomerang|link}}, a {{Term|TFH|Gripshot|link}} and {{Term|TFH|Fire Gloves|link}}. Immediately after the {{Plural|TFH|Item}} are taken, monsters spawn in the darkness, including {{Plural|TFH|Rat|link}} and {{Plural|TFH|Red Stalfos|link}}. A {{Term|TFH|Torchlight|link}} in the center of the room can be lit with the {{Term|TFH|Fire Gloves}} to help light the room a little. While fighting the {{Plural|TFH|Enemy}}, the {{Plural|TFH|Links}} must also be careful of hidden pits in the floor that curve around the room. After all {{Plural|TFH|Enemy}} are defeated, the doors to the {{Term|TFH|Triforce Gateway|link}} open, and wall {{Plural|TFH|Torchlight}} light up to reveal its location. | |||
{{Clear}} | |||
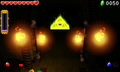
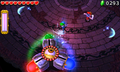
In '''Stage 2''', the Links appear on separate ledges over a bottomless pit. Colored | [[File:TFH Grim Temple Stage 2.png|250px|right|thumb|The Links reaching one another in Stage 2]] | ||
In '''Stage 2''', the {{Plural|TFH|Links}} appear on separate ledges over a bottomless pit. Colored {{Plural|TFH|Poe|link}} fly nearby, and vanishing platforms bridge the gaps. After each {{Term|TFH|Links}} defeats his corresponding-colored {{Term|TFH|Poe}}, several {{Plural|TFH|White Poe}} appear in their place, floating at higher elevations. The {{Plural|TFH|Links}} will have to form a {{Term|TFH|Totem|link}} to defeat them. Once these {{Plural|TFH|Poe}} are defeated, a solid bridge appears heading north to a platform with a {{Term|TFH|Shock Switch|link}}. Hitting this {{Term|TFH|Switch}} creates another bridge to a ledge with five dormant {{Plural|TFH|Gibdo|link}} and a large gap in the middle. Once all three {{Plural|TFH|Links}} are across, the first {{Term|TFH|Gibdo}} will reanimate. Once it is defeated, some vanishing tiles will appear to bridge the gap between ledges, and the other four {{Plural|TFH|Gibdo}} awaken. After they are all defeated, a bridge appears to the {{Term|TFH|Triforce Gateway}}. | |||
{{Clear}} | |||
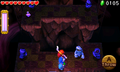
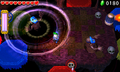
In '''Stage 3''', the Links appear on a ledge next to some colored platforms. The Links must throw each other | [[File:TFH Grim Temple Stage 3.png|250px|right|thumb|Crossing the first colored platforms in Stage 3]] | ||
In '''Stage 3''', the {{Plural|TFH|Links}} appear on a ledge next to some colored platforms with a small gap between them, leading to a larger area. The {{Plural|TFH|Links}} must throw each other and use their {{Term|TFH|Boomerang}} or {{Term|TFH|Gripshot}} to get them all across. Once they cross the gap, a pair of {{Plural|TFH|Prankster Poe|link}} and {{Plural|TFH|Chasupa|link}} appear and must be fought. After they are defeated, a pair of {{Plural|TFH|ReDead|link}} appear at another ledge far to the east, and a series of colored platforms rise to fill the gaps between ledges. A {{Term|TFH|Squiddy|link}} will also appear on the ledge where the {{Plural|TFH|Links}} are. The first two rows of colored platforms are stationary; following them is a row that moves north to south and back, and finally, a series of platforms that will circle around the ledge the {{Plural|TFH|ReDead}} are on. However, these platforms will pass by a {{Term|TFH|Guruguru Bar|link}} blasting flames to the right side of the ledge, which will burn the {{Plural|TFH|Links}} off of their platforms if they do not disembark on time. Since the {{Plural|TFH|ReDead}} can paralyze the {{Plural|TFH|Links}} and drain their {{Plural|TFH|Heart}}, it is advisable that none of the {{Plural|TFH|Links}} are left behind before reaching this ledge. Once the {{Plural|TFH|ReDead}} are defeated, the nearby {{Term|TFH|Triforce Gateway}} activates, reachable by using the circling colored platforms. | |||
{{Clear}} | |||
'''Stage 4''' is where | [[File:TFH Grim Temple Stage 4.png|250px|right|thumb|The ledge before Prismantus, Stage 4]] | ||
'''Stage 4''' is where {{Term|TFH|Prismantus|link}} is fought, on a large circular platform in the dark outdoors. The {{Plural|TFH|Links}} begin on a higher ledge with several {{Plural|TFH|Skull|link}} and {{Term|TFH|Grass|link}} that can be cut down for {{Plural|TFH|Heart|link}}. Once they reach the circular area, the ledge behind them breaks away, and {{Term|TFH|Prismantus}} appears. After it is defeated, a long stairway to the {{Term|TFH|Triforce Gateway}} appears. | |||
{{Clear}} | |||
===Drablands Challenge=== | ==={{Plural|TFH|Drablands Challenge}}=== | ||
Grim Temple | Once {{Term|TFH|Prismantus|link}} has been defeated, the {{Term|TFH|Grim Temple|link}} can be replayed with the following {{Plural|TFH|Drablands Challenge|link}}: "[[Drablands Challenge#Fewer Heart Containers!|Fewer Heart Containers!]]", "[[Drablands Challenge#Clear within the time limit!|Clear within the time limit!]]", and "[[Drablands Challenge#Don't fall at all!|Don't fall at all!]]". | ||
In "Clear within the time limit!", the {{Plural|TFH|Links|link}} are given a timer of one minute and 30 seconds in [[Multiplayer]], or two minutes and 15 seconds in single-player. This timer can be increased by collecting {{Plural|TFH|Hourglass|link}} or wearing {{Term|TFH|Linebeck's Uniform|link}}. | |||
==== | ==={{Plural|TFH|Material}}=== | ||
At the end of the {{Term|TFH|Level}}, three {{Plural|TFH|Treasure Chest|link}} can be opened. Two contain the same {{Term|TFH|Material|link}}, and one contains another, more valuable {{Term|TFH|Material}}. | |||
== | {{Data Table | ||
|game= TFH | |||
|columns= {{Term|TFH|Drablands Challenge}}, {{Plural|TFH|Magical Material}} [Amounts] | |||
|- | |||
| N/A | |||
| 2 Spider Silk Lace, 1 Twisted Twig | |||
|- | |||
| [[File:TFH Fewer Heart Containers Icon.png]]<br/>'''Fewer Heart Containers!''' | |||
| 2 Poe Soul, 1 Lava Drop | |||
|- | |||
| [[File:TFH No Falls Icon.png]]<br/>'''Don't fall at all!''' | |||
| 2 Twisted Twig, 1 Sanctuary Mask | |||
|- | |||
| [[File:TFH Hourglass Icon.png]]<br/>'''Clear within the time limit!''' | |||
| 2 Lava Drop, 1 Sanctuary Mask | |||
}} | |||
==={{Plural|TFH|Enemy}} and Traps=== | |||
The {{Plural|TFH|Gibdo|link}} in this {{Term|TFH|Level}} produce {{Plural|TFH|Red Stalfos|link}} (as opposed to regular {{Plural|TFH|Stalfos|link}}) when their bandages are removed. | |||
= | ;{{Term|TFH|Stage}} 1 | ||
{{Gallery List|Enemies | |||
|TFH= Rat [Qty:2], Red Stalfos [Qty:5] | |||
}} | |||
= | ;{{Term|TFH|Stage}} 2 | ||
{{Gallery List|Enemies | |||
|TFH= Blue Poe [Qty:1], Gibdo [Qty:5]{{List Note|One awakens first; others awaken after it is defeated.}}, Green Poe [Qty:1], Red Poe [Qty:1], White Poe [Qty:2]{{List Note|These require a {{Term|TFH|Totem|link}} to attack.}} | |||
}} | |||
=== | ;{{Term|TFH|Stage}} 3 | ||
{{Gallery List|Enemies | |||
|TFH= Chasupa [Qty:1], Guruguru Bar [Qty:1]{{List Note|Stationary, with extending and retracting flames.}}, Prankster Poe [Qty:2], ReDead [Qty:2], Squiddy{{List Note|Appears after {{Term|TFH|Chasupa}} and {{Plural|TFH|Prankster Poe}} are defeated.}} | |||
}} | |||
;{{Term|TFH|Stage}} 4 | |||
{{Gallery List|Enemies | |||
|TFH= Prismantus | |||
}} | |||
{{List Notes}} | |||
==Trivia== | |||
*As described in Vol. 5 of the {{Term|TFH|Drablands Diary|link}}, a set of green handprints is hidden in each {{Term|TFH|Level|link}} of {{Term|TFH|The Ruins|link}}. They can be found on the large doors in {{Term|TFH|Stage}} 1 of {{Term|TFH|Grim Temple}}, and can only be seen before the {{Plural|TFH|Enemy|link}} are all defeated. | |||
==Nomenclature== | |||
{{Nomenclature}} | |||
==Gallery== | |||
<gallery> | <gallery> | ||
File:TFH | File:TFH Grim Temple Stage 1 2.png|Using the {{Term|TFH|Fire Gloves}} in {{Term|TFH|Stage}} 1, revealing large pits | ||
File:TFH | File:TFH Grim Temple Stage 1 3.png|The door to the {{Term|TFH|Triforce Gateway}} opening in {{Term|TFH|Stage}} 1 | ||
File:TFH | File:TFH Grim Temple Stage 2 2.png|The first of five {{Plural|TFH|Gibdo}} awakens in {{Term|TFH|Stage}} 2 | ||
File:TFH | File:TFH Grim Temple Stage 2 3.png|Using the {{Term|TFH|Gripshot}} on {{Plural|TFH|Gibdo}} in {{Term|TFH|Stage}} 2 | ||
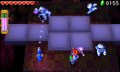
File:TFH Grim Temple Stage 3 3.png|Colored platforms, stationary and moving, in {{Term|TFH|Stage}} 3 | |||
File:TFH | File:TFH Grim Temple Stage 3 4.png|A {{Term|TFH|ReDead}} shrieking in {{Term|TFH|Stage}} 3 | ||
File:TFH Prismantus Battle.png|Battling {{Term|TFH|Prismantus}} in {{Term|TFH|Stage}} 4 | |||
File:TFH | |||
File:TFH | |||
</gallery> | </gallery> | ||
{{Ref}} | |||
{{ | |||
{{Categories | |||
|Temples, The Ruins | |||
|levels= TFH | |||
}} | |||
Latest revision as of 01:41, 5 December 2023
Grim Temple is a Level in Tri Force Heroes.[1] It is the fourth and last Level of The Ruins Area, and is preceded by Lone Labyrinth.
The Grim Temple is a large, dark crypt filled with the undead and ghosts. The Level features the colored platforms present in Illusory Mansion, which Link will fall through if their color does not match his, as well as the vanishing grey platforms that appeared in Lone Labyrinth. Because of the Temple's abundance of pitfalls, as well as Enemies who knock Link backwards when struck with his Sword, the Tingle Tights and Fierce Deity Armor and become useful here.

In Stage 1, the Links begin at the corner of a pitch dark chamber. Ahead of them are a Boomerang, a Gripshot and Fire Gloves. Immediately after the Items are taken, monsters spawn in the darkness, including Rats and Red Stalfos. A Torch in the center of the room can be lit with the Fire Gloves to help light the room a little. While fighting the Enemies, the Links must also be careful of hidden pits in the floor that curve around the room. After all Enemies are defeated, the doors to the Triforce Gateway open, and wall Torches light up to reveal its location.

In Stage 2, the Links appear on separate ledges over a bottomless pit. Colored Poes fly nearby, and vanishing platforms bridge the gaps. After each Link defeats his corresponding-colored Poe, several White Poes appear in their place, floating at higher elevations. The Links will have to form a Totem to defeat them. Once these Poes are defeated, a solid bridge appears heading north to a platform with a Shock Switch. Hitting this Switch creates another bridge to a ledge with five dormant Gibdos and a large gap in the middle. Once all three Links are across, the first Gibdo will reanimate. Once it is defeated, some vanishing tiles will appear to bridge the gap between ledges, and the other four Gibdos awaken. After they are all defeated, a bridge appears to the Triforce Gateway.

In Stage 3, the Links appear on a ledge next to some colored platforms with a small gap between them, leading to a larger area. The Links must throw each other and use their Boomerang or Gripshot to get them all across. Once they cross the gap, a pair of Prankster Poes and Chasupa appear and must be fought. After they are defeated, a pair of ReDeads appear at another ledge far to the east, and a series of colored platforms rise to fill the gaps between ledges. A Squiddy will also appear on the ledge where the Links are. The first two rows of colored platforms are stationary; following them is a row that moves north to south and back, and finally, a series of platforms that will circle around the ledge the ReDeads are on. However, these platforms will pass by a Guruguru Bar blasting flames to the right side of the ledge, which will burn the Links off of their platforms if they do not disembark on time. Since the ReDeads can paralyze the Links and drain their Hearts, it is advisable that none of the Links are left behind before reaching this ledge. Once the ReDeads are defeated, the nearby Triforce Gateway activates, reachable by using the circling colored platforms.

Stage 4 is where Prismantus is fought, on a large circular platform in the dark outdoors. The Links begin on a higher ledge with several Skulls and Grass that can be cut down for Hearts. Once they reach the circular area, the ledge behind them breaks away, and Prismantus appears. After it is defeated, a long stairway to the Triforce Gateway appears.
Drablands Challenges
Once Prismantus has been defeated, the Grim Temple can be replayed with the following Drablands Challenges: "Fewer Heart Containers!", "Clear within the time limit!", and "Don't fall at all!".
In "Clear within the time limit!", the Links are given a timer of one minute and 30 seconds in Multiplayer, or two minutes and 15 seconds in single-player. This timer can be increased by collecting Hourglasses or wearing Linebeck's Uniform.
Materials
At the end of the Level, three Treasure Chests can be opened. Two contain the same Material, and one contains another, more valuable Material.
| Drablands Challenge | — |
|---|---|
| Magical Materials | |
| Drablands Challenge | Fewer Heart Containers! |
| Magical Materials | |
| Drablands Challenge | Don't fall at all! |
| Magical Materials | |
| Drablands Challenge | Clear within the time limit! |
| Magical Materials |
| Drablands Challenge | Magical Materials |
|---|---|
— | |
Fewer Heart Containers! | |
Don't fall at all! | |
Clear within the time limit! |
Enemies and Traps
The Gibdos in this Level produce Red Stalfos (as opposed to regular Stalfos) when their bandages are removed.
- Stage 1
-

Rat ×2
-

Red Stalfos ×5


- Stage 2

![Gibdo ×5[a]](/wiki/File:TFH_Gibdo_Model.png)


![White Poe ×2[b]](/wiki/File:TFH_White_Poe_Model.png)
- Stage 3
![Guruguru Bar ×1[c]](/wiki/File:TFH_Guruguru_Bar_Model.png)


![Squiddy[d]](/wiki/File:TFH_Squiddy_Model.png)
- Stage 4

Trivia
- As described in Vol. 5 of the Drablands Diary, a set of green handprints is hidden in each Level of The Ruins. They can be found on the large doors in Stage 1 of Grim Temple, and can only be seen before the Enemies are all defeated.
Nomenclature
| Language | Names | Meanings |
|---|---|---|
Japanese | 黄泉の神殿 (Yomi no Shinden)[3] | Underworld Temple |
FrenchCA | temple de l'au-delà sic[7] | |
FrenchEU | Temple de l'au-delà[5] | |
German | Unterwelttempel[4] | |
Italian | Santuario cupo[2] | |
SpanishLA | Templo del inframundo[6] | |
SpanishEU | Templo del Inframundo[8] | |
| This table was generated using translation pages. To request an addition, please contact a staff member with a reference. | ||
Gallery
-
Using the Fire Gloves in Stage 1, revealing large pits
-
The door to the Triforce Gateway opening in Stage 1
-
The first of five Gibdos awakens in Stage 2
-
Using the Gripshot on Gibdos in Stage 2
-

Colored platforms, stationary and moving, in Stage 3
-
A ReDead shrieking in Stage 3
-
Battling Prismantus in Stage 4


References
- ↑ Encyclopedia, Dark Horse Books, pg. 161
- ↑ "Santuario cupo" — Level Selection (Tri Force Heroes)
- ↑ "黄泉の神殿" — Level Selection (Tri Force Heroes)
- ↑ "Unterwelttempel" — Level Selection (Tri Force Heroes)
- ↑ "Temple de l'au-delà" — Level Selection (Tri Force Heroes)
- ↑ "Templo del inframundo" — Level Selection (Tri Force Heroes)
- ↑ "temple de l'au-delà" — Level Selection (Tri Force Heroes)
- ↑ "Templo del Inframundo" — Level Selection (Tri Force Heroes)