Hyrule Castle B3: Difference between revisions
(Created page with "{{Infobox Location |image= {{Media <!-- Uses Series term -->|Screenshot BotW= File:BotW Hyrule Castle B3.png |Screenshot TotK= File:TotK Hyrule Castle B3.png |Map TotK= File:TotK Hyrule Castle B3 Map.png }} |caption= |pronunciation= |game= BotW, TotK |other= |inhab= |items= |services= |season= |temperature= |counter= |theme= |related= {{List| {{Term|Series|Hyrule Castle 1F|link}}, {{Term|Series|Hyrule Castle B1|link}}, {{Term|Series|Hyrule Castle B2|lin...") |
TriforceTony (talk | contribs) No edit summary Tag: Undo |
||
| (3 intermediate revisions by the same user not shown) | |||
| Line 34: | Line 34: | ||
==={{TotK|-}}=== | ==={{TotK|-}}=== | ||
Hyrule Castle B3 reappears in {{TotK}}, having been located within the portion of {{Term|TotK|Hyrule Castle (Dungeon)|link}} that was lifted into the {{Term|TotK|Sky|link}} at the start of the {{Term|TotK|Upheaval|link}}. | Hyrule Castle B3 reappears in {{TotK}}, having been located within the portion of {{Term|TotK|Hyrule Castle (Dungeon)|link}} that was lifted into the {{Term|TotK|Sky|link}} at the start of the {{Term|TotK|Upheaval|link}}. | ||
====Areas==== | |||
{{Gallery List|Locations | |||
|TotK= Hyrule Castle Corridors, Library {{Areas Within}}, Round Spiral Staircase, Water Pump Room | |||
}} | |||
====Enemies==== | |||
{{Gallery List|Enemies | |||
|TotK= Black Lizalfos [Qty:2][Sublocation:Hyrule Castle Corridors]{{Equipment|TotK|Steel Lizal Bow}}, Gloom [Sublocation:Hyrule Castle Corridors:Library] | |||
}} | |||
=====Sub-Bosses===== | |||
{{Heading|During the "Crisis at Hyrule Castle" Main Quest}} | |||
{{Listing Container| | |||
{{Listing Item|header= {{Small|''Scourge of Hyrule Castle''}}<br/>Monster Forces|perrow= 2|content= | |||
{{Gallery List|Enemies | |||
|TotK= Black Hinox [Qty:1][Sublocation:Library]{{Equipment|TotK|Royal Bow}}{{Equipment|TotK|Royal Broadsword}}{{Equipment|TotK|Royal Claymore}}, Electric Chuchu [2][Qty:1][Sublocation:Library], Fire Chuchu [2][Qty:1][Sublocation:Library], Ice Chuchu [2][Qty:1][Sublocation:Library] | |||
}} | |||
}} | |||
{{Listing Item|header= {{Small|''Scourge of Hyrule Castle''}}<br/>Monster Forces{{List Note|North of the {{Term|TotK|Library|link}}}}|perrow= 2|content= | |||
{{Gallery List|Enemies | |||
|TotK= Gibdo [Qty:3][Sublocation:Hyrule Castle Corridors], Moth Gibdo [Qty:1][Sublocation:Hyrule Castle Corridors] | |||
}} | |||
{{List Notes}} | |||
}} | |||
{{Listing Item|header= {{Small|''Scourge of Hyrule Castle''}}<br/>Monster Forces|perrow= 2|content= | |||
{{Gallery List|Enemies | |||
|TotK= Ice Keese [Qty:2][Sublocation:Water Pump Room], Silver Moblin [Qty:1][Sublocation:Water Pump Room]{{Equipment|TotK|Knight's Claymore}} | |||
}} | |||
}} | |||
{{Listing Item|header= {{Small|''Scourge of Hyrule Castle''}}<br/>Monster Forces{{List Note|East of the {{Term|TotK|Round Spiral Staircase|link}}}}|perrow= 2|content= | |||
{{Gallery List|Enemies | |||
|TotK= Shock Like [Qty:3][Sublocation:Hyrule Castle Corridors] | |||
}} | |||
{{List Notes}} | |||
}} | |||
}} | |||
====Equipment==== | |||
{{Gallery List|Equipment | |||
|TotK= Arrow x 10 [Sublocation:Library:Water Pump Room], Knight's Broadsword [Sublocation:Hyrule Castle Corridors:Round Spiral Staircase], Knight's Claymore [Sublocation:Library], Royal Broadsword [Sublocation:King's Study], Royal Claymore [Sublocation:Hyrule Castle Corridors], Royal Guard's Bow [Sublocation:Water Pump Room], Royal Guard's Shield [Sublocation:Hyrule Castle Corridors:Library], Royal Guard's Spear [Sublocation:Library], Royal Shield [Sublocation:King's Study], Soldier's Bow [Sublocation:Library], Soldier's Claymore [Sublocation:Library], Soldier's Shield [Sublocation:Round Spiral Staircase], Sturdy Long Stick [Sublocation:Hyrule Castle Corridors] | |||
}} | |||
====Treasure Chests==== | |||
{{Treasure Chests|game= TotK | |||
|- | |||
| Stone Chest [2] | |||
| Royal Guard's Claymore | |||
| -0387, 0999, 0241 | |||
| Atop a ledge around the side of the water pump in the {{Term|TotK|Water Pump Room|link}} | |||
|- | |||
| Stone Chest [2] | |||
| Shard of Dinraal's Spike | |||
| -0189, 1083, 0221 | |||
| In the chamber hidden by a {{Term|TotK|Bookcase|link}} along the western {{Term|TotK|Library|link}} wall | |||
|- | |||
| Stone Chest [2] | |||
| Royal Guard Boots | |||
| -0174, 1122, 0216 | |||
| At the back wall of the {{Term|TotK|King's Study|link}} | |||
|- | |||
| Stone Chest [2] | |||
| Royal Broadsword | |||
| -0326, 1001, 0186 | |||
| Located in a small chamber positioned beneath {{Term|TotK|Princess Zelda's Room|link}} on the underside of the portion of {{Term|TotK|Hyrule Castle|link}} that has risen into the {{Term|TotK|Sky|link}}<br/>Accessible by {{Term|TotK|Paraglider|link|display=Paragliding}} eastward from the western edge near {{Term|TotK|Princess Zelda's Study|link}} | |||
}} | |||
==Nomenclature== | ==Nomenclature== | ||
Latest revision as of 03:26, 11 May 2024
Hyrule Castle B3 is a recurring location in The Legend of Zelda series.(TotK)[1] Hyrule Castle B3 goes unnamed in Breath of the Wild.
Features and Overview
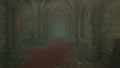
Breath of the Wild
Hyrule Castle B3 is an interior portion of Hyrule Castle, which includes both the Library and the Round Spiral Staircase.
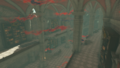
Tears of the Kingdom
Hyrule Castle B3 reappears in Tears of the Kingdom, having been located within the portion of Hyrule Castle that was lifted into the Sky at the start of the Upheaval.
Areas
-
-
Library
 More areas within
-
-


Enemies


Sub-Bosses
During the "Crisis at Hyrule Castle" Main Quest
Scourge of Hyrule Castle
Monster Forces


Scourge of Hyrule Castle
Monster Forces[a]
-
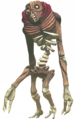
Gibdo ×3
-

Moth Gibdo ×1


Scourge of Hyrule Castle
Monster Forces


Scourge of Hyrule Castle
Monster Forces[a]
-
Shock Like ×3

- ↑ East of the Round Spiral Staircase
Equipment


Treasure Chests
| Treasure Chest | |
|---|---|
| Contents | |
| Coordinates | -0387, 0999, 0241 |
| Notes | Atop a ledge around the side of the water pump in the Water Pump Room |
| Treasure Chest | |
| Contents | |
| Coordinates | -0189, 1083, 0221 |
| Notes | |
| Treasure Chest | |
| Contents | |
| Coordinates | -0174, 1122, 0216 |
| Notes | At the back wall of the King's Study |
| Treasure Chest | |
| Contents | |
| Coordinates | -0326, 1001, 0186 |
| Notes | Located in a small chamber positioned beneath Princess Zelda's Room on the underside of the portion of Hyrule Castle that has risen into the Sky |

| Treasure Chest | Contents | Coordinates | Notes |
|---|---|---|---|
-0387, 0999, 0241 | Atop a ledge around the side of the water pump in the Water Pump Room | ||
-0189, 1083, 0221 | |||
-0174, 1122, 0216 | At the back wall of the King's Study | ||
-0326, 1001, 0186 | Located in a small chamber positioned beneath Princess Zelda's Room on the underside of the portion of Hyrule Castle that has risen into the Sky |
Nomenclature
| Language | Names | |
|---|---|---|
Japanese | ハイラルじょう城 B3 | |
ChineseTR | 海拉魯城堡 B3 (Hǎilālǔ Chéngbǎo B3) | |
ChineseSI | 海拉鲁城堡 B3 (Hǎilālǔ Chéngbǎo B3) | |
FrenchCA | Château d'Hyrule, 3e sous-sol | |
FrenchEU | Château d'Hyrule, 3e sous-sol | |
German | Schloss Hyrule – U3 | |
Italian | Castello di Hyrule - S3 | |
Korean | 하이랄 성 B3 | |
SpanishEU | Castillo de Hyrule — S3 | |
| This table was generated using translation pages. To request an addition, please contact a staff member with a reference. | ||
See Also
References
- ↑ "Hyrule Castle B3
Hyrule Field" — Game Screen (Tears of the Kingdom)