Crenel Hills: Difference between revisions
No edit summary |
|||
| Line 34: | Line 34: | ||
[[File:BotW Korok Seed Icon.png|left|40px]] | [[File:BotW Korok Seed Icon.png|left|40px]] | ||
A total of six {{Plural|BotW|Korok Seed Puzzle|link}} are located on the {{Term|BotW|Crenel Hills}}. The first can be solved by inspecting the {{Term|BotW|Leaves with Fairy Dust|link}} south of the {{Term|BotW|Raft}}. The second is a {{Term|BotW|Circle|link}} of {{Plural|Series|Lily Pad|link}}, which {{Term|BotW|Link}} must jump in the center of. The third is a {{Term|BotW|Rock|link}} that {{Term|BotW|Link}} must pick up, revealing it to be a {{Term|BotW|Natural Hiding Spot|link}}. On top of a dead {{Term|BotW|Cedar Tree|link}} near {{Term|BotW|Namika Ozz Shrine}}, {{Term|BotW|Link}} will find more {{Term|BotW|Leaves with Fairy Dust}}, which is the fourth {{Term|BotW|Korok Seed Puzzle|display=Puzzle}}. South of the {{Term|BotW|Ancient Shrine|link}}, {{Term|BotW|Link}} will find the fifth, which is an {{Term|BotW|Archery (Mechanic)|link}} {{Term|BotW|Korok Seed Puzzle|display=Puzzle}} marked by a {{Term|BotW|Pinwheel|link}}. Finally, the sixth is a {{Term|BotW|Natural Hiding Spot}} southeast of the {{Term|BotW|Ancient Shrine|display=Shrine}}, requiring {{Term|BotW|Link}} to pick up a {{Term|BotW|Rock}} in a normal-sized {{Term|BotW|Tree Stump}}. Once each of these {{Plural|BotW|Korok Seed Puzzle}} are solved, a {{Term|BotW|Korok|link}} will appear and give {{Term|BotW|Link}} a {{Term|BotW|Korok Seed|link}}.<ref>{{Cite|Yahaha! You found me!|Korok|BotW}}</ref> | A total of six {{Plural|BotW|Korok Seed Puzzle|link}} are located on the {{Term|BotW|Crenel Hills}}. The first can be solved by inspecting the {{Term|BotW|Leaves with Fairy Dust|link}} south of the {{Term|BotW|Raft}}. The second is a {{Term|BotW|Circle|link}} of {{Plural|Series|Lily Pad|link}}, which {{Term|BotW|Link}} must jump in the center of. The third is a {{Term|BotW|Rock|link}} that {{Term|BotW|Link}} must pick up, revealing it to be a {{Term|BotW|Natural Hiding Spot|link}}. On top of a dead {{Term|BotW|Cedar Tree|link}} near {{Term|BotW|Namika Ozz Shrine}}, {{Term|BotW|Link}} will find more {{Term|BotW|Leaves with Fairy Dust}}, which is the fourth {{Term|BotW|Korok Seed Puzzle|display=Puzzle}}. South of the {{Term|BotW|Ancient Shrine|link}}, {{Term|BotW|Link}} will find the fifth, which is an {{Term|BotW|Archery (Mechanic)|link}} {{Term|BotW|Korok Seed Puzzle|display=Puzzle}} marked by a {{Term|BotW|Pinwheel|link}}. Finally, the sixth is a {{Term|BotW|Natural Hiding Spot}} southeast of the {{Term|BotW|Ancient Shrine|display=Shrine}}, requiring {{Term|BotW|Link}} to pick up a {{Term|BotW|Rock}} in a normal-sized {{Term|BotW|Tree Stump}}. Once each of these {{Plural|BotW|Korok Seed Puzzle}} are solved, a {{Term|BotW|Korok|link}} will appear and give {{Term|BotW|Link}} a {{Term|BotW|Korok Seed|link}}.<ref>{{Cite|Yahaha! You found me!|Korok|BotW}}</ref> | ||
====Areas==== | |||
{{Gallery List|Locations | |||
|BotW= Namika Ozz Shrine | |||
}} | |||
===={{Plural|BotW|Creature}}==== | ===={{Plural|BotW|Creature}}==== | ||
| Line 42: | Line 47: | ||
====Minor {{Plural|BotW|Enemy}}==== | ====Minor {{Plural|BotW|Enemy}}==== | ||
{{Gallery List|Enemies | {{Gallery List|Enemies | ||
|BotW= Blizzrobe {{ | |BotW= Blizzrobe [Qty:1] {{Equipment|BotW|Blizzard Rod}}, | ||
Blue Bokoblin, | Blue Bokoblin [Qty:1], | ||
Blue Bokoblin {{ | Blue Bokoblin [Qty:1] {{Equipment|BotW|Meteor Rod}}{{Equipment|BotW|Horn}}, | ||
Blue Bokoblin {{ | Blue Bokoblin [Qty:2] {{Equipment|BotW|Spiked Boko Bow}}{{Equipment|BotW|Arrow}}, | ||
Blue Bokoblin {{ | Blue Bokoblin [Qty:3] {{Equipment|BotW|Spiked Boko Bow}}{{Equipment|BotW|Bomb Arrow}}, | ||
Blue Bokoblin {{ | Blue Bokoblin [Qty:1] {{Equipment|BotW|Spiked Boko Bow}}{{Equipment|BotW|Fire Arrow}}{{Equipment|BotW|Horn}}, | ||
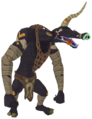
Blue Moblin {{ | Blue Moblin [Qty:2] {{Equipment|BotW|Spiked Boko Spear}}, | ||
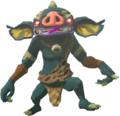
Bokoblin {{ | Bokoblin [Qty:1] {{Equipment|BotW|Spiked Boko Club}}{{Equipment|BotW|Horn}}, | ||
Bokoblin {{ | Bokoblin [Qty:1] {{Equipment|BotW|Spiked Boko Bow}}{{Equipment|BotW|Arrow}}{{Equipment|BotW|Horn}}, | ||
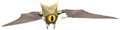
Electric Keese, | Electric Keese [Qty:2], | ||
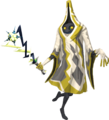
Electric Wizzrobe {{ | Electric Wizzrobe [Qty:1] {{Equipment|BotW|Lightning Rod}}, | ||
Fire Wizzrobe {{ | Fire Keese [Qty:3], | ||
Forest Octorok, | Fire Wizzrobe [Qty:1] {{Equipment|BotW|Fire Rod}}, | ||
Ice Chuchu, | Forest Octorok [Qty:6], | ||
Ice Wizzrobe {{ | Ice Chuchu [Qty:7], | ||
Keese, | Ice Chuchu [2] [Qty:1], | ||
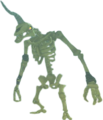
Meteo Wizzrobe {{ | Ice Keese [Qty:3], | ||
Stalizalfos {{ | Ice Wizzrobe [Qty:1] {{Equipment|BotW|Ice Rod}}, | ||
Stalizalfos {{ | Keese [Qty:20], | ||
Stalkoblin {{ | Meteo Wizzrobe [Qty:1] {{Equipment|BotW|Meteor Rod}}, | ||
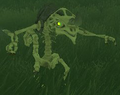
Stalmoblin {{ | Stalizalfos [Qty:1] {{Equipment|BotW|Lizal Boomerang}}, | ||
Stalmoblin {{ | Stalizalfos [Qty:3] {{Equipment|BotW|Lizal Spear}}, | ||
Stone Pebblit, | Stalkoblin [Qty:3] {{Equipment|BotW|Dragon Bone Boko Bow}}{{Equipment|BotW|Arrow}}, | ||
Thunder Wizzrobe {{ | Stalmoblin [Qty:1] {{Equipment|BotW|Moblin Club}}, | ||
Yiga Footsoldier {{ | Stalmoblin [Qty:1] {{Equipment|BotW|Spiked Moblin Club}}, | ||
Stone Pebblit [Qty:16], | |||
Thunder Wizzrobe [Qty:1] {{Equipment|BotW|Thunderstorm Rod}}, | |||
Yiga Footsoldier {{Equipment|BotW|Duplex Bow}}{{Equipment|BotW|Arrow}} | |||
}} | |||
====={{Plural|BotW|Sub-Boss}}===== | |||
{{Gallery List|Enemies | |||
|BotW= Stone Talus (Luminous) [Qty:1]<br/>{{Small|''Crenel Hills''}} | |||
}} | }} | ||
Revision as of 10:22, 30 November 2023
The Crenel Hills are a recurring location in The Legend of Zelda series.[1][2]
Features and Overview
Breath of the Wild
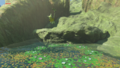
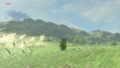
The Crenel Hills are located in Hyrule Field. They are a series of rocky hills that are surrounded on either side by Hylia River. In addition to this, covered in the giant, hollow Tree Stumps. The Namika Ozz Shrine is located within one of these Stumps, and Thims Bridge and Orsedd Bridge both connect the Hills to other parts of Hyrule. The Crenel Hills also feature the remains of many smaller Trees, and a Raft is beached on its northern shore. Ore Deposits, Rare Ore Deposits, and Luminous Stone Deposits can all be found on the Crenel Hills.
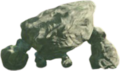
In the northern part of the Crenel Hills, there is a Stone Talus (Luminous) embedded in the ground.[3] It will initially be inactive, but it will rise up and begin to attack Link if he approaches it.
Several Treasure Chests can be found among the Crenel Hills. In total, these Chests contain one Purple Rupee, one Silver Rupee, one Ruby, one Thunderstorm Rod, one Soldier's Shield, 10 Fire Arrows, five Shock Arrows, and five Bomb Arrows.
A total of six Korok Seed Puzzles are located on the Crenel Hills. The first can be solved by inspecting the Leaves with Fairy Dust south of the Raft. The second is a Circle of Lily Pads, which Link must jump in the center of. The third is a Rock that Link must pick up, revealing it to be a Natural Hiding Spot. On top of a dead Cedar Tree near Namika Ozz Shrine, Link will find more Leaves with Fairy Dust, which is the fourth Puzzle. South of the Ancient Shrine, Link will find the fifth, which is an Archery Puzzle marked by a Pinwheel. Finally, the sixth is a Natural Hiding Spot southeast of the Shrine, requiring Link to pick up a Rock in a normal-sized Tree Stump. Once each of these Korok Seed Puzzles are solved, a Korok will appear and give Link a Korok Seed.[4]
Areas

Creatures


Minor Enemies
-

-
-
-
-
-
-
-

-
-

-

-

Fire Keese ×3
-

-

-

Ice Chuchu ×7
-

Ice Chuchu ×1
-

Ice Keese ×3
-

-
Keese ×20
-

-
-
-

-
-
-
Stone Pebblit ×16
-
-


Sub-Bosses
-
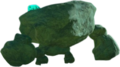
Stone Talus (Luminous) ×1
Crenel Hills
_Model.png)
Materials


Tears of the Kingdom
Nomenclature
The Crenel Hills and Crenel Peak are named after Mount Crenel, a mountain from The Minish Cap.[5]
| Language | Names | |
|---|---|---|
Japanese | ゴングルのおか丘 | |
ChineseTR | 更格爾山丘 (Gènggéěr shānqiū) | |
ChineseSI | 更格尔山丘 (Gènggéěr shānqiū) | |
FrenchCA | Colline Gonggle | |
FrenchEU | Colline Gonggle | |
German | Gongol-Hügel | |
Italian | Colle Fez | |
Korean | 공글 언덕 | |
SpanishEU | Colina de Gongol | |
| This table was generated using translation pages. To request an addition, please contact a staff member with a reference. | ||
Gallery
-
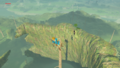
One of the Koroks found on the Crenel Hills from Breath of the Wild
-
One of the Koroks found on the Crenel Hills from Breath of the Wild
-
One of the Koroks found on the Crenel Hills from Breath of the Wild


See Also
- Crenel Canyon Mine
- Crenel Hills Cave
- Crenel Peak
- Crenel Peak Cave
- Crenel Road
- Hyrule Field
- Mount Crenel
- Mount Crenel's Base
- Namika Ozz Shrine
References
- ↑ "Crenel Hills" — Map (Breath of the Wild)
- ↑ "Crenel Hills" — Map (Tears of the Kingdom)
- ↑ "Crenel Hills
Stone Talus" — N/A (Breath of the Wild) - ↑ "Yahaha! You found me!" — Korok (Breath of the Wild)
- ↑ The Legend of Zelda: Breath of the Wild—The Complete Official Guide, Piggyback Interactive Limited, pg. 351