Wallmaster: Difference between revisions
m (→top: Infobox Transition) |
m (→Gallery) |
||
| (46 intermediate revisions by 16 users not shown) | |||
| Line 1: | Line 1: | ||
{{Hatnote|Not to be confused with {{Term|Series|Floormaster|link}}.}} | |||
{{Infobox Enemy | {{Infobox Enemy | ||
|image= | |image= | ||
{{Media | {{Media | ||
|Artwork TLoZ= File:TLoZ Wallmaster Artwork.png | |Artwork TLoZ= File:TLoZ Wallmaster Artwork.png | ||
|Model LANS= File:LANS Wallmaster Model.png | |||
|Model OoT= File:OoT Wallmaster Model.png | |Model OoT= File:OoT Wallmaster Model.png | ||
|Model OoT3D= File:OoT3D Wallmaster Model.png | |Model OoT3D= File:OoT3D Wallmaster Model.png | ||
| Line 18: | Line 19: | ||
}} | }} | ||
|caption= | |caption= | ||
|game= | |pronunciation= | ||
|other= | |plural= | ||
| | |race= | ||
|game= TLoZ, ALttP, LANS, OoT, MM, OoS, OoA, FSA, TMC, ALBW, TFH | |||
|other= TLoZ (Valiant Comics), TFoE, TWoG, ZA, FPTRR | |||
|habitat= {{Spawn Locations}} | |||
|member= | |||
|health= | |||
{{Infobox Game Blocks | |||
|TLoZ= {{HP|TLoZ|3}} | |||
|OoT= {{HP|OoT|4}} | |||
}} | |||
|attack= | |||
|weapon= {{Term|Series|Sword|link}} | |weapon= {{Term|Series|Sword|link}} | ||
|spoils= {{Term|TLoZ|Heart|link}} | |spoils= | ||
{{Infobox Game Blocks | |||
|TLoZ= {{Term|TLoZ|Heart|link}}, One {{Term|TLoZ|Rupee|link}}, Five {{Plural|TLoZ|Rupee}}, {{Term|TLoZ|Clock|link}} | |||
}} | }} | ||
{{Term/Store|Wallmaster|Wallmasters|Series, TLoZ, ALttP, OoT, OoT3D, MM, MM3D, OoS, OoA, FSA, TMC, ALBW, TFH|plural}},<ref>{{Cite Book|quote= |book= E |publisher= |page= 211 {{Exp Game|TLoZ, ALttP, OoT, OoT3D, MM, MM3D, OoA, OoS, FSA, TMC, ALBW, TFH}}}}</ref> also known as | |exp= | ||
|theme= | |||
}} | |||
{{Term/Store|Wallmaster|Wallmasters|Series, TLoZ, ALttP, OoT, OoT3D, MM, MM3D, OoS, OoA, FSA, TMC, ALBW, TFH|plural}},{{Exp Game|TLoZ, ALttP, OoT, MM, OoS, OoA, FSA, TMC, ALBW, TFH}}<ref>{{Cite Book|quote= |book= E |publisher= |page= 211 {{Exp Game|TLoZ, ALttP, OoT, OoT3D, MM, MM3D, OoA, OoS, FSA, TMC, ALBW, TFH}}}}</ref> also known as {{Term/Store|Wall Master|Wall Masters|ZA|plural}},{{Exp Game|TMC, ZA}}<ref>{{Cite|Wall Master|Figurine|TMC}}</ref><ref>{{Cite Magazine|quote= S2-22: Twee Wall Masters (geesthanden) proberen Zelda te grijpen.|translation= S2-22: Two Wall Masters (ghost hands) try to grab Zelda.|magazine= CD Interactief|volume= |issue= |date= January/February/March 1999|publisher= HUB Uitgevers|page= 7}}</ref> are recurring {{Plural|Series|Enemy|link}} in {{TLoZ|Series}}.{{Name Ref|TLoZ (Valiant Comics), TFoE, TWoG, FPTRR}} {{Plural|Series|Wallmaster}} go unnamed in {{LA|NS}}. | |||
==Characteristics== | ==Characteristics== | ||
{{Plural|Series|Wallmaster}} are monstrous hands that hang from the walls and ceilings of dark areas and {{Plural|Series|Dungeon|link}},<ref>{{Cite | {{Plural|Series|Wallmaster}} are monstrous hands that hang from the walls and ceilings of dark areas and {{Plural|Series|Dungeon|link}},<ref>{{Cite Manual|quote=A monster hand that appears out of the labyrinth wall.|game= TLoZ|page=36}}</ref> attempting to grab {{Term|Series|Link|link}}. If they grab him, {{Term|Series|Link}} will be taken back to the beginning of the {{Term|Series|Dungeon}} or the specific room.<ref>{{Cite Manual|quote=If it catches Link, it takes him back to the entrance to the labyrinth.|game= TLoZ|page=36}}</ref> | ||
With the exception of {{TLoZ|-}}, {{Plural|Series|Wallmaster}} drop down from the ceiling, which is indicated by their growing shadows and a warning sound as they prepare to grab {{Term|Series|Link}}. | With the exception of {{TLoZ|-}}, {{Plural|Series|Wallmaster}} drop down from the ceiling, which is indicated by their growing shadows and a warning sound as they prepare to grab {{Term|Series|Link}}. | ||
==={{TLoZ|-}}=== | ==={{TLoZ|-}}=== | ||
{{ | {{Manual|TLoZ|Wall Master|A monster hand that appears out of the labyrinth wall. If it catches Link, it takes him back to the entrance to the labyrinth.}} | ||
{{Plural|TLoZ|Wallmaster}} emerge from the walls and attempt to grab {{Term|TLoZ|Link|link}} in {{TLoZ}}. When defeated, {{Plural|TLoZ|Wallmaster}} may drop either a {{Term|TLoZ|Heart|link}}, one {{Term|TLoZ|Rupee|link}}, five {{Plural|TLoZ|Rupee}} or a {{Term|TLoZ|Clock|link}}.{{Note|If {{Term|TLoZ|Link}} defeats 10 enemies without getting hit or teleporting with the {{Term|TLoZ|Recorder}}, then the 10th enemy defeated will drop five {{Plural|TLoZ|Rupee}}; however, if the 10th enemy is defeated with a {{Term|TLoZ|Bomb}}, then it will drop four {{Plural|TLoZ|Bomb}}. If {{Term|TLoZ|Link}} defeats 16 enemies without getting hit or teleporting, then the 16th enemy will drop a {{Term|TLoZ|Fairy}}. After the 16th enemy, {{Term|TLoZ|Link}} must get hit and reset the counter to zero in order to achieve this effect again. Defeating {{Plural|TLoZ|Armos}}, {{Plural|TLoZ|Like Like}}, {{Plural|TLoZ|Keese}}, or {{Plural|TLoZ|Gel}} will not be counted.<ref>{{Cite | {{Plural|TLoZ|Wallmaster}} emerge from the walls and attempt to grab {{Term|TLoZ|Link|link}} in {{TLoZ}}. When defeated, {{Plural|TLoZ|Wallmaster}} may drop either a {{Term|TLoZ|Heart|link}}, one {{Term|TLoZ|Rupee|link}}, five {{Plural|TLoZ|Rupee}} or a {{Term|TLoZ|Clock|link}}.{{Note|If {{Term|TLoZ|Link}} defeats 10 enemies without getting hit or teleporting with the {{Term|TLoZ|Recorder}}, then the 10th enemy defeated will drop five {{Plural|TLoZ|Rupee}}; however, if the 10th enemy is defeated with a {{Term|TLoZ|Bomb}}, then it will drop four {{Plural|TLoZ|Bomb}}. If {{Term|TLoZ|Link}} defeats 16 enemies without getting hit or teleporting, then the 16th enemy will drop a {{Term|TLoZ|Fairy}}. After the 16th enemy, {{Term|TLoZ|Link}} must get hit and reset the counter to zero in order to achieve this effect again. Defeating {{Plural|TLoZ|Armos}}, {{Plural|TLoZ|Like Like}}, {{Plural|TLoZ|Keese}}, or {{Plural|TLoZ|Gel}} will not be counted.<ref>{{Cite Web|quote=|author=n.a.|published=n.d.|retrieved=August 17, 2017|url=http://redcandle.us/The_Legend_of_Zelda#Forced_drops|title=Forced Drops|site=redcandle.us}}</ref>}} | ||
==={{ALttP|-}}=== | ==={{ALttP|-}}=== | ||
| Line 42: | Line 58: | ||
==={{OoT|-}}=== | ==={{OoT|-}}=== | ||
{{Navi| | {{Stub|OoT}} | ||
Watch out for its shadow on the floor. Destroy it before it goes back up to the ceiling!}} | |||
{{Navi | |||
|quote1= {{Color|OoT White|Wallmaster}}<br/>Watch out for its shadow on the floor. Destroy it before it goes back up to the ceiling! | |||
}} | |||
{{Term|OoT3D|Navi|link}} warns {{Term|OoT3D|Link|link}} upon entering an area with {{Plural|OoT3D|Wallmaster}} in {{OoT}}.<ref>{{Cite|Watch for the shadows of monsters hanging from the ceiling.|Navi|OoT}}</ref> They are also able to rapidly regenerate themselves after defeat. There are usually no more than one {{Term|OoT3D|Wallmaster}} in a room at any time. | {{Term|OoT3D|Navi|link}} warns {{Term|OoT3D|Link|link}} upon entering an area with {{Plural|OoT3D|Wallmaster}} in {{OoT}}.<ref>{{Cite|Watch for the shadows of monsters hanging from the ceiling.|Navi|OoT}}</ref> They are also able to rapidly regenerate themselves after defeat. There are usually no more than one {{Term|OoT3D|Wallmaster}} in a room at any time. | ||
==={{MM|-}}=== | ==={{MM|-}}=== | ||
{{Tatl| | {{Stub|MM}} | ||
{{Tatl | |||
|quote1= It's a {{Color|MM3D White|Wallmaster}}! Keep an eye out for it by watching for its shadow on the floor. Get it before it goes back up to the ceiling. | |||
}} | |||
==={{OoS|-}}=== | ==={{OoS|-}}=== | ||
| Line 61: | Line 83: | ||
==={{TMC|-}}=== | ==={{TMC|-}}=== | ||
{{ | {{Figurines|TMC}} | ||
{{Plural|TMC|Wallmaster}} appear in the {{Term|TMC| | {{Plural|TMC|Wallmaster}} appear in the {{Term|TMC|Fortress of Winds|link}} and {{Term|TMC|Dark Hyrule Castle|link}} in {{TMC}}. Unlike their {{Term|TMC|Floor Master|link}} counterparts, they hang from the ceilings of rooms, invisible except for their growing shadow before dropping down onto {{Term|TMC|Link|link}}. If a {{Term|TMC|Wallmaster}} touches {{Term|TMC|Link}}, it will not deal any damage, but will return him to the beginning of the {{Term|TMC|Dungeon|link}}. | ||
==={{ALBW|-}}=== | ==={{ALBW|-}}=== | ||
| Line 71: | Line 93: | ||
==Other Appearances== | ==Other Appearances== | ||
==={{TLoZ|-}} (Valiant Comics)=== | |||
{{Noncanon|Start}} | {{Noncanon|Start}} | ||
[[File:LinkZeldaWallmaster.jpg|{{Term|TLoZ (Valiant Comics)|Link}} pushing {{Term|TLoZ (Valiant Comics)|Princess Zelda}} into a {{Term|TLoZ (Valiant Comics)|Wallmaster}} to keep her safe outside|thumb|right]] | [[File:LinkZeldaWallmaster.jpg|{{Term|TLoZ (Valiant Comics)|Link}} pushing {{Term|TLoZ (Valiant Comics)|Princess Zelda}} into a {{Term|TLoZ (Valiant Comics)|Wallmaster}} to keep her safe outside|thumb|right]] | ||
{{Plural|TLoZ (Valiant Comics)|Wallmaster}} also make an appearance in the {{TLoZ|Valiant Comics}} published by Valiant Comics. They first appear in "''[[The Power]]''", where {{Term|TLoZ (Valiant Comics)|Link}} pushes {{Term|TLoZ (Valiant Comics)|Princess Zelda|link}} into a {{Term|TLoZ (Valiant Comics)|Wallmaster}} to let her escape from a dungeon while the young hero goes off to fight {{Term|TLoZ (Valiant Comics)|Ganon|link}}.<ref>{{Cite Book|quote=That Wall Master will put you outside where it's safe! I'll take a raincheck on the kiss!|book= | {{Plural|TLoZ (Valiant Comics)|Wallmaster}} also make an appearance in the {{TLoZ|Valiant Comics}} published by Valiant Comics. They first appear in "''[[The Power]]''", where {{Term|TLoZ (Valiant Comics)|Link}} pushes {{Term|TLoZ (Valiant Comics)|Princess Zelda|link}} into a {{Term|TLoZ (Valiant Comics)|Wallmaster}} to let her escape from a dungeon while the young hero goes off to fight {{Term|TLoZ (Valiant Comics)|Ganon|link}}.<ref>{{Cite Book|quote=That Wall Master will put you outside where it's safe! I'll take a raincheck on the kiss!|book= TLoZ (Valiant Comics)|publisher= |page=3}}</ref> They later appear in both stories of Issue #5. In "''[[Assault]]''", when {{Term|TLoZ (Valiant Comics)|Ganon}} tells {{Term|TLoZ (Valiant Comics)|Link}} that {{Term|TLoZ (Valiant Comics)|Princess Zelda}} has died,<ref>{{Cite Book|quote=Ha! Ha! Ha! Princess Zelda no longer exists! She is gone...forever!|book= TLoZ (Valiant Comics)|publisher= |page=9}}</ref> {{Term|TLoZ (Valiant Comics)|Miff|link}} charges at {{Term|TLoZ (Valiant Comics)|Ganon}} while at the same time, {{Term|TLoZ (Valiant Comics)|Link}} throws his {{Term|TLoZ (Valiant Comics)|Sword}} at him and warns the {{Term|TLoZ (Valiant Comics)|Fairy|link}} that it is a trap.<ref>{{Cite Book|quote=Miff! NO! It's a trap!|book= TLoZ (Valiant Comics)|publisher= |page=10}}</ref> Upon striking {{Term|TLoZ (Valiant Comics)|Ganon}} with the {{Term|TLoZ (Valiant Comics)|Sword}}, a {{Term|TLoZ (Valiant Comics)|Wallmaster}} is revealed, which crushes {{Term|TLoZ (Valiant Comics)|Link}}'s weapon in two and makes {{Term|TLoZ (Valiant Comics)|Link}} realize that {{Term|TLoZ (Valiant Comics)|Princess Zelda}} is still alive.<ref>{{Cite Book|quote=A Wall Master! He was lying...trying to make me mad enough to attack him! That means Zelda is still alive!|book= TLoZ (Valiant Comics)|publisher= |page=10}}</ref> In their last depiction in "''[[Choices]]''", a {{Term|TLoZ (Valiant Comics)|Wallmaster}} grabs {{Term|TLoZ (Valiant Comics)|Link}} by surprise after he successfully defeats a four-headed {{Term|TLoZ (Valiant Comics)|Gleeok|link}}. | ||
{{Noncanon|End}} | |||
==={{TFoE|-}}=== | ==={{TFoE|-}}=== | ||
{{Noncanon|Start}} | |||
{{Plural|TFoE|Wallmaster}} appear as non-moving enemies that appear in certain {{Plural|TFoE|Stage}} in {{TFoE}}, often in dark corridors. They often appear in large groups. Unlike their other incarnations, {{Plural|TFoE|Wallmaster}} stay in one place and do not pursue {{Term|TFoE|Link|link}}. If they move close to him, it will grab and damage him, however the {{Term|TFoE|Wallmaster}} will not attempt to drag him outside the area. They are a difficult enemy to fight as they do not have many weaknesses, but can be defeated with a {{Term|TFoE|Bomb|link}}. | {{Plural|TFoE|Wallmaster}} appear as non-moving enemies that appear in certain {{Plural|TFoE|Stage}} in {{TFoE}}, often in dark corridors. They often appear in large groups. Unlike their other incarnations, {{Plural|TFoE|Wallmaster}} stay in one place and do not pursue {{Term|TFoE|Link|link}}. If they move close to him, it will grab and damage him, however the {{Term|TFoE|Wallmaster}} will not attempt to drag him outside the area. They are a difficult enemy to fight as they do not have many weaknesses, but can be defeated with a {{Term|TFoE|Bomb|link}}. | ||
{{Noncanon|End}} | |||
==={{TWoG|-}}=== | ==={{TWoG|-}}=== | ||
{{Stub}} | {{Noncanon|Start}} | ||
{{Stub|TWoG}} | |||
{{Noncanon|End}} | |||
==={{ZA|-}}=== | ==={{ZA|-}}=== | ||
{{Noncanon|Start}} | |||
{{Plural|ZA|Wallmaster}} only appear in the {{Term|ZA|Shrine of Illusion|link}} in a single room later in the dungeon in {{ZA}}. Like their canonical incarnations, they drop down from the ceiling, but will not actively pursue {{Term|ZA|Princess Zelda|link}} and instead fall at random. They will damage {{Term|ZA|Princess Zelda}} if they touch her. | {{Plural|ZA|Wallmaster}} only appear in the {{Term|ZA|Shrine of Illusion|link}} in a single room later in the dungeon in {{ZA}}. Like their canonical incarnations, they drop down from the ceiling, but will not actively pursue {{Term|ZA|Princess Zelda|link}} and instead fall at random. They will damage {{Term|ZA|Princess Zelda}} if they touch her. | ||
{{Noncanon|End}} | |||
==={{FPTRR|-}}=== | ==={{FPTRR|-}}=== | ||
{{Noncanon|Start}} | |||
{{Plural|FPTRR|Wallmaster}} serve a helpful purpose in {{FPTRR}}. If {{Term|FPTRR|Tingle|link}} brews the {{Term|FPTRR|Hand Potion|link}}, he can use it on flaming hand statues deep inside {{Plural|FPTRR|Dungeon|link}}, and a {{Term|FPTRR|Wallmaster}} will grab {{Term|FPTRR|Tingle}} and toss him outside the {{Term|FPTRR|Dungeon}}. This is actually helpful, as the game can only be saved at {{Term|FPTRR|Tingle}}'s {{Term|FPTRR|House|link}}. {{Term|FPTRR|Tingle}} cannot use his {{Term|FPTRR|Tingle Balloon|link|display=Balloon}} to return home unless he is outside the cavern. | {{Plural|FPTRR|Wallmaster}} serve a helpful purpose in {{FPTRR}}. If {{Term|FPTRR|Tingle|link}} brews the {{Term|FPTRR|Hand Potion|link}}, he can use it on flaming hand statues deep inside {{Plural|FPTRR|Dungeon|link}}, and a {{Term|FPTRR|Wallmaster}} will grab {{Term|FPTRR|Tingle}} and toss him outside the {{Term|FPTRR|Dungeon}}. This is actually helpful, as the game can only be saved at {{Term|FPTRR|Tingle}}'s {{Term|FPTRR|House|link}}. {{Term|FPTRR|Tingle}} cannot use his {{Term|FPTRR|Tingle Balloon|link|display=Balloon}} to return home unless he is outside the cavern. | ||
{{Noncanon|End}} | {{Noncanon|End}} | ||
| Line 91: | Line 122: | ||
==Trivia== | ==Trivia== | ||
*In {{TLoZ|-}}, {{OoS|-}}, and {{OoA|-}}, {{Plural|Series|Wallmaster}} appear with only four fingers. | *In {{TLoZ|-}}, {{OoS|-}}, and {{OoA|-}}, {{Plural|Series|Wallmaster}} appear with only four fingers. | ||
*{{Plural|TMC|Wallmaster}} in {{TMC|-}} behave like the {{Plural|TWWHD|Floormaster|link}} from {{TWW|-}}. They also take their design and appearance from the art style of {{TWW|-}}; however, {{TMC|-}}'s {{Plural|TMC|Wallmaster}} are red as opposed to the {{Term|TWWHD|Floormaster}}'s purple. | *{{Plural|TMC|Wallmaster}} in {{TMC|-}} behave like the {{Plural|TWWHD|Floormaster|link}} from {{TWW|-}}. They also take their design and appearance from the art style of {{TWW|-}}; however, {{TMC|-}}'s {{Plural|TMC|Wallmaster}} are red as opposed to the {{Term|TWWHD|Floormaster}}'s purple. | ||
*An unused {{Term|Series|Wallmaster}} model exists in the files for {{CR}},<ref>{{Cite | *An unused {{Term|Series|Wallmaster}} model exists in the files for {{CR}},<ref>{{Cite Web|quote= |author= |published= |retrieved= June 17, 2019|url= https://www.nicovideo.jp/watch/sm23045617|title= キャプテン★レインボー 消された住人達その3 フォールマスター(前編)|site= Niconico Video|type= }}</ref> indicating that it was planned to appear as a character at some point in development. Its wish would seemingly have been to become a TV celebrity.<ref>{{Cite Web|quote= |author= |published= |retrieved= June 17, 2019|url= https://www.nicovideo.jp/watch/sm23130831|title= キャプテン★レインボー 消された住人達その3 フォールマスター(後編)|site= Niconico Video|type= }}</ref> | ||
==Nomenclature== | ==Nomenclature== | ||
{{Nomenclature}} | {{Nomenclature}} | ||
===Other Names=== | |||
{{Other Names | |||
|- | |||
| Clutch<ref>{{Cite Guide|quote= |game= ALttP |guide= Nintendo |page= 155}}</ref> | |||
| {{ALttP}} | |||
| {{Guide|ALttP|Nintendo}} | |||
| {{E}} | |||
|- | |||
| Clutch<ref name="Zelda.com">{{Cite Web|quote= {{Big|Wallmaster}}<br/>Wallmasters are devious creatures who rely on the element of surprise. They crawl along the ceiling or inside dungeon walls, waiting to grab their prey. Since they are nothing more than large hands, they are perfectly designed to carry their victims away. In some regions, the term "Clutch" is used to refer to these creatures.|retrieved= January 22, 2022|url= https://web.archive.org/web/20160308171202/http://zelda.com/universe/pedia/w.jsp#wallmaster|title= The Great Hyrule Encyclopedia |site= Zelda.com |type= archive}}</ref> | |||
| {{OoT}} | |||
| [[Zelda.com]] | |||
| {{E}} | |||
|- | |||
| Wall Master<ref>{{Cite Guide|quote= |game= OoT |guide= Versus |page= 76}}</ref> | |||
| {{OoT}} | |||
| {{Guide|OoT|Versus}} | |||
| {{E}} | |||
|- | |||
| Clutch<ref name="Zelda.com"/> | |||
| {{MM}} | |||
| [[Zelda.com]] | |||
| {{E}} | |||
|- | |||
| Clutch<ref name="Zelda.com"/> | |||
| {{OoS}} | |||
| [[Zelda.com]] | |||
| {{E}} | |||
|- | |||
| Three-Dimensional Space Master<ref>{{Cite Guide|quote= |game= OoS |guide= Versus |page= 12 {{Exp Game|OoS}}}}</ref> | |||
| {{OoS}} | |||
| {{Guide|OoS|Versus}} | |||
| {{E}} | |||
|- | |||
| Wallaster<ref>{{Cite Guide|quote= |game= OoS |guide= Versus |page= 26 {{Exp Game|OoS}}}}</ref> | |||
| {{OoS}} | |||
| {{Guide|OoS|Versus}} | |||
| {{E}} | |||
|- | |||
| Clutch<ref name="Zelda.com"/> | |||
| {{OoA}} | |||
| [[Zelda.com]] | |||
| {{E}} | |||
|- | |||
| Clutch<ref name="Zelda.com"/> | |||
| {{FSA}} | |||
| [[Zelda.com]] | |||
| {{E}} | |||
|- | |||
| Clutch<ref name="Zelda.com"/> | |||
| {{TMC}} | |||
| [[Zelda.com]] | |||
| {{E}} | |||
}} | |||
==Gallery== | ==Gallery== | ||
| Line 102: | Line 186: | ||
File:OoT Wallmaster-Floormaster Concept Screenshot.png|An early {{Term|OoT|Wallmaster}} from {{OoT|-}} | File:OoT Wallmaster-Floormaster Concept Screenshot.png|An early {{Term|OoT|Wallmaster}} from {{OoT|-}} | ||
File:ALBW Wallmaster Carrying Link Model.png|A {{Term|ALBW|Wallmaster}} carrying {{Term|ALBW|Link}} away from {{ALBW|-}} | File:ALBW Wallmaster Carrying Link Model.png|A {{Term|ALBW|Wallmaster}} carrying {{Term|ALBW|Link}} away from {{ALBW|-}} | ||
File: | File:BSTLoZ Wallmaster Sprite.png|{{Term|BSTLoZ|Wallmaster}} from {{BSTLoZ|-}} | ||
File: | File:TWoG Wallmaster Sprite.png|{{Term|TFoE|Wallmaster}} from {{TFoE|-}} and {{TWoG|-}} | ||
File:ZA | File:ZA Wall Master Sprite.png|{{Term|ZA|Wallmaster}} from {{ZA|-}} | ||
File:HW Wizzro Hand.jpg|{{Term|HW|Wizzro}}'s hand attack resembling a {{Term|HW|Wallmaster}} from {{HW|-}} | File:HW Wizzro Hand.jpg|{{Term|HW|Wizzro}}'s hand attack resembling a {{Term|HW|Wallmaster}} from {{HW|-}} | ||
</gallery> | </gallery> | ||
| Line 110: | Line 194: | ||
==See Also== | ==See Also== | ||
* {{Term|Series|Floormaster|link}} | * {{Term|Series|Floormaster|link}} | ||
* {{Term|Series|Key Master|link}} | |||
* {{Term|Series|Knucklemaster|link}} | |||
* {{Term|Series|Zant's Hand|link}} | * {{Term|Series|Zant's Hand|link}} | ||
| Line 115: | Line 201: | ||
{{Ref}} | {{Ref}} | ||
{{Categories | {{Categories | ||
|Levitating Enemies | |Hand Enemies, Levitating Enemies | ||
|enemies= TLoZ, ALttP, LANS, OoT, OoT3D, MM, MM3D, OoS, OoA, FSA, TMC, ALBW, TFH, TFoE, TWoG | |enemies= TLoZ, ALttP, LANS, OoT, OoT3D, MM, MM3D, OoS, OoA, FSA, TMC, ALBW, TFH, TFoE, TWoG, BSTLoZ | ||
}} | }} | ||
Latest revision as of 12:55, 24 August 2023
Wallmasters,(TLoZ | ALttP | OoT | MM | OoS | OoA | FSA | TMC | ALBW | TFH)[1] also known as Wall Masters,(TMC | ZA)[2][3] are recurring Enemies in The Legend of Zelda series.[name references needed] Wallmasters go unnamed in Link's Awakening for Nintendo Switch.
Characteristics
Wallmasters are monstrous hands that hang from the walls and ceilings of dark areas and Dungeons,[4] attempting to grab Link. If they grab him, Link will be taken back to the beginning of the Dungeon or the specific room.[5]
With the exception of The Legend of Zelda, Wallmasters drop down from the ceiling, which is indicated by their growing shadows and a warning sound as they prepare to grab Link.
The Legend of Zelda
Wallmasters emerge from the walls and attempt to grab Link in The Legend of Zelda. When defeated, Wallmasters may drop either a Heart, one Rupee, five Rupees or a Clock.[note 1]
A Link to the Past
Wallmasters appear in A Link to the Past in the Skull Woods. Here, they drop down from the ceiling and try to grab Link. If they succeed, they take him back to the beginning of the Dungeon.
Link's Awakening for Nintendo Switch
Wallmasters appear as a +Effect Panel that can be placed in any Chamber inside Chamber Dungeons in Link's Awakening for Nintendo Switch. When they appear, they drop down and bring Link back to the beginning of the Dungeon.
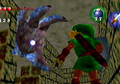
Ocarina of Time

Wallmaster
Watch out for its shadow on the floor. Destroy it before it goes back up to the ceiling!
Navi warns Link upon entering an area with Wallmasters in Ocarina of Time.[7] They are also able to rapidly regenerate themselves after defeat. There are usually no more than one Wallmaster in a room at any time.
Majora's Mask

It's a Wallmaster! Keep an eye out for it by watching for its shadow on the floor. Get it before it goes back up to the ceiling.
Oracle of Seasons
Oracle of Ages
Four Swords Adventures
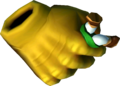
The Minish Cap
| Figurine | |
|---|---|
| Number | 089 |
| Description | Appears in dungeons. |
| Figurine | Number | Description |
|---|---|---|
089 | Appears in dungeons. |
Wallmasters appear in the Fortress of Winds and Dark Hyrule Castle in The Minish Cap. Unlike their Floormaster counterparts, they hang from the ceilings of rooms, invisible except for their growing shadow before dropping down onto Link. If a Wallmaster touches Link, it will not deal any damage, but will return him to the beginning of the Dungeon.
A Link Between Worlds
Link can Wall Merge to avoid their attacks in A Link Between Worlds, which will stun the Wallmaster as it slams into the floor.
Tri Force Heroes
Wallmasters in Tri Force Heroes only appear as special enemies during the "Evade the Wallmaster!" Drablands Challenge. When one appears, it will choose a Link to follow and, after a period of time, will slam down onto its target. If one slams down onto a Link, it will result in an instant KO and a loss of a Fairy for all the Links. Destroying a Wallmaster will delay its attempts to grab a Link, reappearing moments later. The effect of a Wallmaster's slam can damage other enemies, flip Terrorpins, and cause damage to brittle ice floor panels. Wallmasters can be stunned if they are hit with certain items, such as the shockwave from the Magic Hammer, while close to the ground. They also appear in the Coliseum if only two Links are fighting. Their behavior there is the same as in the Drablands Challenges.
Other Appearances
The Legend of Zelda (Valiant Comics)

Wallmasters also make an appearance in the The Legend of Zelda comics by Valiant Comics published by Valiant Comics. They first appear in "The Power", where Link pushes Princess Zelda into a Wallmaster to let her escape from a dungeon while the young hero goes off to fight Ganon.[8] They later appear in both stories of Issue #5. In "Assault", when Ganon tells Link that Princess Zelda has died,[9] Miff charges at Ganon while at the same time, Link throws his Sword at him and warns the Fairy that it is a trap.[10] Upon striking Ganon with the Sword, a Wallmaster is revealed, which crushes Link's weapon in two and makes Link realize that Princess Zelda is still alive.[11] In their last depiction in "Choices", a Wallmaster grabs Link by surprise after he successfully defeats a four-headed Gleeok.
The Faces of Evil
Wallmasters appear as non-moving enemies that appear in certain Stages in The Faces of Evil, often in dark corridors. They often appear in large groups. Unlike their other incarnations, Wallmasters stay in one place and do not pursue Link. If they move close to him, it will grab and damage him, however the Wallmaster will not attempt to drag him outside the area. They are a difficult enemy to fight as they do not have many weaknesses, but can be defeated with a Bomb.
The Wand of Gamelon
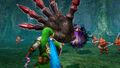
Zelda's Adventure
Wall Masters only appear in the Shrine of Illusion in a single room later in the dungeon in Zelda's Adventure. Like their canonical incarnations, they drop down from the ceiling, but will not actively pursue Princess Zelda and instead fall at random. They will damage Princess Zelda if they touch her.
Freshly-Picked Tingle's Rosy Rupeeland
Wallmasters serve a helpful purpose in Freshly-Picked Tingle's Rosy Rupeeland. If Tingle brews the Hand Potion, he can use it on flaming hand statues deep inside Dungeons, and a Wallmaster will grab Tingle and toss him outside the Dungeon. This is actually helpful, as the game can only be saved at Tingle's House. Tingle cannot use his Balloon to return home unless he is outside the cavern.
Trivia
- In The Legend of Zelda, Oracle of Seasons, and Oracle of Ages, Wallmasters appear with only four fingers.
- Wallmasters in The Minish Cap behave like the Floormasters from The Wind Waker. They also take their design and appearance from the art style of The Wind Waker; however, The Minish Cap's Wallmasters are red as opposed to the Floormaster's purple.
- An unused Wallmaster model exists in the files for Captain Rainbow,[12] indicating that it was planned to appear as a character at some point in development. Its wish would seemingly have been to become a TV celebrity.[13]
Nomenclature
| Language | Names | Meanings |
|---|---|---|
Japanese |
| |
ChineseSI | 天魔手 (Tiān Mó Shǒu) (TLoZ)[24] | Magic Hand from Sky |
Dutch | Wall Master (TLoZ) | |
FrenchCA | La Main (CoH)[27] | The Hand |
FrenchEU |
| |
German | Todesgrapscher (CoH)[26] | Death grabber; portmanteau of Todes (death) and Grapscher (grabber). |
Italian |
| |
SpanishLA | Wallmaster (CoH)[25] | |
SpanishEU | Wallmaster (CoH) | |
| This table was generated using translation pages. To request an addition, please contact a staff member with a reference. | ||
Other Names
| Name | Clutch[28] |
|---|---|
| Applies to | |
| Source | |
| Superseded by | |
| Name | Clutch[29] |
| Applies to | |
| Source | |
| Superseded by | |
| Name | Wall Master[30] |
| Applies to | |
| Source | |
| Superseded by | |
| Name | Clutch[29] |
| Applies to | |
| Source | |
| Superseded by | |
| Name | Clutch[29] |
| Applies to | |
| Source | |
| Superseded by | |
| Name | Three-Dimensional Space Master[31] |
| Applies to | |
| Source | |
| Superseded by | |
| Name | Wallaster[32] |
| Applies to | |
| Source | |
| Superseded by | |
| Name | Clutch[29] |
| Applies to | |
| Source | |
| Superseded by | |
| Name | Clutch[29] |
| Applies to | |
| Source | |
| Superseded by | |
| Name | Clutch[29] |
| Applies to | |
| Source | |
| Superseded by |
| Name | Applies to | Source | Superseded by |
|---|---|---|---|
Clutch[28] | |||
Clutch[29] | |||
Wall Master[30] | |||
Clutch[29] | |||
Clutch[29] | |||
Three-Dimensional Space Master[31] | |||
Wallaster[32] | |||
Clutch[29] | |||
Clutch[29] | |||
Clutch[29] |
Gallery
-
An early Wallmaster from Ocarina of Time
-
A Wallmaster carrying Link away from A Link Between Worlds
-

Wallmaster from BS The Legend of Zelda
-

Wallmaster from The Faces of Evil and The Wand of Gamelon
-

Wall Master from Zelda's Adventure
-
Wizzro's hand attack resembling a Wallmaster from Hyrule Warriors


See Also
Notes
- ↑ If Link defeats 10 enemies without getting hit or teleporting with the Flute, then the 10th enemy defeated will drop five Rupees; however, if the 10th enemy is defeated with a Bomb, then it will drop four Bombs. If Link defeats 16 enemies without getting hit or teleporting, then the 16th enemy will drop a Fairy. After the 16th enemy, Link must get hit and reset the counter to zero in order to achieve this effect again. Defeating Armos, Like Likes, Keese, or Gels will not be counted.[6]
References
- ↑ Encyclopedia, Dark Horse Books, pg. 211 (TLoZ | ALttP | OoT | OoT3D | MM | MM3D | OoS | OoA | FSA | TMC | ALBW | TFH)
- ↑ "Wall Master" — Figurine (The Minish Cap)
- ↑ "S2-22: Twee Wall Masters (geesthanden) proberen Zelda te grijpen." (S2-22: Two Wall Masters (ghost hands) try to grab Zelda.) (CD Interactief, HUB Uitgevers, January/February/March 1999, pg. 7)
- ↑ "A monster hand that appears out of the labyrinth wall." (The Legend of Zelda manual, pg. 36)
- ↑ "If it catches Link, it takes him back to the entrance to the labyrinth." (The Legend of Zelda manual, pg. 36)
- ↑ n.a., Forced Drops , redcandle.us, published n.d., retrieved August 17, 2017.
- ↑ "Watch for the shadows of monsters hanging from the ceiling." — Navi (Ocarina of Time)
- ↑ "That Wall Master will put you outside where it's safe! I'll take a raincheck on the kiss!" (The Legend of Zelda comic, Valiant Comics, pg. 3)
- ↑ "Ha! Ha! Ha! Princess Zelda no longer exists! She is gone...forever!" (The Legend of Zelda comic, Valiant Comics, pg. 9)
- ↑ "Miff! NO! It's a trap!" (The Legend of Zelda comic, Valiant Comics, pg. 10)
- ↑ "A Wall Master! He was lying...trying to make me mad enough to attack him! That means Zelda is still alive!" (The Legend of Zelda comic, Valiant Comics, pg. 10)
- ↑ キャプテン★レインボー 消された住人達その3 フォールマスター(前編) , Niconico Video, retrieved June 17, 2019.
- ↑ キャプテン★レインボー 消された住人達その3 フォールマスター(後編) , Niconico Video, retrieved June 17, 2019.
- ↑ Enciclopedia di Hyrule, Magazzini Salani, pg. 211
- ↑ "Mano rapace" — Navi (Ocarina of Time 3D, Italian localization)
- ↑ "È la mano rapace!" — Tatl (Majora's Mask 3D, Italian localization)
- ↑ "Causa della sconfitta: Mano rapace" — Game Over (Cadence of Hyrule, Italian localization)
- ↑ Nintendo Official Guidebook: The Legend of Zelda: A Link to the Past Vol. 2, Shogakukan, pg. 140
- ↑ Nintendo Official Guidebook—The Legend of Zelda: Ocarina of Time, Shogakukan, pg. 145
- ↑ Hyrule Encyclopedia, Tokuma Shoten Publishing Co., Ltd., pg. 164
- ↑ The Legend of Zelda manual, pg. 36
- ↑ Hyrule Historia, Les Éditions Soleil, pg. 141 (TLoZ)
- ↑ "Défaite causée par: La Main" — Game Over (Cadence of Hyrule, European French localization)
- ↑ 塞尔达传说:百科全书, New Star Press, pg. 206
- ↑ "¡Fin de la partida! Causa: Wallmaster" — Game Over (Cadence of Hyrule, European Spanish localization)
- ↑ "Besiegt von: Todesgrapscher" — Game Over (Cadence of Hyrule, German localization)
- ↑ "Défaite causée par: La Main" — Game Over (Cadence of Hyrule, Canadian French localization)
- ↑ The Legend of Zelda: A Link to the Past—Nintendo Player's Guide, Nintendo of America, pg. 155
- ↑ 29.0 29.1 29.2 29.3 29.4 29.5 "Wallmaster
Wallmasters are devious creatures who rely on the element of surprise. They crawl along the ceiling or inside dungeon walls, waiting to grab their prey. Since they are nothing more than large hands, they are perfectly designed to carry their victims away. In some regions, the term "Clutch" is used to refer to these creatures." — The Great Hyrule Encyclopedia , Zelda.com (archive), retrieved January 22, 2022. - ↑ The Legend of Zelda: Ocarina of Time—Perfect Guide, Versus Books, pg. 76
- ↑ Official The Legend of Zelda: Oracle of Seasons & Ages Perfect Guide, Versus Books, pg. 12 (OoS)
- ↑ Official The Legend of Zelda: Oracle of Seasons & Ages Perfect Guide, Versus Books, pg. 26 (OoS)
- Enemies
- Hand Enemies
- Levitating Enemies
- Enemies in The Legend of Zelda
- Enemies in A Link to the Past
- Enemies in Link's Awakening (Nintendo Switch)
- Enemies in Ocarina of Time
- Enemies in Ocarina of Time 3D
- Enemies in Majora's Mask
- Enemies in Majora's Mask 3D
- Enemies in Oracle of Seasons
- Enemies in Oracle of Ages
- Enemies in Four Swords Adventures
- Enemies in The Minish Cap
- Enemies in A Link Between Worlds
- Enemies in Tri Force Heroes
- Enemies in The Faces of Evil
- Enemies in The Wand of Gamelon
- Enemies in BS The Legend of Zelda