Beamos: Difference between revisions
TriforceTony (talk | contribs) No edit summary |
|||
| (253 intermediate revisions by 87 users not shown) | |||
| Line 1: | Line 1: | ||
{{Enemy | {{Reorg}} | ||
| | {{Infobox Enemy | ||
| | |image= | ||
| | {{Media | ||
| | |Render SS= File:SS Beamos Render.png | ||
| | |Model LANS= File:LANS Beamos Model.png | ||
| | |Model OoT= File:OoT Beamos Model.png | ||
|Model OoT3D= File:OoT3D Beamos Model.png | |||
|Model MM= File:MM Beamos Model.png | |||
|Model MM3D= File:MM3D Beamos Model.png | |||
|Model TWW= File:TWW Beamos Red Model.png | |||
|Model TWWHD= File:TWWHD Beamos Model.png | |||
|Model TP= File:TP Beamos Model.png | |||
|Model TPHD= File:TPHD Beamos Model.png | |||
|Model PH= File:PH Beamos Model.png | |||
|Model SS= File:SS Beamos Model.png | |||
|Model SSHD= File:SSHD Beamos Model.png | |||
|Model ALBW= File:ALBW Beamos Model.png | |||
|Model TFH= File:TFH Beamos Model.png | |||
|Model BotW= File:BotW Beamos Model.png | |||
|Sprite ALttP= File:Beamos moving ALttP.gif | |||
|Sprite LA= File:LA Beamos Sprite.png | |||
|Sprite LADX= File:LADX Beamos Sprite.png | |||
|Sprite OoS= File:OoS Beamos Sprite.png | |||
|Sprite OoA= File:OoA Beamos Sprite.png | |||
|Sprite FSA= File:FSA Beamos Sprite.png | |||
}} | }} | ||
|caption= | |||
|pronunciation= | |||
|race= | |||
|game= ALttP, LA, OoT, MM, OoS, OoA, TWW, FSA, TP, PH, SS, ALBW, TFH, BotW | |||
|other= AST, LCT, HW, CoH | |||
|habitat= {{Spawn Locations}} | |||
|member= | |||
|health= | |||
|attack= {{Infobox Game Blocks | |||
|ALttP= {{Damage | |||
|attack1= Eye Beam | |||
|damage1= 1.00 | |||
}} | |||
|LA= {{Damage | |||
|attack1= Contact | |||
|damage1= 0.50 | |||
|attack2= Eye Beam | |||
|damage2= 1.00 | |||
}} | |||
|OoS= {{Damage | |||
|attack1= Eye Beam | |||
|damage1= 0.50 | |||
}} | |||
|OoA= {{Damage | |||
|attack1= Eye Beam | |||
|damage1= 0.50 | |||
}} | |||
|OoT= {{Damage | |||
|attack1= Eye Beam | |||
|damage1= 0.25 | |||
|attack2= Explode | |||
|damage2= 0.25 | |||
}} | |||
|MM= {{Damage | |||
|attack1= Eye Beam | |||
|damage1= 0.25 | |||
|attack2= Explode | |||
|damage2= 0.25 | |||
}} | |||
|TWW= {{Damage | |||
|attack1= Contact | |||
|damage1= 0.50 | |||
|attack2= Eye Beam | |||
|damage2= 0.25 | |||
}} | |||
|FSA= {{Damage | |||
|attack1= Eye Beam | |||
|damage1= 1.00 | |||
}} | |||
|TP= {{Damage | |||
|attack1= Eye Beam | |||
|damage1= 0.25 | |||
}} | |||
|SS= {{Damage | |||
|attack1= Electric Eye Beam | |||
|damage1= 1.00 | |||
}} | |||
}} | |||
|weapon= {{List|[[Bomb]]s, [[Bow]], [[Sword]]}} | |||
|spoils= | |||
|exp= | |||
|theme= | |||
}} | |||
{{Term/Store|Beamos|Beamos|Series, ALttP, LA, LADX, OoT, OoT3D, MM, MM3D, OoS, OoA, TWW, TWWHD, FSA, TP, TPHD, PH, SS, ALBW, TFH, BotW, CoH, HWDE|plural}} are recurring enemies in the {{TLoZ|Series}}.<ref>{{Cite Book|quote= |book= E |publisher= |page= 165 {{Exp Game|ALttP, LA, LADX, OoT, OoT3D, MM, MM3D, OoS, OoA, TWW, TWWHD, FSA, TP, TPHD, PH, SS, TFH}}}}</ref><ref>{{Cite Guide|quote= |game= ALBW |guide= Prima |page= 203}}</ref><ref>{{Cite Book|quote= |book= CaC |publisher= |page= 218}}</ref><ref name="HWDE Tutorials">{{Cite|Stone statues called {{Color|HWDE Adventure Mode Green|Beamos}} attack with powerful beams once they spot you.|Tutorials|HWDE}}</ref><ref>{{Cite|Defeated By: Beamos|Game Over|CoH}}</ref>{{Name Ref|LANS, SSHD, AST, LCT}} | |||
==Characteristics== | |||
{{Navi | |||
|quote1= {{Color|OoT White|Beamos}}<br/>Watch out for its searching beam! I bet it doesn't like {{Color|OoT White|smoke}} to get in its eye! | |||
}} | |||
{{Tatl | |||
|quote1= What?! You don't know about the {{Color|MM White|Beamos}}? Don't let its beam scare you. Just give it a good blast! | |||
}} | |||
{{Tingle | |||
|context1= | |||
|quote1= <p>Ack! A '''Beamos'''!</p><p>For now...flee!</p> | |||
|context2= After obtaining the Bow | |||
|quote2= <p>It's a '''Beamos'''!</p><p>Shoot an arrow into its eye when it glows!</p> | |||
}} | |||
The Beamos is one of the most technologically advanced enemies in the ''Zelda'' universe. They appear as statues with rotating, glaring eyes capable of shooting beams of light at their foes, and are usually indestructible. They can appear as either statues of stone or of solid metal, however much like real statues, they are incapable of moving, and must rely on their laser solely to keep intruders at bay. For this reason, Beamos are often situated inside dungeon rooms, or placed strategically on a staircase or entrance to impede progress, using swiveling movements to check all of their bounds. This laser of theirs, in every incarnation, has a specified range that can be bested whenever [[Link]] steps out of range, hides behind an object, or in some games, simply when the Beamos is off the screen. | |||
While the laser of the Beamos normally cannot be stopped once it has been shot, in some games, specifically in {{LA}} and {{SS}}, Link can use certain [[Shield]]s to reflect the laser away. However it most games, it must simply be avoided. For the majority of ''Zelda'' titles, the laser itself is a continuous long beam, except for {{ALttP}} and {{LA|-}}, where it is a single short beam. | |||
Beamos across {{TLoZ|Series}} often only come in one variety, however, other variations do exist. In {{TWW}}, which distinguishes Beamos by color, red Beamos behave like ordinary Beamos, whereas the blue kind have fixed beam paths, and will block Link's path entirely until they are destroyed. In {{TP}}, there exists two varieties; a larger brown type in the [[Goron Mines]] and minor caves that are able to shoot fire beams, and a thinner white version in the [[Temple of Time (Dungeon)|Temple of Time]], which shoots pink beams of energy. The white variants can be destroyed by the statue Link controls with the [[Dominion Rod]]. | |||
In many games, Beamos are indestructible and impervious to all attacks, requiring that Link avoid them entirely. However in a few games, particularly in the 3D console games, the Beamos statues can be destroyed or rendered inoperable. In {{OoT}} and {{MM}}, Beamos can be destroyed with the use of a [[Bomb]]. The entire statue is destroyed on impact and explodes as its eye hits the ground. In {{TWW|-}}, {{FSA}} and {{TP|-}}, an [[Arrow]] can be shot at its eye to destroy it. The [[Ball and Chain]] can also be used to destroy a Beamos Statue in {{TP|-}}. In {{LA|-}} for Nintendo Switch, the beams can be reflected back at the Beamos with the [[Mirror Shield]], temporarily disabling them. | |||
==={{SS|-}}=== | |||
{{Fi | |||
|quote1= <p>Target lock: {{Color|SS Blue|Beamos}}</p><p>This is an ancient security mechanism. Its weak point is its eye. The eye is also a weapon that fires a focused energy beam.</p><p>I calculate a 100% failure rate at any attempt to strike the eye with your sword while it is still on top of the pedestal.</p><p>I recommend using a weapon that can strike at high targets. Conversely, you could lower its head to a height your sword can reach.</p> | |||
}} | |||
In {{SS|-}}, Beamos appear as multi-layered poles composed of electrified sections. The head of the Beamos turns in a rigid, mechanical motion as opposed to moving fluently. The beams they shoot are electrified, which will cause Link more harm if he attempts to block it with an Iron Shield. As they are mechanical creations from the past, they are shown to have crumbled into a pile of stone after many years, but will be returned to life as do other enemies when under the effects of an activated [[Timeshift Stone]]. | |||
Beamos can be defeated by slicing apart different sections of their body and stabbing the eye. However the [[Bow]] also becomes effective later in the game. They can be stunned by blocking their beams with a shield, with the exception of an Iron Shield. Using the [[Gust Bellows]] on the wing-like structures on the sides of its head will also cause it to become dizzy and stunned for a short time. | |||
==={{TFH|-}}=== | |||
In {{TFH}}, Beamos have a slightly different appearance. Instead of a rotating tower, as in previous games, they are spherical in shape and sit atop stone pillars where they scan their surroundings and fire a laser beam when they spot one of the [[Links]]. They can only be reached by forming a [[Totem]], and can then be attacked by shooting Arrows at them. It takes a couple Arrow shots to defeat them, however if their eye is successfully shot as they rotate, they are instantly defeated. Once they have been defeated, they will roll towards the Links while flashing, and eventually explode. This behavior is very similar to Armos. | |||
==={{BotW|-}}=== | |||
In {{BotW}}, Beamos are simply objects that appear only in certain [[Ancient Shrine]]s, such as [[Sheh Rata Shrine]]. They constantly emit a dangerous blue laser straight forward, that can be blocked with any [[shield]]. They are stationary, but they are occasionally placed on movable platforms. Some Beamos can be picked up. Like other ancient [[Sheikah]] technology, they are absent from {{TotK}}, being effectively replaced by the [[Beam Emitter]] and a new type of red laser that appears in [[Shrine of Light|Shrines of Light]], although these are not exact equivalents. | |||
== | ==Other Appearances== | ||
==={{AST|-}}=== | |||
{{Noncanon|Start}} | |||
{{Stub|AST}} | |||
{{Noncanon|End}} | |||
== | ==={{LCT|-}}=== | ||
{{Noncanon|Start}} | |||
{{Stub|LCT}} | |||
{{Noncanon|End}} | |||
{{ | |||
== | ==={{HW|-}}=== | ||
[[ | {{Noncanon|Start}} | ||
{{ | [[File:HW Beamos Render.png|right|100px]] | ||
In {{HW}}, Beamos typically appear inside of [[Keep]]s, or rarely outside of them, in various Stages of the game. They shoot magical beams into the floor in a straight path which then explode sequentially.<ref name="HWDE Tutorials"/> They are primarily susceptible to Bombs, as regular attacks are ineffective against them.<ref>{{Cite|Beamos are extraordinarily tough, {{Color|HWDE Adventure Mode Green|so normal attacks will be ineffective}}. Find some means of attacking Beamos!|Tutorials|HWDE}}</ref> Despite their weakness to Bombs, blasts from Bomb Flowers do not harm them. | |||
Special Attacks are also capable of defeating Beamos, as Special Attacks are capable of bypassing an enemy's defense. This is evidenced by the fact that when using Focus Spirit, regular attacks break its "shield" and eventually are capable of defeating it. Powerful Focus Spirit attacks are also capable of defeating Beamos in the same manner. | |||
{{Noncanon|End}} | |||
== | ==={{CoH|-}}=== | ||
{{Ambig|Start}} | |||
Beamos appear as enemies in {{CoH}} where they move to the beat of the music. While their bodies are stationary, their single eye rotates around them on every single beat, lighting up for one music beat when spotting either {{Term|CoH|Cadence|link}}, {{Term|CoH|Link|link}}, {{Term|CoH|Yves|link}}, or {{Term|CoH|Princess Zelda|link}} when they pass by, and then firing a laser at them on the following beat. Their laser can fire in any direction, including diagonally, and also deal damage to enemies that accidentally walk into their line of fire. Beamos only possess 2 hearts. | |||
{{Ambig|End}} | |||
==Trivia== | ==Trivia== | ||
*In | * In {{OoT|-}}, when targeting a Beamos, [[Navi]] says that it does not like smoke. This quote is similar to the [[Old Man]]'s hint in {{Term|TLoZ|Level 2|link}} in {{TLoZ}}, where he says that "[[Iconic Quotes from The Legend of Zelda#"Dodongo Dislikes Smoke"|Dodongo Dislikes Smoke]]." | ||
* The Beamos, [[Dexivine]]s, [[Vines]], and [[Warship]]s in {{TWW|-}} are the only enemies in the game that cannot be made into a [[Nintendo Gallery]] [[Figurines in The Wind Waker|Figurine]]. Giving a picture of one to [[Carlov]] will result in him making an [[Armos]] Figurine. | |||
{{ | ==Nomenclature== | ||
{{Nomenclature}} | |||
===Other Names=== | |||
{{Other Names | |||
|- | |||
| Beamos Statue<ref>{{Cite Web|quote= |author= |title= Zelda Universe |url= http://www.zelda.com/universe/game/past/walk.jsp |archive= https://web.archive.org/web/20050313044453/http://www.zelda.com/universe/game/past/walk.jsp |published= |retrieved= March 13, 2005 |site= Zelda.com |type= archive}}</ref> | |||
| {{ALttP}} | |||
| [[Zelda.com]] | |||
| {{E}} | |||
|- | |||
| Rotating Green Laser Statue<ref>{{Cite Guide|quote= |game= ALttP |guide= Nintendo |page= 168}}</ref> | |||
| {{ALttP}} | |||
| {{Guide|ALttP|Nintendo}} | |||
| {{E}} | |||
|- | |||
| Laser Turret<ref>{{Cite Guide|quote= |game= ALttP&FS |guide= Nintendo |page= 30 {{Exp Game|ALttP}}}}</ref> | |||
| {{ALttP}} | |||
| {{Guide|ALttP&FS|Nintendo}} | |||
| {{E}} | |||
|- | |||
| Laser<ref>{{Cite Guide|quote= |game= OoS |guide= Nintendo |page= 35 {{Exp Game|OoS}}}}</ref> | |||
| {{OoS}} | |||
| {{Guide|OoS|Nintendo}} | |||
| {{E}} | |||
|- | |||
| Laser Eyeball<ref>{{Cite Guide|quote= |game= OoS |guide= BradyGames |page= 50 {{Exp Game|OoS}} |edition= Pocket Guide}}</ref> | |||
| {{OoS}} | |||
| {{Guide|OoS|BradyGames}} | |||
| {{E}} | |||
|- | |||
| Laser-eye Turret<ref>{{Cite Guide|quote= |game= OoS |guide= BradyGames |page= 77 {{Exp Game|OoS}} |edition= Pocket Guide}}</ref> | |||
| {{OoS}} | |||
| {{Guide|OoS|BradyGames}} | |||
| {{E}} | |||
}} | |||
==Gallery== | ==Gallery== | ||
<gallery> | <gallery> | ||
File:ALttP Beamos Sprite.png|Beamos from {{ALttP|-}} | |||
File:LttP bemosfiring.gif|Beamos attacking Link from {{ALttP|-}} | |||
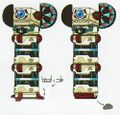
File:LANS Beamos Concept Artwork.png|Concept artwork of a {{Term|LANS|Beamos}} from {{LANS|-}} | |||
File:OoT Beamos Model.png|Beamos model from {{OoT|-}} and {{MM|-}} | |||
File:TWW Beamos Model.png|Red Beamos from {{TWW|-}} | |||
File:TWW Beamos Blue Model.png|Blue Beamos from {{TWW|-}} | |||
File:TP White Beamos Model.png|Temple of Time Beamos from {{TP|-}} | |||
File:TPHD Beamos Attacking.png|Goron Mines Beamos attacking from {{TPHD|-}} | |||
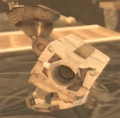
File:TPHD Unused Beamos Model.png|Unused model of a Beamos from {{TPHD|-}} | |||
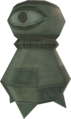
File:BeamosPresentSS.png|Destroyed Beamos from {{SS|-}} | |||
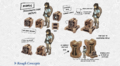
File:SS concept 42.jpg|Concept art of Beamos from {{SS|-}} | |||
File:BotW Beamos Concept Art.png|Concept art of Beamos from {{BotW|-}} | |||
File:HWDE Beamos Model.png|Beamos from {{HWDE|-}} | |||
File:HWDE Beamos Icon.png|Beamos Portrait from {{HWDE|-}} | |||
File:HWDE Beamos Mini Map Icon.png|Beamos Mini Map icon from {{HWDE|-}} | |||
File:CoH Beamos Sprite.png|A Beamos from {{CoH|-}} | |||
</gallery> | </gallery> | ||
{{ | {{Ref}} | ||
{{Categories | |||
|Beam Enemies, Eye Enemies, Shooting Enemies | |||
|enemies= ALttP, LA, LADX, LANS, OoT, OoT3D, MM, MM3D, OoS, OoA, TWW, TWWHD, FSA, TP, TPHD, PH, SS, SSHD, ALBW, TFH, BotW, AST, LCT, HW, HWL, HWDE, CoH | |||
}} | |||
Latest revision as of 21:26, 9 April 2024

Beamos are recurring enemies in the The Legend of Zelda series.[1][2][3][4][5][name references needed]
Characteristics


What?! You don't know about the Beamos? Don't let its beam scare you. Just give it a good blast!
Ack! A Beamos!
For now...flee!
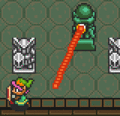
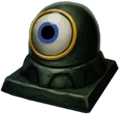
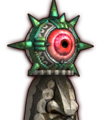
The Beamos is one of the most technologically advanced enemies in the Zelda universe. They appear as statues with rotating, glaring eyes capable of shooting beams of light at their foes, and are usually indestructible. They can appear as either statues of stone or of solid metal, however much like real statues, they are incapable of moving, and must rely on their laser solely to keep intruders at bay. For this reason, Beamos are often situated inside dungeon rooms, or placed strategically on a staircase or entrance to impede progress, using swiveling movements to check all of their bounds. This laser of theirs, in every incarnation, has a specified range that can be bested whenever Link steps out of range, hides behind an object, or in some games, simply when the Beamos is off the screen.
While the laser of the Beamos normally cannot be stopped once it has been shot, in some games, specifically in Link's Awakening and Skyward Sword, Link can use certain Shields to reflect the laser away. However it most games, it must simply be avoided. For the majority of Zelda titles, the laser itself is a continuous long beam, except for A Link to the Past and Link's Awakening, where it is a single short beam.
Beamos across The Legend of Zelda series often only come in one variety, however, other variations do exist. In The Wind Waker, which distinguishes Beamos by color, red Beamos behave like ordinary Beamos, whereas the blue kind have fixed beam paths, and will block Link's path entirely until they are destroyed. In Twilight Princess, there exists two varieties; a larger brown type in the Goron Mines and minor caves that are able to shoot fire beams, and a thinner white version in the Temple of Time, which shoots pink beams of energy. The white variants can be destroyed by the statue Link controls with the Dominion Rod.
In many games, Beamos are indestructible and impervious to all attacks, requiring that Link avoid them entirely. However in a few games, particularly in the 3D console games, the Beamos statues can be destroyed or rendered inoperable. In Ocarina of Time and Majora's Mask, Beamos can be destroyed with the use of a Bomb. The entire statue is destroyed on impact and explodes as its eye hits the ground. In The Wind Waker, Four Swords Adventures and Twilight Princess, an Arrow can be shot at its eye to destroy it. The Ball and Chain can also be used to destroy a Beamos Statue in Twilight Princess. In Link's Awakening for Nintendo Switch, the beams can be reflected back at the Beamos with the Mirror Shield, temporarily disabling them.
Skyward Sword
Target lock: Beamos
This is an ancient security mechanism. Its weak point is its eye. The eye is also a weapon that fires a focused energy beam.
I calculate a 100% failure rate at any attempt to strike the eye with your sword while it is still on top of the pedestal.
I recommend using a weapon that can strike at high targets. Conversely, you could lower its head to a height your sword can reach.
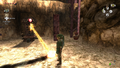
In Skyward Sword, Beamos appear as multi-layered poles composed of electrified sections. The head of the Beamos turns in a rigid, mechanical motion as opposed to moving fluently. The beams they shoot are electrified, which will cause Link more harm if he attempts to block it with an Iron Shield. As they are mechanical creations from the past, they are shown to have crumbled into a pile of stone after many years, but will be returned to life as do other enemies when under the effects of an activated Timeshift Stone.
Beamos can be defeated by slicing apart different sections of their body and stabbing the eye. However the Bow also becomes effective later in the game. They can be stunned by blocking their beams with a shield, with the exception of an Iron Shield. Using the Gust Bellows on the wing-like structures on the sides of its head will also cause it to become dizzy and stunned for a short time.
Tri Force Heroes
In Tri Force Heroes, Beamos have a slightly different appearance. Instead of a rotating tower, as in previous games, they are spherical in shape and sit atop stone pillars where they scan their surroundings and fire a laser beam when they spot one of the Links. They can only be reached by forming a Totem, and can then be attacked by shooting Arrows at them. It takes a couple Arrow shots to defeat them, however if their eye is successfully shot as they rotate, they are instantly defeated. Once they have been defeated, they will roll towards the Links while flashing, and eventually explode. This behavior is very similar to Armos.
Breath of the Wild
In Breath of the Wild, Beamos are simply objects that appear only in certain Ancient Shrines, such as Sheh Rata Shrine. They constantly emit a dangerous blue laser straight forward, that can be blocked with any shield. They are stationary, but they are occasionally placed on movable platforms. Some Beamos can be picked up. Like other ancient Sheikah technology, they are absent from Tears of the Kingdom, being effectively replaced by the Beam Emitter and a new type of red laser that appears in Shrines of Light, although these are not exact equivalents.
Other Appearances
Ancient Stone Tablets
Link's Crossbow Training
Hyrule Warriors

In Hyrule Warriors, Beamos typically appear inside of Keeps, or rarely outside of them, in various Stages of the game. They shoot magical beams into the floor in a straight path which then explode sequentially.[4] They are primarily susceptible to Bombs, as regular attacks are ineffective against them.[6] Despite their weakness to Bombs, blasts from Bomb Flowers do not harm them.
Special Attacks are also capable of defeating Beamos, as Special Attacks are capable of bypassing an enemy's defense. This is evidenced by the fact that when using Focus Spirit, regular attacks break its "shield" and eventually are capable of defeating it. Powerful Focus Spirit attacks are also capable of defeating Beamos in the same manner.
Cadence of Hyrule
Beamos appear as enemies in Cadence of Hyrule where they move to the beat of the music. While their bodies are stationary, their single eye rotates around them on every single beat, lighting up for one music beat when spotting either Cadence, Link, Yves, or Zelda when they pass by, and then firing a laser at them on the following beat. Their laser can fire in any direction, including diagonally, and also deal damage to enemies that accidentally walk into their line of fire. Beamos only possess 2 hearts.
Trivia
- In Ocarina of Time, when targeting a Beamos, Navi says that it does not like smoke. This quote is similar to the Old Man's hint in Level 2 in The Legend of Zelda, where he says that "Dodongo Dislikes Smoke."
- The Beamos, Dexivines, Vines, and Warships in The Wind Waker are the only enemies in the game that cannot be made into a Nintendo Gallery Figurine. Giving a picture of one to Carlov will result in him making an Armos Figurine.
Nomenclature
| Language | Names | Meanings |
|---|---|---|
Japanese |
| |
Dutch | Beamos (SSHD)[21] | |
FrenchCA | Sentinelle (CoH)[23] | Sentinel |
FrenchEU | Sentinelle (SSHD | CoH)[19][20] | Sentinel |
German | Strahlzyklop (SSHD | HWDE | CoH)[16][17][18] | Beam cyclops; portmanteau of Strahl (beam) and Zyklop (cyclops). |
Italian | Laseros (ALttP | LA | LADX | OoT | OoT3D | MM | MM3D | OoS | OoA | TWW | FSA | ALBW | CoH)[7][8][9][10][11] | From "laser" |
SpanishLA | Beamos (CoH)[22] | |
SpanishEU | Beamos (SSHD | CoH)[24][25] | |
| This table was generated using translation pages. To request an addition, please contact a staff member with a reference. | ||
Other Names
| Name | Beamos Statue[26] |
|---|---|
| Applies to | |
| Source | |
| Superseded by | |
| Name | Rotating Green Laser Statue[27] |
| Applies to | |
| Source | |
| Superseded by | |
| Name | Laser Turret[28] |
| Applies to | |
| Source | |
| Superseded by | |
| Name | Laser[29] |
| Applies to | |
| Source | |
| Superseded by | |
| Name | Laser Eyeball[30] |
| Applies to | |
| Source | |
| Superseded by | |
| Name | Laser-eye Turret[31] |
| Applies to | |
| Source | |
| Superseded by |
| Name | Applies to | Source | Superseded by |
|---|---|---|---|
Beamos Statue[26] | |||
Rotating Green Laser Statue[27] | |||
Laser Turret[28] | |||
Laser[29] | |||
Laser Eyeball[30] | |||
Laser-eye Turret[31] |
Gallery
-

Beamos from A Link to the Past
-
Beamos attacking Link from A Link to the Past
-
Concept artwork of a Beamos from Link's Awakening for Nintendo Switch
-

Beamos model from Ocarina of Time and Majora's Mask
-
Red Beamos from The Wind Waker
-

Blue Beamos from The Wind Waker
-

Temple of Time Beamos from Twilight Princess
-
Goron Mines Beamos attacking from Twilight Princess HD
-
Unused model of a Beamos from Twilight Princess HD
-
Destroyed Beamos from Skyward Sword
-
Concept art of Beamos from Skyward Sword
-
Concept art of Beamos from Breath of the Wild
-

Beamos from Hyrule Warriors: Definitive Edition
-
Beamos Portrait from Hyrule Warriors: Definitive Edition
-

Beamos Mini Map icon from Hyrule Warriors: Definitive Edition
-

A Beamos from Cadence of Hyrule


References
- ↑ Encyclopedia, Dark Horse Books, pg. 165 (ALttP | LA | LADX | OoT | OoT3D | MM | MM3D | OoS | OoA | TWW | TWWHD | FSA | TP | TPHD | PH | SS | TFH)
- ↑ The Legend of Zelda: A Link Between Worlds Prima Official Game Guide, Prima Games, pg. 203
- ↑ Creating a Champion, Dark Horse Books, pg. 218
- ↑ 4.0 4.1 "Stone statues called Beamos attack with powerful beams once they spot you." — Tutorials (Hyrule Warriors: Definitive Edition)
- ↑ "Defeated By: Beamos" — Game Over (Cadence of Hyrule)
- ↑ "Beamos are extraordinarily tough, so normal attacks will be ineffective. Find some means of attacking Beamos!" — Tutorials (Hyrule Warriors: Definitive Edition)
- ↑ Enciclopedia di Hyrule, Magazzini Salani, pg. 165
- ↑ "Laseros
Fai attenzione al suo raggio laser! Scommetto che non ama molto avere del fumo nell'occhio!" — Navi (Ocarina of Time 3D, Italian localization) - ↑ "Questo è un laseros." — Tatl (Majora's Mask 3D, Italian localization)
- ↑ Enciclopedia di Hyrule, Magazzini Salani, pg. 164
- ↑ "Causa della sconfitta: Laseros" — Game Over (Cadence of Hyrule, Italian localization)
- ↑ Nintendo Official Guidebook: The Legend of Zelda: A Link to the Past Vol. 1, Shogakukan, pg. 134Nintendo Official Guidebook—The Legend of Zelda: A Link to the Past & Four Swords, Shogakukan, pg. 31
- ↑ Nintendo Official Guidebook—The Legend of Zelda: Ocarina of Time, Shogakukan, pg. 145
- ↑ Hyrule Encyclopedia, Ambit Ltd., pg. 195
- ↑ "敗因:ビーモス" — Game Over (Cadence of Hyrule, Japanese localization)
- ↑ "Dies ist ein Strahlzyklop." — Fi (Skyward Sword HD, German localization)
- ↑ "Strahlzyklopen sind Steinstatuen, die dich mit einem mächtigen Energiestrahl angreifen." — Tutorial (Hyrule Warriors: Definitive Edition)
- ↑ "Besiegt von: Strahlzyklop" — Game Over (Cadence of Hyrule, German localization)
- ↑ "La cible verrouillée est une Sentinelle." — Fi (Skyward Sword HD, European French localization)
- ↑ "Défaite causée par: Sentinelle" — Game Over (Cadence of Hyrule, European French localization)
- ↑ "Doelwit: Beamos" — Fi (Skyward Sword HD, Dutch localization)
- ↑ "¡Fin de la partida! Causa: Beamos" — Game Over (Cadence of Hyrule, Latin American Spanish localization)
- ↑ "Défaite causée par: Sentinelle" — Game Over (Cadence of Hyrule, Canadian French localization)
- ↑ "El objetivo seleccionado es un beamos." — Fi (Skyward Sword HD, European Spanish localization)
- ↑ "¡Fin de la partida! Causa: Beamos" — Game Over (Cadence of Hyrule, European Spanish localization)
- ↑ Zelda Universe (web archive), Zelda.com (archive), retrieved March 13, 2005.
- ↑ The Legend of Zelda: A Link to the Past—Nintendo Player's Guide, Nintendo of America, pg. 168
- ↑ The Legend of Zelda: A Link to the Past & Four Swords—The Official Nintendo Player's Guide, Nintendo of America, pg. 30 (ALttP)
- ↑ The Legend of Zelda: Oracle of Seasons and Oracle of Ages—The Official Nintendo Player's Guide, Nintendo of America, pg. 35 (OoS)
- ↑ The Legend of Zelda: Oracle of Seasons and Oracle of Ages—Official Strategy Guide (Pocket Guide), BradyGames, pg. 50 (OoS)
- ↑ The Legend of Zelda: Oracle of Seasons and Oracle of Ages—Official Strategy Guide (Pocket Guide), BradyGames, pg. 77 (OoS)
- Enemies
- Beam Enemies
- Eye Enemies
- Shooting Enemies
- Enemies in A Link to the Past
- Enemies in Link's Awakening
- Enemies in Link's Awakening DX
- Enemies in Link's Awakening (Nintendo Switch)
- Enemies in Ocarina of Time
- Enemies in Ocarina of Time 3D
- Enemies in Majora's Mask
- Enemies in Majora's Mask 3D
- Enemies in Oracle of Seasons
- Enemies in Oracle of Ages
- Enemies in The Wind Waker
- Enemies in The Wind Waker HD
- Enemies in Four Swords Adventures
- Enemies in Twilight Princess
- Enemies in Twilight Princess HD
- Enemies in Phantom Hourglass
- Enemies in Skyward Sword
- Enemies in Skyward Sword HD
- Enemies in A Link Between Worlds
- Enemies in Tri Force Heroes
- Enemies in Breath of the Wild
- Enemies in Ancient Stone Tablets
- Enemies in Link's Crossbow Training
- Enemies in Hyrule Warriors
- Enemies in Hyrule Warriors Legends
- Enemies in Hyrule Warriors: Definitive Edition
- Enemies in Cadence of Hyrule