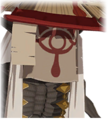
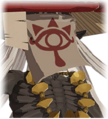
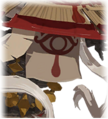
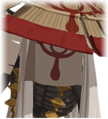
Monk Maz Koshia
Monk Maz Koshia is a recurring Boss and character in The Legend of Zelda series.[5][6]
Biography
Breath of the Wild
Monk Maz Koshia is a Sheikah Monk who is exclusive to The Champions' Ballad DLC Pack, appearing during the "EX The Champions' Ballad" Main Quest. Monk Maz Koshia's goal is to test those who wish to undergo the Divine Beast Tamer's Trial.[7] He first speaks to Link inside the Shrine of Resurrection, where he bestows the One-Hit Obliterator to him as the first part of his Trial.[8] He informs Link that to complete this part of the Trial, he must travel to the four marked locations on the Great Plateau and defeat the bands of Monsters there.[9]
After Link has done this, Monk Maz Koshia will congratulate Link on his progress and reveal that this task was the first of many in the Trial.[10] The Monk continues, saying that the One-Hit Obliterator will guide him to the next steps.[10] This causes the One-Hit Obliterator to split into four glowing orbs, which scatter to various parts of Hyrule Kingdom. Monk Maz Koshia urges Link to follow them in order to continue.[11]
After Link completes "EX Champion Daruk's Song," "EX Champion Mipha's Song," "EX Champion Revali's Song," and "EX Champion Urbosa's Song," Monk Maz Koshia will call to Link once more, instructing him to return to the Shrine of Resurrection to face his final trial.[12] Once Link returns to the Shrine of Resurrection, Monk Maz Koshia will greet him, instructing him to return the Sheikah Slate to the Sheikah Slate Pedestal he found it in to reveal the passageway to his Final Trial.[13] Upon doing so, the door closest, and the chamber begins to descend.[14]
Once the chamber has fully descended, Monk Maz Koshia will welcome Link to the Final Trial, explaining that he can be found here.[15] The Monk guides Link to the labyrinth's Guidance Stone, after which he leaves Link to complete the labyrinth of his own accord.[16] Upon reaching the Monk's Pedestal bearing Monk Maz Koshia, he once again greets Link, revealing that there is one remaining part of the Final Trial.[17] Monk Maz Koshia stands up and Warps the two of them away to a platform in the sky, where they must do combat.[18]
Once Link defeats Monk Maz Koshia, he will shrink to his normal size and commend Link for overcoming all of the obstacles he faced.[19] Afterwards, Monk Maz Koshia will activate the flying structure that they are on, causing the Master Cycle Zero to rise from within.[20] Monk Maz Koshia explains that the Master Cycle Zero is a masterpiece of innovation that was intended for the "one true hero".[21] With his role served, Monk Maz Koshia wishes Link well before returning him to the Great Plateau.[22]
After completing the battle, Link can talk to Monk Maz Koshia to battle him again as many times as he wants. On subsequent visits to his Monk's Pedestal, Maz Koshia commends Link for returning, but he claims that he has nothing left to give.[23] Despite this, he reveals that the only thing he can do to help Link is challenge him to another battle.[24] After the fight, Monk Maz Koshia is assured that Link is capable of saving Hyrule.[25] He tells Link to make use of the Master Cycle Zero and wishes him well.[26] Link will then be Warped back to the Shrine of Resurrection.
Characteristics
Breath of the Wild
137
(???) Monk Maz Koshia |
Description As the last part of the final trial, the monk offers a challenge of ancient techniques. |
Common Locations | |
Recoverable Materials | |
Monk Maz Koshia boasts a wide array of tactics that he may use in his fight against Link. Like a Yiga Footsoldier, Monk Maz Koshia can magically teleport and strike Link from above with his Sword, or he may use a Bow and shoot at Link from the air. Monk Maz Koshia can use Fire Arrows, Ice Arrows, and Shock Arrows to strike Link.
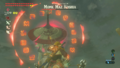
After Monk Maz Koshia's health has been reduced by 25%, he will retreat and split himself into nine copies. Each of these copies can damage Link, though only one of them can sustain more than one hit. In order to advance, Link must find the correct copy of Monk Maz Koshia and attack him. The copies will work in unison to attack Link, until they are destroyed. When all of the copies have been destroyed, Monk Maz Koshia may summon another set of them.
Once Monk Maz Koshia's health has been reduced to half, he will retreat again and magically enlarge himself while flying in the air. At this stage, Monk Maz Koshia can use charged laser attacks to strike Link. If Link deflects one of these lasers back at Monk Maz Koshia, the Monk will be temporarily stunned, allowing Link to attack. Monk Maz Koshia may also summon a series of eight metallic Spiked Iron Balls. Monk Maz Koshia will sequentially cast these Spiked Iron Balls at Link in an attempt to hurt him. Afterwards, Monk Maz Koshia will begin charging a Lightning storm, which will strike each of the Spiked Iron Balls. Much like with Thunderblight Ganon's metal spikes, Link can use Magnesis to direct one of the Spiked Iron Balls near Monk Maz Koshia, causing him to be struck by his own Lightning. Monk Maz Koshia can also magically tilt the battle stage before summoning the Spiked Iron Balls, which will roll towards the bottom of the slope before falling off. Monk Maz Koshia can also stomp the ground to cause a tornado to chase Link around. If Link is hit by the tornado, he will be struck by a strong pulse from the ground.
With a quarter of his health remaining, Monk Maz Koshia will ground himself. If Link gets close to Monk Maz Koshia's feet, the Monk will stomp the ground, damaging the Hylian Champion. Monk Maz Koshia can also summon two miniature copies of himself, who will attack Link in a similar manner to the second phase of the fight.
During the battle, Link can distract Monk Maz Koshia with Mighty Bananas, leaving the Monk temporarily vulnerable to attack. This can only be done once.
Other Appearances
Hyrule Warriors: Age of Calamity
Monk Maz Koshia is a secret character in Hyrule Warriors: Age of Calamity that can be obtained as early as Chapter 4. After completing the "Destroy the Yiga Clan!" Scenario, three Side Quests will appear. These are "The Trial of Monsters," "The Trial of the Mighty Foe," and "The Trial of Stones." After completing all three, a new Quest called "The Trial of the Ancients" will appear, where the character will have to beat Monk Maz Koshia in three minutes. After this is completed, Monk Maz Koshia will become a playable Warrior.
Nomenclature
Like many Sheikah Monks, Maz Koshia's name is derived from the name of a developer at Nintendo: Yoshiaki Koizumi.
| Language | Names | Meanings |
|---|---|---|
Japanese |
|
|
ChineseTR | 導師米茲‧喬西亞 (Dǎoshī Mǐzī-Qiáoxīyǎ) (BotW) | |
Dutch | Maz Koshia (BotW | HWAoC)[31][32] | |
FrenchEU | Guide Miz'Kyosia (BotW | HWAoC)[29][30] | |
FrenchCA | Guide Miz'Kyosia (BotW) | |
German | Priester Miz Kyoshia (BotW | HWAoC)[33][34] | |
Italian | Monaco Myz Kyoshia (BotW)[27] | |
Korean | 도사 미즈‧코시아 (Dosa Mijeu-Kosia) (BotW) | |
Russian | Священник Маз-Кош (Svyashchennik Maz-Kosh) (BotW)[35] | |
SpanishLA | Monje Makkosh (BotW)[36] | |
SpanishEU | Monje Makkosh (BotW) | |
| This table was generated using translation pages. To request an addition, please contact a staff member with a reference. | ||
Gallery
-
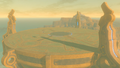
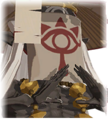
The arena where Link fights Monk Maz Koshia from Breath of the Wild
-

Monk Maz Koshia making copies of himself from Breath of the Wild
-
Link fighting a giant Monk Maz Koshia from Breath of the Wild
-
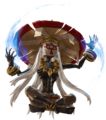
Artwork of Monk Maz Koshia from Hyrule Warriors: Age of Calamity
-
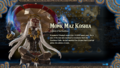
An in-game blurb about Monk Maz Koshia from Hyrule Warriors: Age of Calamity
-
Monk Maz Koshia's portrait from Hyrule Warriors: Age of Calamity
-
Monk Maz Koshia's portrait from Hyrule Warriors: Age of Calamity
-
Monk Maz Koshia's portrait from Hyrule Warriors: Age of Calamity
-
Monk Maz Koshia's portrait from Hyrule Warriors: Age of Calamity
-
Monk Maz Koshia's portrait from Hyrule Warriors: Age of Calamity
-

Icon of Monk Maz Koshia from Hyrule Warriors: Age of Calamity


See Also
References
- ↑ "The Divine Trial
Monk Maz Koshia" — N/A (Breath of the Wild) - ↑ "Monk Maz Koshia
Conduit of the Goddess" — N/A (Hyrule Warriors: Age of Calamity) - ↑ "Before you could report your completion of the trial to Monk Maz Koshia, he rose before you and the final trial started." — Adventure Log (Breath of the Wild)
- ↑ "/Hyrule Warriors: Age of Calamity by Nintendo/KOEI TECMO comes to Nintendo Switch, featuring Christian Rummel as Maz Koshia!" — Christian Rummel, Christian Rummel , official site, retrieved November 30, 2020.
- ↑ "Monk Maz Koshia" — Hyrule Compendium (Breath of the Wild)
- ↑ "Monk Maz Koshia" — N/A (Hyrule Warriors: Age of Calamity)
- ↑ "I am Maz Koshia. I now address the one who wishes to master a Divine Beast..." — Monk Maz Koshia (Breath of the Wild)
- ↑ "To undertake this task requires unwavering dedication. That weapon defeats foes with one hit. However, the reverse is also true, as its wielder will also fall to a single strike. You can use this weapon's ability only twice within a set period of time...only when it is glowing. When enough time passes, the weapon will regain its sheen along with its power." — Monk Maz Koshia (Breath of the Wild)
- ↑ "At the four marked locations within the Great Plateau...defeat all monsters present to prove your power. If you are not up to the challenge, leave this plateau. The weapon will return here, and the trial will end." — Monk Maz Koshia (Breath of the Wild)
- ↑ 10.0 10.1 "I am Maz Koshia. You have done well to conquer the trials laid before you. You are Hyrule's beacon of hope. But your trails have only just begun. The divine weapon shall lead you..." — Monk Maz Koshia (Breath of the Wild)
- ↑ "Now that you have proven your power, a new journey awaits. Go to the four locations that will be revealed to you, and reach for greater heights than ever before." — Monk Maz Koshia (Breath of the Wild)
- ↑ "I am Maz Koshia. I must commend you for conquering the trial thus far. The door to the final trial is now open at the Shrine of Resurrection. Go, and face your destiny." — Monk Maz Koshia (Breath of the Wild)
- ↑ "To the brave soul who wishes to master a Divine Beast... You have done well to return to this place of beginnings. You have overcome many challenges thus far. Now, allow me to bestow upon you one final trial. Return the Sheikah Slate to the terminal you first obtained it from. Do so, and the final passageway will reveal itself..." — Monk Maz Koshia (Breath of the Wild)
- ↑ "Descending... Please beware of tremors." — Sheikah Slate Pedestal (Breath of the Wild)
- ↑ "Welcome, hero. You have overcome many trials to reach me. Now it is time to face the final trial. This trial is a complex labyrinth." — Monk Maz Koshia (Breath of the Wild)
- ↑ "To start, you will need a map. You may obtain map information from the Guidance Stone." — Monk Maz Koshia (Breath of the Wild)
- ↑ "You have proven to possess the power of a true hero. In the name of the Goddess Hylia... I offer this final trial!" — Monk Maz Koshia (Breath of the Wild)
- ↑ "Let us begin." — Monk Maz Koshia (Breath of the Wild)
- ↑ "You faced that challenge with great courage. You have erased all doubt from my mind. You are a true hero." — Monk Maz Koshia (Breath of the Wild)
- ↑ "As such, you were destined to take hold of this ancient masterpiece..." — Monk Maz Koshia (Breath of the Wild)
- ↑ "That which you have obtained...is a masterpiece of innovation, created for the one true hero." — Monk Maz Koshia (Breath of the Wild)
- ↑ "Hero of Hyrule... May the Goddess smile upon you." — Monk Maz Koshia (Breath of the Wild)
- ↑ "I applaud you for having the fortitude to come here. I have nothing more to offer you." — Monk Maz Koshia (Breath of the Wild)
- ↑ "However, there is one thing I can do to help a hero such as yourself reach new heights... You may challenge me once more." — Monk Maz Koshia (Breath of the Wild)
- ↑ "Most impressive. The fate of Hyrule is safe in your heroic hands." — Monk Maz Koshia (Breath of the Wild)
- ↑ "Now go, and make good use of the ancient masterpiece. May the Goddess smile upon the one true hero." — Monk Maz Koshia (Breath of the Wild)
- ↑ "137 Monaco Myz Kyoshia" — Hyrule Compendium (Breath of the Wild)
- ↑ "137 導師ミィズ・キョシア" — Hyrule Compendium (Breath of the Wild)
- ↑ "137 Guide Miz'Kyosia" — Hyrule Compendium (Breath of the Wild)
- ↑ "Guide Miz'Kyosia" — Gallery (Hyrule Warriors: Age of Calamity)
- ↑ "137 Maz Koshia" — Hyrule Compendium (Breath of the Wild)
- ↑ "Maz Koshia" — Gallery (Hyrule Warriors: Age of Calamity)
- ↑ "137 Priester Miz Kyoshia" — Hyrule Compendium (Breath of the Wild)
- ↑ "Priester Miz Kyoshia" — Gallery (Hyrule Warriors: Age of Calamity)
- ↑ "137 Священник Маз-Кош" — Hyrule Compendium (Breath of the Wild)
- ↑ "137 Monje Makkosh" — Hyrule Compendium (Breath of the Wild)
Mazura • Jermafenser • Rebonack • Carock • Gooma • Barba • Thunderbird • Link's Shadow
Ball and Chain Trooper • Armos Knights • Lanmolas • Moldorm • Agahnim
Helmasaur King • Arrghus • Mothula • Blind the Thief • Kholdstare • Vitreous • Trinexx • Ganon
Moldorm • Genie • Slime Eye • Angler Fish • Slime Eel • Facade • Evil Eagle • Hot Head • Shadow Nightmares
Spike Roller • Moblin Chief • Hinox • Dodongo Snakes • Lanmola • Hydrosoar
Master Stalfos • Gohma • Armos Knight • Rover • Grim Creeper • Turtle Rock • Blaino
Gohma • King Dodongo • Barinade • Phantom Ganon • Volvagia • Morpha • Bongo Bongo • Twinrova • Ganon
Lizalfos • Big Octo • Stalfos • Meg • Flare Dancer • White Wolfos • Dark Link • Dead Hand • Gerudo Thief • Iron Knuckle
Odolwa • Goht • Gyorg • Twinmold • Majora's Mask
Dinolfos • Gekko • Wizzrobe • Gerudo Pirate • Wart • Gekko and Mad Jelly
Captain Keeta • Iron Knuckle • Sharp • Igos du Ikana • Garo Master • Gomess • Eyegore
Aquamentus • Dodongo • Mothula • Gohma • Digdogger • Manhandla • Gleeok • Medusa Head • General Onox
Twinrova • Ganon
Brother Goriyas • Facade • Omuai • Agunima • Great Moblin • Syger • Vire • Poe Sisters • Frypolar
Pumpkin Head • Head Thwomp • Shadow Hag • Eyesoar • Smog • Octogon • Possessed Nayru • Plasmarine • Ramrock • Veran
Twinrova • Ganon
Giant Ghini • Swoop • Subterror • Armos Warrior • Great Moblin • Smasher • Vire • Angler Fish • Blue Stalfos
Gohma • Kalle Demos • Gohdan • Helmaroc King • Jalhalla • Molgera • Puppet Ganon • Ganondorf
Mothula • Darknut • Phantom Ganon • Stalfos • Wizzrobe • Mighty Darknut • Big Octo![]()
Phantom Ganon • Stone Arrghus • Helmaroc King • Big Poe • Big Moldorm • Frostare • Vaati • Ganon
Chief Soldier • Shadow Link • Manhandla • Dodongos • Big Dark Stalfos • Gohma • Big Dodongo
Big Green Chuchu • Gleerok • Mazaal • Big Octorok • Gyorg Pair • Vaati
Madderpillar • Dark Nut • Big Blue Chuchu • Red Dark Nut • Black Knight
Diababa • Fyrus • Morpheel • Stallord • Blizzeta • Armogohma • Argorok • Zant • Puppet Zelda • Ganon
Ook • King Bulblin • Dangoro • Twilit Carrier Kargarok • Twilit Bloat
Deku Toad • Death Sword • Darkhammer • Darknut • Aeralfos • Phantom Zant
Stagnox • Fraaz • Phytops • Cragma • Byrne • Skeldritch • Demon Train • Chancellor Cole • Malladus
Mothula • Snapper • Heatoise • Big Blin • Rocktite • Geozard Chief • Dark Link![]()
Ghirahim • Scaldera • Moldarach • The Imprisoned • Koloktos • Tentalus • Levias • Bilocyte • Demise
Stalfos • Lizalfos • Stalmaster • Moldarach • LD-002G Scervo • Dark Lizalfos • Magmanos • Moldorm • LD-003D Dreadfuse
Yuga • Moldorm • Margomill • Gemesaur King • Arrghus • Knucklemaster • Stalblind • Zaganaga • Dharkstare • Grinexx • Yuga Ganon
Armos • Red Stalfos • Heedles • Green & Red Goriyas • Gigabari • Gibdos & Purple Mini-Moldorms • Red Eyegores • Flying Tiles & Devalants • Big Pengator & Pengators • Fire Gimos • Moldorm • Lorule Ball and Chain Soldier • Arrghus
Margoma • Arrghus • Moldorm • Blizzagia • The Lady's Pets • Stalchampion • Prismantus • The Lady • Shadow Links
Electric Blob King • Electric Blob Queen • Hinox Brothers • Freezlord • Vulture Vizier • Grim Repoe • Gigaleon
Windblight Ganon • Fireblight Ganon • Thunderblight Ganon • Waterblight Ganon • Monk Maz Koshia(TCB) • Calamity Ganon • Dark Beast Ganon
Stone Talus • Stone Talus (Luminous) • Stone Talus (Rare) • Igneo Talus • Frost Talus • Igneo Talus Titan(TCB) • Molduga • Molduking(TCB) • Hinox • Blue Hinox • Black Hinox • Master Kohga
Bosses in Tears of the Kingdom
Colgera • Yunobo • Moragia • Marbled Gohma • Sludge Like • Mucktorok • Queen Gibdo • Seized Construct • Phantom Ganon • Demon King's Army • Demon King Ganondorf • Demon Dragon