Piece of Heart: Difference between revisions
PhantomCaleb (talk | contribs) No edit summary |
m (→Gallery) |
||
| (19 intermediate revisions by 11 users not shown) | |||
| Line 28: | Line 28: | ||
|Sprite OoA= File:OoA Piece of Heart Sprite.png | |Sprite OoA= File:OoA Piece of Heart Sprite.png | ||
|Sprite TWW= File:TWW Piece of Heart Icon.png | |Sprite TWW= File:TWW Piece of Heart Icon.png | ||
|Sprite TMC= File:TMC Piece of Heart Sprite.png | |Sprite TMC= File:TMC Piece of Heart Sprite.png | ||
|Sprite TP= File:TP Piece of Heart Icon.png | |Sprite TP= File:TP Piece of Heart Icon.png | ||
| Line 37: | Line 36: | ||
|plural= | |plural= | ||
|type= | |type= | ||
|game= | |game= ALttP, LA, OoT, MM, OoS, OoA, TWW, TMC, TP, SS, ALBW | ||
|other= | |other= SSBB, HW | ||
|cost= | |cost= | ||
|value= | |value= | ||
| Line 49: | Line 48: | ||
|theme= | |theme= | ||
}} | }} | ||
{{Term/Store|Piece of Heart|Pieces of Heart|Series, ALttP, LA, LADX, LANS, OoT, OoT3D, MM, MM3D, OoS, OoA, TWW, TWWHD, TMC, TP, TPHD, SS, SSHD, ALBW, CoH|plural}},{{Exp Game|ALttP, OoT, MM, OoS, OoA, TWW, TWWHD, TMC, TP, TPHD, SS, ALBW, CoH}}<ref name="E 134">{{Cite Book|quote= |book= E |publisher= |page= 134 {{Exp Game|ALttP, OoT, OoT3D, MM, MM3D, OoS, OoA, TWW, TWWHD, TMC, TP, TPHD, SS, ALBW}}}}</ref><ref>{{Cite|You got a {{Color|LANS Pink|Piece of Heart}}! What a rare find!|N/A|LANS}}</ref><ref>{{Cite|You got a {{Color|SSHD Gold|Piece of Heart}}!|N/A|SSHD}}</ref><ref>{{Cite|{{Color|CoH Red|Pieces of Heart}}<br/>Collect four Pieces of Heart to gain a new Heart Container, increasing your maximum health!|Inventory|CoH}}</ref>{{Name Ref|SSBB}} also known as '''Rare Peach Stones''',{{Exp Game|OoS}}<ref>{{Cite|Rare Peach Stone<br/>I'll trade for {{Color|OoS Red|20 Ore Chunks}} and {{Color|OoS Red|10 Ember Seeds}}.|Subrosian|OoS}}</ref> | {{Term/Store|Piece of Heart|Pieces of Heart|Series, ALttP, LA, LADX, LANS, OoT, OoT3D, MM, MM3D, OoS, OoA, TWW, TWWHD, TMC, TP, TPHD, SS, SSHD, ALBW, CoH|plural}},{{Exp Game|ALttP, OoT, MM, OoS, OoA, TWW, TWWHD, TMC, TP, TPHD, SS, ALBW, CoH}}<ref name="E 134">{{Cite Book|quote= |book= E |publisher= |page= 134 {{Exp Game|ALttP, OoT, OoT3D, MM, MM3D, OoS, OoA, TWW, TWWHD, TMC, TP, TPHD, SS, ALBW}}}}</ref><ref>{{Cite|You got a {{Color|LANS Pink|Piece of Heart}}! What a rare find!|N/A|LANS}}</ref><ref>{{Cite|You got a {{Color|SSHD Gold|Piece of Heart}}!|N/A|SSHD}}</ref><ref>{{Cite|{{Color|CoH Red|Pieces of Heart}}<br/>Collect four Pieces of Heart to gain a new Heart Container, increasing your maximum health!|Inventory|CoH}}</ref>{{Name Ref|SSBB}} also known as '''Rare Peach Stones''',{{Exp Game|OoS}}<ref>{{Cite|Rare Peach Stone<br/>I'll trade for {{Color|OoS Red|20 Ore Chunks}} and {{Color|OoS Red|10 Ember Seeds}}.|Subrosian|OoS}}</ref> are recurring {{Plural|Series|Item|link}} in {{TLoZ|Series}}. They are collected to form a full {{Term|Series|Heart Container|link}}, extending {{Term|Series|Link|link}}'s maximum health by one {{Term|Series|Heart|link}}. | ||
{{OTOC}} | {{OTOC}} | ||
| Line 63: | Line 62: | ||
==={{ALttP|-}}=== | ==={{ALttP|-}}=== | ||
{{Stub|ALttP}} | {{Stub|ALttP}} | ||
There are 24 {{Plural|ALttP|Piece of Heart}} in | There are 24 {{Plural|ALttP|Piece of Heart}} in {{ALttP|-}}. 19 can be found in the {{Term|ALttP|Light World|link}}, and five can be found in the {{Term|ALttP|Dark World|link}}. Each {{Term|ALttP|Piece of Heart}} amounts to one fourth of a {{Term|ALttP|Heart Container|link}}. | ||
{{Collapsible | |||
|header= List of {{Plural|ALttP|Piece of Heart}} in {{ALttP|-}} | |||
|collapse= True | |||
|content= | |||
{{Data Table | |||
|game= ALttP | |||
|columns= No.{{List Note|{{Term|ALttP|Piece of Heart}} numbers are determined by the {{Guide|ALttP&FS|Nintendo}}.}}, Location[Term][Nowrap], World[Term][Nowrap], Notes[Description] | |||
|- | |||
| 1 | |||
| Lost Woods | |||
| Light World | |||
| Inside a {{Term|ALttP|Cave|link}} hidden by nine patches of {{Term|ALttP|Grass|link}} in the eastern part of the {{Term|ALttP|Lost Woods|link}} | |||
|- | |||
| 2 | |||
| Lumberjacks' House | |||
| Light World | |||
| Inside a {{Term|ALttP|Cave|link}} obscured by the {{Term|ALttP|Tree|link}} outside the {{Term|ALttP|Lumberjacks' House|link}}<br/>Can only be accessed by {{Term|ALttP|Dashing|link}} into the {{Term|ALttP|Tree}} by using the {{Term|ALttP|Pegasus Boots|link}} after defeating {{Term|ALttP|Agahnim|link}} at {{Term|ALttP|Hyrule Castle|link}} | |||
|- | |||
| 3 | |||
| Spectacle Rock | |||
| Light World | |||
| On the eastern "eye" of {{Term|ALttP|Spectacle Rock}}<br/>Can only be accessed by using the {{Term|ALttP|Magic Mirror|link}} on the equivalent "eye" in the {{Term|ALttP|Dark World|link}} | |||
|- | |||
| 4 | |||
| Death Mountain | |||
| Light World | |||
| In a {{Term|ALttP|Cave|link}} accessible from a ledge south of {{Term|ALttP|Spectacle Rock|link}} | |||
|- | |||
| 5 | |||
| Death Mountain | |||
| Light World | |||
| On the isolated eastern peak of {{Term|ALttP|Death Mountain}}<br/>Can only be accessed by traveling through {{Term|ALttP|Cave 2|link}} in the {{Term|ALttP|Dark World|link}}'s {{Term|ALttP|Death Mountain}} and using the {{Term|ALttP|Magic Mirror|link}} to reach the peak in the {{Term|ALttP|Light World}} | |||
|- | |||
| 6 | |||
| Death Mountain | |||
| Light World | |||
| Inside a {{Term|ALttP|Cave|link}} that can only be accessed by using the {{Term|ALttP|Magic Mirror|link}} after crossing the long ledge found in the {{Term|ALttP|Dark World|link}}'s {{Term|ALttP|Death Mountain}} through {{Term|ALttP|Turtle Rock|link}} | |||
|- | |||
| 7 | |||
| Near Zora's Waterfall | |||
| Light World | |||
| Surrounded on three sides by a fence south of {{Term|ALttP|Zora's Waterfall|link}}<br/>Accessible only by falling down the {{Term|ALttP|Zora's Waterfall|display=Waterfall}} from the east | |||
|- | |||
| 8 | |||
| Graveyard | |||
| Light World | |||
| On the ledge above the {{Term|ALttP|Graveyard}}<br/>Accessible only by climbing the ladder north of the {{Term|ALttP|Ghostly Garden|link}} in the {{Term|ALttP|Dark World|link}} | |||
|- | |||
| 9 | |||
| Hyrule Castle Area | |||
| Light World | |||
| Inside a {{Term|ALttP|Cave|link}} hidden underneath a pile of {{Plural|ALttP|Rock|link}} due west of the {{Term|ALttP|Sanctuary|link}} | |||
|- | |||
| 10 | |||
| Kakariko Well | |||
| Light World | |||
| Behind the {{Term|ALttP|Fragile Wall|link}} in the {{Term|ALttP|Kakariko Well}}<br/>Accessible only by falling down the {{Term|ALttP|Kakariko Well|display=Well}} | |||
|- | |||
| 11 | |||
| Thieves' Hideout | |||
| Light World | |||
| Behind the {{Term|ALttP|Fragile Wall|link}} in the basement of the {{Term|ALttP|Thieves' Hideout}} | |||
|- | |||
| 12 | |||
| Kakariko Village Area | |||
| Light World | |||
| Received as a prize for winning the {{Term|ALttP|15-Second Game|link}} west of the {{Term|ALttP|Quarreling Brothers' House|link}} | |||
|- | |||
| 13 | |||
| Desert of Mystery | |||
| Light World | |||
| Inside a {{Term|ALttP|Cave|link}} hidden by a large {{Term|ALttP|Rock|link}} on a ledge in the northeast {{Term|ALttP|Desert of Mystery}}<br/>Accessible only by using the {{Term|ALttP|Magic Mirror|link}} in the equivalent spot in the {{Term|ALttP|Dark World|link}}'s {{Term|ALttP|Swamp of Evil|link}} | |||
|- | |||
| 14 | |||
| Aginah's Dwelling | |||
| Light World | |||
| Behind the {{Term|ALttP|Fragile Wall|link}} inside {{Term|ALttP|Aginah's Dwelling}} | |||
|- | |||
| 15 | |||
| Desert of Mystery Area | |||
| Light World | |||
| Inside a {{Term|ALttP|Cave|link}} on a ledge south of the {{Term|ALttP|Haunted Grove|link}}<br/>Accessible only by visiting the equivalent area {{Term|ALttP|Around Swamp Palace|link}} in the {{Term|ALttP|Dark World|link}} and using the {{Term|ALttP|Magic Mirror|link}} to reach the ledge in the {{Term|ALttP|Light World}} | |||
|- | |||
| 16 | |||
| Desert of Mystery | |||
| Light World | |||
| South of the western entrance to the {{Term|ALttP|Desert Palace|link}} | |||
|- | |||
| 17 | |||
| Great Swamp | |||
| Light World | |||
| Inside the pond beside the {{Term|ALttP|Swamp Ruins|link}}<br/>Accessible only by pulling the {{Term|ALttP|Lever|link}} inside the {{Term|ALttP|Swamp Ruins}} to drain the pond | |||
|- | |||
| 18 | |||
| Lake Hylia | |||
| Light World | |||
| Atop the lone islet in the northwest of {{Term|ALttP|Lake Hylia}}<br/>Accessible only by visiting the shallow island surrounded by rocks in the northwest of the {{Term|ALttP|Dark World|link}}'s {{Term|ALttP|Ice Lake|link}} and using the {{Term|ALttP|Magic Mirror|link}} to reach the island in the {{Term|ALttP|Light World}} | |||
|- | |||
| 19 | |||
| Skull Woods Area | |||
| Dark World | |||
| Atop a ledge at the end of a {{Term|ALttP|Cave|link}} at the foot of the {{Term|ALttP|Dark World}}'s {{Term|ALttP|Death Mountain}}<br/>Accessible only by using the {{Term|ALttP|Hookshot|link}} to cross a gap and passing through the {{Term|ALttP|Bumper|link}} inside the {{Term|ALttP|Cave}} with the {{Term|ALttP|Magic Cape|link}} | |||
|- | |||
| 20 | |||
| Village of Outcasts | |||
| Dark World | |||
| Received as a prize in the {{Term|ALttP|Treasure Chest Game|link}} | |||
|- | |||
| 21 | |||
| Stake Garden | |||
| Dark World | |||
| Inside a {{Term|ALttP|Cave|link}} that only appears once all 22 {{Plural|ALttP|Stake|link}} have been hit with the {{Term|ALttP|Magic Hammer|link}} | |||
|- | |||
| 22 | |||
| Village of Outcasts Area | |||
| Dark World | |||
| Received as a prize in the {{Term|ALttP|Digging Game|link}} | |||
|- | |||
| 23 | |||
| Swamp of Evil | |||
| Dark World | |||
| In the {{Term|ALttP|Cave|link}} west of {{Term|ALttP|Misery Mire (Dungeon)|link}} | |||
|- | |||
| 24 | |||
| Pyramid of Power | |||
| Dark World | |||
| On the lowest ledge on the eastern side of the {{Term|ALttP|Pyramid of Power}} | |||
}} | |||
{{List Notes}} | |||
}} | |||
==={{LA|-}}=== | ==={{LA|-}}=== | ||
| Line 78: | Line 208: | ||
There are 52 {{Plural|MM3D|Piece of Heart}} in {{MM}}; the most out of any game in {{TLoZ|Series}}. This is due to {{MM|-}} featuring fewer {{Plural|MM3D|Boss|link}} than usual, therefore fewer {{Plural|MM3D|Heart Container|link}}. | There are 52 {{Plural|MM3D|Piece of Heart}} in {{MM}}; the most out of any game in {{TLoZ|Series}}. This is due to {{MM|-}} featuring fewer {{Plural|MM3D|Boss|link}} than usual, therefore fewer {{Plural|MM3D|Heart Container|link}}. | ||
In {{MM3D}}, the [[Sheikah Stone]] can show Link 23 different Hint | In {{MM3D}}, the [[Sheikah Stone]] can show Link 23 different {{Plural|MM3D|Hint Photo|link}} revealing the location of a Piece of Heart that is not received as a reward for completing an action during an [[Event]]. | ||
==={{OoS|-}}=== | ==={{OoS|-}}=== | ||
| Line 87: | Line 217: | ||
==={{TWW|-}}=== | ==={{TWW|-}}=== | ||
There are 44 {{Plural|TWWHD|Piece of Heart}} in {{TWW}}. The [[Sea Hearts Chart|Sea]] and [[Island Hearts Chart]]s reveal the location in both the sea and on islands.<ref>{{Cite Guide|quote= |game= TWW|publisher= Prima|page= 154}}</ref><ref>{{Cite Guide|quote= |game= TWW|publisher= Prima|page= 157}}</ref> | There are 44 {{Plural|TWWHD|Piece of Heart}} in {{TWW}}. The [[Sea Hearts Chart|Sea]] and [[Island Hearts Chart]]s reveal the location in both the sea and on islands.<ref>{{Cite Guide|quote= |game= TWW |publisher= Prima |page= 154}}</ref><ref>{{Cite Guide|quote= |game= TWW |publisher= Prima |page= 157}}</ref> | ||
The Japanese version of {{TWW|-}} has different locations for some of the {{Plural|TWW|Piece of Heart}}: | |||
*The {{Term|TWW|Treasure Chest}} under {{Term|TWW|Link's House}} contains a {{Term|TWW|Piece of Heart}} instead of 100 {{Plural|TWW|Rupee}}. In the North American and European versions, this {{Term|TWW|Piece of Heart}} was moved to the bottom of the {{Term|TWW|Savage Labyrinth}} which originally contained only 10 {{Plural|TWW|Rupee}}. | |||
*The {{Term|TWW|Treasure Chest}} at the center of {{Term|TWW|Horseshoe Island}} contains a {{Term|TWW|Piece of Heart}} instead of {{Term|TWW|Treasure Chart 28}}. In the North American and European versions, this {{Term|TWW|Piece of Heart}} in turn is the reward for {{Term|TWW|Wind-Powerd Ferris Wheel|link}}, instead of just a few {{Plural|TWW|Rupee}}.{{How Many}} | |||
*The {{Term|TWW|Treasure Chest}} on one of the small islands at {{Term|TWW|Forest Haven}} contains a {{Term|TWW|Piece of Heart}} instead of {{Term|TWW|Treasure Chart 3}}. In the North American and European versions, this {{Term|TWW|Piece of Heart}} in turn is the reward for placing 14 {{Plural|TWW|Decoration|link}} across {{Term|TWW|Windfall Island}}, instead of 100 {{Plural|TWW|Rupee}}. | |||
==={{TMC|-}}=== | ==={{TMC|-}}=== | ||
Four {{Plural|TMC|Piece of Heart}} are required to form a new {{Term|TMC|Heart Container|link}} in {{TMC}}. A total of 44 {{Plural|TMC|Piece of Heart}} can be found throughout {{Term|TMC|Hyrule|link}}, with some appearing in {{Plural|TMC|Dungeon|link}}, atop beanstalks grown from {{Plural|TMC|Bean|link}}, and within {{Plural|TMC|Dig Cavern|link}}. Some cannot be accessed until specific {{Plural|TMC|Kinstone Fusion|link}} are performed. | Four {{Plural|TMC|Piece of Heart}} are required to form a new {{Term|TMC|Heart Container|link}} in {{TMC}}. A total of 44 {{Plural|TMC|Piece of Heart}} can be found throughout {{Term|TMC|Hyrule|link}}, with some appearing in {{Plural|TMC|Dungeon|link}}, atop beanstalks grown from {{Plural|TMC|Bean|link}}, and within {{Plural|TMC|Dig Cavern|link}}. Some cannot be accessed until specific {{Plural|TMC|Kinstone Fusion|link}} are performed. | ||
{{Collapsible | |||
|header= List of {{Plural|TMC|Piece of Heart}} in {{TMC|-}} | |||
|collapse= True | |||
|content= | |||
{{Data Table | |||
|game= TMC | |||
|columns= No.{{List Note|Number corresponds to the order given in {{Guide|TMC|Nintendo}}.}}, Location[Term], Details [Description] | |||
|- | |- | ||
| 1 | | 1 | ||
| Minish Woods | |||
| Directly south of {{Term|TMC|Deepwood Shrine|link}} | | Directly south of {{Term|TMC|Deepwood Shrine|link}} | ||
|- | |- | ||
| 2 | | 2 | ||
| Minish Village | |||
| Northeast pier of the {{Term|TMC|Minish Village|display=Village}} | | Northeast pier of the {{Term|TMC|Minish Village|display=Village}} | ||
|- | |- | ||
| 3 | | 3 | ||
| Deepwood Shrine | |||
| Use the {{Term|TMC|Gust Jar|link}} on the eastern side of the south wall in the room where the {{Term|TMC|Madderpillar|link}} is fought | | Use the {{Term|TMC|Gust Jar|link}} on the eastern side of the south wall in the room where the {{Term|TMC|Madderpillar|link}} is fought | ||
|- | |- | ||
| 4 | | 4 | ||
| Deepwood Shrine | |||
| After revealing the blue {{Term|TMC|Portal | | After revealing the blue {{Term|TMC|Portal|link}}, return to the entrance of the {{Term|TMC|Dungeon|link}} and use it | ||
|- | |- | ||
| 5 | | 5 | ||
| | | Mount Crenel | ||
| | | In the northwestern corner of {{Term|TMC|Mount Crenel's Base|link}}, go north and place a {{Term|TMC|Bomb|link}} between two {{Plural|TMC|Tree|link}} | ||
|- | |- | ||
| 6 | | 6 | ||
| Mount Crenel | |||
| | | East of the bottom of the {{Term|TMC|Crenel Wall|link}}, place a {{Term|TMC|Bomb|link}} between two rocks | ||
|- | |- | ||
| 7 | | 7 | ||
| {{Term|TMC| | | Cave of Flames | ||
| Use a {{Term|TMC|Bomb|link}} on the southern wall following the room with four {{Plural|TMC|Trap|link}} and an upturned {{Term|TMC|Mine Cart|link}} | |||
|- | |- | ||
| 8 | | 8 | ||
| {{Term|TMC| | | Veil Falls | ||
| Accessed by using the {{Term|TMC|Cane of Pacci|link}} on a hole on the northern edge of {{Term|TMC|Lon Lon Ranch|link}} | |||
|- | |- | ||
| 9 | | 9 | ||
| | | North Hyrule Field | ||
| | | Destroy a cracked {{Term|TMC|Block|link}} with a {{Term|TMC|Bomb|link}} in the northwest corner | ||
|- | |- | ||
| 10 | | 10 | ||
| {{Term|TMC| | | Hyrule Town | ||
| Use the {{Term|TMC|Cane of Pacci|link}} to flip over a {{Term|TMC|Minish Portal|link}} in the {{Term|TMC|Guy's House|link}}, go north and climb a small vine near the {{Term|TMC|Happy Hearth Inn|link}}, and travel around to the back of the {{Term|TMC|Happy Hearth Inn|display=Inn}} | |||
|- | |- | ||
| 11 | | 11 | ||
| {{Term|TMC| | | Minish Woods | ||
| | | After attempting to cross {{Term|TMC|Castor Wilds|link}} and witnessing {{Term|TMC|Rem|link}} fall asleep, cross through {{Term|TMC|Lon Lon Ranch|link}} to access the northwestern portion of {{Term|TMC|Minish Woods}}; the {{Term|TMC|Piece of Heart}} is found to the southwest near a pool of water | ||
|- | |- | ||
| 12 | | 12 | ||
| | | Mount Crenel | ||
| | | Inside {{Term|TMC|Grayblade|link}}'s dojo | ||
|- | |- | ||
| 13 | | 13 | ||
| | | Hyrule Castle Garden | ||
| | | Inside {{Term|TMC|Grimblade|link}}'s dojo | ||
|- | |- | ||
| 14 | | 14 | ||
| | | Lon Lon Ranch | ||
| | | Dashing into a {{Term|TMC|Tree|link}} with the {{Term|TMC|Pegasus Boots|link}} will reveal a {{Term|TMC|Minish Portal|link}}; it can be used to access the small {{Term|TMC|Minish|link}}-sized path nearby | ||
|- | |- | ||
| 15 | | 15 | ||
| Castor Wilds | |||
| Inside {{Term|TMC|Swiftblade I|link}}'s dojo | | Inside {{Term|TMC|Swiftblade I|link}}'s dojo | ||
|- | |- | ||
| 16 | | 16 | ||
| Wind Ruins | |||
| Use the second {{Term|TMC|Minish Portal|link}} in the area to shrink down to {{Term|TMC|Minish|link}} size and travel west, climbing down the middle vine of three vines to reach a small cave | | Use the second {{Term|TMC|Minish Portal|link}} in the area to shrink down to {{Term|TMC|Minish|link}} size and travel west, climbing down the middle vine of three vines to reach a small cave | ||
|- | |- | ||
| 17 | | 17 | ||
| Fortress of Winds | |||
| After shrinking to {{Term|TMC|Minish|link}} size in the eastern section of the {{Term|TMC|Dungeon|link}}, fall down the hole near the {{Plural|TMC|Armos|link}} and pass into the room to the east | | After shrinking to {{Term|TMC|Minish|link}} size in the eastern section of the {{Term|TMC|Dungeon|link}}, fall down the hole near the {{Plural|TMC|Armos|link}} and pass into the room to the east | ||
|- | |- | ||
| 18 | | 18 | ||
| Mount Crenel | |||
| Dig into the {{Term|TMC|Dig Cavern|link}} west of the {{Term|TMC|Crenel Hermit|link}}'s cave | | Dig into the {{Term|TMC|Dig Cavern|link}} west of the {{Term|TMC|Crenel Hermit|link}}'s cave | ||
|- | |- | ||
| 19 | | 19 | ||
| Hyrule Town | |||
| Complete {{Term|TMC|Simon's Simulations|link}} | | Complete {{Term|TMC|Simon's Simulations|link}} | ||
|- | |- | ||
| 20 | | 20 | ||
| {{Term|TMC| | | Hyrule Town | ||
| After obtaining the {{Term|TMC|Flippers|link}}, {{Term|TMC|Swimming|link|display=Swim}} across the water while still within the {{Term|TMC|Fountain|link}} | |||
|- | |- | ||
| 21 | | 21 | ||
| {{Term|TMC|Hyrule | | Veil Falls | ||
| Enter the area from the northeastern corner of {{Term|TMC|North Hyrule Field|link}} and {{Term|TMC|Swimming|link|display=Swim}} to the east | |||
|- | |- | ||
| 22 | | 22 | ||
| | | Lake Hylia | ||
| | | {{Term|TMC|Diving|link|display=Dive}} beneath the water in the small pool adjacent to {{Term|TMC|Stockwell's House|link}} | ||
|- | |- | ||
| 23 | | 23 | ||
| | | Lake Hylia | ||
| | | Swim to the southern edge of the {{Term|TMC|Lake Hylia|display=Lake}} | ||
|- | |- | ||
| 24 | | 24 | ||
| | | Lake Hylia | ||
| | | Inside {{Term|TMC|Waveblade|link}}'s dojo | ||
|- | |- | ||
| 25 | | 25 | ||
| | | Minish Woods | ||
| | | Use the {{Term|TMC|Minish Portal|link}} west of the {{Term|TMC|Minish Village|link}} and go northwest to three small caves; enter the leftmost cave | ||
|- | |- | ||
| 26 | | 26 | ||
| Castor Wilds | |||
| | | {{Term|TMC|Swimming|link|display=Swim}} to a cave in the northeastern corner of {{Term|TMC|Castor Wilds}} | ||
|- | |- | ||
| 27 | | 27 | ||
| {{Term|TMC| | | Castor Wilds | ||
| {{Term|TMC| | | A {{Term|TMC|Lily Pad|link}} will appear in {{Term|TMC|Castor Wilds}} after {{Term|TMC|Kinstone Fusion|link|display=Fusing}} {{Plural|TMC|Kinstone Piece|link}} with either {{Term|TMC|Zill|link}} or a {{Term|TMC|Forest Picori|link}} in the {{Term|TMC|Minish Village|link}}; after shrinking to {{Term|TMC|Minish|link}} size and taking it south, travel to the southeastern corner of the {{Term|TMC|Castor Wilds|display=Wilds}} and {{Term|TMC|Swimming|link|display=Swim}} northeast to a small cave | ||
|- | |- | ||
| 28 | | 28 | ||
| South Hyrule Field | |||
| Use the {{Term|TMC|Pegasus Boots|link}} to reveal a {{Term|TMC|Minish Portal|link}} in the southwestern corner; shrink down to {{Term|TMC|Minish|link}} size and {{Term|TMC|Swimming|link|display=Swim}} north to a small cave | | Use the {{Term|TMC|Pegasus Boots|link}} to reveal a {{Term|TMC|Minish Portal|link}} in the southwestern corner; shrink down to {{Term|TMC|Minish|link}} size and {{Term|TMC|Swimming|link|display=Swim}} north to a small cave | ||
|- | |- | ||
| 29 | | 29 | ||
| Hyrule Town | |||
| Complete the final level of {{Term|TMC|Anju|link}}'s {{Term|TMC|Cucco|link}} game | | Complete the final level of {{Term|TMC|Anju|link}}'s {{Term|TMC|Cucco|link}} game | ||
|- | |- | ||
| 30 | | 30 | ||
| {{Term|TMC| | | Royal Valley | ||
| Push the northwestern {{Term|TMC|Tombstone|link}} and use the {{Plural|TMC|Flashing Spot on the Floor|link}} to push aside a large {{Term|TMC|Block|link}} | |||
|- | |- | ||
| 31 | | 31 | ||
| {{Term|TMC| | | Palace of Winds | ||
| In the northwestern corner of the fourth floor, push a {{Term|TMC|Block|link}} down and use the {{Term|TMC|Roc's Cape|link}} to leap over the gap, heading north through the door | |||
|- | |- | ||
| 32 | | 32 | ||
| | | Hyrule Town | ||
| | | Leap up into the bell with the {{Term|TMC|Roc's Cape|link}} | ||
|- | |- | ||
| 33 | | 33 | ||
| Lake Hylia | |||
| {{Term|TMC| | | Use the {{Term|TMC|Roc's Cape|link}} to leap across two small islands in the northern portion of the {{Term|TMC|Lake Hylia|display=Lake}} | ||
|- | |- | ||
| 34 | | 34 | ||
| {{Term|TMC| | | Lon Lon Ranch | ||
| Use the {{Term|TMC|Roc's Cape|link}} to leap to the northern shore of {{Term|TMC|Lake Hylia|link}} and dig into the {{Term|TMC|Dig Cavern|link}}; head left to exit at {{Term|TMC|Lon Lon Ranch}} | |||
|- | |- | ||
| 35 | | 35 | ||
| {{ | | Hyrule Town | ||
| Obtain the first 130 {{Plural|TMC|Figurine|link}} and speak with {{Term|TMC|Herb|link}} to access the {{Term|TMC|Music House|link}} | |||
|- | |- | ||
| 36 | | 36 | ||
| {{Term|TMC| | | Hyrule Town | ||
| | | Use the {{Term|TMC|Minish Portal|link}} inside {{Term|TMC|Funday School|link}} to access the {{Term|TMC|Minish|link}}-sized path in the schoolyard; use the {{Plural|TMC|Flashing Spot on the Floor|link}} to push aside a large rock | ||
|- | |- | ||
| 37 | | 37 | ||
| {{Term|TMC|Hyrule | | South Hyrule Field | ||
| | | A {{Term|TMC|Tree|link}} in the southeast corner of {{Term|TMC|South Hyrule Field}} is opened after {{Term|TMC|Kinstone Fusion|link|display=Fusing}} {{Plural|TMC|Kinstone Piece|link}} with the {{Term|TMC|Hurdy-Gurdy Man|link}} | ||
|- | |- | ||
| 38 | | 38 | ||
| {{Term|TMC| | | Eastern Hills | ||
| | | A {{Term|TMC|Bean|link}} will grow into a beanstalk after {{Term|TMC|Kinstone Fusion|link|display=Fusing}} {{Plural|TMC|Kinstone Piece|link}} with a nearby {{Term|TMC|Forest Picori|link}} | ||
|- | |- | ||
| 39 | | 39 | ||
| {{Term|TMC| | | Western Wood | ||
| | | A {{Term|TMC|Tree|link}} in the {{Term|TMC|Western Wood}} opens after {{Term|TMC|Kinstone Fusion|link|display=Fusing}} {{Plural|TMC|Kinstone Piece|link}} with the {{Term|TMC|Forest Picori|link}} near the {{Term|TMC|Wind Crest|link}} at {{Term|TMC|Lake Hylia|link}} | ||
|- | |- | ||
| 40 | | 40 | ||
| {{Term|TMC| | | Mount Crenel | ||
| A {{Term|TMC|Bean|link}} at the top of {{Term|TMC|Mount Crenel}} grows into a beanstalk after {{Term|TMC|Kinstone Fusion|link|display=Fusing}} {{Plural|TMC|Kinstone Piece|link}} with {{Term|TMC|Melari|link}} | |||
|- | |- | ||
| 41 | | 41 | ||
| {{Term|TMC| | | Lake Hylia | ||
| | | After {{Term|TMC|Kinstone Fusion|link|display=Fusing}} {{Plural|TMC|Kinstone Piece|link}} with the {{Term|TMC|Forest Picori|link}} along the eastern edge of the {{Term|TMC|Lake Hylia|display=Lake}}, use the {{Term|TMC|Roc's Cape|link}} to leap to the northern shore and dig into the {{Term|TMC|Dig Cavern|link}}; head right to access the beanstalk that grows from a {{Term|TMC|Bean|link}} | ||
|- | |- | ||
| 42 | | 42 | ||
| {{Term|TMC| | | Veil Falls | ||
| A {{Term|TMC|Waterfall|link}} opens after {{Term|TMC|Kinstone Fusion|link|display=Fusing}} {{Plural|TMC|Kinstone Piece|link}} with {{Term|TMC|Gale|link}} | |||
|- | |- | ||
| 43 | | 43 | ||
| {{Term|TMC| | | Veil Falls | ||
| A shoal appears after {{Term|TMC|Kinstone Fusion|link|display=Fusing}} {{Plural|TMC|Kinstone Piece|link}} with the {{Term|TMC|Forest Picori|link}} in the far eastern house of the {{Term|TMC|Minish Village|link}}, granting access to a {{Term|TMC|Dig Cavern|link}} | |||
|- | |- | ||
| 44 | | 44 | ||
| Hyrule Castle Garden | |||
| | | A random {{Term|TMC|Kinstone Fusion|link}} will drain the northeastern pool of water | ||
}} | |||
{{List Notes}} | |||
}} | |||
==={{TP|-}}=== | ==={{TP|-}}=== | ||
There are 45 {{Plural|TPHD|Piece of Heart}} in {{TP}}. This game breaks the tradition by requiring five {{Plural|TPHD|Piece of Heart}} in order to form a {{Term|TPHD|Heart Container|link}} as opposed to the usual four. Despite of this, {{Term|TPHD|Link}}'s smallest unit of health is still a quarter-{{Term|TPHD|Heart|link}}. {{Plural|TPHD|Piece of Heart}} in {{TP|-}} are found in the usual manners, though more {{Plural|TPHD|Piece of Heart}} are found inside {{Plural|TPHD|Dungeon|link}} than in prior games. | There are 45 {{Plural|TPHD|Piece of Heart}} in {{TP}}. This game breaks the tradition by requiring five {{Plural|TPHD|Piece of Heart}} in order to form a {{Term|TPHD|Heart Container|link}} as opposed to the usual four.<ref>{{Cite|You got a {{Color|TPHD Red|Piece of Heart}}! Collect {{Color|TPHD Red|5 pieces}} to form a new Heart Container and increase your life energy!|Game Screen|TPHD}}</ref> Despite of this, {{Term|TPHD|Link}}'s smallest unit of health is still a quarter-{{Term|TPHD|Heart|link}}. {{Plural|TPHD|Piece of Heart}} in {{TP|-}} are found in the usual manners, though more {{Plural|TPHD|Piece of Heart}} are found inside {{Plural|TPHD|Dungeon|link}} than in prior games. | ||
At her shop in {{Term|TPHD|Hyrule Castle Town|link}}, {{Term|TPHD|Madame Fanadi|link}} can show {{Term|TPHD|Link}} a vision of the location of a {{Term|TPHD|Piece of Heart}} if {{Term|TPHD|Link}} pays for a fortune about "Love". | At her shop in {{Term|TPHD|Hyrule Castle Town|link}}, {{Term|TPHD|Madame Fanadi|link}} can show {{Term|TPHD|Link}} a vision of the location of a {{Term|TPHD|Piece of Heart}} if {{Term|TPHD|Link}} pays for a fortune about "Love". | ||
| Line 318: | Line 457: | ||
==={{SSBB|-}}=== | ==={{SSBB|-}}=== | ||
{{Noncanon|Start}} | {{Noncanon|Start}} | ||
In {{SSBB}}, a Piece of Heart | In {{SSBB}}, a Piece of Heart appears as a {{Term|SSBB|Sticker|link}}. | ||
{{SSBSticker|header=yes}} | {{SSBSticker|header=yes}} | ||
{{#section:Sticker|Piece of Heart}} | {{#section:Sticker|Piece of Heart}} | ||
| Line 332: | Line 471: | ||
==Nomenclature== | ==Nomenclature== | ||
{{Nomenclature}} | {{Nomenclature}} | ||
===Other Names=== | |||
{{Other Names | |||
|- | |||
| Broken Heart<ref>{{Cite Manual|quote= |game= ALttP |page= 12}}</ref> | |||
| {{ALttP}} | |||
| {{ALttP}} manual | |||
| {{E}} | |||
|- | |||
| Heart Piece<ref>{{Cite Web|quote= {{Big|Heart Pieces}}<br/>Fractions of a full Heart Container. If the user collects the required number of them, he will gain an additional Heart Container on his health meter.<br/>{{Small|Heart Pieces as seen in: The Legend of Zelda: Ocarina of Time 3D}} |author= |published= |retrieved= January 15, 2022 |url= https://zelda.com/about/ |title= The official home for The Legend of Zelda - About |site= Zelda.com |type= }}</ref> | |||
| {{OoT3D}} | |||
| [[Zelda.com]] | |||
| {{E}} | |||
|- | |||
| 1/4-Heart Container<ref>{{Cite Guide|quote= |game= OoS |guide= Versus |page= 12 {{Exp Game|OoS}}}}</ref> | |||
| {{OoS}} | |||
| {{Guide|OoS|Versus}} | |||
| {{E}} | |||
|- | |||
| Heart Piece<ref>{{Cite Guide|quote= |game= OoA |guide= Versus |page= 5 {{Exp Game|OoA}}}}</ref> | |||
| {{OoA}} | |||
| {{Guide|OoA|Versus}} | |||
| {{E}} | |||
}} | |||
==Gallery== | ==Gallery== | ||
<gallery> | <gallery> | ||
File:LANS Pieces of Heart Map.jpeg|A map of all the locations of {{Plural|LANS|Piece of Heart}} in {{LANS|-}} | |||
File:OoT3D Piece of Heart Model 2.png|Detailed view of a {{Term|OoT3D|Piece of Heart}} from {{OoT3D|-}} and {{MM3D|-}} | File:OoT3D Piece of Heart Model 2.png|Detailed view of a {{Term|OoT3D|Piece of Heart}} from {{OoT3D|-}} and {{MM3D|-}} | ||
File:OoT3D Piece of Heart ¼ Icon.png|Icon of a single Piece of Heart assembled in the Gear Screen from {{OoT3D|-}} | File:OoT3D Piece of Heart ¼ Icon.png|Icon of a single Piece of Heart assembled in the Gear Screen from {{OoT3D|-}} | ||
| Line 347: | Line 511: | ||
File:TMC Heart Container Sprite 4.png|Sprite of 2/4 Pieces of Heart from {{TMC|-}} | File:TMC Heart Container Sprite 4.png|Sprite of 2/4 Pieces of Heart from {{TMC|-}} | ||
File:TMC Heart Container Sprite 5.png|Sprite of 3/4 Pieces of Heart from {{TMC|-}} | File:TMC Heart Container Sprite 5.png|Sprite of 3/4 Pieces of Heart from {{TMC|-}} | ||
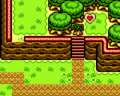
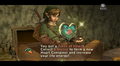
File:TP Piece of Heart Obtained.png|Link obtaining a Piece of Heart | File:TP Piece of Heart Obtained.png|Link obtaining a Piece of Heart from {{TP|-}} | ||
File:TPHD Piece of Heart Stamp.png|Piece of Heart | File:TPHD Piece of Heart Stamp.png|{{Term|TPHD|Piece of Heart}} {{Term|TPHD|Miiverse Stamp}} from {{TPHD|-}} | ||
File:ALBW Heart Empty.png|Artwork of 0/4 Pieces of Heart from {{ALBW|-}} | File:ALBW Heart Empty.png|Artwork of 0/4 Pieces of Heart from {{ALBW|-}} | ||
File:ALBW Heart One Quarter.png|Artwork of 1/4 Piece of Heart from {{ALBW|-}} | File:ALBW Heart One Quarter.png|Artwork of 1/4 Piece of Heart from {{ALBW|-}} | ||
| Line 358: | Line 522: | ||
File:ALBW Three Quarters Piece of Heart Icon.png|Icon of 3/4 Pieces of Heart from {{ALBW|-}} | File:ALBW Three Quarters Piece of Heart Icon.png|Icon of 3/4 Pieces of Heart from {{ALBW|-}} | ||
File:HW Piece of Heart Model.png|A Piece of Heart from {{HW|-}} | File:HW Piece of Heart Model.png|A Piece of Heart from {{HW|-}} | ||
File:HWDE Piece of Heart Icon 2.png|A {{Term|HWDE|Piece of Heart}} as seen in {{Term|HWDE|Adventure Mode}} from {{HWDE|-}} | |||
File:CoH Piece of Heart Sprite.png|A Piece of Heart from {{CoH|-}} | File:CoH Piece of Heart Sprite.png|A Piece of Heart from {{CoH|-}} | ||
</gallery> | </gallery> | ||
{{Ref}} | {{Ref}} | ||
{{Categories | {{Categories | ||
|Health Restoring Items, Pickups | |Health Restoring Items, Hearts, Pickups | ||
|items= ALttP, LA, LADX, LANS, OoT, OoT3D, MM, MM3D, OoS, OoA, TWW, TWWHD, TMC, TP, TPHD, SS, ALBW, CoH, HW, HWL, HWDE | |items= ALttP, LA, LADX, LANS, OoT, OoT3D, MM, MM3D, OoS, OoA, TWW, TWWHD, TMC, TP, TPHD, SS, ALBW, CoH, HW, HWL, HWDE | ||
}} | }} | ||
Revision as of 08:57, 16 April 2024
Pieces of Heart,(ALttP | OoT | MM | OoS | OoA | TWW | TWWHD | TMC | TP | TPHD | SS | ALBW | CoH)[1][2][3][4][name references needed] also known as Rare Peach Stones,(OoS)[5] are recurring Items in The Legend of Zelda series. They are collected to form a full Heart Container, extending Link's maximum health by one Heart.
Location and Uses

Pieces of Heart were first seen in A Link to the Past, and have since appeared in almost every other title following it. Pieces of Heart are scattered throughout the world. They can be found in Treasure Chests,[6] won in Mini-Games,[7] purchased[8], or given to Link after completing a Side Quest. In many games, a Heart Container can form by collecting four Pieces of Heart.[9] Obtaining a Piece of Heart will immediately refill all of Link's health, regardless of whether or not that Piece of Heart is completing a Heart Container. The amount of Pieces of Heart depends primarily on how many Heart Containers are in the game; the Pieces of Heart, combined with the Heart Containers, typically add up to a total of 20 Hearts by the end of a game.
It is unknown if any character other than Link understands the use and purpose of the Pieces of Heart, or if any character other than Link can use the Pieces of Heart, as very few characters ever have anything to say about them, even when handing them out as rewards. In Twilight Princess, if Link catches the Piece of Heart while fishing in the Fishing Hole, Hena will remark "Whose heart did you catch? You big sweetheart!" In Skyward Sword, Beedle will eventually sell Link a Piece of Heart starting at 1,600 Rupees. If Link asks Beedle about the item so that he can buy it, Beedle will tell him that he does not actually know what it is, and that he found it somewhere nearby. Fortune tellers who give hints leading to the location of Pieces of Heart refer to them as something having to do with love.
Although now a series staple, a number of games do not feature Pieces of Heart. Four Swords, Four Swords Adventures and Tri Force Heroes do not have collectible Pieces of Heart, as Heart Containers are not permanent upgrades in those games. Phantom Hourglass and Spirit Tracks, despite having permanent Heart Containers, also do not have Pieces of Heart. In Breath of the Wild, Pieces of Heart are replaced by Spirit Orbs, and are obtained at the end of every Shrine. Four Spirit Orbs can be traded in for a Heart Container at a Goddess Statue.
A Link to the Past
There are 24 Pieces of Heart in A Link to the Past. 19 can be found in the Light World, and five can be found in the Dark World. Each Piece of Heart amounts to one fourth of a Heart Container.
| No.[a] | 1 |
|---|---|
| Location | |
| World | |
| Notes | Inside a Cave hidden by nine patches of Grass in the eastern part of the Lost Woods |
| No.[a] | 2 |
| Location | |
| World | |
| Notes | Inside a Cave obscured by the Tree outside the Lumberjacks' House |
| No.[a] | 3 |
| Location | |
| World | |
| Notes | On the eastern "eye" of Spectacle Rock |
| No.[a] | 4 |
| Location | |
| World | |
| Notes | In a Cave accessible from a ledge south of Spectacle Rock |
| No.[a] | 5 |
| Location | |
| World | |
| Notes | On the isolated eastern peak of Death Mountain |
| No.[a] | 6 |
| Location | |
| World | |
| Notes | Inside a Cave that can only be accessed by using the Magic Mirror after crossing the long ledge found in the Dark World's Death Mountain through Turtle Rock |
| No.[a] | 7 |
| Location | |
| World | |
| Notes | Surrounded on three sides by a fence south of Zora's Waterfall |
| No.[a] | 8 |
| Location | |
| World | |
| Notes | On the ledge above the Graveyard |
| No.[a] | 9 |
| Location | |
| World | |
| Notes | |
| No.[a] | 10 |
| Location | |
| World | |
| Notes | Behind the Fragile Wall in the Kakariko Well |
| No.[a] | 11 |
| Location | |
| World | |
| Notes | Behind the Fragile Wall in the basement of the Thieves' Hideout |
| No.[a] | 12 |
| Location | |
| World | |
| Notes | Received as a prize for winning the Race west of the Quarreling Brothers' House |
| No.[a] | 13 |
| Location | |
| World | |
| Notes | Inside a Cave hidden by a large Rock on a ledge in the northeast Desert of Mystery |
| No.[a] | 14 |
| Location | |
| World | |
| Notes | Behind the Fragile Wall inside Aginah's Dwelling |
| No.[a] | 15 |
| Location | |
| World | |
| Notes | Inside a Cave on a ledge south of the Haunted Grove |
| No.[a] | 16 |
| Location | |
| World | |
| Notes | South of the western entrance to the Desert Palace |
| No.[a] | 17 |
| Location | |
| World | |
| Notes | Inside the pond beside the Swamp Ruins |
| No.[a] | 18 |
| Location | |
| World | |
| Notes | Atop the lone islet in the northwest of Lake Hylia |
| No.[a] | 19 |
| Location | |
| World | |
| Notes | Atop a ledge at the end of a Cave at the foot of the Dark World's Death Mountain |
| No.[a] | 20 |
| Location | |
| World | |
| Notes | Received as a prize in the Treasure Chest Game |
| No.[a] | 21 |
| Location | |
| World | |
| Notes | Inside a Cave that only appears once all 22 Stakes have been hit with the Magic Hammer |
| No.[a] | 22 |
| Location | |
| World | |
| Notes | Received as a prize in the Digging Game |
| No.[a] | 23 |
| Location | |
| World | |
| Notes | In the Cave west of Misery Mire |
| No.[a] | 24 |
| Location | |
| World | |
| Notes | On the lowest ledge on the eastern side of the Pyramid of Power |
| No.[a] | Location | World | Notes |
|---|---|---|---|
1 | Inside a Cave hidden by nine patches of Grass in the eastern part of the Lost Woods | ||
2 | Inside a Cave obscured by the Tree outside the Lumberjacks' House | ||
3 | On the eastern "eye" of Spectacle Rock | ||
4 | In a Cave accessible from a ledge south of Spectacle Rock | ||
5 | On the isolated eastern peak of Death Mountain | ||
6 | Inside a Cave that can only be accessed by using the Magic Mirror after crossing the long ledge found in the Dark World's Death Mountain through Turtle Rock | ||
7 | Surrounded on three sides by a fence south of Zora's Waterfall | ||
8 | On the ledge above the Graveyard | ||
9 | |||
10 | Behind the Fragile Wall in the Kakariko Well | ||
11 | Behind the Fragile Wall in the basement of the Thieves' Hideout | ||
12 | Received as a prize for winning the Race west of the Quarreling Brothers' House | ||
13 | Inside a Cave hidden by a large Rock on a ledge in the northeast Desert of Mystery | ||
14 | Behind the Fragile Wall inside Aginah's Dwelling | ||
15 | Inside a Cave on a ledge south of the Haunted Grove | ||
16 | South of the western entrance to the Desert Palace | ||
17 | Inside the pond beside the Swamp Ruins | ||
18 | Atop the lone islet in the northwest of Lake Hylia | ||
19 | Atop a ledge at the end of a Cave at the foot of the Dark World's Death Mountain | ||
20 | Received as a prize in the Treasure Chest Game | ||
21 | Inside a Cave that only appears once all 22 Stakes have been hit with the Magic Hammer | ||
22 | Received as a prize in the Digging Game | ||
23 | In the Cave west of Misery Mire | ||
24 | On the lowest ledge on the eastern side of the Pyramid of Power |
- ↑ Piece of Heart numbers are determined by the The Legend of Zelda: A Link to the Past & Four Swords—The Official Nintendo Player's Guide by Nintendo Power.
Link's Awakening
There are 12 Pieces of Heart in Link's Awakening and 32 Pieces of Heart in Link's Awakening for Nintendo Switch. Four Pieces of Heart are required to form a new Heart Container, totaling Link's Life Gauge to 14 Heart Containers in Link's Awakening and 20 in Link's Awakening for Nintendo Switch.
A Piece of Heart can be found in a puddle of Water in the Well.
Ocarina of Time
There are 36 Pieces of Heart in Ocarina of Time. Four Pieces of Heart are required to form a new Heart Container. Some Pieces of Heart require Magic Beans to acquire.
Majora's Mask
There are 52 Pieces of Heart in Majora's Mask; the most out of any game in The Legend of Zelda series. This is due to Majora's Mask featuring fewer Bosses than usual, therefore fewer Heart Containers.
In Majora's Mask 3D, the Sheikah Stone can show Link 23 different Hint Photos revealing the location of a Piece of Heart that is not received as a reward for completing an action during an Event.
Oracle of Seasons
Oracle of Ages
The Wind Waker
There are 44 Pieces of Heart in The Wind Waker. The Sea and Island Hearts Charts reveal the location in both the sea and on islands.[10][11]
The Japanese version of The Wind Waker has different locations for some of the Pieces of Heart:
- The Treasure Chest under House contains a Piece of Heart instead of 100 Rupees. In the North American and European versions, this Piece of Heart was moved to the bottom of the Savage Labyrinth which originally contained only 10 Rupees.
- The Treasure Chest at the center of Horseshoe Island contains a Piece of Heart instead of Treasure Chart 28. In the North American and European versions, this Piece of Heart in turn is the reward for Wind-Powerd Ferris Wheel, instead of just a few Rupees.[how many?]
- The Treasure Chest on one of the small islands at Forest Haven contains a Piece of Heart instead of Treasure Chart 3. In the North American and European versions, this Piece of Heart in turn is the reward for placing 14 Decorations across Windfall Island, instead of 100 Rupees.
The Minish Cap
Four Pieces of Heart are required to form a new Heart Container in The Minish Cap. A total of 44 Pieces of Heart can be found throughout Hyrule, with some appearing in Dungeons, atop beanstalks grown from Beans, and within Secret Caves. Some cannot be accessed until specific Kinstone Fusions are performed.
| No.[a] | 1 |
|---|---|
| Location | |
| Details | Directly south of Deepwood Shrine |
| No.[a] | 2 |
| Location | |
| Details | Northeast pier of the Village |
| No.[a] | 3 |
| Location | |
| Details | Use the Gust Jar on the eastern side of the south wall in the room where the Madderpillar is fought |
| No.[a] | 4 |
| Location | |
| Details | |
| No.[a] | 5 |
| Location | |
| Details | In the northwestern corner of Mount Crenel's Base, go north and place a Bomb between two Trees |
| No.[a] | 6 |
| Location | |
| Details | East of the bottom of the Crenel Wall, place a Bomb between two rocks |
| No.[a] | 7 |
| Location | |
| Details | Use a Bomb on the southern wall following the room with four Traps and an upturned High-Speed Cart |
| No.[a] | 8 |
| Location | |
| Details | Accessed by using the Cane of Pacci on a hole on the northern edge of Lon Lon Ranch |
| No.[a] | 9 |
| Location | |
| Details | |
| No.[a] | 10 |
| Location | |
| Details | Use the Cane of Pacci to flip over a Minish Portal in the Guy's House, go north and climb a small vine near the Happy Hearth Inn, and travel around to the back of the Inn |
| No.[a] | 11 |
| Location | |
| Details | After attempting to cross Castor Wilds and witnessing Rem fall asleep, cross through Lon Lon Ranch to access the northwestern portion of Minish Woods; the Piece of Heart is found to the southwest near a pool of water |
| No.[a] | 12 |
| Location | |
| Details | Inside Grayblade's dojo |
| No.[a] | 13 |
| Location | |
| Details | Inside Grimblade's dojo |
| No.[a] | 14 |
| Location | |
| Details | Dashing into a Tree with the Pegasus Boots will reveal a Minish Portal; it can be used to access the small Minish-sized path nearby |
| No.[a] | 15 |
| Location | |
| Details | Inside Swiftblade I's dojo |
| No.[a] | 16 |
| Location | |
| Details | Use the second Minish Portal in the area to shrink down to Minish size and travel west, climbing down the middle vine of three vines to reach a small cave |
| No.[a] | 17 |
| Location | |
| Details | |
| No.[a] | 18 |
| Location | |
| Details | Dig into the Secret Cave west of the Crenel Hermit's cave |
| No.[a] | 19 |
| Location | |
| Details | Complete Simon's Simulations |
| No.[a] | 20 |
| Location | |
| Details | |
| No.[a] | 21 |
| Location | |
| Details | Enter the area from the northeastern corner of North Hyrule Field and Swim to the east |
| No.[a] | 22 |
| Location | |
| Details | Dive beneath the water in the small pool adjacent to Stockwell's House |
| No.[a] | 23 |
| Location | |
| Details | Swim to the southern edge of the Lake |
| No.[a] | 24 |
| Location | |
| Details | Inside Waveblade's dojo |
| No.[a] | 25 |
| Location | |
| Details | Use the Minish Portal west of the Minish Village and go northwest to three small caves; enter the leftmost cave |
| No.[a] | 26 |
| Location | |
| Details | Swim to a cave in the northeastern corner of Castor Wilds |
| No.[a] | 27 |
| Location | |
| Details | A Lily will appear in Castor Wilds after Fusing Kinstone Pieces with either Zill or a Forest Picori in the Minish Village; after shrinking to Minish size and taking it south, travel to the southeastern corner of the Wilds and Swim northeast to a small cave |
| No.[a] | 28 |
| Location | |
| Details | Use the Pegasus Boots to reveal a Minish Portal in the southwestern corner; shrink down to Minish size and Swim north to a small cave |
| No.[a] | 29 |
| Location | |
| Details | |
| No.[a] | 30 |
| Location | |
| Details | Push the northwestern Tombstone and use the Flashing Spots on the Floor to push aside a large Block |
| No.[a] | 31 |
| Location | |
| Details | In the northwestern corner of the fourth floor, push a Block down and use the Roc's Cape to leap over the gap, heading north through the door |
| No.[a] | 32 |
| Location | |
| Details | Leap up into the bell with the Roc's Cape |
| No.[a] | 33 |
| Location | |
| Details | Use the Roc's Cape to leap across two small islands in the northern portion of the Lake |
| No.[a] | 34 |
| Location | |
| Details | Use the Roc's Cape to leap to the northern shore of Lake Hylia and dig into the Secret Cave; head left to exit at Lon Lon Ranch |
| No.[a] | 35 |
| Location | |
| Details | Obtain the first 130 Figurines and speak with Herb to access the Music House |
| No.[a] | 36 |
| Location | |
| Details | Use the Minish Portal inside Funday School to access the Minish-sized path in the schoolyard; use the Flashing Spots on the Floor to push aside a large rock |
| No.[a] | 37 |
| Location | |
| Details | A Tree in the southeast corner of South Hyrule Field is opened after Fusing Kinstone Pieces with the Hurdy-Gurdy Man |
| No.[a] | 38 |
| Location | |
| Details | A Bean will grow into a beanstalk after Fusing Kinstone Pieces with a nearby Forest Picori |
| No.[a] | 39 |
| Location | |
| Details | A Tree in the Western Wood opens after Fusing Kinstone Pieces with the Forest Picori near the Wind Crest at Lake Hylia |
| No.[a] | 40 |
| Location | |
| Details | A Bean at the top of Mount Crenel grows into a beanstalk after Fusing Kinstone Pieces with Melari |
| No.[a] | 41 |
| Location | |
| Details | After Fusing Kinstone Pieces with the Forest Picori along the eastern edge of the Lake, use the Roc's Cape to leap to the northern shore and dig into the Secret Cave; head right to access the beanstalk that grows from a Bean |
| No.[a] | 42 |
| Location | |
| Details | A Waterfall opens after Fusing Kinstone Pieces with Gale |
| No.[a] | 43 |
| Location | |
| Details | A shoal appears after Fusing Kinstone Pieces with the Forest Picori in the far eastern house of the Minish Village, granting access to a Secret Cave |
| No.[a] | 44 |
| Location | |
| Details | A random Kinstone Fusion will drain the northeastern pool of water |
| No.[a] | Location | Details |
|---|---|---|
1 | Directly south of Deepwood Shrine | |
2 | Northeast pier of the Village | |
3 | Use the Gust Jar on the eastern side of the south wall in the room where the Madderpillar is fought | |
4 | ||
5 | In the northwestern corner of Mount Crenel's Base, go north and place a Bomb between two Trees | |
6 | East of the bottom of the Crenel Wall, place a Bomb between two rocks | |
7 | Use a Bomb on the southern wall following the room with four Traps and an upturned High-Speed Cart | |
8 | Accessed by using the Cane of Pacci on a hole on the northern edge of Lon Lon Ranch | |
9 | ||
10 | Use the Cane of Pacci to flip over a Minish Portal in the Guy's House, go north and climb a small vine near the Happy Hearth Inn, and travel around to the back of the Inn | |
11 | After attempting to cross Castor Wilds and witnessing Rem fall asleep, cross through Lon Lon Ranch to access the northwestern portion of Minish Woods; the Piece of Heart is found to the southwest near a pool of water | |
12 | Inside Grayblade's dojo | |
13 | Inside Grimblade's dojo | |
14 | Dashing into a Tree with the Pegasus Boots will reveal a Minish Portal; it can be used to access the small Minish-sized path nearby | |
15 | Inside Swiftblade I's dojo | |
16 | Use the second Minish Portal in the area to shrink down to Minish size and travel west, climbing down the middle vine of three vines to reach a small cave | |
17 | ||
18 | Dig into the Secret Cave west of the Crenel Hermit's cave | |
19 | Complete Simon's Simulations | |
20 | ||
21 | Enter the area from the northeastern corner of North Hyrule Field and Swim to the east | |
22 | Dive beneath the water in the small pool adjacent to Stockwell's House | |
23 | Swim to the southern edge of the Lake | |
24 | Inside Waveblade's dojo | |
25 | Use the Minish Portal west of the Minish Village and go northwest to three small caves; enter the leftmost cave | |
26 | Swim to a cave in the northeastern corner of Castor Wilds | |
27 | A Lily will appear in Castor Wilds after Fusing Kinstone Pieces with either Zill or a Forest Picori in the Minish Village; after shrinking to Minish size and taking it south, travel to the southeastern corner of the Wilds and Swim northeast to a small cave | |
28 | Use the Pegasus Boots to reveal a Minish Portal in the southwestern corner; shrink down to Minish size and Swim north to a small cave | |
29 | ||
30 | Push the northwestern Tombstone and use the Flashing Spots on the Floor to push aside a large Block | |
31 | In the northwestern corner of the fourth floor, push a Block down and use the Roc's Cape to leap over the gap, heading north through the door | |
32 | Leap up into the bell with the Roc's Cape | |
33 | Use the Roc's Cape to leap across two small islands in the northern portion of the Lake | |
34 | Use the Roc's Cape to leap to the northern shore of Lake Hylia and dig into the Secret Cave; head left to exit at Lon Lon Ranch | |
35 | Obtain the first 130 Figurines and speak with Herb to access the Music House | |
36 | Use the Minish Portal inside Funday School to access the Minish-sized path in the schoolyard; use the Flashing Spots on the Floor to push aside a large rock | |
37 | A Tree in the southeast corner of South Hyrule Field is opened after Fusing Kinstone Pieces with the Hurdy-Gurdy Man | |
38 | A Bean will grow into a beanstalk after Fusing Kinstone Pieces with a nearby Forest Picori | |
39 | A Tree in the Western Wood opens after Fusing Kinstone Pieces with the Forest Picori near the Wind Crest at Lake Hylia | |
40 | A Bean at the top of Mount Crenel grows into a beanstalk after Fusing Kinstone Pieces with Melari | |
41 | After Fusing Kinstone Pieces with the Forest Picori along the eastern edge of the Lake, use the Roc's Cape to leap to the northern shore and dig into the Secret Cave; head right to access the beanstalk that grows from a Bean | |
42 | A Waterfall opens after Fusing Kinstone Pieces with Gale | |
43 | A shoal appears after Fusing Kinstone Pieces with the Forest Picori in the far eastern house of the Minish Village, granting access to a Secret Cave | |
44 | A random Kinstone Fusion will drain the northeastern pool of water |
- ↑ Number corresponds to the order given in The Legend of Zelda: The Minish Cap—The Official Nintendo Player's Guide by Nintendo Power.
Twilight Princess
There are 45 Pieces of Heart in Twilight Princess. This game breaks the tradition by requiring five Pieces of Heart in order to form a Heart Container as opposed to the usual four.[12] Despite of this, Link's smallest unit of health is still a quarter-Heart. Pieces of Heart in Twilight Princess are found in the usual manners, though more Pieces of Heart are found inside Dungeons than in prior games.
At her shop in Hyrule Castle Town, Madame Fanadi can show Link a vision of the location of a Piece of Heart if Link pays for a fortune about "Love".
Skyward Sword
There are 24 Pieces of Heart in Skyward Sword.
A Link Between Worlds
There are 28 Pieces of Heart in A Link Between Worlds.
Pieces of Heart Summary
| ALttP | LA | OoT | MM | OoS | OoA | TWW | TMC | TP | SS | ALBW |
|---|---|---|---|---|---|---|---|---|---|---|
| 24 | 12 | 36 | 52 | 12 | 12 | 44 | 44 | 45 | 24 | 28 |
Other Appearances
Super Smash Bros. Brawl
In Super Smash Bros. Brawl, a Piece of Heart appears as a Sticker.
| Sticker | Artwork from | Effect in The Subspace Emissary | Usable by |
|---|---|---|---|
Piece of Heart |
Twilight Princess | Heart Container Effect +50 |
Hyrule Warriors
Pieces of Hearts can be found in Scenarios in Legend Mode and in Battles in Adventure Mode in Hyrule Warriors. Each Piece of Heart can only be obtained by a specific Warrior and will form a full Heart Container when that Warrior has collected four Pieces of Heart. Pieces of Heart can typically be found in a Treasure Chest that appears when Allied Forces capture certain Keeps. The Treasure Chest containing a Piece of Heart can only be opened by the Warrior that can obtain the Piece. If none of the Warriors are the correct Warrior, a different Treasure Chest containing Rupees or a Weapon will appear instead. Every Scenario except for the five in Cia's Tale has a hidden Piece of Heart in Hyrule Warriors while all Scenarios in Hyrule Warriors Legends and Hyrule Warriors: Definitive Edition have a hidden Piece of Heart.
Nomenclature
| Language | Names | Meanings |
|---|---|---|
Japanese | ハートのかけら (Hāto no Kakera) (ALttP | LANS | OoT | TMC | ALBW)[22][23][24][25] | Heart Fragment |
ChineseSI | 心之碎片 (Xīn zhī suìpiàn) (LANS | OoT | CoH)[31][32] | |
Dutch | Hartstukje (LANS) | |
FrenchCA | Quart de cœur (ALBW)[34] | |
FrenchEU | Fragment de cœur (LANS | ALBW)[26] | |
German |
| |
Italian |
| |
Korean | 하트 조각 (Hateu Jogag) (ALBW)[30] | Heart Piece |
Russian | Частицу сердца (Chastitsu serdtsa) (LANS) | Heart particle |
SpanishLA | Pieza de corazón (ALBW)[33] | |
SpanishEU | Pieza de corazón (LANS | ALBW)[35] | |
| This table was generated using translation pages. To request an addition, please contact a staff member with a reference. | ||
Other Names
| Name | Broken Heart[36] |
|---|---|
| Applies to | |
| Source | A Link to the Past manual |
| Superseded by | |
| Name | Heart Piece[37] |
| Applies to | |
| Source | |
| Superseded by | |
| Name | 1/4-Heart Container[38] |
| Applies to | |
| Source | |
| Superseded by | |
| Name | Heart Piece[39] |
| Applies to | |
| Source | |
| Superseded by |
| Name | Applies to | Source | Superseded by |
|---|---|---|---|
Broken Heart[36] | A Link to the Past manual | ||
Heart Piece[37] | |||
1/4-Heart Container[38] | |||
Heart Piece[39] |
Gallery
-
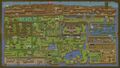
A map of all the locations of Pieces of Heart in Link's Awakening for Nintendo Switch
-

Detailed view of a Piece of Heart from Ocarina of Time 3D and Majora's Mask 3D
-

Icon of a single Piece of Heart assembled in the Gear Screen from Ocarina of Time 3D
-

Icon of two Pieces of Heart assembled in the Gear Screen from Ocarina of Time 3D
-

Icon of three Pieces of Heart assembled in the Gear Screen from Ocarina of Time 3D
-
Zora Link next to a Piece of Heart from Majora's Mask
-

A Piece of Heart sold upside down as a "Rare Peach Stone" at Subrosia Market from Oracle of Seasons
-
The Piece of Heart in Horon Village from Oracle of Seasons
-
Beedle selling a Piece of Heart from the Masked Beedle Shop from The Wind Waker
-

Sprite of 0/4 Pieces of Heart from The Minish Cap
-

Sprite of 1/4 Piece of Heart from The Minish Cap
-

Sprite of 2/4 Pieces of Heart from The Minish Cap
-

Sprite of 3/4 Pieces of Heart from The Minish Cap
-
Link obtaining a Piece of Heart from Twilight Princess
-

Piece of Heart Miiverse Stamp from Twilight Princess HD
-

Artwork of 0/4 Pieces of Heart from A Link Between Worlds
-

Artwork of 1/4 Piece of Heart from A Link Between Worlds
-

Artwork of 1/2 Heart from A Link Between Worlds
-

Artwork of 3/4 Pieces of Heart from A Link Between Worlds
-

Icon of 0/4 Pieces of Heart from A Link Between Worlds
-

Icon of 1/4 Piece of Heart from A Link Between Worlds
-

Icon of 1/2 Heart from A Link Between Worlds
-

Icon of 3/4 Pieces of Heart from A Link Between Worlds
-

A Piece of Heart from Hyrule Warriors
-

A Piece of Heart as seen in Adventure Mode from Hyrule Warriors: Definitive Edition
-

A Piece of Heart from Cadence of Hyrule


References
- ↑ Encyclopedia, Dark Horse Books, pg. 134 (ALttP | OoT | OoT3D | MM | MM3D | OoS | OoA | TWW | TWWHD | TMC | TP | TPHD | SS | ALBW)
- ↑ "You got a Piece of Heart! What a rare find!" — N/A (Link's Awakening for Nintendo Switch)
- ↑ "You got a Piece of Heart!" — N/A (Skyward Sword HD)
- ↑ "Pieces of Heart
Collect four Pieces of Heart to gain a new Heart Container, increasing your maximum health!" — Inventory (Cadence of Hyrule) - ↑ "Rare Peach Stone
I'll trade for 20 Ore Chunks and 10 Ember Seeds." — Subrosian (Oracle of Seasons) - ↑ The Legend of Zelda: The Wind Waker—Prima's Official Strategy Guide, Prima Games, pg. 146
- ↑ The Legend of Zelda: The Wind Waker—Prima's Official Strategy Guide, Prima Games, pg. 139
- ↑ "This Piece of Heart is only 950 Rupees! Buy it! Buy it! Buy buy buy!" — Beedle (The Wind Waker)
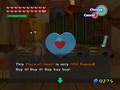
- ↑ The Legend of Zelda: The Wind Waker—Prima's Official Strategy Guide, Prima Games, pg. 15
- ↑ The Legend of Zelda: The Wind Waker—Prima's Official Strategy Guide, Prima Games, pg. 154
- ↑ The Legend of Zelda: The Wind Waker—Prima's Official Strategy Guide, Prima Games, pg. 157
- ↑ "You got a Piece of Heart! Collect 5 pieces to form a new Heart Container and increase your life energy!" — Game Screen (Twilight Princess HD)
- ↑ "Ecco un Pezzo di Cuore!" — N/A (Oracle of Seasons, Italian localization)
- ↑ "Ecco un Pezzo di Cuore!" — N/A (Oracle of Ages, Italian localization)
- ↑ "Hai ottenuto un frammento di cuore." — N/A (Ocarina of Time 3D, Italian localization)
- ↑ "Hai ottenuto un frammento di cuore!" — N/A (Majora's Mask 3D, Italian localization)
- ↑ "Frammenti di cuore
Con 4 avrai un portacuore in più e il numero massimo di cuori aumenterà di uno!" — Gear (A Link Between Worlds) - ↑ "Frammento di cuore" — Inventory (Cadence of Hyrule, Italian localization)
- ↑ "Hai trovato un Frammento di Cuore!" — N/A (A Link to the Past, Italian localization)
- ↑ Enciclopedia di Hyrule, Magazzini Salani, pg. 134
- ↑ "Hai ottenuto un Frammento di Cuore!" — N/A (The Wind Waker, Italian localization)
- ↑ A Link to the Past manual, pg. 33 Nintendo Official Guidebook: The Legend of Zelda: A Link to the Past Vol. 1, Shogakukan, pg. 30
- ↑ Nintendo Official Guidebook—The Legend of Zelda: Ocarina of Time, Shogakukan, pg. 151
- ↑ "ハートのうつわとハートのかけら" (The Minish Cap manual, Japanese localization, pg. 21)
- ↑ "ハートのかけら
4つ集めるとハートの器になって
ハートの最大値が1つ増える" — Gear (A Link Between Worlds) - ↑ "Fragments de cœur
Trouvez-en 4 pour obtenir un nouveau réceptacle de cœur et gagner en vitalité." — Gear (A Link Between Worlds) - ↑ "Ein Herzteil! Es gehört Dir!" — N/A (Link's Awakening, German localization)
- ↑ "Herzteil
Sammele vier, um einen Herzcontainer zu erhalten." — Gear (A Link Between Worlds) - ↑ "Herzteil:
Sammle vier Herzteile ein, um deine Energieleiste um ein Herz zu erhöhen und sie komplett aufzufüllen." — Tutorial (Hyrule Warriors: Definitive Edition) - ↑ "하트 조각
4개 모으면 생명의 그릇이 되어
하트의 최대치가 1개 늘어난다" — Gear (A Link Between Worlds) - ↑ Ocarina of Time manual, iQue version, pg. 29
- ↑ "心之碎片" — N/A (Cadence of Hyrule, Simplified Chinese localization)
- ↑ "Pieza de corazón
Recoge 4 para obtener otro contenedor de corazón y recibir un corazón más." — Gear (A Link Between Worlds) - ↑ "Quart de cœur
Trouvez-en 4 pour obtenir un nouveau réceptacle de cœur et gagner en vitalité!" — Gear (A Link Between Worlds) - ↑ "Piezas de corazón
Recoge 4 para conseguir otro contenedor de corazón y recibir un corazón más." — Gear (A Link Between Worlds) - ↑ A Link to the Past manual, pg. 12
- ↑ "Heart Pieces
Fractions of a full Heart Container. If the user collects the required number of them, he will gain an additional Heart Container on his health meter.
Heart Pieces as seen in: The Legend of Zelda: Ocarina of Time 3D" — The official home for The Legend of Zelda - About , Zelda.com, retrieved January 15, 2022. - ↑ Official The Legend of Zelda: Oracle of Seasons & Ages Perfect Guide, Versus Books, pg. 12 (OoS)
- ↑ Official The Legend of Zelda: Oracle of Ages & Seasons Perfect Guide, Versus Books, pg. 5 (OoA)
- Items
- Health Restoring Items
- Hearts
- Pickups
- Items in A Link to the Past
- Items in Link's Awakening
- Items in Link's Awakening DX
- Items in Link's Awakening (Nintendo Switch)
- Items in Ocarina of Time
- Items in Ocarina of Time 3D
- Items in Majora's Mask
- Items in Majora's Mask 3D
- Items in Oracle of Seasons
- Items in Oracle of Ages
- Items in The Wind Waker
- Items in The Wind Waker HD
- Items in The Minish Cap
- Items in Twilight Princess
- Items in Twilight Princess HD
- Items in Skyward Sword
- Items in A Link Between Worlds
- Items in Hyrule Warriors
- Items in Hyrule Warriors Legends
- Items in Hyrule Warriors: Definitive Edition
- Items in Cadence of Hyrule